Friday, November 29, 2013

Thanksgiving 2013

I meant to blog a pre-Thanksgiving post on Wednesday to link the dessert recipes I was working on but I was too busy baking them to get to my blog.  And now Thanksgiving has come and gone and I hope all those who celebrated it had a good one and are suitably stuffed.  I stopped eating around 3:30 pm yesterday and didn't break my fast until 17 hours later this morning if that gives you any indication on how much I had to be grateful for yesterday.

But pictures say a thousand words so here's the pictorial of our Thanksgiving feast yesterday
As a whole, we're not really big on turkey in my family so we had a relatively modest 10-lb turkey.  Based on a tip from Martha Stewart on how to keep the turkey from drying out, my sister wrapped it in parchment paper for most of its baking time.  Towards the last 30 minutes of roasting, she peeled back the parchment and laid strips of bacon over it. It worked because the turkey was pretty moist.
The rice stuffing my mom and my niece made
Below is my mom's mashed potatoes - I don't have the recipe but I was in the kitchen when she and my sister were making it and I was listening to the ingredients that went into it which included sour cream, milk, mayonnaise and butter.  I had to ask "are any potatoes going into that?" LOL. It's garnished with the bacon crumbled from the slices that went on top of the turkey. I didn't have enough room to try them but everyone seemed to like them.
Mashed potatoes
Gravy made from the turkey drippings
My mom also made crab-stuffed chicken breasts.  I didn't have room to try this either at the time but I took some home as leftovers and will have it later this weekend.
Crab-Stuffed Chicken Breasts
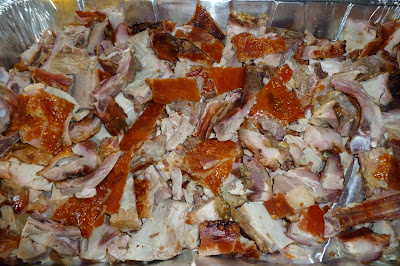
My uncle brought lechon and it was really good, very tender and moist.  I haven't had lechon in awhile so I think I ate more lechon than turkey.
Lechon (roast pork)
My mom also made Shrimp Pesto Pasta, a family favorite.  You can't tell from the picture but there's a lot of shrimp underneath the noodles.
Shrimp Pesto Pasta
The ham is from Honeybaked.  My poor mom stood in line for an hour just to get inside the shop then had to wait some more to buy it.  I'm not normally a big fan of ham but it was pretty good.  Even better as leftovers the next day with scrambled eggs.
Honeybaked Ham
This was my plate and I'm only posting this one because I forgot to take an individual shot of my Caramelized Sweet Potatoes, the post that has gotten the most hits over the past few days so I hope other people were able to give them a try as well.  I remembered to add the orange zest this time and it did make the sweet potatoes more orange-y.  They were good that way but I also liked them without the zest.
I will post the desserts separately later on.  I have 14 family members coming to my house this afternoon for dessert so I'd better get off my computer and get ready for them....


Tuesday, November 26, 2013

Black Bottom Peanut Butter Cups

Black Bottom Peanut Butter Cups - made November 23, 2013 from Chocolatier magazine, Oct 2006 edition
I took today and tomorrow off to do my holiday baking for Thanksgiving weekend.  For our family Thanksgiving, I'm baking the desserts (more on that in a future post) plus I'm hosting a dessert gathering at my place the next day.
I know I'm not the only one busy with all the Thanksgiving preparations.  But in the midst of all the holiday flurry, I'm also mindful of those in the Philippines impacted by Typhoon Haiyan, a stark contrast of all that I have to be thankful for right now versus the numerous Filipinos displaced and struggling to survive the aftermath of the typhoon. I'm not the only one who feels this way; there has also been an outpouring of support in the Filipino community and beyond to help provide aid and relief to the victims of Haiyan.  Stateside, there are numerous fundraisers happening and I was privileged to contribute in some small way to one of them this past weekend through a long-time friend. I offered to bake for the kids and team members behind the fundraiser, about 24 in total so I had some serious baking to do.
Starting with this recipe for a peanut butter and chocolate combination.  It's essentially a dark chocolate cake, "filled" with a peanut butter cream cheese filling and topped with a Reese's peanut butter cup.  Since I was planning to do a variety of treats, I went small on these so people could sample without overcommitting to any one thing. I filled mini cupcake tins with the chocolate cake batter, added a dollop of the peanut butter cream cheese filling in the center (or sort of in the center) and once they were out of the oven, immediately topped them with mini Reese's peanut butter cups which turned out to be the perfect size for mini cupcakes.
These look rather homey (or homely?) as I wasn't super neat about filling the center in a perfect circle but I liked the homemade look of it all.  This was a nice pairing of peanut butter and chocolate.  The cake itself was soft in texture and dark chocolate in taste while the peanut butter cream cheese filling provided the richness. It made quite a bit of batter though.  I made 2 dozen mini cupcakes, 2 dozen brownie-square-sized ones and a dozen regular-size cupcakes. It's important to time these in the oven as the cake, being a more liquid batter than the filling, will bake first while the filling will seem underdone.  That's okay because you don't want to overbake the cake to dryness.  It's better for the cake to be perfectly done and the filling to be slightly underdone. 

Peanut butter-cream cheese filling
6 ounces cream cheese, softened
½ cup creamy peanut butter
2/3 cup granulated sugar
2 tablespoons bleached all-purpose flour
1 large egg, room temperature
1 teaspoon pure vanilla extract
1/8 teaspoon salt
¾ cup (4 ½ ounces) Nestle swirled milk chocolate and peanut butter morsels, Reese’s pieces or peanut butter chips

Chocolate cupcake batter
3 cups bleached all-purpose flour
1 ½ cups granulated sugar
2/3 cup unsweetened non-alkalized cocoa powder
2 teaspoons baking soda
¾ teaspoon salt
½ cup firmly packed golden brown sugar
2 cups lukewarm water
2/3 cup vegetable oil
2 tablespoons cider vinegar
2 teaspoons pure vanilla extract

Garnish (optional)
About 36 small (1” diameter) Reese’s or other peanut butter cup candies, cut in half

1.     Make peanut butter-cream cheese filling: Place cream cheese and peanut butter in bowl of electric mixer fitted with paddle attachment.  Beat on medium speed until smooth and creamy.  Gradually add sugar, beating another 1-2 minutes, or until light and fluffy.  Mix in flour until just incorporated.  Add egg, vanilla extract, and salt.  Beat until egg is uniformly incorporated.  Stir in chocolate chips.  Set aside.
2.     Prepare chocolate cupcake batter: Position rack in center of oven and preheat oven to 350˚F.  Line twenty-four 2 ½” diameter muffin cups with paper cupcake liners.  Sift flour, granulated sugar, cocoa powder, baking soda, and salt together in large bowl.  Stir in brown sugar, breaking it apart with fork or whisk to evenly distribute it.  Make well in center of dry ingredients and add lukewarm water, oil, vinegar and vanilla extract.  Stir gently until batter is creamy and smooth, pressing out any lumps with fork or back of spatula.
3.     Spoon or pour about 3 tablespoons batter into each lined muffin cup to fill it no more than two-thirds full.  Then top each cupcake with 1 generous tablespoon peanut butter filling.  Bake about 25-27 minutes or until toothpick inserted in cake portion comes out clean.  Allow cupcakes to cool about 15 minutes in pan.  (Note: the cream cheese centers will sink slightly as cupcakes cool.  But, no worries; these little wells are perfect nesting spots for Reese’s cups that will go on top.)  Carefully remove cupcakes from pans and transfer to racks to cool completely.  While cupcakes are still slightly warm, but not hot, place 2-3 peanut butter cup halves on top of each for garnish.  The residual heat from cupcakes should melt peanut butter cups even so slightly, causing them to adhere to cupcake tops.

Monday, November 25, 2013

Chewy Sugar Cookies

Chewy Sugar Cookies - made dough November 14, 2013 from Baking Away
As my high-baking season approaches, otherwise known as the holidays, I start stocking up on cookie doughs.  I make them, portion them into dough balls, place them in freezer bags, mark the bags with what kind of cookie they are, oven temp they should be baked at and the recommended baking time according to the recipe.  Then at any given time in the next 4-6 weeks, I can pull what I need out of the freezer and bake them at the last minute for gifts, parties and get togethers.
Theoretically I should only be making recipes I've tried before and every year when I make that vow, I end up fibbing to myself because I can't resist any excuse to try a new recipe.  I do try to stick to "safe" recipes, meaning the ones I scan and see they look okay, have pictures of from where someone else has made them and decide they look good.  To be really safe, I also plan to bake them with other really tried and true recipes so if they don't turn out as well as I would've liked, I can also mix them in with the better stuff.
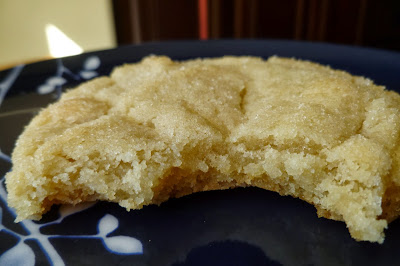
It's funny because for a lot of people, holiday baking means they bring out their once-a-year specialty, often steeped in tradition and the flavors of the season: gingerbread cookies, peppermint something-or-the-other, eggnog-ish treats, or even the ubiquitous fruitcake.  Me, since I bake a lot of my holiday gifts, I amp up the volume and am less about the flavors of the season than about a variety of baked goods to gift, preferably something my friends have liked before and I use the holidays to give them something similar again.  Since I bake so much and get easily bored with making the same recipe(s) over and over (no challenge), I tend to try variations of the same thing. Case in point, this sugar cookie.  I have a couple of really good recipes for sugar cookies but I'm always open to trying a new one. This was actually a pretty good find.  It has crisp edges but lives up to its name in being chewy; it also had a great vanilla flavor and, despite its name, isn't too sweet. Sometimes it's good to have something "plain" (I prefer the term "classic") amongst all the holiday fancy. And for kids who don't like chocolate, nuts, or anything fussy in their cookies, this is a safe choice.

2 3/4 cups all-purpose flour
1 teaspoon baking soda
1/2 teaspoon baking powder
1/2 teaspoon salt
1 cup butter, softened
1 1/2 cups white sugar
1 egg
1 1/2 teaspoons vanilla extract
1/2 cup sugar for rolling cookies
  1. Preheat oven to 350 degrees. Line cookie sheets with parchment paper.
  2. In a small bowl, stir together flour, baking soda, baking powder and salt. Set aside.
  3. Using a mixer, beat together the butter and sugar until smooth and very fluffy. Beat in egg and vanilla extract. Gradually blend in the dry ingredients.
  4. Roll rounded teaspoonfuls of dough into balls, and roll in sugar. Place on lined cookie sheets about 1 1/2 inches apart.
  5. Bake 8 to 10 minutes in the preheated oven, or until lightly browned. Let stand on cookie sheet two minutes before removing to cool on wire racks.

Sunday, November 24, 2013

Snickerdoodle Pancakes

Snickerdoodle Pancakes - made November 21, 2013 from Number 2 Pencil
I had a 6:30 am meeting last week that I took from home since there was no way I was going to be awake, showered, dressed and coherent at the office by then.  Fortunately, it was an all-hands meeting so I could be logged on from my laptop in my kitchen with the phone on speaker and I could listen to the meeting and still multi-task, namely make myself breakfast. I don't normally eat that early since I usually work out first thing in the morning and eat only when I get to the office.  In hindsight, technically I suppose I could've been on my treadmill getting a workout in while I listened to the all-hands but I tend to zone out when I'm exercising so that probably wouldn't have been a good idea.
Instead, I made pancakes. I think I could bake or prepare sweet treats like pancakes in my sleep so this was a safe multi-tasking effort.  Especially pancakes which are so easy to put together.  Dump the dry ingredients in one bowl, the wet ingredients in the other, whisk together while the frying pan is heating and fry.  Initially I was going to skip the cinnamon vanilla glaze and use syrup instead but since the pancakes took such little time and effort to make, I decided to go ahead with the glaze. It turned out to be a good thing that I did because the glaze was the best part....says the person who normally doesn't like frosting and this was essentially like a frosting but thinner and better. I only used 1/4 cup milk to make fluffier pancakes like the recipe suggested but the pancakes didn't come out as fluffy as others I've made.  It also isn't sweet at all which is good because the glaze provides the needed sweetness and flavor and I think having sweet pancakes would've been too much with the glaze.  On the other hand, with so much sour cream in them, they actually turned out a little bitter and I think they could've used a little more sweetness.  I'd suggest keeping the glaze recipe and making something like the Orange Cinnamon Roll pancakes and subbing out the orange glaze in that recipe for the cinnamon glaze in this recipe for that snickerdoodle slant. Which is what I did the next day to use up the leftover glaze (pics below).
Made with this pancake recipe
1 cup of all-purpose flour
3 tablespoons of sugar
2 teaspoons of cream of tartar
½ teaspoon baking soda
½ teaspoon of kosher salt
2 teaspoons of cinnamon
¼ teaspoon of freshly grated nutmeg
1 cup of sour cream
4 tablespoons of melted butter
1 egg, lightly beaten
¼ – ½ cup of milk
  1. Combine dry ingredients in large bowl and whisk to combine.
  2. Add wet ingredients and whisk just until combined.
  3. Use ¼ cup of milk for thicker, fluffy pancakes. Add more milk for thinner, tender pancakes.
  4. Pour ¼ cup of pancake batter onto hot non-stick griddle.
  5. When edges of pancakes start to set, flip and cook until light golden brown.
  6. Serve with butter and cinnamon vanilla glaze.
Cinnamon Vanilla Glaze
1 cup confectioners' sugar
1 teaspoon pure vanilla extract
1 teaspoon cinnamon
3-4 tablespoons milk (depending on the consistency you want)
  1. Whisk ingredients together, adding the milk 1 tablespoon at a time, until desired consistency is achieved.  Pour over hot pancakes and serve immediately.

Saturday, November 23, 2013

Bakery Review: Copenhagen Crown Bakery & Deli

Copenhagen Crown Bakery - visited November 15, 2013 (linking to their yelp page as their direct site goes to a hosting page that tells you nothing about the bakery)
After my coworker and I went to Thaibodia, we walked a few doors down to Copenhagen Crown Bakery, which, in reality, was a big reason why we went to Thaibodia in the first place because of its proximity to this bakery that we both wanted to try. My coworker had seen it first from a previous Thaibodia visit and I'm always willing to go along for any new bakery discoveries so it took no little persuading to get me to join her.
Inside near the front of the bakery
The bakery had not only glass display cases showcasing their goods but also a number of tables and chairs as they also offered a deli-type selection of "real food", including salads.  We had already eaten though so we were just there for the sweets. One half of the big display case was devoted to breads and cookies and the other half to more traditional fancy bakery fare, namely cakes, both as whole cakes and as individual slices.  I like that I could buy individual slices of different cakes so that I could taste a variety without being beholden to finishing an entire cake.

The display cases and deli in the back corner
Similar to la Terra Bakery, the cake slices were protected in plastic sleeves so you could see the cake layers but the cut edges didn't dry out from being exposed in a refrigerated display case.  The man behind the counter who waited on us was patient as we perused the displays and made our selections.  He was also kind enough to let us pick which particular slice we want.  Normally I'm not that picky but since he didn't seem to mind, both my coworker and I wanted cake slices that weren't end pieces because neither of us wanted the additional frosting accompanying the ends.
Cream Puff filled with pastry cream
I got a slice of the burnt almond cake, a slice of red velvet and a cream puff.  According to the yelp reviews, their specialty were the cream puffs.  While I'm not a big cream puff fan, I was willing to play sheeple and try it out. I'm glad I did because the cream puff was actually quite good.  Their filling was real pastry cream, like the kind I make myself, not overly goopy but with a great vanilla flavor and creamy texture, almost like a creme brulee without the brulee.  The puff pastry was more reminiscent of like those flaky apple turnovers from Pepperidge Farm although not as buttery.  It was good but I think I like the cream puff shell from Beard Papa's better. Yet I prefer the pastry cream filling of Copenhagen's better than Beard Papa's. Copenhagen's cream puff was also rather sizable, almost twice the size of a Beard Papa cream puff and is better meant split for two. Although I confess I ate the whole thing by myself just fine....
Red Velvet Cake - side view
Red Velvet Cake - top view
The cake slices were also pretty tasty although the red velvet was just okay in my book.  It was better than la Terra's in that it actually had more flavor and the cream cheese frosting was very complimentary to the cake.  To my picky taste buds though, although it wasn't dry, the red velvet could have been just a touch more moist.  But I have no complaints on the burnt almond cake.  Between the two cake slices, that was the better one.  The texture of the cake was soft and fluffy with good vanilla flavor.  I'm not big on whipped cream frosting and I scraped some of it off but I loved the toasted almonds on top of the cake (and I'm not normally a fan of nuts with my cakes). I might even like Copenhagen's burnt almond cake better than the one from Dick's Bakery, another local bakery famous for its burnt almond cake.
Burnt Almond Cake - side view
Burnt Almond Cake - top view
I didn't ask what the individual prices were for what I was buying and maybe I should have because I was a little surprised that for just those 3 things, the total came to $10.55.  That's an average price of just over $3.50 each which, for the size of the cream puff and the cake slices, is on par with bakeries like Icing on the Cake but not cheap like Asian bakeries such as Sheng Kee. Still, the items I've tried so far were pretty good so Copenhagen Crown Bakery is worth future visits.

Friday, November 22, 2013

Lemon Angel Hair Pasta with Shrimp and Spinach

Lemon Angel Hair Pasta with Shrimp and Spinach - made November 17, 2013 adapted from The Recipe Crayon Box
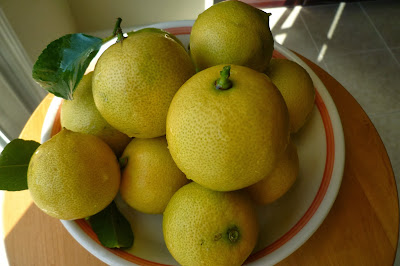
I did my first mass harvest of my lemon tree a short time ago. I think it was easier not to notice how many lemons were on it when the lemons were all green and blended cunningly with the equally green leaves.  Now that a number of them are turning yellow, it's more obvious that my one little dwarf lemon tree has a lot of lemons on it. I mean, a lot.  As in I clipped over a dozen lemons for the first harvest and it looked like I hadn't touched the tree at all. Eeek. Prepare for a lot of lemon recipes appearing on my blog for the next month or so.
Starting with this one.  Given the plethora of lemons my little tree is poised to grace me with, I don't know if I can make them all into desserts so might as well go for a savory dish or two.  This one had the added advantage of using spinach which I also needed to use up before it wilts on me. I subbed out shrimp for the chicken in the original recipe but you can use either or both.  I also thought I should add the spinach to the sauce while it bubbled to cook it down a bit.  That turned out to be unnecessary and if I make this again, I'd probably cut up the spinach and only add it at the last minute.  Actually, I will probably make this again because it turned out pretty well and I liked it even better than the Lemon Chicken Pasta I posted earlier..  The sauce is a bit thin which is good because I didn't want a thick or heavy cream sauce but it was the lemon that made it really tasty. There's just something about using really fresh lemons that adds to the taste; the tartness of the lemon juice paired very well with the garlic and the creamy cheesiness of the sauce. This has the added bonus of being easy to prepare so it's a great option for a quick weeknight meal.
1/2 lb angel hair pasta (I used brown rice noodles)
3 tablespoons extra virgin olive oil
4 cloves of garlic
1/2 teaspoon crushed red pepper
1 cup or more of shrimp, peeled and deveined, raw or cooked
2 lemons, zested and juiced
3/4 cup half-and-half (I used 3/8 cup whole milk and 3/8 cup heavy cream)
1/2 cup chicken broth
1 cup Parmesan, grated (or shredded)
1 cup baby spinach, stems removed
  1. Bring a pot of water to a boil. Salt the water well, and add pasta. 
  2. Heat a large skillet over low heat. Add oil, garlic, and crushed red pepper. Cook until the oil sizzles and garlic is brown. Add lemon juice, half-and-half, and chicken broth to the garlic oil mixture. Raise the heat to med-low to med heat until the sauce begins to bubble.  If your shrimp is raw, you may add it now to cook while the sauce bubbles.
  3. Drain pasta and add it, the zest, and 1/2 cup Parmesan to the cream sauce. Toss for a minute or two. Add shrimp if you haven't already and the spinach, and toss until well distributed. Top with remaining cheese.

Restaurant Review: Thaibodia

Thaibodia - lunch on November 15, 2013
Another new Thai restaurant to try with one of my coworkers.  In case you wonder as I go to these different restaurants for lunch with a coworker or two, it's not always with the same person.  I think I rotate through 3-5 coworkers to go out.  We usually end up talking about work so it's like a (more fun) meeting but with food.
Soup
With a name like Thaibodia, I expected the cuisine would be a fusion of Thai and Cambodian food but a perusal of the menu leads me to believe it's mostly just Thai food. It starts off with a clear soup and I really liked the broth, not too spicy but very flavorful.  They also served us a side salad as part of the lunch special but they had already added dressing to it so I left mine untouched.  I'll eat salad greens but don't like dressing.
Pad See Ew
For once I didn't order the pad thai although that was my first inclination. Instead I got the pad see ew with chicken.  Pad See Ew is made with wide rice noodles served in a soy-based sauce.  Thaibodia's also came with carrots and broccoli.  I don't mind carrots but I don't like broccoli so I requested that they exclude it.  As you can see from the picture, they got it wrong since my dish had broccoli but nary a carrot in sight.  No big deal, I just fished out the broccoli and set them on my unused salad plate.  When the waiter came to clear the salad plates, he remarked "oh, you don't like broccoli?" "Um, no, that's why I ordered it without broccoli." He apologized for the mistake but I waved it aside - again, not a big deal.  Although I did think it was funny because the waitress who took my order even repeated "no broccoli" to me when confirming my order.  Clearly something went wrong between her order pad and the kitchen.  Fortunately, broccoli is easy to pick out and set aside. The pad see ew was good but the only thing I didn't like about it is they had chunks of garlic strewn throughout.  I don't mind garlic for the flavor but would prefer not having big pieces of it in my noodles.  Next time I'm trying the pad thai instead.
Eggplant
My coworker got the rice plate special with eggplant and we ordered the roti appetizer.  Although it was an appetizer, the roti actually came out last after we had already started on our entrees.  They give you a little more than at Banana Leaf but it wasn't flaky like Banana Leaf's and was more dense and chewy. I liked it and thought it was good but have to admit that Banana Leaf's roti was better because it was flaky and not as greasy.
Roti
Overall, Thaibodia is an okay place for lunch.  The portions are fairly generous - I ate only half of my pad see ew and took the rest home for dinner - and the prices are reasonable with most lunch specials at $10 or less.  They were really busy for a Friday and the poor waiters seemed rushed off their feet but I had no complaints about the service or wait time.


Thursday, November 21, 2013

Fresh Apple Cake with Brown Sugar Glaze

Fresh Apple Cake with Brown Sugar Glaze - made November 16, 2013 from Southern Cakes by Nancie McDermott
It's autumn and the days are finally getting a bit chilly. I actually wore a long-sleeved sweater to work recently - no coat but still, I live in sleeveless and short-sleeved blouses most of the time so you know there's got to be a nip in the air if I wear something that comes all the way down to my wrists. Regardless of the weather, fall still says apples to me and I was in the mood for an apple cake so I searched through my baking books to come up with this one.
This is similar to a carrot cake in that it's an oil-based cake.  Which means it'll probably be moist and a bit dense and so it was.  It was also delicious.  The batter is really thick, almost like cookie dough when I finished mixing, but don't worry, the apples add a lot of moisture in baking so it's not going to be dry. It was a bit dense so don't look for a fluffy texture but I liked both the texture and the taste.
However, where I had a baking fail is with the frosting.  I forgot this was the same book where I also had an epic fail with caramel frosting in making Gigi's Fabulous Caramel Cake. Give me points for consistency because I failed again.  The brown sugar caramel was fine and nicely liquid in the pan but once I took it off the stove and started pouring it over the warm cake, it hardened up into a concrete-like penuche consistency even before I finished emptying all of the frosting over the cake. Which made spreading it evenly and nicely an impossible task.  Ugh. Once it had cooled and I cut it, the "frosting" broke apart in slabs.  I kid you not.  I could even easily pluck it off in slabs from the top of the cake, leaving the cake naked, stripped bare and ugly. Talk about cake wreck. Fortunately the cake itself tasted fantastic and is worth making again.  Next time, I'm going to leave the frosting off completely (the cake doesn't need it) or sprinkle cinnamon sugar over it for a little crunch.  I'm staying away from caramel frostings until the trauma of baking failure passes.
3 cups all purpose flour
2 cups sugar
1 teaspoon baking soda
1 teaspoon salt
3 eggs
1 1/2 cups vegetable oil
2 teaspoons vanilla
3 cups finely chopped apples (I used organic Fuji apples)

Brown Sugar Glaze (make at your own peril)
1 cup packed light brown sugar
1/3 cup butter
1 teaspoon vanilla
2 tablespoons heavy cream (you might want to add more and/or switch to whole milk for a more runny consistency)
  1. Cake: Preheat the oven to 350 degrees F. Line a 9 x 13" baking pan with foil and spray lightly with nonstick cooking spray.
  2. In a medium bowl, combine the flour, sugar, baking soda, and salt whisking light to mix everything together.
  3. In a large bowl, mix the eggs with a mixer on low speed until pale yellow and foamy. Add the oil and vanilla and beat well.
  4. Stir in the flour mixture and continue stirring the batter til the flour disappears. Add the apples and stir to mix them into the batter.
  5. Scrape batter into prepared pan and bake for 45-50 minutes, or until a toothpick inserted in the center comes out clean.
  6. Place the hot cake on a wire rack. 
  7. Glaze: While the cake is still hot, prepare the glaze. Combine all the ingredients in a medium saucepan. Cook over medium heat, stirring often, until the mixture comes to a gentle boil, and cook for 3-5 minutes.
  8. Spoon the hot glaze over the still hot-from-the-oven cake. Let the glazed cake cool completely before serving.

Wednesday, November 20, 2013

Baked in the USA

Last night, my blog passed a milestone.  After 4 years, 2 months and 6 days, I finally hit and passed half a million page views.  If you're reading this post or have read any of the others in the past, THANK YOU for helping me get to this point. I literally couldn't have done it without you, especially since I don't have blogger track my own page views so I can't add to the count, lol.  I know that might be paltry compared to more popular blogs but I prefer to compare myself to myself and it's pretty exciting to me, probably because this is something I only work on during nights and weekends, the odd vacation day and afternoon off here and there.  Even if it was 4+ years in the making, I made it. Although I go back and read some of my old posts and I cringe now and then at how inexperienced I was at blogging then but hopefully I've made some improvements since the beginning.

To commemorate the milestone, here's a slightly different post than I normally write. It's that time of year again with lots of holiday baking on the horizon so I wanted to squeeze another gift-giving for bakers type of post but with a made in the USA bent.

In the past, I've written up what to get for bakers on your holiday gift giving list, preparing baking gifts, sending care packages for the holidays, tips on marathon baking sessions, and hosting a dessert party.  This year's theme is Baked in the USA.  (Advance warning that this post is very US-centric.) I've been more conscious about supporting my local businesses, particularly the small business owners, and buying made in the USA products. I don't want to get political about it, just that I believe in supporting my local area and my home country as much as possible.  My bedroom set and my home office furniture are made by a furniture maker in Oregon; the daybed in my guest room, my dining set and my bookshelves are from various furniture makers (makers, not factories) in North Carolina.  I've even cut back drastically on my beloved Hallmark ornament collection, partly because they're made in China and, in recent years, not made very well in China either. Not everything I buy is made in the USA, largely because sometimes it simply isn't made here and there's no other alternative but I do what I can to stay local. Readers in other parts of the world probably feel the same way about supporting their country. 

With that stay-local mindset, my gift giving has leaned towards baked goods and service-oriented gifts like gift certificates to the local nail salon for a mani-pedi or restaurant gift cards, preferably to non-national-chain restaurants. Other similar-minded friends and acquaintances have also given me good ideas about gifts like auto-detailing from a local auto shop, pet care services from local pet care providers, fresh fruit arrangements, perfumed soaps and lotions made in the USA, and so on.  For more common types of gifts, if you've ever shopped at a typical department store like a Target, Kohls, K-Mart, Sears, JC Penney, and Wal-mart, you know how hard it is to find anything made in the USA (it's virtually impossible if you want to buy electronics). But here are some recent finds I wanted to share for any bakers on your gift list, mostly from amazon so you can also avoid shopping in overcrowded malls this holiday season:

Baking pans
I needed a new 9 x 13 pan recently and found this USA pan from amazon. It's made in Pittsburgh, PA and is pretty good quality.  I've been using it for over a month and it works just as well as my more expensive, made-in-China Calphalon pan. USA pans come in a variety of shapes and sizes so as I replenish my bakeware, I'm definitely buying their products from now on. King Arthur Flour also sells a line of R.A.F. pans that are made in the USA which look remarkably similar to the USA pans so I don't know if they're from the same company and just a different brand.
9 x 13 baking pan from USA pans

Ingredients
Now if you're in the US, you'd think most ingredients are local or US-made anyway and many of them are but not all of them.  My beloved Pernigotti cocoa is made in Italy and my Costco Kirkland brand parchment paper is made in France. But I did discover a new brand of vanilla extract I can wholeheartedly recommend and that's J.R. Watkins Vanilla Extract whose company headquarters are in Minnesota. One whiff of their extract and you're immediately seduced by vanilla goodness.

Nielsen-Massey is also another good choice for vanilla extract and they're headquartered in Waukegan, Illinois.
Buttermilk powder - I finally got tired of rushing to use up buttermilk every time I bought a pint or throwing out unused buttermilk when the expiration date arrived so I switched to using buttermilk powder. I found this one from Hoosier Hill Farms, headquartered in Indiana. For every cup of buttermilk you need, you add 4 tablespoons of buttermilk powder to 1 cup of water.  It's not as thick or creamy as fresh buttermilk but I haven't found any difference in the final output of whatever I bake it in.

Not pictured but dairy products are also easy to find from local farms. While giving milk or heavy cream is a too-weird gift, even for me, you can gift local cheeses and wines.  Easy for me since Napa Valley is a drive away or, more conveniently, their products are easily available in my local shops and we also have Harley Goat Farm within driving distance as well as cow dairy farms. Jars of locally made honey also make a nice gift (er, except for me since I don't like honey but you get my point). You don't have to live where I do to have access to locally made and produced goods.  A simple yelp search or trip to your local farmers' markets would probably yield some good results.

And if you do want to give baked goods as a gift but don't want to bake it yourself and/or your recipients are far away, here are just a few places you can order online that I've personally sampled and can recommend - all made in the USA. (Disclaimer: as with every other product in this post, I'm not affiliated with any of these businesses and I don't get paid for endorsing them.  I just like them.)

  • Annie the Baker - wonderful, tasty cookies, especially for those who lean towards cookie dough as much as cookies
  • Crumbs Bake Shop - I've had their cupcakes and they're delicious
  • Baked NYC - awesome brownies and I love their baking books. You can also find their brownie and cake mixes at Williams Sonoma
  • Gambino's Bakery - located in New Orleans, they're a little pricey to ship but their red velvet cake is delicious
There are many others out there and if anyone has any particular favorites, I'd love to hear about them.  I'm always looking for new, small businesses to order from online who ship.