Tuesday, April 28, 2020

Instant Pot Teriyaki Chicken

Instant Pot Teriyaki Chicken - made April 14, 2020 modified from Five Heart Home
Yup, another Instant Pot recipe. I think I've forgotten how to cook any other way so that may be all the "real food" cooking you're going to see for awhile.
This made a lot of sauce, at least for the amount of chicken I used, so if you're also carb comfort eating, this goes well with rice.
The sauce was pretty good, not too tart or sour but also not too sweet, as some (jarred) teriyaki sauces can be. The ingredients are also pretty straightforward. If I can find any small silver lining in these pandemic times, it's that I'm using ingredients I have on hand, some of which (like rice vinegar) have been barely touched in my pantry.

1/2 cup soy sauce
1/2 cup honey
3 tablespoons rice vinegar
2 tablespoons water
4 cloves garlic, minced
2 teaspoons ginger
1/2 teaspoon crushed red pepper flakes
8 bone-in chicken thighs

3 tablespoons cornstarch
3 tablespoons cold water
  1. In a medium bowl, whisk together soy sauce, honey, rice vinegar, water, garlic, ginger and red pepper flakes. Place chicken in the bottom of the Instant Pot, pouring a little sauce between the layers and the rest over the top.
  2. Seal the lid and cook on Manual for 10 minutes. When cycle has completed, allow to naturally release for 5 minutes then vent to a quick release.
  3. Remove the lid carefully, remove chicken thighs to a foil-lined baking dish and broil in oven for several minutes until browned. 
  4. In the Instant Pot, set to saute mode. In a small bowl, whisk together cornstarch and water until cornstarch has dissolved. When sauce starts bubbling in Instant Pot, add cornstarch slurry and whisk sauce to combine until thickened. Cancel Saute function and add browned chicken back to sauce. Serve warm.

Thursday, April 23, 2020

Instant Pot Cream Cheese Spaghetti

Instant Pot Cream Cheese Spaghetti - made April 16, 2020, modified from Spicy Southern Kitchen
I've seen versions of this recipe making the rounds on pinterest so I thought I'd try it as a variation of the Instant Pot Spaghetti I made earlier that turned out pretty well.
Unfortunately for me, this one didn't turn out quite as well as the first but I think the mistakes I made could easily be remedied for a better dish. For one thing, for any instant pot spaghetti recipe, not just this one, don't use thin noodles like angel hair pasta. Even pressure cooking this at 6 minutes which is what I did made the noodles too mushy, especially when reheating later. Plus angel hair noodlesstuck together more than thicker noodles would have. Regular spaghetti or fettuccine noodles would've been better.
The other issue is more of a personal preference thing but I thought this was just a little too creamy for me due to the cream cheese. Which I should've expected but alas, I underestimated just how rich and creamy the cream cheese would make it. If creamy sauce is your thing, this is great. If not, cut the cream cheese in half.


I didn't have Italian seasoning so I made up my own substitute which is easy to do if you have basil, oregano, rosemary and thyme. I also only had an 18-ounce jar of spaghetti sauce instead of the 24-ounce jar called for in the original recipe so I used all of the 6-ounce can of tomato paste and increased the amount of water by 1/4 cup. That worked pretty well and I'm glad I don't have leftover tomato paste to worry about using later.
1 pound lean ground beef
1 teaspoon garlic powder
1/2 teaspoon salt
2 teaspoons Italian seasoning (I substituted 1/2 teaspoon dried basil, 1/2 teaspoon dried oregano, 1/2 teaspoon dried rosemary, 1/2 teaspoon thyme)
1/4 teaspoon black pepper
1/4 teaspoon crushed red pepper flakes
1 6-ounce can tomato paste
12 ounces uncooked thin spaghetti
2 3/4 cups water
1 18-ounce jar spaghetti sauce
1 8-ounce block cream cheese, cut into pieces and softened (decrease to 4 ounces if you don't want super creamy sauce)
1/3 cup freshly grated Parmesan cheese
  1. Turn on Instant Pot to Saute mode and brown ground beef, stirring to break up large clumps. Drain excess grease.
  2. Turn Instant Pot off and add garlic powder, salt, Italian seasoning (or substitutes), pepper, crushed red pepper and tomato paste. Stir to mix.
  3. Break dry spaghetti noodles in half and layer over ground beef mixture.
  4. Pour in water and spaghetti sauce, ensuring noodles are submerged in liquid. Do not stir.
  5. Place lid on and set to pressure cook (manual setting) for 6-8 minutes (6 for thin noodles, up to 8 for regular noodles).
  6. When Instant Pot is finished, do a quick pressure release. Remove lid and add cream cheese and Parmesan cheese, stirring into mixture. Replace lid and let sit for 5 minutes to completely melt the cheeses. Stir and serve warm.

Monday, April 20, 2020

Bread Machine Honey Oatmeal Bread

Bread Machine Honey Oatmeal Bread - made April 9, 2020, modified from Happy Hooligans
To partially echo my previous post, an observation off the bat: there seems to have been an astonishing shortage of flour and yeast lately, second only to the Great Toilet Paper Shortage in stores. Is the lost art of homemade bread baking making a comeback? I, for one, hope so because I love bread. LOVE. So much so that, at the risk of having my Filipino card revoked, I love bread more than rice. I can go days without eating rice. I prefer not to go without bread for any length of time.

This is how small the bread container is - makes a 1-lb loaf

dough in the proofing stage

That said, I rarely make bread at home. So rarely, in fact, that I bought a mini breadmaker years ago (in COVID-19 timelines, that would be back when dinosaurs roamed the earth) and can't even remember the last time I used it. I know it was before my Marie Kondo decluttering phase which was at least 5-7 years ago. I didn't know whether my bread machine brought me joy because at the time I bought (and used it), I wasn't attaching emotions to my inanimate possessions and couldn't remember what feelings my long-dormant bread machine evoked back when I actually used it.
But, despite my somewhat successful decluttering (I really did get rid of a lot of stuff), for some reason, I couldn't bring myself to get rid of my breadmaker. Maybe because it was expensive, even in the mini size. Maybe because I really do love bread and was unwilling to part ways with an appliance that could make it. Maybe because I thought "someday" I would make bread more often.

Now, during these times, I'm extremely glad I held onto it. Being short of flour was never a danger for me because, hello, baker here. My pantry is never low on flour, shortage in the stores or not. Plus, hi, Costco shopper also present. I buy the organic flour that Costco sells as two 10-pound packs. So it takes me awhile to go through flour, especially since I've cut back on baking lately. This recipe calls for bread flour and lo and behold, I had a 5-lb bag of that as well. But what really pushed me to bust out my breadmaker was coming across yeast at Winco. They didn't have piles of yeast packs but there were enough that I snagged three of the 3-packs and there was still plenty of yeast left. I kept 2 individual packs for myself and mailed the rest off to friends who wanted to bake bread and were lamenting the yeast shortage in their local stores.
I modified this recipe because, as mentioned, I only have a mini breadmaker. I can't remember how much it can hold but from how small it is, probably nothing larger than ingredients for a 1-pound loaf. The original recipe calls for putting this on a "1 1/2-lb" bread setting. I don't have that setting on my breadmaker. So I just cut the ingredients to either 2/3 or 3/4 of the recipe and hoped that would work (spoiler: it did).
Like the breadmaking version of an instant pot, the great thing about bread machines is you put everything in the machine, close it, press a button and go away for several hours. After that, voila, fresh bread. Similar to making spaghetti or other pasta dishes in the instant pot, you do have to put everything in a particular order and you don't stir it once you do. Nope, just layer in the ingredients with the wet ingredients first then the dry ingredients and lastly the yeast. Then go away.

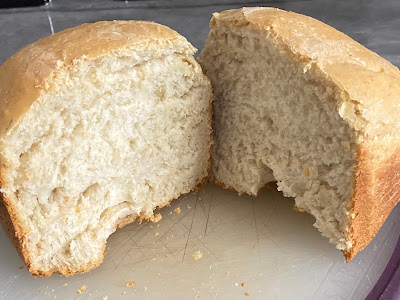
But make sure you come back when the bread machine is done because, wow, this bread is amazing. I loved it. It had just the right texture, not too dense but not too light and it was delicious. The oatmeal itself somehow "melted" into the dough because there are no distinct oatmeal flakes in it but I think it helps give the bread some structure. I don't normally like honey and you can't taste it in the bread but it is a tiny bit sweeter than generic white bread. I set my bread machine on the soft crust setting which was perfect to complement the chewiness of the inside. I'm so glad I (literally) dusted off my bread machine and made this bread. I'll be making it again, probably multiple times. Or at least until I run out of yeast.
A couple of bread and bread machine baking tips: make sure your water is warm (100-110 degrees F is optimal). Too hot and it'll kill the yeast. Too cold and it won't activate the yeast as well. Also, don't let the salt touch the yeast when you layer in your ingredients. Separate it with the flour. Salt interacting with the yeast too soon will kill your yeast.

In the pictures, you'll see a loaf made with the original recipe cut in half. I've since made this bread 3 more times and gradually increased the ingredients until it more fully filled the pan. Those measurements are what I list below.

Modified for a 1-lb loaf (see original post from Happy Hooligans for full recipe)
6 ounces water, 100-110 degrees F
3/4 teaspoon salt
1 generous tablespoon honey
3/4 tablespoon softened butter
1/3 cup quick cook oats (I used old-fashioned and it was fine)
1 7/8 cups bread flour
1 1/4 teaspoons active dry yeast
  1. Place water, honey and butter at the bottom of bread machine pan. Add oats, salt and bread flour then yeast.
  2. For my mini bread machine, I chose the basic loaf setting with a soft crust. My machine said it would take 3 hours. That worked well. Your bread machine may have different settings. If you make the full recipe, I would chose a basic bread setting that would take between 2 1/2 to 3 hours.

Saturday, April 18, 2020

Cream Cheese Pound Cake with Rum Glaze

Cream Cheese Pound Cake with(out) Rum Glaze - made April 4, 2020 from Perfect Cakes by Nick Malgieri
One of the ironies (to me) of the pandemic is I've been baking less while I see all my friends baking more. And not just them, if I go by the shortages of flour, sometimes sugar and often yeast. I've been baking less because I'm not sending out homemade cookies and brownies in military care packages for now (due to expected long shipment times) and instead have been sending out storebought packaged treats like oreos, Biscoff cookies, Speculoos and any other munchies I can find at Trader Joe's when I go grocery shopping.
I can't as easily explain the increased amount of baking everyone else is doing but presumably keto and low carbing have gone out the window and everyone is discovering what I've known for years: baking is comfort and we all need all the comfort we can get these days. More (baking) power to all of you; welcome to the club.
I did, however, finally did bake something a couple of weeks ago. It was mostly because I had an 8-ounce block of cream cheese I bought back in January and its expiration date was coming up. I hate letting any food go to waste, especially these days, so I turned to this recipe from Nick Malgieri that I've been meaning to try out for months.

All I can say is I'm sorry I waited so long. This was delicious. If you like pound cakes, this is a good one to try in terms of both taste and texture. Some pound cakes can be a little heavy (if not beaten enough when you cream butter and sugar together, if you use too much flour, or if you don't bake long enough) or dry (if you use too much flour and/or bake too long). The addition of cream cheese in the batter will mitigate those risks and gives the cake a nice mouthfeel.
The tang of the cream cheese is muted by the sugar. I recommend eating this warm (not hot) for the best texture. As you can see from the pictures, I skipped the glaze as I prefer pound cakes plain. This was so good it doesn't really need a glaze but I've included the recipe for it for anyone who wants to add it.

Cake
2 cups all-purpose flour
1 teaspoon baking powder
1/2 pound (2 sticks) unsalted butter, softened
One 8-ounce package cream cheese, softened
2 cups sugar
2 teaspoons vanilla extract
6 large eggs, room temperature

Rum Glaze
3 cups confectioners' sugar
2 tablespoons white rum
2 tablespoons water

One 12-cup tube or Bundt pan, buttered and floured
  1. Preheat oven to 325 degrees F.
  2. Sift together the flour and baking powder; set aside.
  3. Place the butter, cream cheese and sugar in the bowl of a stand mixer and beat on medium speed with the paddle attachment until very light, about 5 minutes. Beat in the vanilla. Beat in 4 of the eggs, one at a time, beating until smooth after each addition.
  4. Reduce the mixer speed to low and beat in one-third of the flour, then another egg, beating until smooth after each addition. Scrape down the sides of the bowl with a rubber spatula. Beat in another third of the flour then, after the flour has been absorbed, the last egg. Scrape again and beat in the remaining flour.
  5. Pour batter into prepared pan and smooth the top. 
  6. Bake for 65-75 minutes, or until cake is well risen, cracked on top, golden color and a toothpick inserted in the thickest part emerges clean.
  7. Cool the cake in the pan for a few minutes then unmold it onto a rack and turn right side up to finish cooling.
  8. Make the glaze: combine the sugar, rum and water in a medium saucepan and heat just until lukewarm. Drizzle over the cake with a spoon or pour glaze over to cover the entire cake.

Wednesday, April 15, 2020

Instant Pot Chili

Instant Pot Chili - made March 30, 2020 from The Cozy Cook
Now that I have to cook for myself on a regular basis, I'm all about the instant pot life so here's another recipe for using it. Chili is one of the easiest things to make, with an instant pot or without one but since I have one, I used it.
I'm also not very picky about chili as long as it has ground beef and isn't too spicy (I know, chili aficianados just put a hex on me). I also had all the (Penzey's) spices needed on hand and wanted to use them so this was a perfect quick meal to make, especially as we were having late winter weather rolling in at the time (now it's 70 degrees).
The original recipe called for masa harina which I had to google to figure out what that was. It's a traditional flour used to make tortillas, in case you wanted to know. Well, I didn't have any and wasn't about to use my limited grocery shopping excursions to find it so I also googled what can be substituted for it and came up with cornmeal. Which I did have already so that's what I used.
I think the purpose is to thicken up the chili with the masa harina/cornmeal addition. I don't have the most discerning taste buds so I can't tell you that it made that much of a difference except to give a slightly coarse texture to the chili. But it's hard to go wrong with a bowl of chili on a cloudy day so this served its purpose nicely. It makes quite a lot for one person so I ended up portioning it out into single serving containers and putting most into the freezer for future meals. Luckily, chili keeps well.

2 pounds lean ground beef
2 cloves garlic, diced
14.5 ounces diced tomatoes, with juice
2 tablespoons chili powder
1 teaspoon ground cumin
1 teaspoon ground oregano
1 teaspoon salt
1/4 teaspoon cayenne pepper
1/4 cup masa harina (I used cornmeal)
15-ounce can kidney beans
15-ounce can pinto beans
  1. Set the Instant Pot to Saute mode. Cook and crumble the ground beef until browned; drain excess grease. Add the garlic and diced tomatoes and cook for an additional minute.
  2. Combine chili powder, cumin, oregano, salt and cayenne pepper in a small bowl. Add to Instant Pot mixture.
  3. In another small bowl, combine masa harina or cornmeal with 1/2 cup water; whisk to combine. Add to Instant Pot mixture. Add kidney beans and pinto beans to Instant Pot, turn off Saute mode, cover and seal instant pot and set to manual for 15 minutes.
  4. When it has finished, allow to natural release for 5 minutes then quick release until all steam has escaped. Serve chili hot. Garnish with cheese if desired.

Monday, April 13, 2020

Instant Pot Chicken Tetrazzini

Instant Pot Chicken Tetrazzini - made April 4, 2020, modified from One Happy Housewife
Since I'm not baking as much as I used to, at least for now, and I can't run out and pick up takeout (confining myself at home and trying to only go out for my volunteer food bank shifts and grocery shopping which I try to do on the same days) whenever the urge arises, out of sheer survival, I've been cooking more.
Rotisserie Chicken

Layering in the noodles over the chicken

Adding the rest of the ingredients - do not stir
When I do go to Costco (trying to keep it to once a month), I snag a rotisserie chicken. For $5, it's a deal and sometimes, there's nothing better than that first juicy bite. Of course, after the next 10 bites and 3 meals of rotisserie chicken later, I have to admit, I get sick of it. There's only so much rotisserie chicken you can eat in a short amount of time. Yes, I  could strip the chicken from the bones and put it in the freezer but that just means I'll have it waiting for me later when I think I'm still sick of eating it. So I was pleased to find this recipe for Instant Pot Chicken Tetrazzini where I could easily use the rest of the rotisserie chicken to add to the noodles.
After cooking - still liquidy

add the cheese and let melt into the sauce
Thank goodness for the instant pot! As you know, I'm a big fan of putting "stuff" in a pot, closing it and letting it do its thing with very little involvement from me. This was no exception. I stripped all the rotisserie chicken off the bones, chopped it in to even-ish-sized pieces then layered in the ingredients.
toss the noodles in the sauce - still soupy while hot
After this finished cooking, at first it seemed too soupy and that I hadn't used enough noodles. But it does thicken up later so don't worry. Just serve up the noodles with a little sauce for the first meal. When I went back later to portion it out and put into single-serving containers, the sauce has thickened up considerably and was almost too thick.
This is a nice, easy and creamy pasta dish to make. The rotisserie chicken gives it some flavor. It's not as rich as an alfredo or carbonara sauce but is still plenty creamy. And tasty.
1 tablespoon olive oil
1 rotisserie chicken, shredded
1 tablespoon onion powder
1/2 teaspoon garlic powder
1/2 teaspoon black pepper

1 pound dry spaghetti noodles
4 cups unsalted chicken stock

Cream sauce
1/2 cup heavy whipping cream
3 tablespoons all-purpose flour
4 teaspoons Better Than Bouillon (roasted chicken flavor)
1 tablespoon lemon juice
1 teaspoon salt
1 cup whole milk

1 cup mozzarella cheese
  1. Turn Instant Pot to saute mode and heat olive oil. Add shredded rotisserie chicken, onion powder, garlic powder and black pepper and stir until hot. Cancel Saute setting.
  2. Break dry spaghetti noodles in half and add to the pot, spreading evenly over chicken. Pour chicken stock over noodles; do not stir.
  3. Prepare cream sauce: mix flour into heavy cream until fully dissolved. Add Better Than Bouillon, salt and lemon juice; mix until combined. Pour the milk into the cream sauce and whisk until combined. Pour cream sauce into instant pot; do not stir.
  4. Seal Instant Pot and, with the pressure valve set to "sealing", set pot to Manual for 9 minutes. Once Instant Pot has completed its cycle, allow to naturally release for 2 minutes then move pressure seal to release.
  5. Once Instant Pot is completely depressurized, remove lid and add mozzarella cheese. Stir and toss to coat pasta with sauce. Serve warm.


Friday, April 10, 2020

Soft Brown Sugar Cookies

Soft Brown Sugar Cookies - made March 14, 2020 from Family Fresh Meals
Since I enjoyed the flavor of the Brown Sugar & Cinnamon Cookies so much, I decided to try another brown sugar cookie recipe and to see if I could find one that didn't spread as much but would have the same brown sugar flavor.
This was the last cookie I made in the last Angel Baker care package I sent out with homemade baked goods. It seems like a lifetime ago and I hope the box has gotten there by now but I have my doubts. Mail is still going through to overseas US bases but anecdotal evidence says they're taking much longer to arrive. Guess we'll see if vacuum sealing the cookies works as well as touted.

I hope so as it would be a shame if these spoiled or got too dry before they arrived. Because this was delicious. Almost like a chocolate chip cookie without the chocolate chips but with a softer texture. It literally was a (brown) sugar cookie but with more caramel overtones. If that's your jam, make these cookies.


14 tablespoons unsalted butter, divided
1/2 cup granulated sugar, divided
2 cups light brown sugar, packed, divided
2 cups all-purpose flour plus 2 tablespoons
1/2 teaspoon baking soda
1/4 teaspoon baking powder
1/2 teaspoon salt
1 large egg
1 large egg yolk
1 tablespoon vanilla extract
  1. In a small saucepan, melt 10 tablespoons butter over medium heat. Stir constantly until butter starts to brown. Once it begins to brown, add remaining 4 tablespoons butter and remove from heat. When butter has completely melted, stir in 1 1/2 cups brown sugar and stir until smooth. Whisk in egg, yolk, salt and vanilla. Set aside.
  2. In a separate bowl, whisk together 1/4 cup granulated sugar, 1/2 cup brown sugar, flour, baking soda and baking powder.
  3. Add dry ingredients to butter mixture, stirring until dough forms.
  4. Portion dough into golf-ball-size dough balls. Cover and chill or freeze for several hours or overnight. 
  5. When ready to bake, preheat oven to 350 degrees. Line baking sheets with parchment paper.
  6. Place 1/4 cup granulated sugar in a small bowl. Roll dough balls in sugar until coated and evenly space on baking sheets. Bake for 12-14 minutes or until edges just begin to set and middles no longer look raw. Remove from oven, let rest on baking sheet for several minutes then remove cookies to wire racks to cool completely.