Monday, June 29, 2020

Double Chocolate Brownies

Double Chocolate Brownies - made June 9, 2020 from Martha Stewart's Cookies
I've been baking a lot of brownies lately. They're the easiest to package and ship in care packages and, once vacuum sealed, they have a better chance than cookies of staying fresh in transit, not to mention they're unlikely to crumble or break like cookies. They will also survive intense heat better.

The original recipe would make these as plain but I dressed it up a bit by adding chopped up chunks of Mounds bars to turn them into coconut brownies.

These were moist and fudgy, the two things I require in any brownie. The best way to bake brownies is to do the toothpick test in a corner first and the center of the brownie second. If it comes out clean in the corner but with a few moist crumbs in the middle, the brownie is at the optimal bake. The corners and ends won't be too dry and the middle will have baked enough to be fudgy when cooled but not too underbaked or mushy.

Every oven is different so I can't give you exact times when this optimal point will be reached. And you don't want to keep opening your oven door to poke the brownies and keep checking or too much heat will escape. I'd advise not even trying to test it until at least 20 minutes have passed. If the corner or edge isn't clean but has raw batter, then your brownie has longer to go.
I liked this recipe because it made brownies of a good thickness and the combination of melted bittersweet chocolate and cocoa powder ensures it has a fudgy texture and a deep chocolate flavor.
6 tablespoons unsalted butter
6 ounces semisweet chocolate, coarsely chopped
1/4 cup unsweetened Dutch process cocoa
3/4 cup all-purpose flour
1/4 teaspoon baking powder
1/4 teaspoon salt
1 cup granulated sugar
2 large eggs
2 teaspoons vanilla extract
  1. Preheat oven to 350 degrees F. Line an 8 x 8-inch baking pan with foil and lightly spray with nonstick cooking spray.
  2. Melt butter, chocolate and cocoa powder in the top half of a double boiler over hot water, whisking to combine until melted and smooth. Cool slightly.
  3. In a separate bowl, whisk together flour, baking powder and salt; set aside.
  4. In the bowl of a stand mixer fitted with the whisk attachment, beat together sugar, eggs and vanilla on medium speed until pale, about 3-4 minutes. Add chocolate mixture and beat on low speed until combined. Add flour mixture and mix on low speed until just combined.
  5. Pour into prepared pan and smooth top. Bake until toothpick inserted near the center comes out with a few moist crumbs, not raw batter, about 35 minutes. Cool completely before cutting and serving.

Sunday, June 28, 2020

Chewy Molasses Crinkles

Chewy Molasses Crinkles - made June 13, 2020 from Martha Stewart's Cookies
I haven't had a cookie failure in awhile. So the Baking Gods decided it was time to give me the finger. I'm a little up in my feelings about it too because this recipe is from Martha Stewart and I didn't expect failure to come from one of her recipes. Possibly user error? But I've been doing this for awhile and I don't think I made any mistakes with the recipe.
Then again, I don't like molasses cookies well enough to make them very often so I don't have the same level of expertise with molasses cookies that I do with chocolate chip cookies or snickerdoodles. I tried out this recipe just to have a different kind of cookie to include in care packages. That'll teach me.
First of all, the dough was too soft. After mixing it, I had to chill it just to firm it up enough to form it into dough balls. Always a bad sign. Even after I had chilled it for several hours, it wasn't that firm. I portioned into dough balls and froze them overnight.
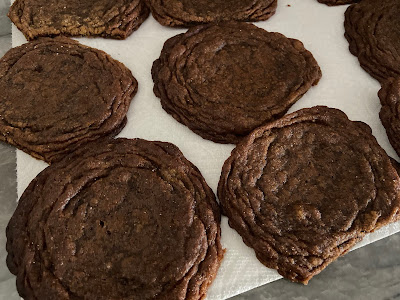
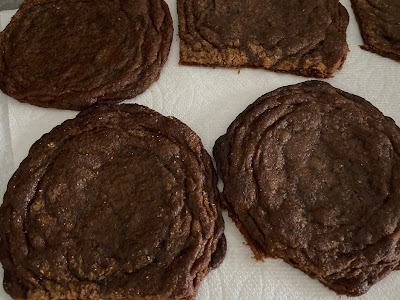
Then I baked them. And you can see for yourself how much they spread. First World problem #2. I didn't make the dough balls that big either but the cookies spread like they were bent on thwarting me to turn themselves into a bar cookie mass.

The real insult to injury though - problem #3 - is the texture was way too chewy. I've made molasses cookies before that were actually the texture of - you know - cookies. These were more chewy than that. The tragedy is, in my baking hubris, I had vacuum sealed all but the taste test cookie AND packaged them up for mailing (seriously, they were already taped up in the boxes with shipping labels and everything) before I tasted the taste test cookie. Oops. Too late to undo everything. Sorry, soldiers, this wasn't my best work. Eat the other stuff in the boxes instead.
1/2 cup unsalted butter, room temperature
1 cup packed light brown sugar
1/2 cup granulated sugar plus 1/4 for rolling
2 large eggs
1/2 cup unsulfured molasses
2 tablespoons vegetable oil
2 cups all-purpose flour
1 teaspoon baking soda
1 teaspoon ground cinnamon
1 teaspoon ground ginger
1 teaspoon ground allspice
1/2 teaspoon salt
  1. Put butter, brown sugar and 1/2 cup granulated sugar in the bowl of an electric mixer fitted with the paddle attachment. Cream on medium speed until smooth and combined, 2-3 minutes. Mix in eggs, one at a time, followed by the molasses and oil.
  2. Reduce speed to low and gradually add the flour, baking soda, cinnamon, ginger, allspice and salt. Cover dough with plastic wrap and refrigerate until firm, about 1 hour to overnight.
  3. Portion dough into 1-2 tablespoon(s)-size dough balls, cover and freeze for several hours or overnight.
  4. When ready to bake, preheat oven to 325 degrees (I baked at 350) F. Line several baking sheets with parchment paper. Place 1/4 cup granulated sugar in a shallow bowl. Roll dough balls in sugar, coating completely, and evenly space on prepared baking sheets. Bake for 15-17 minutes, until cookies are flat and set. Cool completely.

Friday, June 26, 2020

Death by Chocolate (Bundt) Cake

Death by Chocolate (Bundt) Cake - made June 5, 2020 from Yummiest Food Recipes
I chose this recipe to make because - you guessed it - I was sending in military care packages. While I normally am snobby enough to look askance at cake mixes, the prevailing theory is those cake-mix-based baked goods will last longer in mailing, thanks to the preservatives in the mixes. That makes sense so I decided to try it out.

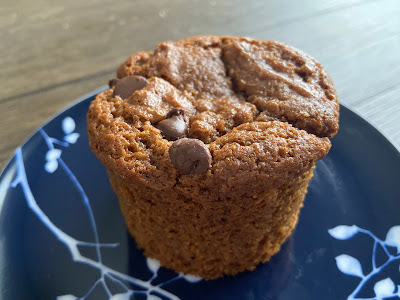
Y'all know I'm a baked goods snob so this isn't going to end up on my top 10 favorite recipes for cakes but it turned out better than I expected. Never mind that my expectations weren't very high! They had the soft cake texture you would expect from a cake mix cake and the oil and sour cream also ensured it would be moist. Although the original recipe makes this cake as a Bundt cake, since I was mailing it, I made it as 4 mini loaves for mailing and a cupcake for taste testing.
It isn't super-chocolaty since the chocolate flavor only comes from the chocolate pudding mix. If you want more of a chocolate punch, try adding a tablespoon or two of high quality cocoa powder and take out the same amount from the rest of the dry ingredients.

1 box yellow cake mix
1 3.4-ounce box vanilla instant pudding
1 3.4-ounce box chocolate instant pudding
4 large eggs
3/4 cup oil
1 cup sour cream
6 ounces chocolate chips
  1. Preheat oven to 350 degrees F. Lightly spray bundt pan with nonstick cooking spray.
  2. Combine all the ingredients except the chocolate chips, beating on medium speed until combined.
  3. Pour half the batter into the prepared Bundt pan and sprinkle half of the chocolate chips. Pour in remaining batter and sprinkle remaining chocolate chips. 
  4. Bake for 45-50 minutes or until toothpick inserted in thickest part of cake comes out with a few moist crumbs.

Wednesday, June 24, 2020

Sugar Cookies from Almost Practical

Sugar Cookies - made dough June 5, 2020 from Almost Practical
dough with butter
The only baking I've been doing is for Soldiers Angels and sending them in care packages to deployed military service members. Since it's summer, we're now in triple degree heat for where most, if not all, of the packages are going.
dough with butter
The volunteer bakers have been warned about products made with butter going rancid if the packages are too long en route or if they're not packaged properly or subjected to intense heat or all three.
dough with butter
I will be the first to raise my hand to admit that I love butter. I love it slathered on warm bread, I love baking with it and I can't fathom eating cookies not made with the goodness of butter.
dough with butter
But the term "rancid' will freak out any baker. We don't go to all the time, effort and pleasure of baking things for others only for them to receive something rancid or moldy. I mean, ewww.
dough with butter
So far, the few times I've heard back from the care package recipients, my boxes have arrived in good shape and have been enjoyed. At least, that's what they've been polite enough to say and I choose to believe them.
cookies with butter
However, I'm sufficiently leery of "rancid" to make some effort to avoid it if I can. Hence why you're seeing a ton of pictures in this post. Because I made this recipe twice, once as is with butter and the second time with butter-flavored shortening instead of butter.
cookies with butter
I've labeled which was which in each picture so you can see the difference. And if you can't tell the difference, I'll give you the cheat sheet: the dough made with butter was great to work with and easy to portion out. It spread like a normal cookie, not too thin but didn't stay super thick either. And it tasted amazing once it had cooled enough for the edges to be crisp and airy. The genuine butter flavor came through well and the middle was chewy. Yum.
cookies with butter

dough with shortening, original recipe as is
When I made the recipe as listed but with shortening, the dough was dry. As in, dry and crumbly enough that I knew I wouldn't be able to form into dough balls that would hold their shape and that an extra teaspoon of vanilla wasn't going to fix it. So I add an extra egg instead. That helped bind the dough together and bring its consistency closer to the butter version.
dough with shortening, added extra egg

dough with shortening and extra egg
If you look closely, you can tell the difference between the two doughs. And side by side, you can also tell the difference in appearance between the two versions of baked cookies.
cookies with shortening

cookies with shortening
When I did the taste test, I could also taste the difference between the butter and the shortening versions. While I have already rhapsodized about the butter version, the shortening version was more crisp and airy but lacked the depth of flavor that the butter version had. Which was not surprising.
cookies with shortening

cookies with shortening

butter (L) and shortening (R)
What was surprising, however, is, the next day, when I tried the second half of each that I had held back from the fresh-out-of-the-oven version, the two were much closer in texture and even taste. Yeah, I didn't see that coming.
butter (L) and shortening (R)
The butter flavor was less pronounced in the butter version giving the butter-flavor-Crisco version less of a handicap. The textures were also similar the next day. Huh.
butter (L) and shortening (R)

butter (top) and shortening (bottom)
So the good news is I can make this cookie with butter-flavor Crisco and not entirely compromise my butter-only principles. Okay, I am compromising them but it's better than "rancid". You can do your own taste test but if you do make this with butter-flavor Crisco, don't forget to add the extra egg.
butter (top) and shortening (bottom)
2 3/4 cups all-purpose flour
1 teaspoon baking soda
1/2 teaspoon baking powder
1/4 teaspoon salt
1 cup (2 sticks) butter, softened (or butter-flavor Crisco if you want to sub shortening)
1 1/2 cups granulated sugar
1 egg (use 2 eggs if substituting shortening for the butter)
1 1/4 teaspoons vanilla extract
  1. Whisk together flour, baking soda, baking powder and salt; set aside.
  2. In the bowl of a stand mixer with the paddle attachment, cream butter and sugar together until well combined. Add egg and vanilla and mix to combine.
  3. Add dry ingredients in two batches and mix on low speed until just incorporated. Do not overmix.
  4. Portion into 1-tablespoon-size dough balls, flatten very slightly into thick discs. Cover and chill for several hours or overnight.
  5. When ready to bake, preheat oven to 400 degrees F. Line baking sheets with parchment paper.
  6. Reduce heat to 375 degrees and bake for 10 minutes or until edges are set and middles no longer look raw. Do not overbake. Remove cookies to wire rack to cool completely.

Monday, June 22, 2020

Soft-Baked 4th of July M&M Cookies

Soft-Baked M&M Cookies - made May 31, 2020 from Together as a Family
I don't know what these taste like so, a rarity for me, I'm going to blog about them without being able to tell you one way or the other if they tasted good or not. I think they do. They looked good and they're a regular recipe for cookies so I think they turned out as well as any other M&M cookie recipe.
I baked these for military care packages and the reason I don't know what they tasted like is I packaged them all up for shipping. I normally hold back a taste test cookie or otherwise how do I know these are worthy of being sent??
But I was baking a bunch of cookies to fill multiple boxes and I ended up needing every cookie from this batch for the boxes. I've been baking long enough that I can usually tell if something turned out and these seemed to turn out so I decided I didn't need to taste test them. Multiple military service members can do that for me. And I always tell myself they've got to taste better than MREs, right?
If you want to make the M&Ms "pop" in your cookies, reserve some M&Ms and immediately push them into the tops of the baked cookies as soon as you take the baking sheets out of the oven. The M&Ms that are cracked on top are the ones who baked into the cookies. The non-cracked ones are the ones I pushed into the cookies as soon as I took them out of the oven.

12 tablespoons butter, melted and cooled
3/4 cup brown sugar
1/2 cup granulated sugar
1 large egg
1 large egg yolk
1 teaspoon vanilla extract
2 cups plus 2 tablespoons all-purpose flour
1 teaspoon baking soda
1/2 teaspoon salt
1 cup M&Ms, plus more for additional garnish
  1. In a large mixing bowl, combine butter and sugars. Beat until combined, creamy and light in color, about 1 minute. 
  2. Add egg, egg yolk and vanilla; beat until combined.
  3. Add flour, baking soda, and salt, mixing on low speed until just combined. Stir in the M&Ms.
  4. Portion dough into golf-ball-size balls. Cover and chill for several hours or freezer overnight.
  5. When ready to bake, preheat oven to 350 degrees F. Line baking sheets with parchment paper and evenly space dough balls. Bake for 12-15 minutes or until edges are golden brown and middles no longer look raw. Remove to wire racks to cool completely.

Saturday, June 20, 2020

Hawaiian Bread for the Bread Machine

Hawaiian Bread - made May 29, 2020, modified from More Than Thursdays
I've been getting my money's worth out of my mini bread machine lately. I may have used it more times in the past 2 months than in the last 5 years. Not that I've been testing out a bunch of new bread recipes. Since I stumbled on the Honey Oatmeal Bread, that's pretty much the only recipe I've been using.
But I finally branched out to try this recipe for Hawaiian bread. Since my bread machine is the mini version that only makes a 1-lb loaf and most recipes are for larger loaves, I always have to adjust the ingredient amounts to make sure the dough won't overflow the pan.
I've figured out my mini bread machine will accommodate up to 2 cups of flour so I adjust the proportions accordingly. For the original recipe, please click on the post title, especially if you want to make two loaves.
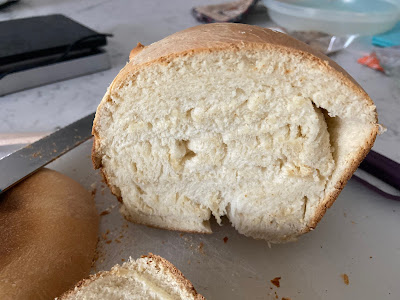
This loaf turned out to be more dense and sweeter than the Honey Oatmeal bread which isn't surprising. I didn't mind the sweetness as it's meant to mimic King's Hawaiian bread but I think I preferred the softer texture of the honey oatmeal bread. This wasn't bad at all but I admit I went back to the honey oatmeal bread for the next round.
1 egg, slightly beaten
1/3 pineapple juice
1/2 teaspoon vanilla
2 1/2 tablespoons butter, melted
1/4 cup granulated sugar
2 cups bread flour
scant 1 teaspoon active dry yeast
  1. Place egg, pineapple juice, vanilla, melted butter and sugar in bread maker pan. Cover with bread flour. Add yeast. 
  2. Follow bread machine instructions to your preference. I used the soft crust setting for a 3-hour cycle. Remove when done and serve while warm.