Tuesday, August 30, 2022

Levain Bakery-Style Oatmeal Scotchie Cookies by The Domestic Rebel

1 cup (2 sticks) cold unsalted butter, cubed
1 cup light brown sugar, lightly packed (172 grams)
1/2 cup granulated sugar (95 grams)
2 large eggs
2 teaspoons vanilla extract
1/2 cup cake flour
1 1/2 cups old-fashioned oats
2 cups all-purpose flour (253 grams)
1 teaspoon cornstarch
1 teaspoon baking soda
1/2 teaspoon salt
1/2 teaspoon ground cinnamon
3 cups butterscotch chips
  1. In the bowl of a stand mixer fitted with the paddle attachment, cream together the cold butter cubes, brown sugar and granulated sugar on low speed for 30 seconds. Scrape down the sides of the bowl to keep the mixture even textured, increase the speed for medium and beat for 30 seconds. Increase the speed to medium high and beat for another 30 seconds until light and fluffy. Scrape down sides and bottom of bowl.
  2. Beat in the eggs, one at a time, then the vanilla extract, mixing until just combined after each addition.
  3. In a medium bowl, whisk together cake flour, oats, all-purpose flour, cornstarch, baking soda, salt and ground cinnamon, Add dry ingredients in two additions, mixing on low speed after each addition. Stir in the butterscotch chips. Chill dough for 15 minutes.
  4. Preheat oven to 410 degrees F. Line 2 baking sheets with parchment paper.
  5. Measure out 6 ounces of dough and form into a loosely packed dough ball, repeating with remaining dough. Place 4 dough balls evenly spaced on prepared baking sheet. Bake one sheet at a time for 11 - 14 minutes. Let cool on baking sheets for 30 minutes then transfer to wire rack to cool completely.
I'm not normally a huge butterscotch fan as I often find the flavor too sweet but I have to admit, few things smell better than anything with butterscotch chips added to it. These cookies smelled divine when they were baking.
I'm happy to say they also tasted as good as they smelled. Butterscotch chips are still a little too sweet for me but they worked well in this cookie, paired with the oats to tone down the sweetness. They were also complemented well with the brown sugar caramelization of the cookie itself.

I didn't make mine the size of Levain Bakery cookies so they weren't as thick as they could be/should have been but they worked well as normal-size cookies and were easy to package up for shipping.


Sunday, August 28, 2022

Chocolate Chip Cookies from Baking with Blondie

Chocolate Chip Cookies - made dough August 13, 2022 from Baking with Blondie
1 cup (2 sticks) unsalted butter, cold and cubed
1 cup brown sugar, packed
1/4 cup granulated sugar
2 large eggs, cold
1 teaspoon vanilla
3 1/2 cups all-purpose flour (can use half cake flour; I used 1 cup cake flour, 2 1/2 cups all-purpose)
1 teaspoon cornstarch
1 teaspoon baking soda
1 teaspoon salt
1 cup large chocolate chips
1 cup mini semisweet chocolate chips
sea salt for garnish, optional
  1. Preheat oven to 410 degrees. Line 2 baking sheets with parchment paper.
  2. In the bowl of a stand mixer fitted with the paddle attachment, cream butter for 1 minute until light and fluffy. Add brown sugar and granulated sugar, mixing on high speed for 3 minutes. Scrape down sides and bottom of bowl to keep mixture even textured.
  3. Add vanilla and eggs, one at a time, mixing well after each addition.
  4. Add flour, cornstarch, baking soda and salt, mixing on low speed until just combined.
  5. Reserve 1/8 cup of chocolate chips and fold in the remaining chocolate chips. Portion dough evenly into 8 balls. Hand press reserved chocolate chips over each dough ball and sprinkle with sea salt if desired.
  6. Bake for 9-10 minutes until slightly golden. Remove from oven and let rest on baking sheets for 5 minutes before transferring to wire rack to cool completely.
I enjoyed all the recipes I've tried from Baking with Blondie's blog so it's almost surprising I waited this long to try out her chocolate chip cookie recipe. 
It's the same base recipe as the other ones so of course it turned out the way I liked and of course I like this cookie. It's really more for people who like big, thick, chewy cookies. Not to mention people who have the patience to wait until this cools to room temperature or even the next day. Yeah, I know, who does that?  But for my taste and texture preference, that's what I recommend. The picture above was taken when the cookie was freshly baked and had cooled to the cool side of lukewarm. Looks like raw cookie dough, right? That's not my thing.
But this picture above was taken when the cookie was fully cool, hours later. This ^^ picture shows the texture I prefer the most. Not mushy but still soft and chewy. Perfect. 

Friday, August 26, 2022

Stamped Cookies #21 - Sugar Cookie Recipe from Preppy Kitchen

Sugar Cookies - made dough August 23, 2022 from Preppy Kitchen
Baked version 
4 cups (480 g), sifted
1/3 cup (40 g) cornstarch
3/4 teaspoon salt
1 cup unsalted butter
1 cup (200 g) sugar
2 eggs
1 teaspoon vanilla extract
  1. Sift flour, cornstarch and salt in a large bowl, whisking to combine.
  2. In the bowl of a stand mixer fitted with the paddle attachment, cream together butter and sugar. Add eggs and mix to combine, scraping down the sides and bottom of bowl to keep mixture even textured. Add vanilla extract and mix to combine.
  3. Add dry ingredients and mix until just combined. Do not overmix. Divide dough into thirds and roll each third between two sheets of parchment paper. Chill 10-15 minutes until dough is slightly firm but still malleable.
  4. In a small bowl, combine equal parts flour and powdered sugar. Once dough is chilled, sprinkle a rolling mat with a little flour-sugar mixture and roll out dough with a rolling pin to desired thickness. Lightly brush cookie stamps with flour-sugar mixture. Press dough with cookie stamps and cut out desired shapes. Place cut out cookies in freezer while oven preheats.
  5. Preheat oven to 375 degrees and line baking sheets with parchment paper. Evenly space cookies and bake for 10-12 minutes, depending on the size and thickness of your cookies. Let rest on baking sheets for several minutes then transfer to wire rack to cool completely.
Unbaked version
Another recipe I found in the files of the Molded Cookies of the World Facebook group and another winner in terms of keeping the impressions from my cookie stamps. Any deficiencies were more mine, i.e. not pressing evenly or hard enough with the whole stamp rather than the recipe's. I haven't stamped cookie dough regularly in awhile so it took a few tries. 

But as you can see, this is another good recipe for stamping. They didn't keep the impressions quite as crisply as the ones I used for my Snoopy stamps; however, these were softer and less crisp so I think I prefer them for mailing in care packages.
Although they're labeled sugar cookies, they're not actually that sweet. The cornstarch allows for a softer texture but there isn't so much that it makes the cookies dry or bland. However, be sure to use fresh butter and real vanilla extract. I also added some vanilla bean paste to amp up the vanilla flavor.
I do recommend chilling this for at least 15-20 minutes, just long enough for the dough to be firm enough to handle but still malleable enough to take a stamped impression well. If your dough is too soft, not only will it stick to your stamps but it will also be more apt to become misshapen when you try to transfer the stamped and cut out cookies (ask me how I know). Additionally, you’ll want to cover and chill or freeze these before you bake them to help keep the impressions intact.


Thursday, August 25, 2022

Stamped Cookies #20 - Butter Cookies for Molding

Butter Cookies for Molding - made August 21, 2022 from Caroline Kallas (from Molded Cookies of the World Facebook page)

Baked cookies - kept the impressions

Unbaked cookies
1 cup (2 sticks) butter 
2 large eggs 
1 teaspoon salt 
2 teaspoons vanilla extract 
1 1/2 cups granulated sugar 
2 tablespoons heavy cream 
4 cups all purpose unbleached flour 
  1. Preheat oven to 350 degrees F. Line baking sheets with parchment paper.
  2. Beat butter, salt, and vanilla extract until combined and creamy. Add sugar, beating until light. Add eggs and beat until smooth and combined. 
  3. Incorporate 3 cups of flour, mixing on low speed then add cream. Add the rest of the flour, beating until just combined. Dough is done when it begins to clean the sides of the mixer bowl. This dough does not like to sit or be refrigerated, use immediately after making. However, if it's really soft, chill for 10-15 minutes before using.
  4. Cut or stamp with cookie molds, stamps and cutters. Evenly space on baking sheets. Bake time will vary depending on cookie size and mold depth. A medium cookie (3 to 4 inches) takes about 10 minutes. Bottoms should remain very pale. Cookies firm up as they cool.
I haven't tried out a real stamped cookie recipe in awhile (the Butter Delights didn't count as that wasn't a recipe really meant for stamping) but wow, I'm glad I found this new recipe.
I found it through a Facebook group I'm a member of called Molded Cookies of the World and the admin is Kitchen Vixen (Jen), the etsy seller I met at the Cookie Con in Reno who's also the creator of the military seal molds I've posted about before. Jen is amazing, a highly talented artist and baker and shares her talents through her Kitchen Vixen etsy shop and her facebook pages. 
The facebook group is always full of pictures of beautifully stamped or molded cookies with seriously next-level extra of aesthetic beauty in cookie form. Some are butter cookies, sugar cookies or springerle cookies. I found this butter cookie recipe in the files of that page and thought I'd give it a whirl as I'm on a never-ending quest to find good cookie recipes that will hold an impression after baking and taste good. So far my previous 19 efforts have typically netted one or the other but seldom both. Until this one.
The pictures speak for themselves and you can also probably tell what my earlier efforts look like as I haven't done cookie stamping in awhile and had to relearn some basic habits to get clean edges and even impressions. It took me a little while so you can see the gamut of my efforts in these pictures.
But no matter as I'm just happy the impressions didn't bake out and remained pretty faithfully to their pre-baked version, always a challenge with stamped cookie recipes. This one turned out beautifully. And they tasted as a good butter cookie should - simple, straightforward butter taste.
The original recipe calls for using the dough right after mixing and not chilling it but, given the warm summer weather I made these in, I do recommend that if your dough is warm or too soft, roll it out between 2 sheets of parchment paper and chill it for 10-15 minutes first before stamping and cutting. Some of my initial misshapen efforts were due to skipping the chilling step then finding the dough too malleable and losing shape when I tried to stamp, cut and move it.
You don't want to chill the dough too long though. Just long enough for it to handle easily between parchment, soft enough to take the impression from your cookie stamp and firm enough to be cut with a cookie cutter and moved gently with a spatula.
I got these Snoopy cookie stamps from Williams Sonoma early this year. I think they were part of the spring line as they're not available on their website now. For once I'm glad of my cookie-stamp-acquiring nature as I got these when I saw them even though it's taken me almost 7 months to finally use them. But I love them and I love finding a recipe where the Snoopy renditions stayed faithfully through the baked product. If you like crisp cookies, bake them a little longer or roll the dough a little thinner. If you like more chewy butter cookies, bake only until the edges are just light golden brown. I liked them both ways. These taste best when eaten as soon as they're cooled. They're still fine the next day but a little more chewy and not as crisp. If you bake them too long, they will get hard. I need to try tweaking the recipe so they’ll have a softer texture but I don’t want to mess with it too much and risk losing how well the impressions hold during baking.
But at least now you (or I) can break out all your fun cookie stamps and use them with confidence that the stamped impressions will make it to your baked cookies.


Wednesday, August 24, 2022

Vegan Fudgy Brownies

Vegan Fudgy Brownies - made August 11, 2022 from Everything Chocolate by America's Test Kitchen 
2 cups (10 ounces) all-purpose flour
1 teaspoon baking powder
3/4 teaspoon salt
1 cup boiling water
3 ounces unsweetened chocolate, finely chopped
3/4 cup (2 1/4 ounces) unsweetened cocoa powder
1 1/2 teaspoons instant espresso powder, optional
2 1/2 cups (17 1/2 ounces) granulated sugar
1/2 cup vegetable oil
1 tablespoon vanilla extract
1/2 cup (3 ounces) bittersweet chocolate chips, optional
  1. Preheat oven to 350 degrees F. Line 9 x 13-inch baking pan with foil and lightly spray with nonstick cooking spray.
  2. Whish flour, baking powder and salt in a small bowl.
  3. In a large bowl, whisk boiling water, unsweetened chocolate, cocoa and espresso powder, if using, until well combined and chocolate is completely melted. Whisk in sugar, oil and vanilla. Using a rubber spatula, stir flour mixture into chocolate mixture until combined and glossy. Fold in chocolate chips.
  4. Scrape batter into prepared pan and smooth top. Bake until toothpick inserted near center of brownie emerges with a few moist crumbs, 30 to 35 minutes. Cool brownies completely before cutting and serving.
I wasn't deliberately trying to bake anything vegan; this was more because I'm back to trying to use recipes from my baking books and I'd had this one bookmarked for awhile to try. I'm not vegan nor do I do any regular vegan baking but it never hurts to have a recipe or two on hand in case I do end up having to bake something for someone with a vegan way of eating.
For this particular recipe, I left off the bittersweet chocolate chips in case they were made with dairy so I could keep this truly vegan. Instead of butter, this uses oil and the chocolate flavor comes from unsweetened chocolate and unsweetened cocoa powder. Which made this really chocolatey.
For people who like super fudgy brownies and that crackly top, this is a great brownie. I don't love crackly tops (too reminiscent of boxed brownie mixes) and I think I could've baked this a few minutes longer so it would be more firm (not dry) but overall, this is a decent brownie. Definitely full of chocolate flavor and fudgy texture. I marked it as vegan for my Soldiers Angels care packages in case there were any vegans on the receiving end so they'd know it was okay for them to eat but otherwise, I don't think you'd be able to tell this was vegan in a blind taste test. Other than being able to tell it was made with oil instead of butter, I don't think I would've known.

Monday, August 22, 2022

Butter Delights

Butter Delights - made August 14, 2022, modified from Golde's Homemade Cookies by Golde Hoffman Soloway
1 cup (2 sticks) unsalted butter 
1/2 cup granulated sugar
1 teaspoon vanilla bean paste
1 1/2 cups all-purpose flour, sifted
1/2 cup cornstarch
  1. Preheat oven to 375 degrees F. Line baking sheets with parchment paper.
  2. In the bowl of a stand mixer fitted with the paddle attachment, cream butter until no lumps remain. Add granulated sugar and beat until combined. Mix in vanilla extract.
  3. Add flour and cornstarch and mix until just combined.
  4. Break off walnut-sized pieces and roll into balls. Flatten slightly with the bottom of a glass dipped in granulated sugar.  Alternatively, press into mooncake molds. 
  5. Evenly space on prepared baking sheets. Bake 13-15 minutes or until edges are lightly golden.
This recipe is from a little book I bought ages ago at a small, independently-owned bookstore for $6. I haven't used it often and suspect I bought it because I wanted to support an independent bookstore and for $6, even if I found one good recipe from it, it'd be worth the price. Plus I was far more acquisitive back in the day and there wasn't a baking book I found that I didn't like. All that to say that I haven't used this book very much at all. It's small and doesn't take up much space so it's survived several moves and multiple book purges simply because it didn't take up a lot of room. In searching my blog, I've only found one entry from it and that was for Crema Gianduja Brownies. Eleven years ago. Eep. Time to try another recipe from it again.
I went with this one as the directions said you could also stamp them although I’m not counting this as a stamped cookie recipe. Still, it led me to hope they might keep a stamp impression. I used my mooncake molds for most of them. The dough was a little soft so I did have to chill it for 15-20 minutes first before molding them. You don't want to chill this for too long or else it'll get hard. But definitely chill it slightly if it's too warm after you mix it, especially if you live in a warm climate. I'll let the pictures speak for themselves on how well the impressions held. Not that well but not too badly. I'd recommend using a design that doesn't have a lot of detail as the finer impressions do bake out. In terms of flavor, this was really buttery. If butter's your thing, this will definitely delight you. The edges were crisp and the middle was chewy. If you prefer a more crisp texture throughout, bake it a little longer, like a shortbread.


Saturday, August 20, 2022

Flourless Chocolate Cake

Flourless Chocolate Cake - made August 7, 2022 from Everything Chocolate by America's Test Kitchen
12 ounces bittersweet chocolate. broken into 1-inch pieces
16 tablespoons unsalted butter
6 large eggs
1 cup (7 ounces) granulated sugar
1/2 cup water
1 tablespoon cornstarch
1 tablespoon vanilla extract
1 teaspoon instant espresso powder
1/2 teaspoon salt
  1. Preheat oven to 275 degrees F. Spray 9-inch springform pan with nonstick cooking spray.
  2. In the top half of a double boiler set over hot water, whisk together bittersweet chocolate and butter until completely melted and smooth. Remove from heat and let cool for 5 minutes. 
  3. Whisk eggs, granulated sugar, water, cornstarch, vanilla extract, espresso powder and salt in large bowl until thoroughly combined, about 30 seconds. Whisk in chocolate mixture until smooth and slightly thickened, about 45 seconds. Strain batter through fine-mesh strainer into prepared pan, pressing against strainer with rubber spatula or back of ladle to help batter pass through. Gently tap on counter to release air bubbles; let sit on counter for 10 minutes to allow air bubbles to rise to top. Use toothpick to gently pop any air bubbles that have risen to the surface. 
  4. Bake until edges are set and center jiggles slightly when shaken gently, 45 to 50 minutess.
  5. Let cake cool in pan on wire rack for 5 minutes; run thin knife around edges of pan to loosen cake. Let cake cool on rack until barely warm, about 30 minutes. Cover cake tightly with plastic wrap, poke a small hole in top and refrigerate until cold and firmly set, at least 6 hours or up to 2 days. Remove sides of pan and slide thin metal spatula between cake bottom and pan bottom to loosen, then slide cake onto platter. Let cake stand at room temperature for 30 minutes before serving. 
just out of the oven
Before you even think about making this cake, you have to make sure you have high quality chocolate for it. If you don't, sorry, but don't bother making it or else you won't enjoy it. I'm not normally so definitive (and judgy, no, wait, I am usually judgy) but you can't make something like a flourless chocolate cake with inferior chocolate. The chocolate in this recipe is the star and is used in a large enough quantity that it can't hide behind the other ingredients. 
after chilling overnight
I used Valrhona from Trader Joe's but you can go with any other good-quality chocolate like Lindt, Scharffenberger, Callebaut and so on. Guittard and Ghirardelli are fine; I'm less convinced about Hershey and Nestle but I'll leave that up to you and your taste buds.
The earmarks of a good flourless chocolate cake are the flavor (hence the good chocolate needed) and the texture. Because it doesn't have flour, it isn't going to be cakey like the name "cake" would imply. Instead, it should be dense, rich and smooth. Not light and airy like a mousse, not as slickly creamy like a ganache but firm and creamy but solid.

I tried to do a few closeups so you can see what I mean. I did follow the directions to let the cake batter sit for 10 minutes and then poke out the holes with a toothpick. I also tapped it on the counter a few times to also break up air bubbles and let them come to the surface to be toothpick-pricked out.
As you can see, I was unsuccessful as the air bubbles seemed to come out of nowhere as soon as I put this in the oven. That doesn't affect the taste or texture, just the appearance on top with those baked in air bubbles. Bah. If you want this more aesthetically pleasing, you can always drizzle caramel or white chocolate in thin stripes across the top or dust it with powdered sugar. I left it naked because I'm not that fussy.
You will want to cut these slices thin and small. Because they are rich. I liked this cake but a little goes a long way. It makes a 9-inch pan and could easily serve 9 chocoholics comfortably or 18 normal people. I'm not kidding.
The great thing about this cake is this richness implies great baking skill and that you can churn out very good desserts. Maybe you can anyway but this cake is really easy for even novice bakers. The only thing to watch out for is you're going to be tempted to overbake this because after 50 minutes at 300 degrees, which is how long I baked mine for, this won't look done. But it is. Take it out, let it cool to room temperature, cover and wrap it in plastic wrap and put it in the refrigerator overnight. That's how you'll get that dense, fudgy, smooth texture.


Friday, August 19, 2022

Crumbl Cookies review #30 - Caramel Popcorn and Lemon Poppyseed

Crumbl Cookies review #30 - Caramel Popcorn and Lemon Poppyseed
Before I get into the review of this week's cookies, it might be a little ironic that the week I finally post a review of the cookies actually available this week, it might be my last week for a regular Crumbl run. Yeah, yeah, I've tried that before and it didn't happen. The main reason I might actually break up with Crumbl for longer than 12 days this time is a trifecta of higher cookie prices, the addition of a service fee and the consistent inconsistency of not getting good-quality cookies.
Anyone who knows me knows I've always been a major proponent of small businesses. And despite Crumbl as a corporation being a multi-million dollar company, their stores are franchised and I consider franchise owners to be small business owners because most of them are. So I understand when they have to raise prices as they've got to run a profitable business or they wouldn't be in business at all. The prices of ingredients have gone up and I want their workers to be paid a livable wage so payroll costs have to be covered; I get it. Plus these cookies are a luxury item and if you can't afford a luxury item, you don't buy it. I'm less blase about the "service fee" which is 2.95% of my total. Are you passing along the costs Visa and Mastercard charge for using a debit or credit card? If so, do I still get charged that 2.95% fee if I pay cash? I suspect so but I haven't tried that out yet. It's also lousy timing to raise cookie prices and institute the service fee the same week, not to mention a sneaky way to nickel and dime the consumer and hope they don't notice a double price increase (spoiler alert: I noticed).
But those things I can suck up because again, luxury item, cookies, don't buy it if you can't afford it or don't want to pay the price, yada yada. What's harder for me to swallow (ha) is the diminishing quality and greater level of inconsistency of the cookies I've been getting lately: more dry, worse texture and, in a few cases, definitely not as advertised by Crumbl when filled cookies don't have filling, toppings are skimpy or whatever else when a $4 cookie is now a $5+ cookie (I always tip; don't suggest I could get the cookies for less if I stopped tipping because I won't - that's a personal choice) so I'm paying more for what may or may not be a good cookie. So that's my 3-paragraph lead-in that (silver lining) I really will be cutting back a lot more on Crumbl and only making it an occasional purchase when the flavor is worth it in terms of the expense and the risk of getting or not getting a good cookie.
Peanut Butter Blossom
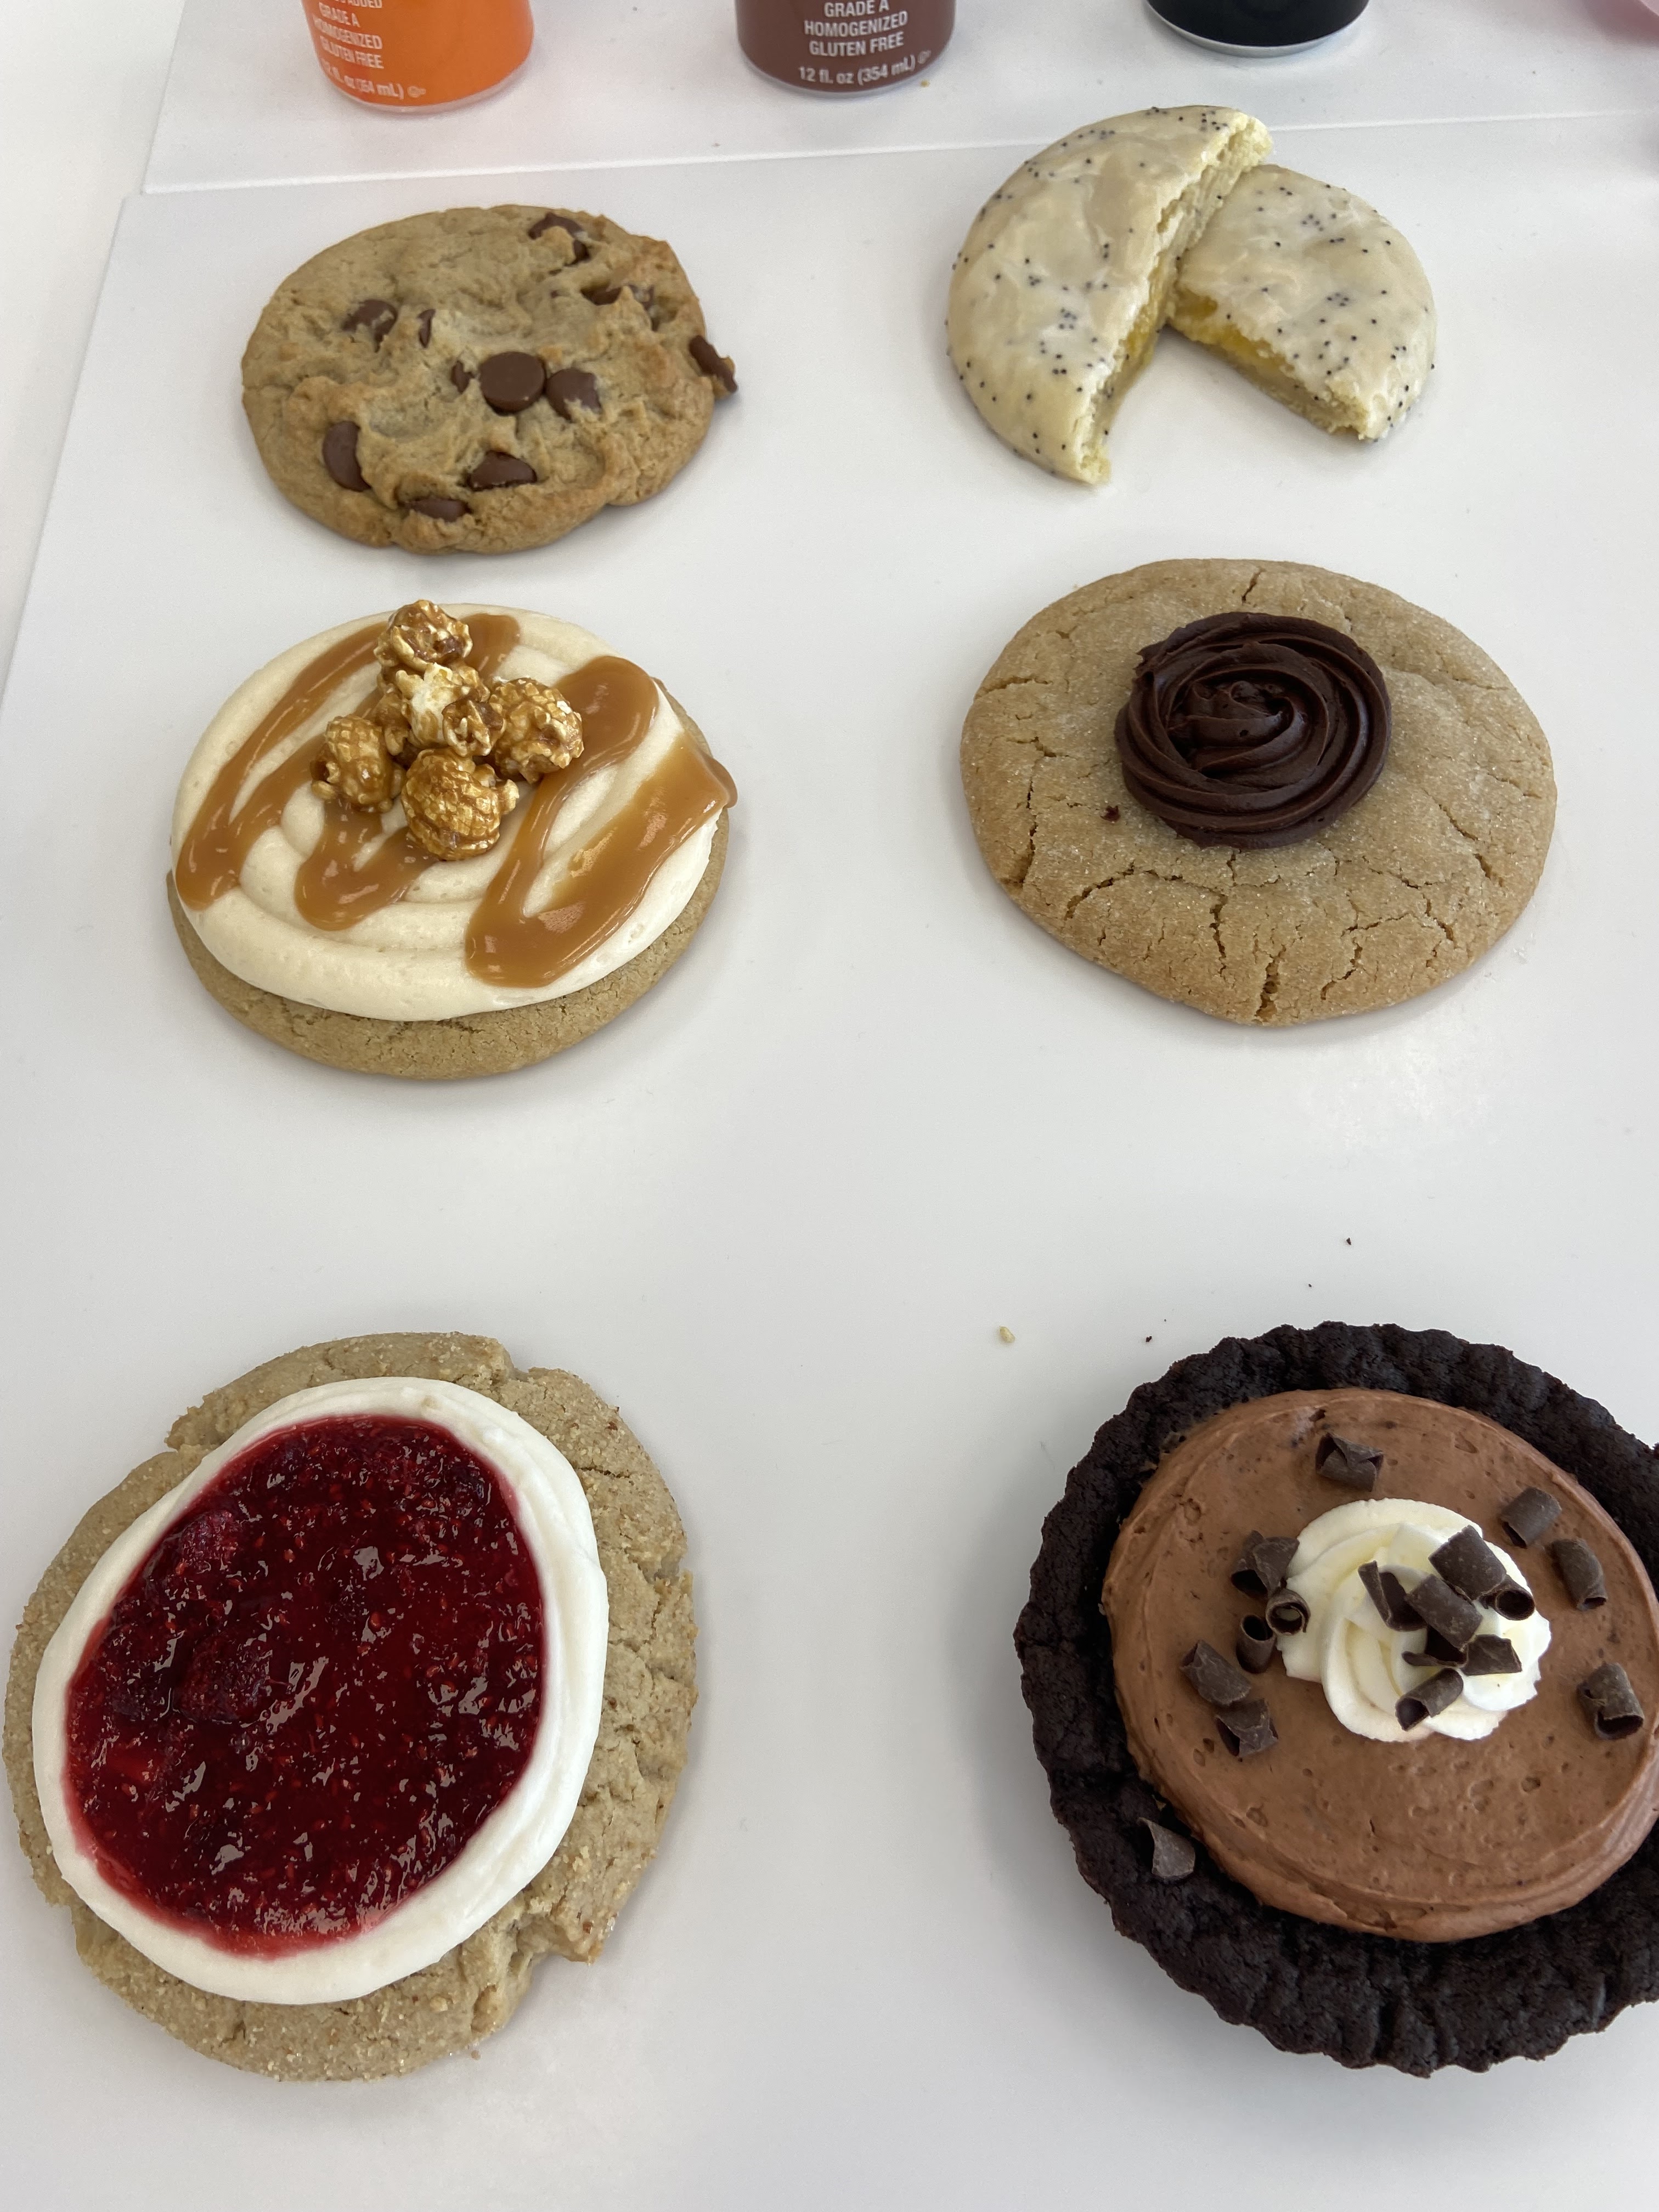
On to this week's cookies. Only for me to tell you I don't know what the Peanut Butter Blossom tastes like because I didn't have any. I bought this for my niece and her boyfriend since they're the peanut butter lovers. The cookie looks good and matches what Corporate Crumbl advertised this week so it has that going for it.
I had never had the caramel popcorn before so I was curious to try it. I only ate 1/4 of a cookie as the taste test and shared the rest with my mom, niece and her boyfriend. This one was okay but I think the caramel popcorn on top as a garnish was unnecessary. The caramel drizzle on top softens the popcorn so when you eat it, it comes off as stale since it's soggy from the caramel. The frosting was a little thick for me and sweet so it almost overwhelmed the cookie. 
Caramel Popcorn
The cookie itself was good but I wouldn't get this one again. The cookie base wasn't anything special, the frosting was too sweet and the popcorn garnish comes across as stale. This wouldn't be worth it under the old, cheaper pricing structure and definitely wouldn't be worth it under the new, higher prices.

Lemon Poppyseed
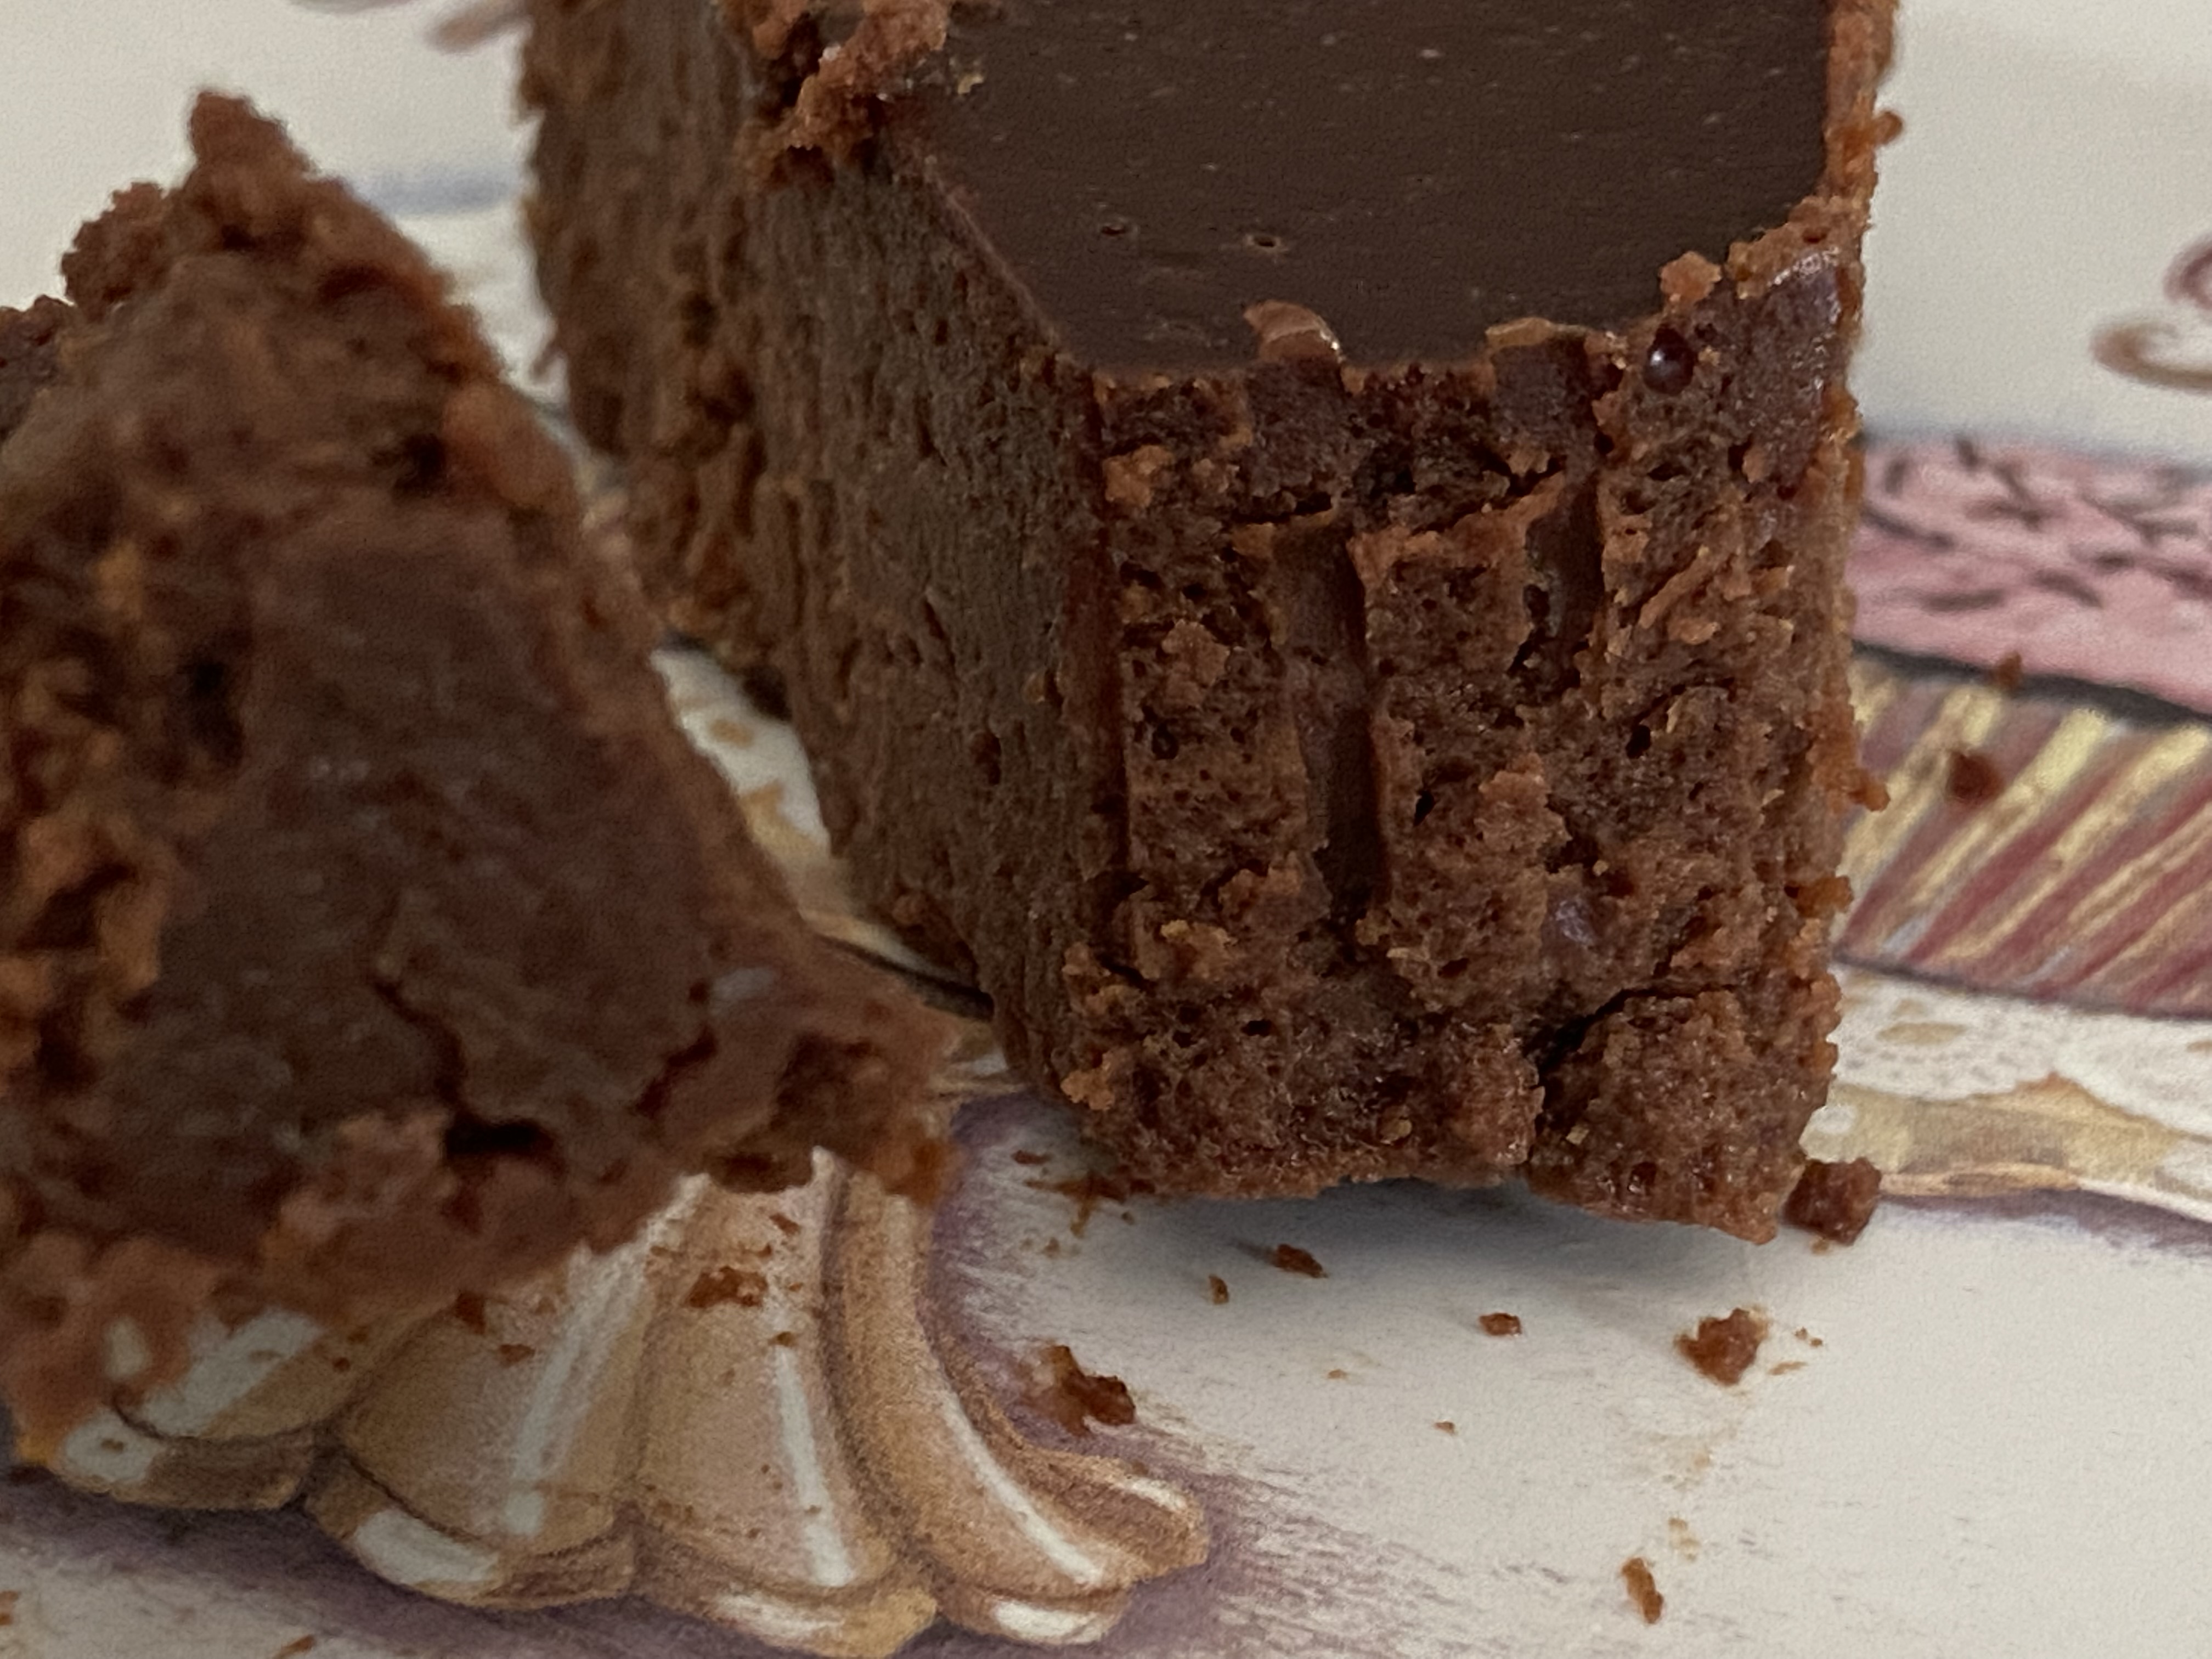
The Lemon Poppyseed was the one I was most interested in trying as I like the flavor combination. Below is the picture and description from Crumbl's website. The description reads: "A zesty lemon cookie packed with yummy poppy seeds then stuffed with a lemony filling and smothered in a lemon almond glaze (Now containing real almond extract)"


The outside of the cookie I got matches the Crumbl website pretty faithfully. The inside does not. The pictures speak for themselves. Apparently my Crumbl either forgot to put any lemon filling inside the cookie or put in so little it baked into the cookie. Either way, it didn't meet my expectations or deliver what Crumbl promised. This happened with the Molten Lava cookie as well; hence my earlier comment about the consistent inconsistency isn't worth the price anymore. Sometimes the cookies are amazing, sometimes they're not. The lack of consistency is a disincentive for me to keep getting their cookies. The quality isn't there consistently but I'm still paying for the cookies and now I have to pay more for the risk that it will or won't be a good cookie. This isn't a risk that I won't like a flavor; this is the risk that the cookie doesn't have what it's supposed to have (filling) or that it isn't made the way it's supposed to be (overbaked, in the warmer too long).

Someone online who I think works or owns a Crumbl suggested I contact my local store about the lemon poppyseed and get another cookie. While I appreciate the suggestion of giving the store the opportunity to make things right, I don't really do that kind of thing, especially for something like a cookie. It's not worth the gas, time or drive back to the store (I didn't discover the no-filling until I got home), I don't want to make the always-nice-and-polite store employees feel bad about it because, hey, it's "just a cookie". 
Picture from Crumbl's advertising of the lemon poppyseed
On one hand, it's good I'm not a "Karen" who is high maintenance on a store. On the other hand, I think this makes me a worse kind of customer for Crumbl because I ended my transaction with them on a bad note for me and because of it, I will be giving them less business in the future. I'm sure my local store would rather I give them the opportunity to make things right and keep on being a frequent customer. But the reality is I'm not going to complain about every cookie I don't feel was up to standard and they had their chance the first time to sell the "right" cookie that was advertised. If this was the first time it happened, I'd cut them more slack. But it isn't the first, second, third or even fourth time.  At some point, it isn't worth the hassle and as a customer, I'm going to move on. I think I'm at that point with Crumbl.
Picture of the lemon poppyseed I got