Thursday, September 29, 2022

Peanut Butter Oatmeal Cookies from Just So Tasty

Peanut Butter Oatmeal Cookies - made September 16, 2022 from Just So Tasty
1/2 cup unsalted butter, softened
1/2 cup brown sugar, packed
1/3 cup granulated sugar
1/2 cup peanut butter
1 large egg
1 teaspoon vanilla extract
3/4 cup all-purpose flour
3/4 teaspoon baking soda
1/4 teaspoon salt
3/4 cup quick oats
1/2 cup old-fashioned oats
  1. In a large bowl, cream together butter, brown sugar, granulated sugar and peanut butter until fluffy.
  2. Mix in the egg and vanilla. 
  3. On low speed, add in the flour, baking soda and salt, mixing until just combined. Mix in the oats.
  4. Portion dough into balls, cover and chill or freeze for several hours or overnight.
  5. When ready to bake, preheat oven to 350 degrees F. Line baking sheets with parchment paper and evenly space dough balls. Bake for 8-10 minutes or until edges are set and middles no longer look raw or shiny.
I actually first tried this recipe during the early months of the pandemic but never blogged about them as I wasn't in the right headspace to keep baking and blogging at the same time. Back then, along with the rest of the world, I did whatever brought comfort and didn't "make" myself do anything I didn't want to. It was enough to get through the day without mishap.
But I did keep a draft of the recipe so I could get back to it "someday". And someday has arrived. I was doubling up on the care packages I've been baking for Soldiers Angels as there are currently a lot of deployed military service members who've signed up for packages and, for the moment, there doesn't seem to be enough supply to meet the demand.
That's where it comes in handy to have easy cookie recipes to make. Although chocolate chip cookies are the most requested in care packages, I tend to vary the types of cookies I send and I gravitate to the hearty ones that have peanut butter and/or oatmeal. 
Not that that makes the cookies healthy, thanks to the butter and sugar, but hey, it gives the illusion, right? I don't have a picture of the inside of the cookie since I didn't eat one but I remember these being a good combination of peanut butter and oatmeal, moist and chewy. They don't spread too much. The ones you see were only briefly chilled and I only left them in the freezer for as long as the oven took to preheat. 

Tuesday, September 27, 2022

Espresso Chocolate Chunk Brownies

1 1/4 cups all-purpose flour
1/4 teaspoon salt
2 1/2 tablespoons unsweetened cocoa powder
12 ounces semisweet chocolate, coarsely chopped
1 cup unsalted butter, cut into tablespoons
3 teaspoons instant espresso powder
2 cups granulated sugar
5 eggs, lightly beaten
1 tablespoon vanilla extract
2 cups chocolate chunks
  1. Preheat oven to 350 degrees F. Line a 9 x 13-inch baking pan with foil and lightly spray with nonstick cooking spray.
  2. In a medium bowl, combine flour, salt and cocoa powder.
  3. In the top half of the double boiler set over hot water, combine semisweet chocolate, butter and instant espresso powder. Whisk until completely melted and combined. 
  4. Turn off the heat and add the sugar, whisking until completely combined. Remove the top half of the double boiler and wipe bottom free of moisture.
  5. Add the eggs to the batter and whisk until just combined. Add vanilla and stir to combine. Add flour mixture and stir until just combined and mixture is glossy. Do not overbeat. Fold in chocolate chunks.
  6. Pour batter into prepared pan and smooth top. Bake for 30 - 35 minutes or until a toothpick inserted in the center comes out with a few moist crumbs. Let cool completely before cutting and serving.
Another good care package brownie, especially if you like coffee or espresso flavor amping up your chocolate. I'm not a coffee drinker myself but I love the smell of coffee and don't mind the flavor of it in baked goods.
We're getting into cooler temps where I live, although "cooler" is relative and just means it isn't triple digit temps anymore. Still not cool enough to risk ordering unsweetened chocolate through the mail but we're getting close. In the meantime, I'm still trying out more cocoa-powder-based recipes.
This one is good. It's nice and fudgy although a bit softer than my favorite recipe. The espresso isn't overwhelming but pairs well with the chocolate. It's a bit sweet so if you want more chocolate rather than sugar in the flavor profile, substitute a few ounces of unsweetened chocolate instead of the semisweet chocolate melted with the butter and espresso powder.


Saturday, September 24, 2022

"Best Ever" Pancakes

Pancakes - made September 16, 2022 from Grace and Good Eats
1 1/2 cups all-purpose flour
3 1/2 teaspoons baking powder
1/2 teaspoon salt
1/4 cup sugar
1 1/4 cups whole milk
1 egg
3 tablespoons butter, melted
  1. In a medium bowl, mix together flour, baking powder, sugar and salt. 
  2. Stir milk and egg together in a separate bowl.
  3. Create well in the center of the flour mixture. Pour the melted butter and milk mixture into the well. Use a wire whisk to stir everything together until just combined. Do not overmix.
  4. Let the batter rest while heating a lightly oiled skillet or griddle to medium high heat. Pour or scoop the batter onto the griddle, using approximately 1/4 cup for each pancake. Cook each side 3-6 minutes or until lightly golden brown.
I actually made this recipe several years ago but I found it in my draft posts so I don't think I ever posted it.
Which is a shame as they're really, really good. They're as fluffy as they look and, covered in maple syrup, hit the spot if you want a bit of sweet for breakfast. Or lunch. Or dinner. I rarely eat solid food in the morning so I almost never have breakfast food at breakfast time. These were my lunch pancakes.

Not sure I'd call them "best ever" but mostly because there haven't been many pancakes I haven't liked. These were good ones. Be sure to let the batter rest for at least 15 minutes if you can so they'll be tender and fluffy.

Wednesday, September 21, 2022

Chewy Oatmeal Cookies

Chewy Oatmeal Cookies - made dough September 2, 2022 from Fearless Baker by Emily Luchetti
12 tablespoons (1 1/2 sticks) unsalted butter, softened
1 cup firmly packed light brown sugar
1/2 cup granulated sugar
1 large egg
1 teaspoon pure vanilla extract
3 cups old-fashioned oats
1 cup all-purpose unbleached flour
1 teaspoon baking soda
1/2 teaspoon salt
2 tablespoons whole milk
1/2 cup dried cherries (omitted, added more chocolate chips)
1/2 cup chocolate chips
  1. Preheat oven to 350 degrees F. Line baking sheets with parchment paper.
  2. In the bowl of a stand mixer fitted with the paddle attachment, beat the butter, brown sugar and granulated sugar until well combined and smooth. Add the egg and vanilla, mixing until combined.
  3. Stir in the oats, flour, baking soda and salt until combined. Stir in the milk, dried cherries and chocolate chips until combined.
  4. Portion into golf-ball-size dough balls, flatten slightly and evenly space on prepared baking sheets. Bake for 10-12 minutes or until edges are lightly browned and middles no longer look raw. Remove from oven and let cool for a few minutes before transferring cookies to wire rack to cool completely. 
My friend Rick emailed me out of the blue one night and I was reminded of his favorite cookie, oatmeal chocolate chip. I used to bring them to work and give Rick a heads up. After we both left the company, I'd occasionally mail oatmeal chocolate chip cookies to him (and his family as presumably he shared the cookies) whenever I tried out a new recipe for them.
So in honor of Rick, I tried out another new recipe for oatmeal chocolate chip from one of my baking books by Emily Luchetti. My criteria for a cookie to truly be an oatmeal chocolate chip cookie instead of a chocolate chip cookie with some oats in them is that it has to contain more oats than flour. This one does.
I used old-fashioned oats instead of instant or quick cooking as I find they're more hearty and are more chewy. This was a true oatmeal cookie. It was a little sweet and some of the cookies came out a little misshapen so I don't think I kept the dough as even textured during mixing as I should have. If you want to soften the oats a bit, after making the dough, refrigerate it overnight to let the oats and flour absorb more moisture. 
This had great caramelization and the semisweet chocolate worked well to offset a little of the sweetness. Sadly for Rick, I mailed these in care packages for Soldiers Angels rather than sending them to him but shhh, no need to tell him that.


Monday, September 19, 2022

Life Changing Brownies from Rumbly Tumbly

Life Changing Brownies - made September 13, 2022 from Rumbly Tumbly
Brownies
1 1/4 cups all-purpose flour
1 teaspoon salt
2 tablespoons unsweetened cocoa powder
1 cup butter
1 1/2 cups semisweet chocolate chips
1 teaspoon instant coffee or espresso powder
1 1/2 cups granulated sugar
1/2 cup packed brown sugar
5 eggs
2 teaspoons vanilla extract

Frosting
6 tablespoons milk
6 tablespoons butter
1 1/2 cups granulated sugar
1 cup semisweet chocolate chips
1/2 teaspoon vanilla extract
  1. Preheat oven to 350 degrees F. Line a 9 x 13-inch baking pan with foil and lightly spray with nonstick cooking spray.
  2. In a small bowl, whisk together flour, cocoa powder and salt. Set aside.
  3. In the top half of a double boiler set over hot water, melt butter, chocolate chips and espresso powder, whisking until completely melted and smooth. Remove from heat 
  4. Mix in granulated sugar and brown sugar until combined. Whisk in the eggs, one at a time, until just combined. Add in vanilla and mix to combine. Do not overmix.
  5. Add dry ingredients and stir to combine. Pour batter into prepared pan. Bake for 25-30 minutes or until a toothpick inserted near the center comes out with a few moist crumbs.
  6. Once the brownies have been removed from the oven. make the frosting: combine the butter, milk and sugar in a saucepan over medium heat. Bring to a boil, stirring to combine. Let come to a rolling boil for 30 seconds. Remove from heat and stir in the chocolate chips and vanilla, mixing until smooth and glossy.
  7. Spread frosting over warm brownies. Let cool completely before cutting.
Whenever I see a recipe for frosted brownies, I think of my favorite recipe for them, Essence of Chocolate Squares which is, essentially (ha), a dark chocolate brownie under a layer of a rich creamy fudgy frosting. 

The comparisons are inevitable. This is similar except the frosting sets and hardens almost like a penuche in texture except it's chocolate. It's more like a thick Magic Shell with the texture of fudge, if that makes sense. It's a bit too sweet for me but if you want to counter the sweetness, replace 1/4 cup of the semisweet chocolate chips with 1.5 ounce of unsweetened chocolate.
I'm not sure these changed my life as the original title dramatically promises but there's always room in my life for more brownies and this was a good one.


Saturday, September 17, 2022

Vegan Sweet Potato Blondies from Wandering Chickpea

1 1/2 cups Japanese sweet potato, cooked, mashed
6 tablespoons vegan butter, softened 
1/2 cup granulated sugar
2 teaspoons apple cider vinegar
1 teaspoon vanilla extract
1/4 cup plant-based milk
1 1/4 cups all-purpose flour
1 teaspoon baking powder
1/4 teaspoon baking soda
3/4 teaspoon salt
3/4 cup dairy-free chocolate chunks (I left them out)
  1. Preheat oven to 350 degrees F. Line an 8 x 8-inch baking pan with foil and lightly spray with nonstick cooking spray.
  2. In a medium bowl, beat together Japanese sweet potato, butter, sugar, apple cider vinegar, vanilla extract and milk.
  3. Add flour, baking powder, baking soda and salt, mixing until combined. Fold in chocolate chunks.
  4. Spread evenly in prepared pan and bake 27-32 minutes or until a toothpick inserted near the center comes out clean or with a few moist crumbs. Let cool completely before cutting and serving.
I'm not really a vegan baker but every once in awhile, I'll try out a vegan recipe in case I ever need to bake for someone who has a vegan way of eating. This recipe caught my eye because it uses Japanese or murasaki sweet potatoes, which is my favorite sweet potato. They're not available year round but they do start making an appearance in the late summer/early fall timeframe. Which is now.

I get them from Trader Joe's but I've heard they're also available at Asian grocery stores and Whole Foods. You'll recognize them by their purple skins and white insides. They look like a regular potato and have a firm texture but taste like a sweet potato. They're good baked, boiled, steamed and fried.

Turns out they also make good blondies. I had intended for these to go in military care packages but they turned out moist and cakey more than firm and brownie-like so I didn't send them, fearing the moisture might make them mold before they got to their destination. Hey, more for me.
This tastes like a Japanese sweet potato in cakey form. I enjoyed it and it's an easy-to-make vegan recipe. I left out the dairy-free chocolate chips in mine, partly because I'm against chocolate in blondies and partly because I didn't have dairy-free chocolate chips. Without them, this was more like a slightly sweet and slightly dense breakfast cake.

Thursday, September 15, 2022

Dark Chocolate Brownies from 12 Tomatoes

Dark Chocolate Brownies - made August 26, 2022, modified slightly from 12 Tomatoes 
2/3 cup flour
1/3 cup unsweetened cocoa powder
1/2 teaspoon cinnamon
1/2 teaspoon salt
2 teaspoons espresso powder, optional
1 cup dark or bittersweet chocolate chips
1 cup (2 sticks) unsalted butter
2 cups granulated sugar
2 teaspoons vanilla extract
5 large eggs
  1. Preheat oven to 350 degrees F. Line a 9 x 13-inch baking pan with foil and lightly spray with nonstick cooking spray.
  2. In a medium bowl, whisk together flour, cocoa powder, cinnamon, and salt.
  3. In the top half of a double boiler set over hot water, melt espresso powder (if using), butter and chocolate chips, whisking together until completely melted and smooth. Remove from heat and cool for several minutes.
  4. Whisk in sugar and vanilla extract. Whisk in eggs, one at a time, until completely combined.
  5. Stir in dry ingredients and mix until combined and mixture is glossy. Do not overmix.
  6. Pour batter into prepared pan, smoothing top evenly. Bake 25-30 minutes or until a toothpick inserted near the center comes out with a few moist crumbs. Let cool completely before cutting and serving.
This is a good, basic, fudgy brownie. It's a bit soft, partly because I underbaked it but also because it has less flour/dry ingredients compared to the amount of butter and liquid ingredients (sugar is considered a "liquid" ingredient because it melts during baking).
I did include the espresso powder in these and the flavor came through nicely. I rewrote the ingredients so that if you do decide to include espresso powder, melt it with the butter and chocolate step. That way you'll be sure the espresso flavor will evenly incorporate throughout the batter and there won't be any grit from partially melted espresso powder or granules, depending on what you use.


Sunday, September 11, 2022

Stamped Cookies #23 - Susan's Favorite Recipe

Stamped Cookies #23 Susan's Favorite Recipe - made dough August 30, 2022 from Susan Moniz (Molded Cookies of the World Facebook page) 
2 ½ cups flour (15.1oz/428 grams) - I weighed the flour for greater accuracy. 428 grams on my food scale is ~3 1/4 cups, not 2 1/2
½ teaspoon salt 
¾ cup (1 ½ sticks) unsalted butter, room temperature 
1 cup sugar, minus 1 ¾ tablespoons (6.8oz/198 grams) 
1 egg 
1 ½ teaspoon vanilla extract 
  1. Beat the butter on med-high speed until creamy. Scrape down sides of bowl when needed. Reduce speed and slowly add sugar. Return to med-high speed and beat until creamy (note: mixture lightens when creamed). 
  2. Reduce speed to medium and add the egg and vanilla. Mix until well incorporated. Scrape down sides of bowl when needed. 
  3. In a separate bowl combine the flour and salt together with a whisk or fork. Reduce the speed to low and add half of the flour and salt mixture. When almost fully incorporated, add the remaining flour and salt mixture and mix until dough starts pulling away from sides of the bowl. Dough should not feel sticky--more like a Play-Doh texture. If dough is sticky, add more flour 1 teaspoon at a time till desired texture is achieved. Too much flour can cause cookies to crack, so check often to prevent over drying.
  4. Divide dough into 2 portions. Form each into disk shape and wrap in plastic wrap. Refrigerate for at least 2 hours or freeze for later use. (If frozen, best when used within 6 months.) Bake cookies at 350˚F on parchment paper until lightly browned on edges. Turn cookie sheet about halfway through baking time. Times vary according to size and thickness of cookie (between 10 and 17 minutes).
I don’t normally post anything on 9/11 of any year as it isn’t “just another day”. But I thought it would be fitting to post this today in visual support of our troops (through cookies) and commemorate those who’ve made and continue to make the sacrifices they make so I could have the privilege to make this post and bake the cookies shown from the safety and security of my home. 

This is another recipe I got from the files in the Molded Cookies of the World Facebook group and this might be the best one yet in terms of keeping the stamped impressions, having a chewy but soft texture and tasting good. It was a great recipe to test out my new Marine Corps stamp from Kitchen Vixen as well.
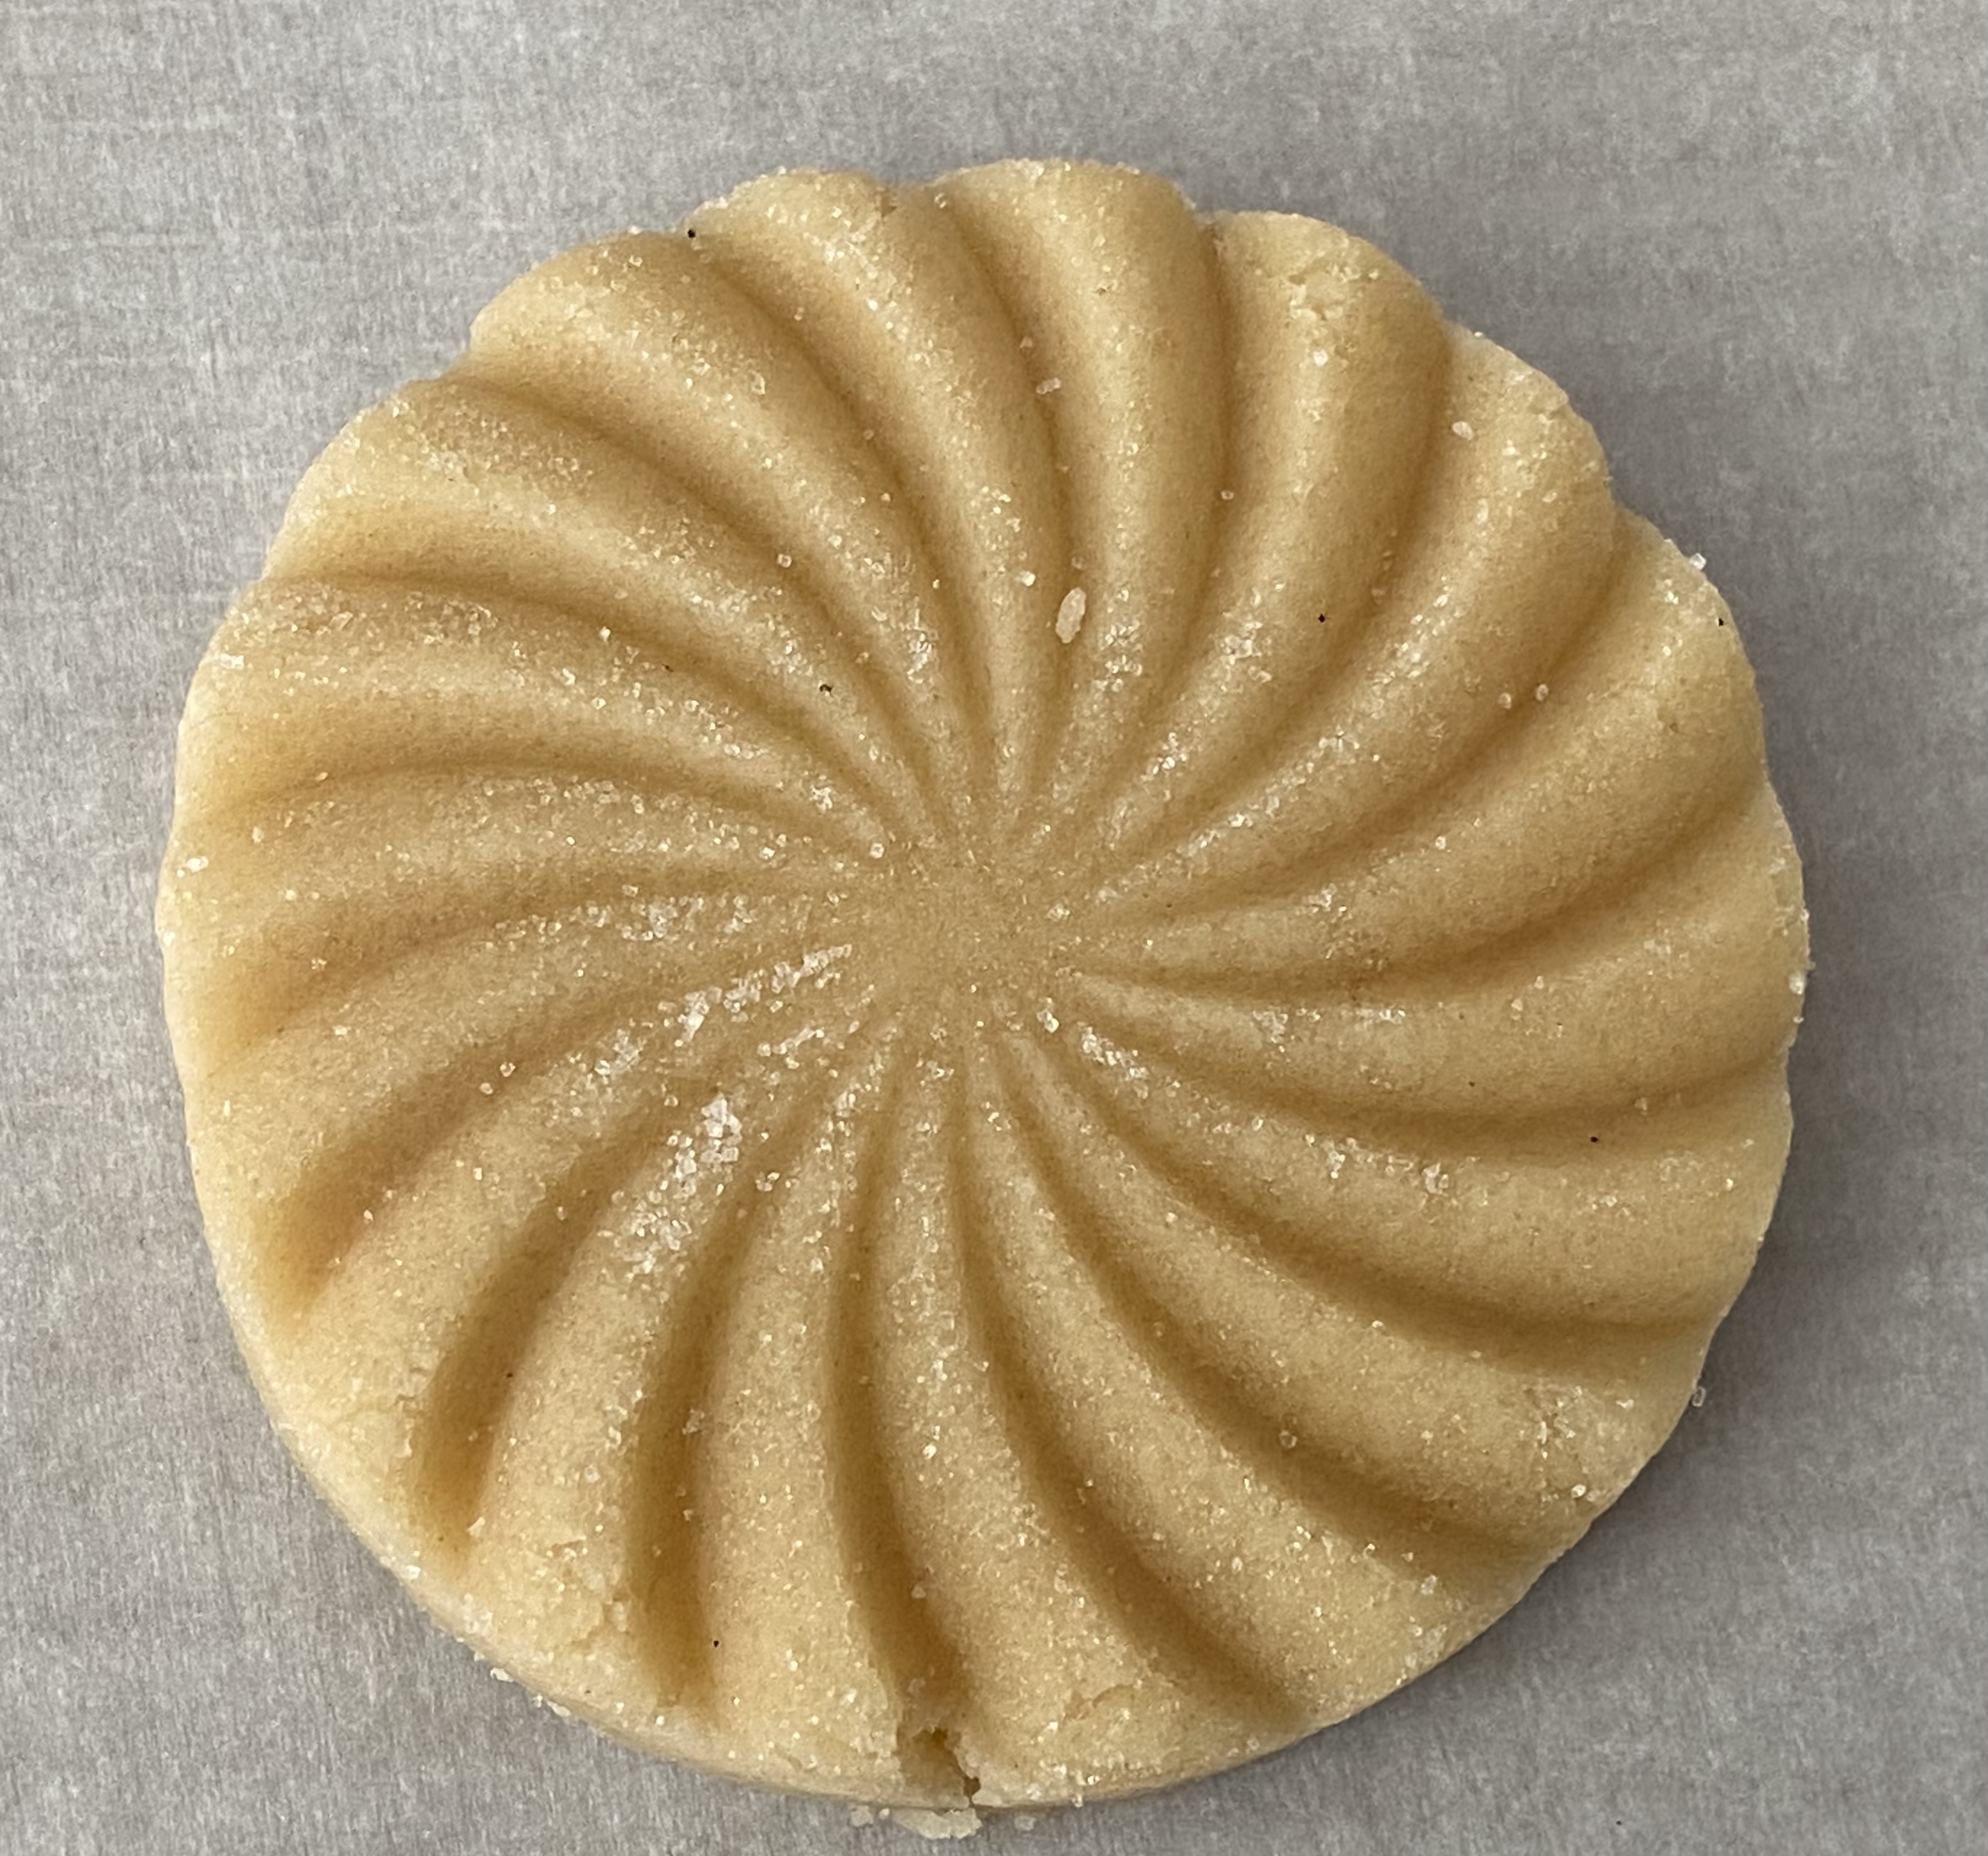
After so many stamping attempts (at least 23 according to my tracking), it's nothing short of thrilling. Plus I've finally unpacked all my stamps and have them organized so I can see what I have. The one pictured above is from Kitchen Vixen and the one below is part of the citrus set from Nordic Ware. I love them all.


I love even more that the impressions held up so well in baking, even the finer details like the lettering and stars. I'm getting better with practice so my stamping is also more consistent.

The dough handled well but was a bit dry. I weighed everything so I know I got the dry ingredients right. But my egg, supposedly "large" was a trifle small so I don't think it added enough liquid. So I ended up more than doubling the amount of vanilla extract just to get more liquid into the dough. It worked beautifully, not only to get the right consistency but added flavor to the cookies.
Another option is to add more egg white. Susan Moniz, the original author of the recipe, suggests using powdered whole eggs for the most consistent results. With a little experience, you'll be able to tell from the feel of the dough what adjustments you need to make. You want the dough pliable but not too soft and not sticky. 
This came together well enough that I didn't even need to refrigerate it before I stamped it. Instead, I stamped and cut out the cookies right after mixing, covered them and chilled them before baking. And voila, look at the results. I'm thrilled, I tell you, thrilled.

I almost need not reiterate these tasted good as well and wasn't too hard or crisp to eat. Definitely use fresh butter as that flavor will absolutely come through.