Monday, February 27, 2023

Chocolate Chip Coconut Cookies from Modern Honey

Chocolate Chip Coconut Cookies - made dough January 28, 2023 from Modern Honey
1 cup butter, softened
1 cup brown sugar
2/3 cup granulated sugar
2 large eggs
1 teaspoon vanilla extract
2 3/4 cups all-purpose flour
1 teaspoon baking soda
1 teaspoon salt
1 1/2 to 2 cups sweetened flaked coconut
2 cups semisweet chocolate chips
  1. In the bowl of a stand mixer fitted with the paddle attachment, cream together butter, brown sugar and granulated sugar for 3-4 minutes, until light and fluffy.
  2. Add eggs and vanilla, mixing until just combined.
  3. Stir in flour, baking soda and salt. Fold in coconut and chocolate chips.
  4. Portion into golf-ball size dough balls, flatten slightly to "hockey pucks", cover and chill for several hours or overnight.
  5. When ready to bake, preheat oven to 375 degrees F. Line several baking sheets with parchment paper. Evenly space dough on baking sheets and bake 8-10 minutes or until edges are set and middles no longer look raw. Remove from oven and let rest on baking sheet for several minutes before transferring to wire rack to cool completely.
For coconut lovers, this is a great riff on the traditional chocolate chip cookie. The edges are crisp and the middles are chewy like any good chocolate chip cookie while the coconut adds both chewiness and sweetness.
Using semisweet chocolate cuts the sweetness from the cookie itself and the coconut. I still prefer milk chocolate but you can use either.


Saturday, February 25, 2023

Dark Chocolate Fudge Brownies from Butternut Bakery

Dark Chocolate Fudge Brownies - made February 17, 2023 from Butternut Bakery
3/4 cup (170 grams) unsalted butter
6 ounces 60% bittersweet chocolate, chopped
1 1/2 teaspoons instant espresso
1/2 cup (100 grams) dark brown sugar, packed
1/2 cup (100 grams) granulated sugar
3 large eggs, room temperature
2 teaspoons vanilla extract
3/4 cup (92 grams) whole wheat flour
1/3 cup (25 grams) dutch-process cocoa powder
1/4 teaspoon salt
4-5 ounces 70-80% dark chocolate, coarsely chopped
  1. Preheat oven to 350 degrees F. Line 8 x 8-inch pan with foil and lightly spray with nonstick cooking spray.
  2. In a large mixing bowl, add the chopped bittersweet chocolate.
  3. In a heavy saucepan, melt butter, stirring constantly, until butter is browned. Pour hot butter over chopped bittersweet chocolate and whisk to combine until chocolate is melted. Whisk in espresso powder then brown sugar and granulated sugar until combined. Let cool for several minutes before whisking in eggs and vanilla extract.
  4. In a separate bowl, whisk together whole wheat flour, cocoa and salt.
  5. Add dry ingredients to chocolate mixture and stir to combine. Add half of the dark chocolate. Pour batter into prepared pan and smooth into an even layer. Top with remaining dark chocolate. Bake 20-25 minutes or until a toothpick inserted near the center comes out with a few moist crumbs, not raw batter.
  6. Let cool completely before cutting and serving.
One of my old college roommates, Caroline, gifted me a number these organic, Fair Trade chocolate bars, both 71% and 48% cacao, this past Christmas. I love getting high quality baking ingredients as gifts (really, they're the best things you can give a baker) and I started using them in various baking experiments. 

These brownies look frosted in some pictures but they're not. I chopped up one of the 71% cacao bars and sprinkled them on top of the brownie before baking. They melted over the top so they look like pure chocolate frosting.

I'm not a dark chocolate person per se although I do prefer dark chocolate brownies to milk chocolate brownies. But I prefer milk chocolate in straight chocolate form over semisweet or bittersweet or dark chocolate.
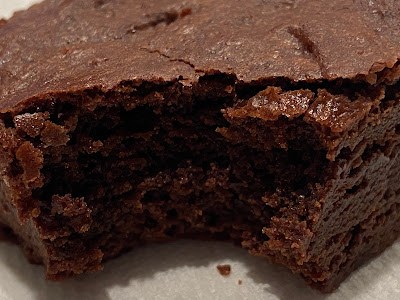
These were good but, you guessed it, I still prefer my go-to brownie recipe as being thicker, more dense and more fudgy. At some point, I will likely give up trying out new recipes for brownies as I simply prefer my go-to recipe over any other.
I think what threw me with these is the slightly gritty texture. That's from the whole wheat flour. Or my imagination. These had a slightly softer crumb than my go-to recipe. The pools of chocolate melted over the top contributed to their richness. Scattering chunks of chocolate bars yields a different result than scattering chocolate chips over the top. At room temperature, chocolate chips remain solid in their original form. Chocolate bars soften, melt and even when they re-solidify at room temperature, they still tend to remain soft. At least, these new chocolate bars I used did.


Thursday, February 23, 2023

Browned Butter Toffee Chocolate Chip Cookies from Handle the Heat

2 sticks (1 cup) unsalted butter, melted and browned
1/2 cup (100 grams) granulated sugar
1 cup (200 grams) lightly packed dark brown sugar
1 1/2 cups (190 grams) all-purpose flour
1 cup (127 grams) bread flour
1 teaspoon baking soda
1 teaspoon salt
1 teaspoon instant espresso powder
1/2 teaspoon baking powder
2 large eggs
1 large egg yolk
2 teaspoons vanilla
10 ounces semisweet chocolate, chopped
1 cup toffee bits
  1. In a large bowl, mix together hot browned butter, granulated sugar and brown sugar. Set aside to cool to room temperature.
  2. In a medium bowl, combine the all-purpose flour, bread flour, baking soda, salt, espresso powder and baking powder.
  3. To the cooled butter mixture, whisk in eggs, yolk and vanilla until combined. Gradually stir in the dry ingredients, mixing with a rubber spatula. Stir in the chocolate chunks and toffee bits. Portion into golf-ball-size dough balls. Cover dough balls with plastic wrap and refrigerate for at least 24 hours but no more than 72 hours.
  4. When ready to bake, preheat oven to 350 degrees F. Line baking sheets with parchment paper. Evenly space cookies on baking sheets and bake for 12 to 14 minutes or until edges are set and middles no longer look raw. Remove from oven and let rest on baking sheets for 2 minutes before removing to wire racks to cool completely.
I continue to try new chocolate chip cookie recipes, partly because I like including them in my military care packages for Soldiers Angels as chocolate chip cookies are one of the most requested cookies from our service members. But also partly because I just like trying new recipes for chocolate chip cookies. They're easy to make and honestly, it's hard to make them badly.

With the challenges of trying to avoid the Flat Cookie Syndrome, it's also rewarding when you flex (or don't have to flex) the recipe to get the cookies to come out as I like them.


These came out as they should so I didn't have to do any adjustments. I'll always make a note if I do. I did weigh the dry ingredients for accuracy but I also kept an eagle eye on the dough to make sure it was the consistency I wanted, not too soft and sticky and not dry or crumbly.
These were fantastic. I'm not necessarily a brown butter acolyte and I like cookies both with browned butter or with "normal" butter creamed into the mixture. But these were good as the recipe directed. Texture was also just how I like it: dense, chewy and moist.

Tuesday, February 21, 2023

Better Than Box Mix Brownies from Persnickety Plates

1 cup butter, room temperature
2 1/4 cups granulated sugar
4 large eggs
1 1/4 cups unsweetened cocoa powder
1 teaspoon salt
1 teaspoon baking powder
1 tablespoon vanilla extract
1 1/2 cups all-purpose flour
1 cup chocolate chips
  1. Preheat oven to 350 degrees F. Line 9 x 13-inch pan with foil and lightly spray with nonstick cooking spray.
  2. In a small pot, melt butter over medium heat. When melted, add sugar and whisk until combined. Continue cooking for 1-2 minutes, stirring constantly. Do not let boil.
  3. Remove from heat and pour into large mixing bowl. Add cocoa powder and whisk to combine.
  4. Add eggs, salt, baking powder and vanilla extract. Mix until completely combined.
  5. Add flour and mix to combine. Fold in chocolate chips.
  6. Pour into an even layer into prepared pan. Bake for 25-30 minutes or until a toothpick inserted near the center comes out with a few moist crumbs. Do not overbake. Let cool completely before cutting.
These did live up to their name that they're better than box mix brownies. But in all honesty, I don't like the artificial taste of box mix brownies so it was a low bar.
They were good, chewy, not quite cakey but not as dense or fudgy as my go-to brownie recipe. The chocolate flavor is also not as rich. They're essentially cocoa brownies because that's where the chocolate flavor comes from. Unlike the Oreo Brownies which also relies on cocoa powder for the flavor, these weren't as rich. These use more cocoa in proportion to the other ingredients so it seems a little more dry, even though I underbaked them.
As you can see from the pictures, I omitted the chocolate chips in these brownies. I wanted to taste them plain. Plus, unless they're melty, I don't enjoy the solidity of chocolate chips inside my brownies. It's a texture thing.


Sunday, February 19, 2023

Iced Gingerbread Oatmeal Cookies from Sally's Baking Addiction

Iced Gingerbread Oatmeal Cookies - made dough January 22, 2023 from Sally's Baking Addiction 
2 cups (170 grams) old-fashioned oats
1 2/3 cups (210 grams) all-purpose flour
1 teaspoon baking soda
1/2 teaspoon salt
2 teaspoons ground ginger
1 1/2 teaspoons ground cinnamon 
1/2 teaspoon ground nutmeg
1/4 teaspoon cloves
3/4 cup (1 1/2 sticks) unsalted butter, room temperature
1 cup (200 grams) brown sugar, packed
1/4 cup (50 grams) granulated sugar
1 large egg, room temperature
1/4 cup unsulfured dark molasses

Icing
1 1/2 cups (180 grams) sifted confectioners sugar
1/4 teaspoon vanilla extract
1 1/2 to 2 tablespoons milk
small pinch each ground cinnamon and ground cinnamon plus extra cinnamon for garnish if desired
  1. Pulse the oats in a food processor 10-12 times. In a medium bowl, whisk together pulsed oats, flour, baking soda, salt, ginger, cinnamon, nutmeg and cloves.
  2. In the bowl of a stand mixer fitted with the paddle attachment, beat together butter, brown sugar and granulated sugar on medium-high speed until creamy, about 2 minutes. Add the egg and molasses and beat on high speed until combined, about 1 minute. Scrape down the sides and bottom of bowl as needed.
  3. Add dry ingredients to butter mixture in 2-3 additions, mixing on low speed after each addition. Cover an chill the dough for 30 minutes then scoop into dough balls. Cover and chill dough balls an additional 2-3 hours or overnight. 
  4. When ready to bake, preheat oven to 350 degrees F. Line baking sheets with parchment paper.
  5. Evenly space dough balls, 3 inches apart on baking sheets. Bake 12-13 minutes or until lightly browned at the edges. Remove from oven and let rest on baking sheets for 5 minutes before transferring to wire rack to cool completely.
  6. Make the icing: combine confectioners' sugar, vanilla extract and 1 tablespoon milk in a medium bowl. Whisk to combine, adding extra milk to make a very thick icing. Whisk in very small pinch of cinnamon and ginger. Add enough milk to achieve desired consistency. Drizzle over cooled cookies and lightly sprinkle with ground cinnamon if desired.
As you can see from the pictures, despite the title, I didn't ice these. I never ice, frost or glaze any baked goods going overseas in military care packages because I can't risk the packages not getting to their destinations before the dairy-based icing goes bad. I did include the recipe though in case anyone else wants to glaze these cookies.

Recipes from Sally's Baking Addiction are pretty reliable in that they'll turn out well. This was no exception.
With oatmeal cookies, I recommend portioning the dough into dough balls as soon as the dough is mixed, covering then chilling in the refrigerator at least overnight. This lets the flour and oats absorb the liquid more fully, especially if you're using old-fashioned oats instead of quick oats. And I always use old-fashioned oats as they're a tad less processed than quick oats. After refrigerating overnight, I put the dough balls into a ziploc freezer bag and froze them until I was ready to bake them.
Because of the color, it may be hard to tell if these are done. I timed these and baked about 12-14 minutes in my oven. That's baking from frozen dough as they went straight from my freezer to the oven. The top side may not look done but you can see from the bottom that they are. The color below is baking on parchment paper on a light-colored Nordic Ware baking sheet.
Lastly, do I even need to mention these were quite good? Like I said, Sally's Baking Addiction recipes typically are. If you like ginger molasses cookies, these are good ones, amped up with oatmeal. I think icing them would be a nice touch but I can vouch that they're also delicious when eaten plain.


Saturday, February 18, 2023

Brown Butter Blondies from 100 Cookies by Sarah Kieffer

Brown Butter Blondies - made January 29, 2023 from 100 Cookies by Sarah Kieffer
2 cups (284 grams) all-purpose flour
1 1/2 teaspoons baking powder
1 cup (2 sticks, 227 grams) unsalted butter
1 cup (200 grams) granulated sugar
1 cup (200 grams) brown sugar
1 1/2 tablespoons pure vanilla extract
1 teaspoon salt
2 large eggs plus 4 large egg yolks room temperature
3/4 cup (90 grams) toasted pecans, coarsely chopped
4 ounces (113 grams) bittersweet chocolate, coarsely chopped
1/2 cup (85 grams) semisweet chocolate chips
  1. Preheat oven to 350 degrees F. Line a 9 x 13 baking pan with foil and lightly spray with nonstick cooking spray.
  2. In a medium bowl, whisk together flour and baking powder.
  3. In a medium saucepan over medium heat, melt 12 tablespoons (1 1/2 sticks) butter. Brown the butter until dark golden brown and giving off nutty aroma, 2 to 3 minutes. Remove from heat and add remaining 4 tablespoons butter, swirling until the butter stops foaming.
  4. Add the granulated sugar, brown sugar, vanilla and salt; stir to combine. Let mixture cool to room temperature.
  5. Add eggs and yolks; whisk to combine. Transfer mixture to large bowl.
  6. Add the flour mixture and stir until just combined. Fold in the pecans, chopped chocolate and chocolate chips. Pour into prepared pan and smooth to an even layer.
  7. Bake for 16 to 22 minutes, until the edges are set and the top is golden brown and just beginning to form cracks. A toothpick inserted in the middle should come out slightly moist with crumbs. Let cool completely before cutting and serving.
I'm not a huge fan of blondies, especially when you add chocolate chips. Then they just seem like chocolate chip cookies in bar form. I have nothing against that concept but if I had a choice, I'd prefer chocolate chip cookies in, well, cookie form. Crisp edges, chewy middles, what's not to love?
But since these aren't about me but about the military care packages going overseas, I wanted to try this recipe to send. It's a good thing I did as these turned out pretty well. At first I was concerned they would be dry (blondies dry out faster than brownies) even though I didn't overbake them or even fully bake them. 
But these were pretty good. For a chocolate chip blondie anyway. They're not super rich and they are more cakey than a chocolate chip cookie but for a blondie bar, thumbs up.


Friday, February 17, 2023

Stamped Cookies #29 from Hayden Annika

Stamped Cookies #29 - made dough January 14, 2023, recipe from Hayden Annika
3 egg yolks, room temperature
75 grams powdered sugar
100 grams salted French butter, room temperature (I used Kerrygold) 
1/4 teaspoon vanilla extract
250 grams cake flour
  1. Whip yolks and sugar until pale and thick with whisk attachment of stand mixer. 
  2. Add softened butter and vanilla until well combined and smooth.
  3. Change to a paddle attachment and mix in cake flour until combined.
  4. Wrap dough and refrigerate for at least 1 hour. Working with chilled dough, stamp cookies. Freeze stamped cookies for at least 1 hour.
  5. When ready to bake, preheat oven to 350 degrees F. Line baking sheets with parchment paper and evenly space frozen stamped cookies. Bake for 10-12 minutes. 

This is a picture-heavy post as you can't have too many pictures of Snoopy, right? I love these Snoopy cookie stamps. Best over-priced thing I've bought at Williams Sonoma. And it looks like they're a seasonal item as they're available again on the Williams-Sonoma website right now. 


I liked using this dough as you can see even the baked cookies kept their impressions as faithfully as I've ever seen on any of the recipes I've tried.
I didn't even need to chill the dough that long after mixing before I could stamp them easily. You can see the results above and below.

The downside, however, is these didn't have a lot of flavor. Normally, with butter cookies, you can taste - well - the butter. For some reason, not so much with these, even though I used European butter (Kerrygold), which tends to have more flavor than US butter. These cookies are also not that sweet and were a little dry, even though I didn't overbake them. 

The good news is they were soft, though not fragile. Some of the other stamped cookie recipes I've tried tend to be a little hard-crisp to eat. Not these.
What the underside should look like when the cookies are baked

On the flavor issue, for more flavor, I suggest amping up the vanilla extract or using some other flavor extract you'd prefer. I want to play with the flavoring on this one as the stamped impressions really can't be beat.
Vacuum sealed and ready for mailing