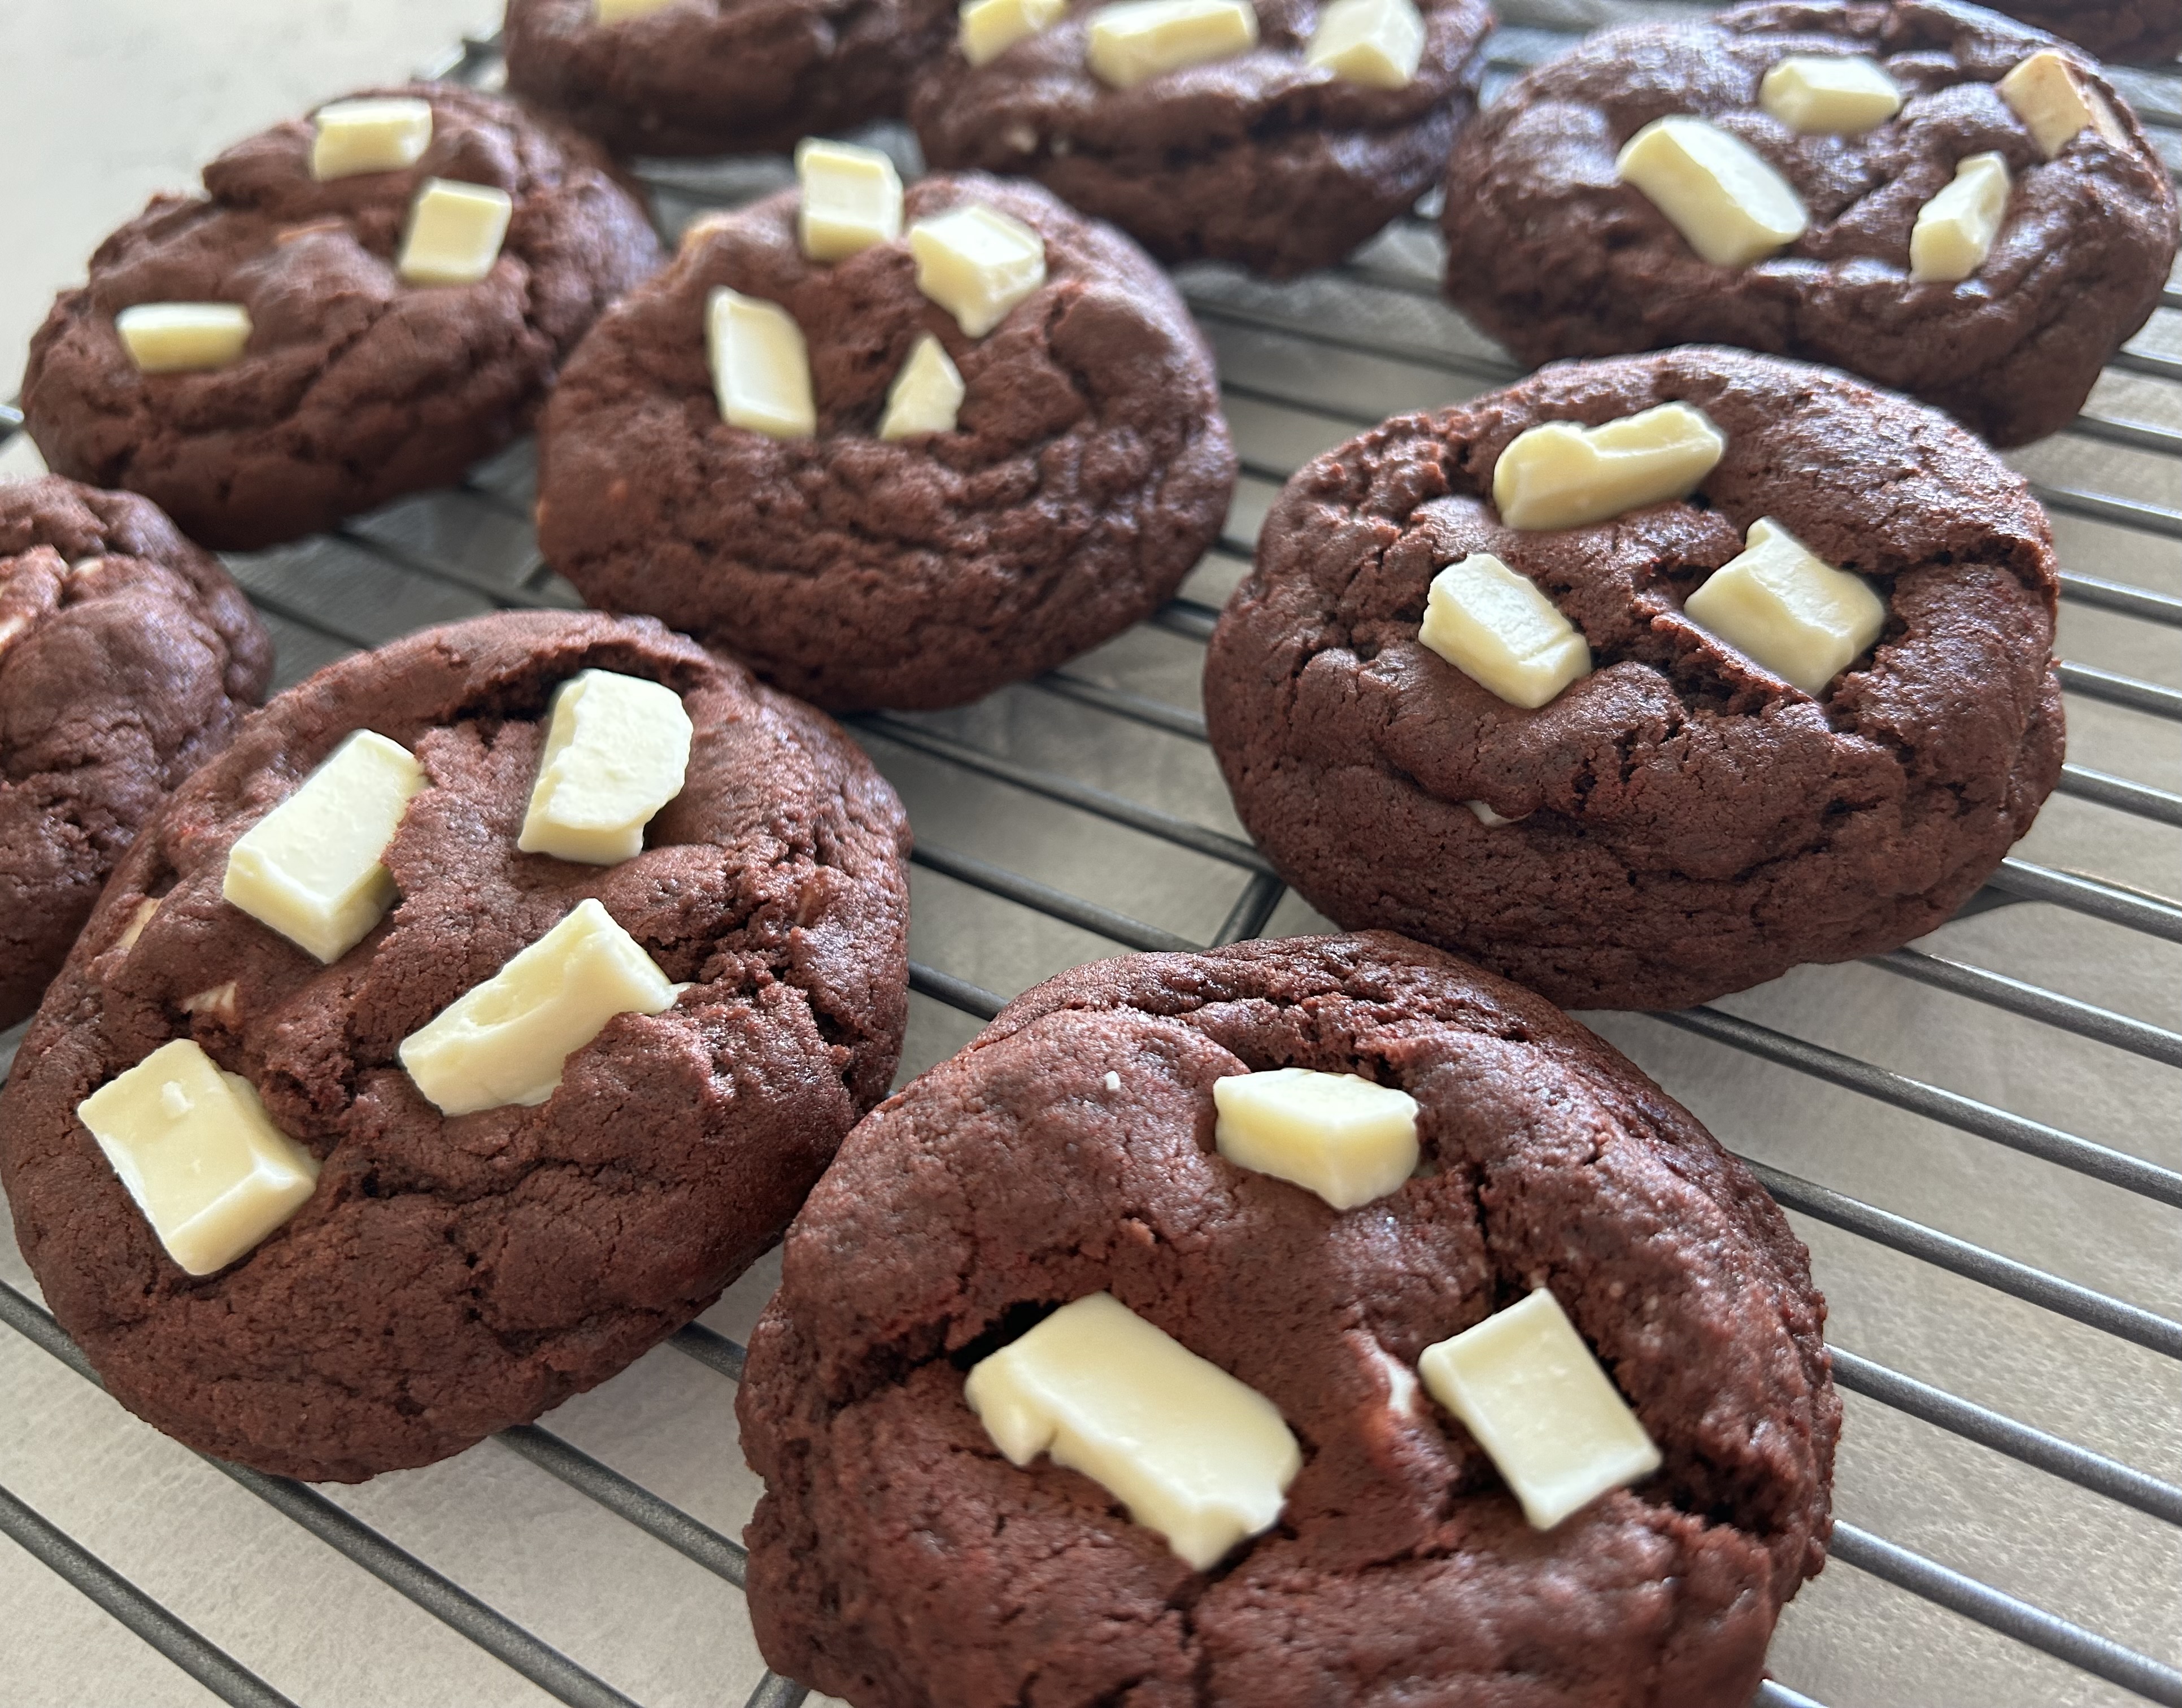
Wednesday, May 31, 2023

Crumbl Copycat Red Velvet Cookies from The Palatable Life

1 cup butter, softened
1 cup brown sugar
1/2 cup granulated sugar
2 large eggs
1 teaspoon vanilla
4-5 drops red coloring
3 cups all-purpose flour
1/2 cup cocoa powder
1 tablespoon cornstarch
1 teaspoon baking soda
1 teaspoon salt

Cream Cheese Frosting
8 ounces cream cheese, room temperature
1/2 cup butter, room temperature
2 cups powdered sugar
1 teaspoon vanilla
  1. In the bowl of a stand mixer fitted with the paddle attachment, cream together butter, brown sugar and granulated sugar until light and fluffy, about 2 minutes.
  2. Add eggs, vanilla and red food coloring, mixing until just combined.
  3. In a separate bowl, whisk together flour, cocoa powder, cornstarch, baking soda and salt. Add in several additions to butter mixture, mixing on low speed after each addition until just combined. Dough should be soft but not sticky.
  4. Portion into 1/2 cup dough balls and flatten slightly to thick discs. Chill for several hours or overnight.
  5. When ready to bake, preheat oven to 350 degrees F. Evenly space dough discs on baking sheets and bake for 10-12 minutes or until edges are set and middles no longer look raw. Let rest on baking sheets for 5 minutes before transferring to wire rack to cool completely.
  6. While cookies are cooling, make the frosting. Combine cream cheese and butter in a mixing bowl and beat for 2-3 minutes until well combined. Add vanilla and powdered sugar and mix for an additional 2-3 minutes. Add frosting to a piping bag. Pipe frosting onto each cooled cookie.
These aren't an exact Crumbl copycat since I didn't make the frosting they're supposed to be topped with. As usual, I was making these for military care packages and cream cheese frosting definitely wouldn't survive the trip, given the longer mailing times overseas not to mention the triple digit heat many of the desert countries are already experiencing.

Instead, I pressed white chocolate chunks gently into the tops as soon as the cookies came out of the oven. The white chocolate topping will probably melt when they reach their destination but at least they won't be as messy as the frosting and they'll last longer without spoiling.
I have to say these cookies were amazing. Not sure if they're exactly like Crumbl's but they were delicious and the texture was perfect, just how I like it with a dense chewiness. I didn't use a lot of red food coloring so they're a bit darker and not as bright as a regular red velvet but that's okay by me. The taste and texture were what mattered. I might even like these better than the Crumbl original.


Monday, May 29, 2023

Chocolate Coconut Blondies from Handle the Heat

Chocolate Coconut Blondies - made May 20, 2023 from Handle the Heat 
2 sticks (1 cup) unsalted butter, melted
1 3/4 cups (350 grams) light brown sugar
2 large eggs plus 1 egg yolk
1 teaspoon vanilla
1/4 teaspoon salt
2 cups (254 grams) all-purpose flour
1 cup (80 grams) sweetened shredded coconut
8 ounces semisweet chocolate, chopped into chunks
  1. Preheat oven to 350 degrees F. Line an 8 x 8-inch baking pan with foil and lightly spray with nonstick cooking spray.
  2. In a large bowl, combine the butter and sugar, stirring together until smooth. Add eggs, egg yolk and vanilla; stir until combined. Stir in the salt and flour until combined. Fold in 3/4 cup coconut and 6 ounces of the chocolate chunks.
  3. Spread the batter into the prepared pan. Sprinkle remaining coconut and chocolate chunks over the top, pressing gently into the batter. Bake for 40 minutes or until set but still gooey. Cool completely before cutting and serving.
I've mentioned this before and I'll say it again: in my experience, most people either really love coconut or really hate it. To date, I haven't met anyone who says "Coconut? Meh, I'm indifferent." Nope. There are typically strong feelings about coconut. 
I'm in the camp that loves coconut and bake with it often. And fortunately for me, I found this recipe and thought it was superb.
That's a little superlative for a blondie but it genuinely was that good. These bars baked up nice and thick and smelled so good baking in the oven. At first I was afraid I had overbaked it as I baked it for 50 minutes, not 40 that the recipe guided to and the coconut on top was getting really brown.
But it turns out that it wasn't overbaked. It wasn't too underbaked either and was actually just right. Let it cool completely first so you get that fudge-like texture. The coconut gives it a great chewiness and the semisweet chocolate cuts some of the sweetness and adds flavor. I'll definitely making this one again, especially for care packages as they're sturdy enough to ship well.


Sunday, May 28, 2023

Crumbl Cookies review #39 - Cake Batter Blondie and Apple Cider Doughnut (tester)

Crumbl Cookies review #39 - Cake Batter Blondie and Apple Cider Doughnut (tester), visited May 17, 2023 
Cake Batter Blondie
I'm a week behind as these were last week's cookies (well, now almost 2 weeks ago since Crumbl is closed today (Sunday) and I still have this past week's review to do). Last week's lineup didn't thrill me. I'm not a fan of honey, marshmallow or peanut butter so that knocked out 3 of last week's flavors. Crumbl cookies have so many calories per bite that I'm getting increasingly picky about which ones I'll get. Some days I'm in a more adventurous mood and want to try something "just to see" and other days I'm a lot more biased. If I don't like a particular flavor, I'm not apt to like that flavor in a cookie, right?
Menu week of May 15, 2023

But I did want to try the Cake Batter Blondie even though I'm also not a fan of white chocolate chips unless they're paired with macadamia nuts and I'm not a sprinkles fan. But I generally like Crumbl's sugar cookies and brown sugar cookies which this was so I thought I'd try it.
Turns out, my biases were on point. I found this cookie a little too sweet for my taste, made more so because of the white chocolate chips and the sprinkles. It was okay and quite pretty to look at but I would've preferred it without the white chocolate chips and sprinkles. Or else throw some macadamia nuts in there.

Apple Cider Doughnut (test cookie)
Last week's tester at my store was the Apple Cider Doughnut. I had some reservations about this cookie as, while I like apples, I don't love the taste of apple cider. Plus I don't like it when Crumbl does "doughnut" cookies. The middle is the best part and they take it out to be cute. Erk.
On the plus side, I liked the texture of this cookie, both the crisp-but-not-hard outside shell and the inner dense-soft-chewy of the inside. The streusel was also a nice touch. On the downside, sure enough, not a big apple cider fan so the flavor didn't do it for me. I'm glad I tried it but when it's released more broadly, this is a pass for me.


Thursday, May 25, 2023

Double Chocolate Nutella Toffee Cookies from Buuck Farms

Double Chocolate Nutella Toffee Cookies - made dough May 15, 2023, adapted from Buuck Farms Bakery
1/2 cup unsalted butter, softened
3/4 cup (155 grams) dark brown sugar
2 tablespoons (25 grams) granulated sugar
1 large egg, room temperature
1 teaspoon vanilla extract
1 1/4 cups (190 grams) all-purpose flour
1/2 cup (50 grams) Dutch process cocoa powder
1/2 teaspoon baking soda
1/4 teaspoon salt
1 cup semisweet chocolate chips
1/4 cup Nutella
chopped toffee or toffee bits
  1. In the bowl of a stand mixer fitted with the paddle attachment, cream butter, brown sugar and granulated sugar for 2-3 minutes, scraping down sides and bottom of bowl as needed.
  2. Add egg and vanilla; mix for another 3 minutes, until fluffy and lightened in color.
  3. In a separate bowl, whisk together flour, cocoa powder, baking soda and salt. 
  4. Add dry ingredients to mixer in 2 additions beating on low speed after each addition until just combined. Fold in chocolate chips.
  5. Portion dough into golf-ball size dough balls. Make an indent in the center of each dough ball with the back of a spoon. Fill indent with Nutella. Cover and chill dough for 30 minutes up to overnight.
  6. When ready to bake, preheat oven to 350 degrees F. Line baking sheets with parchment paper and evenly space cookies. Bake for 10 minutes then remove from oven and sprinkle toffee bits over Nutella centers. Let rest on baking sheets for 2-3 minutes before transferring to wire rack to cool completely.
This cookie is the perfect blend of chocolate, Nutella and toffee. I took some liberties with the original recipe as I didn't have salted butter so I substituted unsalted and it was fine. The original recipe also called for the butter to be "slightly melted". I didn't know how melt-y it was supposed to be so I just took slightly cold butter, cut it into cubes and beat it for 2 minutes before adding the sugars and beating it some more.
To make the indents, I used a tart tamper (yeah, that term sounds funny to me too but that's what it really is called). You can also press the curved side of a tablespoon in the center of the dough ball and swirl it around until the center indent is the size you want it.
The dough was easy to work with and I'm a fan of Nutella so I made sure the wells were nice and deep so I could fit more Nutella into them.
I didn't sprinkle the toffee bits over the Nutella centers until the cookies had come out of the oven. I don't like to bake toffee if I can avoid it as the high heat melts them and when they cool down, sometimes the toffee bits get hard to eat as they're too chewy. I prefer the original crunch of toffee combined with the creaminess of the Nutella filling.

Taste-wise, this was excellent. The chocolate paired well with the Nutella (does anything not pair well with Nutella?) and the toffee bits add a nice sweetness and crunch.


Tuesday, May 23, 2023

Heath Bar Cookies from Big Oven

Heath Bar Cookies - made dough May 13, 2023 from Big Oven
2 1/2 cups all-purpose flour
1/2 teaspoon salt
1 teaspoon baking soda
1 cup unsalted butter, softened
3/4 cup granulated sugar
3/4 cup brown sugar, firmly packed
2 large eggs
1 teaspoon vanilla extract
2 cups Heath English Toffee Bits
  1. Preheat oven to 350 degrees. Line baking sheets with parchment paper.
  2. In a small bowl, whisk together flour, salt and baking soda; set aside.
  3. In the bowl of a stand mixer fitted with the paddle attachment, cream together butter, granulated sugar and brown sugar until well combined, smooth and fluffy, 2-3 minutes.
  4. Add eggs, one at time, beating after each addition. Mix in vanilla.
  5. On low speed, add dry ingredients in two additions, mixing until just combined after each addition. Do not overmix. Fold in toffee bits.
  6. Portion dough into golf-ball-size dough balls and evenly space on prepared baking sheets. Bake 10-11 minutes or until edges are set and middles no longer look raw. Remove from oven and let rest on baking sheets for several minutes before transferring to wire rack to cool completely.
My cookies came out a little thinner than the ones pictured on Big Oven's blog. The dough was a bit soft and sticky when I first mixed it so I ended up adding almost another 1/4 cup of flour. That helped but it was still a bit sticky. I didn't want to add anymore in case it changed the texture of the cookie so I simply chilled it after I portioned it into dough balls.
What I've been doing with any cookie dough lately is, after I portion them into dough balls and cover them, I chill them in the refrigerator for a few hours up to overnight. Then I put the cookie dough balls in a ziploc freezer bag and freeze them for at least another day before baking straight from frozen dough. The purpose of doing both is refrigerating the dough lets it "age", letting the dough absorb the flour and as it dries out slightly in the refrigerator, the flavor gets more concentrated. And I always like to bake straight from frozen dough to prevent spread.

That trick usually works well but in this case, these cookies still spread. Not too badly though but still a bit thin. In terms of flavor, these were a bit sweet, not unexpectedly as the toffee baked into the cookies makes it so. I expected more of a brown sugar caramel flavor but I got mostly the toffee sweetness. If you like toffee or Heath Bars, this is a good cookie version. If you don't want it so sweet, cut back on the toffee bits and add chocolate chips. Although then they won't be Heath Bar cookies as much as chocolate chip cookies with toffee bits.


Sunday, May 21, 2023

Funfetti Pudding Mix Cookies from Cooking Classy

Funfetti Pudding Mix Cookies - made dough May12, 2023 from Cooking Classy 
2 1/4 cups all-purpose flour
3/4 teaspoon baking soda
1/4 teaspoon salt
14 tablespoons unsalted butter, softened
1 1/4 cups granulated sugar
1 large egg
1 large egg yolk
1 teaspoon vanilla extract
3/4 teaspoon almond extract
1 3.5-ounce package instant vanilla pudding mix
2/3 cup sprinkles, plus more for topping
  1. Preheat oven to 350 degrees (postpone this step if not planning to bake cookies right away). Line baking sheets with parchment paper.
  2. In a mixing bowl, whisk together flour, baking soda and salt; set aside.
  3. In the bowl of a stand mixer fitted with the paddle attachment, cream together butter and sugar until well combined and fluffy. Mix in egg, egg yolk, vanilla extract and almond extract.
  4. Mix in vanilla pudding mix.
  5. On low speed, add the dry ingredients in 2-3 additions, mixing after each addition until just combined. Do not overmix. Fold in sprinkles
  6. Portion dough into golf-ball-size balls and evenly space on prepared baking sheets. You can also chill or freeze the dough balls at this point if you don't plan on baking right away. Just cover and chill until firm then place in freezer bags to freeze.
  7. Bake cookies in preheated oven for 9-10 minutes. Gently press additional sprinkles on top if desired. Let rest on baking sheets for several minutes then transfer to wire cooling rack to cool completely.
These did not turn out as well visually as I had hoped. But that was user error on my part as I used the wrong sprinkles. Wrong sprinkles means the ones that can't withstand high heat during baking and melt or bleed into the dough.
The sprinkles I used are really meant for just garnishing on top of frosted baked goods. Oops. I had bought them to add to cookies for a Memorial Day care package going out to a deployed military service member as part of my volunteer work with Soldiers Angels. I sent them anyway and hoped they cared more about taste than appearance.

Taste-wise, these are still pretty good. They did spread more than I had hoped even though I froze the dough and baked from frozen dough. Without the sprinkles, they're a nice sugar cookie. If you're going to use sprinkles, make sure you use the right ones. 

Friday, May 19, 2023

Rolo Chocolate Chip Blondies From Averie Cooks

1/2 stick butter, melted and cooled slightly
1 cup dark brown sugar
1 large egg
1 tablespoon vanilla extract
1/2 teaspoon salt
1 cup all-purpose flour
1 cup semisweet chocolate chips
30-36 Rolo candies
  1. Preheat oven to 350 degrees F. Line 8 x 8-inch baking pan with foil and lightly spray with nonstick cooking spray.
  2. Whisk together melted butter and brown sugar until combined. Add egg, vanilla extract and salt; whisk to combine. Add flour and stir together until combined.
  3. Fold in chocolate chips.
  4. Spread half the batter evenly over bottom of prepared pan. Line unwrapped Rolos in a 5 x 5 formation. Gently spread remaining batter over Rolos, trying to cover completely. 
  5. Bake 22-27 minutes or until edges are set. Remove from oven and gently press remaining Rolos, chopped in half, over top of hot blondies. Let cool completely before cutting and serving.
I'm not usually a blondie fan. In general, they seem like chocolate chip cookies in bar form and I'd rather have chocolate chip cookies in cookie form with their crisp edges and chewy middles. This Rolo version from Averie Cooks changed my mind. These were excellent and were more like a "fudgy" blondie with rolos.
The original recipe says to use 36 Rolos and line them in a 6 x 6 formation over half the batter then cover with the rest of the batter. You can see I only managed a 5 x 5 formation, partly because I only had 31 Rolos and partly because I didn't line them up very well, very closely or in a straight pattern. The great thing about this recipe though is that doesn't matter. No one's going to judge your Rolo placement on these, I promise.
Additionally, there wasn't enough batter to completely cover the Rolos and that's okay too. I probably used more than half of the batter for the bottom layer because I didn't want the Rolos to sink too easily to the bottom. Hence why I didn't have enough batter to cover the Rolos completely. Again, totally okay. This isn't a test; it's a blondie.
Rather than try to stuff the remaining 6 Rolos inside the blondie, I chose to chop them in half and, as soon as I took the pan out of the oven, sprinkled the chopped Rolos over the top of the blondie and let the residual heat melt them into the tops. 
As mentioned, these were delicious. I loved the flavor and the texture as well as the addition of the Rolos to give these an extra caramel kick. When baking with Rolos, I do recommend you cover the Rolos inside the blondie as much as possible (it's okay if the chocolate peeks through the batter as long as the caramel doesn't) and only top with the garnish after the blondies come out of the oven. Then you won't have any caramel part of the Rolos exposed during baking which would make the caramel too chewy and hard once cooled.