Tuesday, January 30, 2024

Crumbl Cookies review #66 - Cinnamon Square and Cannoli (revisited)

Crumbl Cookies review #66 - Cinnamon Square and revisiting Cannoli
Cinnamon Square
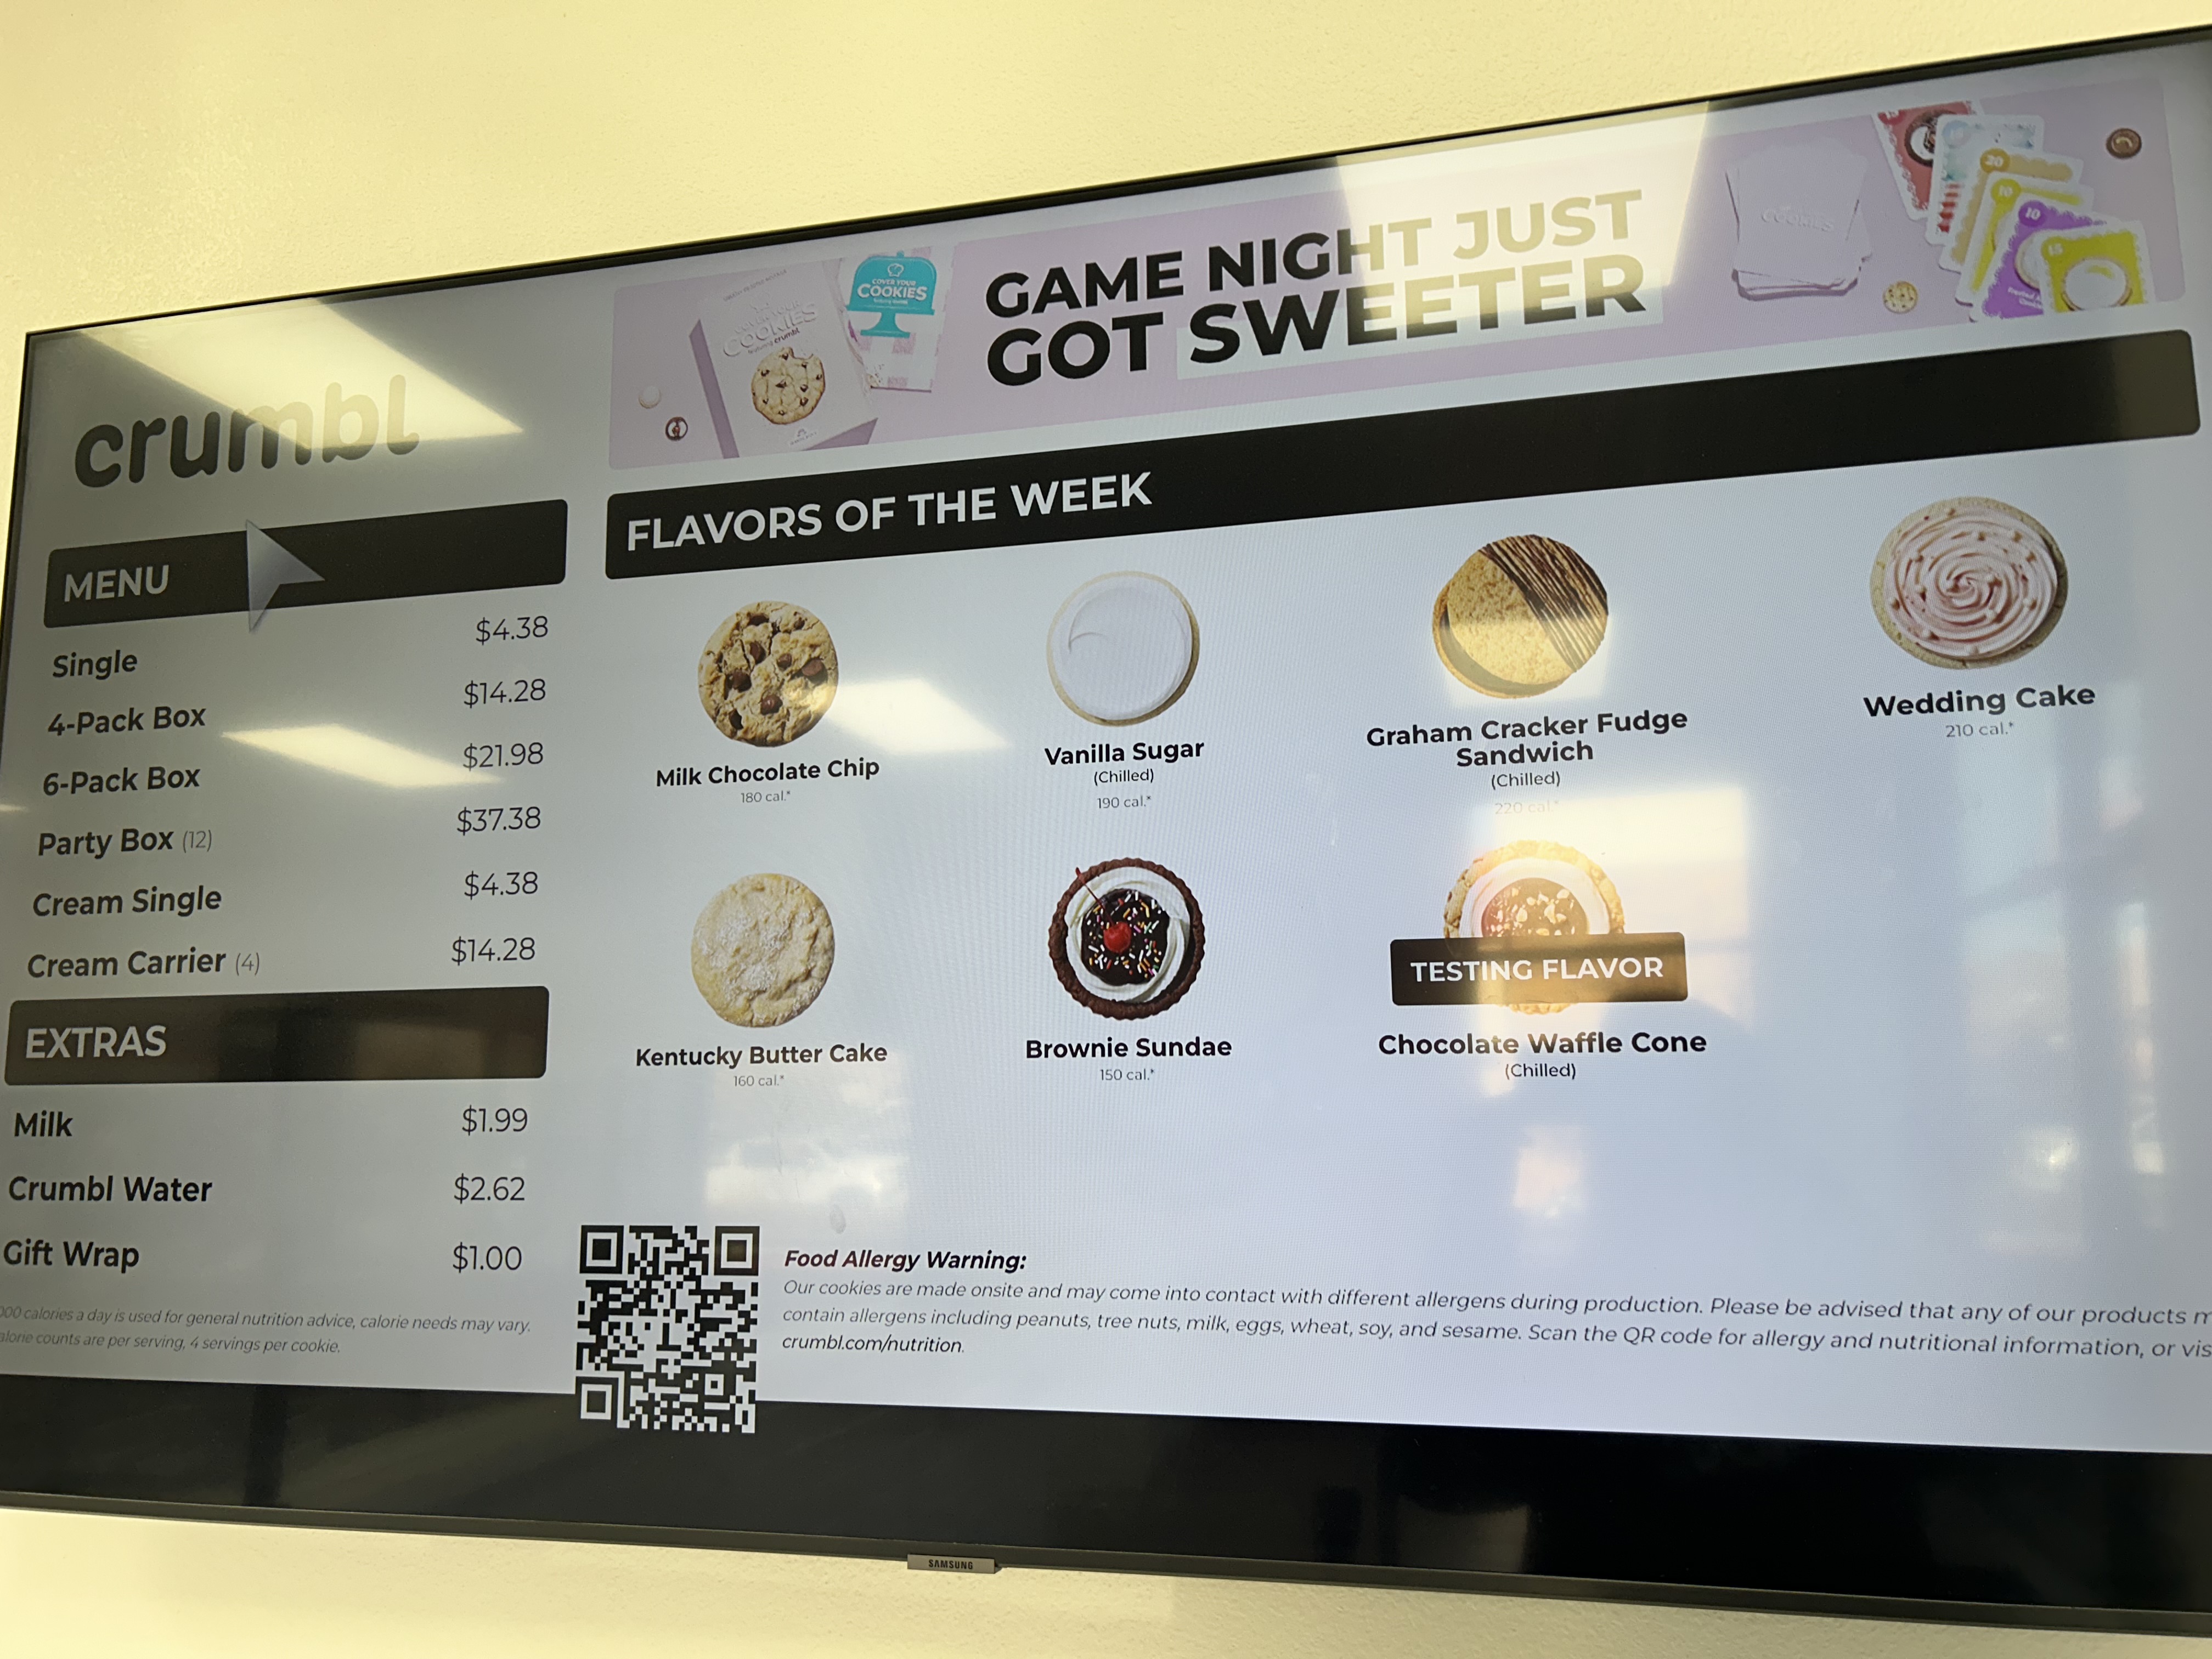
Last week, Crumbl put out what (to me) turned out to be a "controversial" baked good. If you can classify it enough of a First World problem to be controversial. I would insert an eye roll here and say it's just a cookie but apparently that was part of the buzz in that it wasn't a cookie. They billed it as not a cookie and not a cinnamon roll but a "cinnamon square".
I'll save you the mind bend and tell you straight up it was a little cinnamon cake with cream cheese frosting. Served in its own container inserted in the pink box. That's it. It's a cake. 
It was actually a pretty good cake. At least the one I got was. My (reminder: First World) issue with it is I don't go to Crumbl for cakes. I go for cookies. I make copycat cookies, some of which are as good or better than the OG and others that miss the mark completely. This? I can make this. It's not that hard either. I've made worse, I've made better. I can make better far more times than I can make worse when it comes to cakes.
The other issues people posted about was their cake didn't have any cinnamon, very little cinnamon, was raw in the middle, was dry and bland and so on. So it appears this one has a lot of quality control issues, depending on the store you go to. Thankfully, my store did their usual bang up job and I got a nice little cake with cream cheese frosting. I did point out on the Crumbl fan page (yes, it's a thing) that this offering doesn't really fit well with the usual elements for the typical fan. Meaning you can't eat it with your fingers without creating an unholy mess so you need to bring a fork or ask for one at the store (if they have it - mine didn't advertise that they did nor did it occur to me at the time to ask) or wait until you get home. Sorry, you "I ate it in the parking lot" people. This also cost 49 cents more than the cookie price. Not a big deal since, again me, I was raised by first generation immigrants who instilled that if you can't afford it, don't buy it. I can afford another 49 cents so I bought it without complaint. Other people complained (now can I insert my eye roll?). Funny enough, apparently you can't offer constructive feedback on a fan page without having people double down on how delicious their cinnamon square was, it's now in their top 5, they would drive miles and miles for it, no one complained at their store, it's a nice change, they hope it's permanent on the menu and so on. That's cool. We're all different with different opinions. I ain't arguing with people about a not-a-cookie. I'm glad I tried it. I don't need to get it again. I can make my own. One hopefully that isn't 920 calories for a little square. 

Cannoli
Now we get to a former test cookie that's now on the regular menu. Remember when I raved about the cannoli when it was a test cookie and how I would buy multiples of it when it hit the regular menu?
Yeah, no. I was planning on it but decided I would try one first as a regular menu item in case they changed it from when it was a test cookie. That turned out to be the right decision. I don't know if they actually changed the cookie recipe or the bake time. It doesn't look like it but this time around, my cannoli cookie wasn't as good. I let it come to room temperature as always then tried it.
Unfortunately it had a drier mouthfeel than the test cookie and not as much flavor. I think it baked a minute too long or had more flour than the test cookie did. It was still good but not good enough to send me into raptures or get me to go back to the store for another. I'm glad I only bought one. 

Monday, January 29, 2024

White Chocolate Chip Cinnamon Cookies from The Food Charlatan

1/2 cup + 1/3 cup salted butter, softened
1/2 cup butter-flavored shortening
1 cup granulated sugar
1 cup brown sugar, packed
2 large eggs
2 teaspoons vanilla
2 cups whole wheat flour
1 cup all-purpose flour
1 1/4 teaspoons cinnamon
1 teaspoon baking soda
1 teaspoon kosher salt
16 ounces premium white chocolate chips or chunks
  1. In the bowl of a stand mixer fitted with the paddle attachment, cream butter until no lumps remain, 1-2 minutes. Add shortening and mix to combine.
  2. Add granulated sugar and brown sugar, mixing until light and fluffy with no lumps, 2-3 minutes.
  3. Add eggs and vanilla, mixing to combine.
  4. In a separate bowl, whisk together whole wheat flour, all-purpose flour, cinnamon, baking soda and salt. Add to butter mixture in 2 additions, mixing on low speed until just combined after each addition. Do not overmix.
  5. Fold in 12 ounces of white chocolate chunks/chips. Portion dough into golf-ball-size dough balls. Cover and chill for at least 1 hour.
  6. When ready to bake, preheat oven to 350 degrees F. Line baking sheets with parchment paper and evenly space chilled dough balls. Bake 10-12 minutes until edges are light golden brown and middles no longer look raw. Remove from oven and gently press reserved white chocolate chunks/chips over tops of warm cookies. Let rest on baking sheets for several minutes before transferring to wire rack to cool completely.
The dough for this was rather soft after I mixed it but I thought that would be okay since it has shortening in it and shortening helps prevent some of the spread that comes from butter. Boy, was I wrong. These cookies spread distressingly thin. Had I known the shortening wouldn't save the spread, I would've added more flour until the dough wasn't so soft and sticky.

I even tried the swirling trick of swirling the cookies inside a large round cookie cutter but that didn't work either as the cookies spread so much I couldn't get them fully inside my largest cutter to even swirl well. I only managed it with a few cookies small enough to just barely fit inside the cutter. Bummer.

Fortunately, despite their appearance, they still tasted good. Because they spread thin and due to the shortening, these came out with more of a crisp texture than a soft-chewy one. The cinnamon paired well with the white chocolate and both flavors were subtle and complementary to each other. If I make these again, I may have to try adding more flour if the dough is still too soft and sticky.
The swirling trick only worked on a few cookies


Saturday, January 27, 2024

Crumbl Copycat Kentucky Butter Cake Cookies from The Semisweet Sisters

1/2 cup (1 stick) softened salted butter (add 1/4 teaspoon salt if using unsalted)
1/4 cup granulated sugar
1/4 cup brown sugar
1 large egg
1 teaspoon vanilla extract
1 1/2 cups all-purpose flour
3/4 teaspoon baking powder

Glaze
2 tablespoons butter
1/4 cup sugar
1/2 teaspoon water
1/4 teaspoon vanilla
powdered sugar for dusting tops
  1. Preheat oven to 350 degrees F.
  2. In the bowl of a stand mixer fitted with the paddle attachment, cream together butter, granulated sugar and brown sugar until combined. Add egg and vanilla; mix to combine. 
  3. Stir in flour and baking powder, mixing on low speed until combined.
  4. Portion into 2" dough balls and flatten slightly to thick discs. Evenly space on baking sheets lined with parchment paper. Bake 10-13 minutes or until edges are barely browned and middles are set. Cool completely.
  5. Prepare glaze: melt butter in a small saucepan over medium heat. Add sugar, water and vanilla, whisking until smooth, melted and combined. Spoon glaze over cooled cookies. Dust with powdered sugar.
If you like unfrosted, potentially unglazed, thick, buttery cookies that are chewy, not crisp, this is the cookie for you, whether you're a Crumbl fan or not. I already have an excellent Crumbl copycat of their Kentucky Butter Cake from Lifestyle of a Foodie that I tried last year when Crumbl had KBC on the menu. They had Kentucky Butter Cake again the week of January 15 so I decided to try another copycat so I could compare it to the original in real time.
You'll notice I didn't glaze these. I was packing them up for my military care packages and didn't want a glaze to add too much moisture to the cookies and potentially have them mold before they got to their destination. So technically these weren't a faithful copycat by my choice. But that didn't matter as these were fabulous cookies in their own right. Flavor-wise, they were quite similar to the Crumbl original. 

Texture-wise, this was freaking spot on. It didn't spread much (otherwise I would've made the dough discs a bit smoother so they would look a little prettier when baked, ha) and had the perfect chewy-soft denseness of a really good buttery cookie.
Of course, I had to get the Crumbl Kentucky Butter Cake so I could do a side by side comparison and taste test; otherwise, what's the point of assessing a copycat recipe? I love Crumbl's KBC and this one was as good as last year's.
Crumbl OG Kentucky Butter Cake
You can see why I love the Crumbl cookie texture so much. Plus the light buttery glaze was a bonus.
Inside pic of Crumbl OG Kentucky Butter Cake
You can also see how closely this copycat recipe mimics Crumbl's cookie texture. Perfection. The only downside to this recipe is it only makes 6 large cookies. Not that that's a big downside as you can always double the recipe or make it multiple times. For my first test run, I only did a single batch and came up with 6 cookies. 5 for the care package, 1 for me. But I'm glad to have another excellent copycat recipe for one of my favorite Crumbl cookies.
top from Semisweet Sisters copycat recipe, bottom is Crumbl's

Thursday, January 25, 2024

Vanilla Lovers Cookie Bars from Brownie Bites

Vanilla Lovers Cookie Bars - made January 18, 2024 from Brownie Bites 
Vanilla Wafer Crust
1 12-ounce box vanilla wafer cookies, crushed
1/2 cup unsalted butter, melted
1 teaspoon vanilla extract

Blondie layer
1 cup unsalted butter
4 large eggs
1 cup granulated sugar
1/2 cup light brown sugar, packed
2 1/2 teaspoons vanilla extract
2 cups all-purpose flour
1 teaspoon salt
1 cup white chocolate chips
10-12 Golden Oreos, broken into large pieces
  1. Preheat oven to 350 degrees F. Line a 9 x 13 baking pan with foil and lightly spray with nonstick cooking spray.
  2. Vanilla wafer crust: mix together melted butter, vanilla and crushed cookies. Press into the bottom of the prepared pan in an even layer, packing together tightly. Bake 10 minutes and let cool.
  3. Blondie layer: in a saucepan, melt the butter on low heat. Remove from heat and add the white chocolate chips. Cover and let stand 5 minutes; stir until chips are melted and mixture is smooth. Let cool.
  4. In another bowl, beat together eggs, granulated sugar, brown sugar and vanilla. Mix with melted white chocolate then stir in flour and salt. Mix until just combined. Pour batter over cooled vanilla wafer crust. Top with Golden Oreo cookie pieces.
  5. Bake for 30-35 minutes, until top is golden and a toothpick inserted near the center comes out with a few moist crumbs. Do not overbake.
If you want a break from chocolate (I don't know who does but there are all kinds of people out there), this is a good alternative. I've had this on my pinterest board for awhile but it took me a bit of time to gather the various ingredients as Golden Oreos and vanilla wafers are not my pantry staples. I was also running out of white chocolate.
But the stars finally aligned and I had everything on hand so I finally made these. They turned out pretty well but I think I could've baked them a few minutes more. I did bake them for 30-ish minutes, perhaps a few minutes longer, and the toothpick test came out clean.
But vanilla brownies aren't the same as chocolate brownies in that "a few moist crumbs" don't come out clinging to the toothpick. I could tell I should've baked them longer as the corners and edges had a good fluffy looking texture but the middles were dense and a tad mushy.

Once they're cooled, they set better and firmed up slightly. If they were chocolate, they would've been fudgy. These were vanilla-fudgy. Taste-wise, I liked them. These are a good alternative if you prefer vanilla over chocolate and the Golden Oreos added a nice crunch. I could only find the thin Golden Oreos at the store so that's what I went with to top these and I think they're better than the regular ones.; less filling leakage. 
I still have some Golden Oreo Thins left in the package so I'm going to have to try this recipe again and bake it a little longer. As soon as I get more vanilla wafers and white chocolate.

Tuesday, January 23, 2024

Crumbl Cookies review #65: Chocolate Waffle Cone (tester)

Crumbl Cookies review #65: Chocolate Waffle Cone (test cookie) - visited January 16, 2024
I'm trying to catch up on my Crumbl test cookie reviews before tomorrow's test cookie comes out so I'm getting this in now rather than later in case I want to get tomorrow's test cookie and need to review that one.
Last week it seemed like all of the test stores were only testing 1 flavor, going by the test map on the Crumbl app. I liked all the elements describing this test cookie so I wasn't mad about it when that's what my tester store offered.

I think this is slightly misnamed in that there aren't chocolate waffle cone pieces in the cookie base. The chocolate is referring to the "melted semisweet chocolate" in the topping, not the waffle pieces in the cookie base. It might be better to call it a chocolate and vanilla waffle cone cookie to refer to the toppings rather than the cookie base. I was hoping by the description that the "vanilla bean mousse" was the same mousse in the skillet cookie that I liked so much. 
But alas, it wasn't the same. Even if Crumbl swears they used the same recipe, I wouldn't believe them as this mousse didn't have much flavor and it had a heavier texture, like it was heavy whipped cream instead of the original mousse. So I'd dock the cookie for that. The melted semisweet topping was more like a solid piece of chewy chocolate and didn't pair well in terms of texture with the mousse. The peanut garnish was good but as you can see from the picture, I didn't get very much of it. Not a big deal though.
My favorite part of this cookie was the base itself. The waffle pieces added a little crunch and the taste was fantastic. It's more dense as befitting a cookie shell so don't look for the fluffy texture of a more traditional Crumbl cookie. I liked the cookie but I'd only get it again if they use the mousse in the skillet cookie. It would also be better if they used a softer chocolate (more like a frosting than a chocolate that has already set), spread it directly over the cookie shell and topped it with a scoop of the vanilla bean mousse then sprinkled the peanuts over it. Otherwise, if they keep this as is, I'm glad I tried it, and I enjoyed the test cookie but likely wouldn't get it again when it hits the regular menu.

Monday, January 22, 2024

Scottish Shortbread for Molded Cookies from Mary Jane Miller Koch (Stamped Cookies #35)

Scottish Shortbread - made dough January 13, 2024 from Mary Jane Miller Koch (member of Facebook group Molded Cookies of the World - Artisan Bakers and Confections)

2 cups butter (I used Kerrygold butter)
1 cup granulated sugar
1 teaspoon butter flavoring (I used LorAnn's butter emulsion)
1 teaspoon almond flavoring (I used vanilla extract
2 large eggs
5 cups all-purpose flour
  1. In the bowl of a stand mixer fitted with the paddle attachment, cream together butter, granulated sugar, butter flavoring and vanilla extract.
  2. Add eggs, one at a time, mixing after each addition until incorporated.
  3. Stir in flour, 1/2 cup at a time, on low speed, mixing until just combined after each addition.
  4. Cover dough and let rest for 30 minutes.
  5. Stamp or mold cookies. Refrigerate stamped or molded cookies, covered, for 1 hour then freeze for at least 30 minutes or overnight.
  6. When ready to bake, preheat oven to 300 degrees F. Line baking sheets with parchment paper and evenly space cookies. Bake 12-18 minutes. Remove from oven and let rest on baking sheets for several minutes then transfer to wire cooling rack to cool completely. 
I love the Facebook group I'm part of called "Molded Cookies of the World". People share their stamped/molded cookie bakes and are very generous with sharing recipes and the creative ideas they have for using their cookie stamps.
Case in point these cookies. One member showed his idea of using the Nordic Ware stamp in the geocast set then stamping out the center with a heart cut out. He used strawberry (or raspberry?) jam as the filling so the centers were ruby red, perfect for Valentine's Day. Since I don't like jams or jellies, I went with my standby of cookie butter. I would never have come up with the idea of doing the heart cutout so I'm grateful when other people share their creativity. I love how these turned out aesthetically.
I'm even more grateful for the recipe as the cookies themselves tasted really good. Sometimes it's tricky to come up with a cookie that keeps the stamped designs faithfully and tastes good. Some of them taste bland because they have so much flour and cornstarch. Not so with this cookie. It's buttery and flavorful, doesn't spread too much and keeps the stamped design. I loved it. You do need to chill it slightly to help with rolling out the dough and stamping out the design. Once I stamped them, I froze the cookies overnight before I baked them, which also keeps the impressions. I used Kerrygold butter as well to enhance the buttery flavor.

Friday, January 19, 2024

Gideon's Bakehouse Copycat Chocolate Chip Toffee Cookies from Chelsea's Messy Apron

8 tablespoons unsalted butter, melted and cooled 5-10 minutes to room temperature
1 cup brown sugar, tightly packed
1 large egg
1/2 teaspoon vanilla bean paste or 1 teaspoon vanilla extract
1/2 teaspoon baking soda
1/2 teaspoon baking powder
3/4 teaspoon fine sea salt
1 cup cake flour
1 cup all-purpose flour
1 cup semisweet or milk chocolate chips
1 cup mini chocolate chips
1 cup Heath milk chocolate English toffee baking bits
  1. In a medium bowl, combine chocolate chips, mini chocolate chips and toffee bits, stirring until evenly mixed; set aside.
  2. In a mixing bowl, combine melted, cooled butter and brown sugar, stirring to combine. Whisk in egg and vanilla bean paste or extract until smooth and well combined.
  3. Add in baking soda, baking powder and salt, stirring to combine. Add cake flour and all-purpose flour, mixing until just combined. Fold in 1 3/4 cups of the chocolate chip-toffee bits mixture.
  4. Divide dough into 6 large equal portions and roll into balls. Flatten slightly to thick discs. Coat tops and sides (not bottoms) of dough discs with the remaining chocolate chip-toffee bits mixture. You can reserve some to press into cookies after they're baked.
  5. Cover and chill dough for at least 1 hour but preferably 24 hours.
  6. When ready to bake, preheat oven to 325 degrees. Double pan baking sheets and top baking sheet with parchment paper. Evenly space 3 cookie dough balls on 1 sheet to allow room for spread. Bake 15-23 minutes until edges are lightly set and middles no longer look raw. Remove from oven and gently press remaining chocolate chips and toffee bits into any bare spots on the cookies. Let rest on baking sheets for 15 minutes then transfer to wire rack to cool completely.
I'm back with another copycat recipe for a Gideon's Bakehouse cookie. Only this time, it isn't just chocolate chip but chocolate chip toffee. Same concept where you make big cookies and press a combination of milk chocolate chips, mini semisweet chocolate chips and toffee bits all over the cookie dough balls (except for the bottoms) then bake.
The recipe is supposed to male 6 large cookies but I made 7 out of them with my largest cookie scoop. I did gently press a few extra chips and toffee bits over the top of the test cookie after it baked, to fill in a few gaps.
The dough was easy to handle as it wasn't too sticky or dry. I did chill them overnight first to "age" then froze them. I baked the cookie from frozen dough so it took a little longer and fortunately, I remembered to double pan it this time. By double pan, I mean I put one baking sheet upside on the oven rack and placed the baking sheet with the dough ball on top of it (right side up). That worked well to bake the cookie more evenly throughout without the bottom getting too brown or baked.
Flavor-wise and texture-wise, this cookie was fantastic. I ate half the test cookie when it was lukewarm and it was perfect as the edges had cooled to a slight crispness and the middle was dense and chewy without being mushy. Plus the chips were still melty and the toffee bits had cooled to give it both crunch and a little sweetness. I didn't think I liked cookies covered in chocolate chips but when some of the chips are milk chocolate and you toss toffee bits in there, turns out I like it just fine.