Saturday, September 29, 2012

Cheesy Buttermilk Biscuits

Buttermilk Biscuits - made September 24, 2012, recipe adapted from How to Bake by Nick Malgieri

I had a buttermilk expiration deadline (again) and I was trying to use up some of the cheese I had bought for the Gnocchi Mac and Cheese so I thought I would experiment with cheesy biscuits, ala Red Lobster.  It didn't quite pan out.  This was more like a traditional biscuit in terms of texture but not as flaky and it was definitely heavier than a Red Lobster cheddar biscuit and didn't have the cheesy flavor I was going for.  Cheddar would've probably been better than fontina or grueyere.  The outside was crunchy though so that was nice but one of these will sit in your stomach like lead.  I'd advise a bit more buttermilk if your dough is too dry.  On the plus side, it was pretty good warm slathered with butter (what isn't?) and I got to use up some buttermilk.
2 ½ cups bleached all-purpose flour
2 ½ teaspoons baking powder
½ teaspoon baking soda
½ teaspoon salt
4 tablespoons cold unsalted butter
¾ to 1 cup buttermilk
¼ cup grueyere cheese, grated
¼ cup fontina cheese, grated

1.     Set a rack at the middle level of the oven and preheat to 450˚F.
2.     Combine the dry ingredients in a mixing bowl.
3.     Rub in the butter until completely blended using your fingertips or a pastry blender.  Add the cheeses.
4.     Add the buttermilk and stir in with a fork.
5.     Turn the dough onto a lightly floured work surface and fold the dough over on itself several times to distribute the moisture evenly and to make the dough slightly less sticky.
6.     Pat or gently roll the dough ½ thick.  Cut out rounds with a biscuit cutter and place biscuits in a round cake pan sprayed with nonstick cooking spray and lined with a parchment round.  Brush tops lightly with buttermilk and place in preheated oven.  After 5 minutes, lower temperature to 425 degrees.  Bake for 10 to 12 minutes or until risen and golden brown.

Friday, September 28, 2012

Samoa Brownies

Samoa Brownies - made September 22, 2012, recipes adapted from Alchemy Baking and  Six Sisters' Stuff

I got the inspiration for these brownies from Six Sisters' Stuff blog and their picture looked scrumptious.  But they lost me at "brownie mix" so I decided to keep the concept but bake brownies from scratch.  The brownie recipe is from a different blog and one I had pinned earlier.  One of my pin boards is labeled "Baking Recipes I Want to Try" and I'm making a concerted effort to actually try those recipes instead of just pinning them.  Once I make a recipe from that board, I move it to a different board titled "Pinned Recipes I've Already Made".  That way I can keep track.  (Why, yes, I am just that fussy.)

You can go with your own brownie recipe but if you do, I recommend choosing one where most of the chocolate flavor comes from unsweetened chocolate and/or cocoa powder because the topping is best suited for a dark chocolate brownie as opposed to a sweet chocolate one.  The topping is sweet enough because of the caramel and complements a dark, fudgy brownie nicely.  The crisp of the toasted coconut is somewhat muted when it gets mixed into the liquid caramel so I also sprinkled some toasted coconut on top for added texture and chewiness.  I ended up having more melted semisweet chocolate for the topping (because, really, who measures chocolate and thinks there's such a thing as "too much"?) so it became more of an even layer of chocolate on top rather than dollops.  Semisweet or dark chocolate also works well for the topping instead of milk chocolate to prevent the brownie from being too sweet because of the caramel.  I really liked this flavor combination.  If you want it to be more samoa-like, you can bake a shortbread crust first but it also works just fine with the brownie alone as the base.

1 1/2 sticks (170 g.) unsalted butter
2 ounces (57 g) unsweetened chocolate, finely chopped
1 cup (200 g)  white sugar
1 cup (180 g) brown sugar, packed
3 large eggs
1 1/2 teaspoons pure vanilla extract
1/2 teaspoon sea salt
1 cup (150 g) all-purpose flour
1/4 cup plus 2 tablespoons  (38 g) unsweetened cocoa (I used Droste)

  1. Preheat the oven to 350 degrees Fahrenheit.   Line a 9 inch pan with heavy duty foil to hang over the edges, if it isn't long enough on each side, line it on the opposite side as well to create a sling. Spray with nonstick spray or butter the foil, set aside.
  2. In a large pan over medium heat, melt the butter and the unsweetened chocolate together until melted. Whisk in both sugars, and mix until blended, then add the vanilla, salt and eggs, and whisk again well. Add the flour and cocoa and stir until incorporated, the batter will be thick. Pour the batter in the prepared pan.
  3. Bake in the center of the oven for 35-40 minutes, until the edges are set, but the center is still a bit soft, and a toothpick inserted in the center comes out coated with a little bit of batter. Don't over bake.
  4. Let them cool to room temperature for an hour, then refrigerate them until they are just firm about another hour. Lift the brownies from the foil and peel off the foil. Serve them at room temperature.
  5. They will keep (and remain fudgy) (wrapped well in plastic or in an air tight container) for at least 4 days.
Topping
2 cups shredded or sweetened, flaked coconut toasted
1 14-ounce package of caramels, unwrapped
1/2 tsp. salt
2 tablespoons milk
3 ounces semisweet chocolate chips (or more if desired)
  1. Prepare brownies and cool.
  2. Preheat oven to 375 degrees and place coconut on baking pan. Cook for 2-3 minutes. Stir coconut and cook for another 2-3 minutes until toasted. Watch closely so it doesn't burn.
  3. In a large, microwaveable bowl, add unwrapped caramels, salt, and milk and cook on high for 3-5 minutes, stirring occasionally (about every 45-60 seconds). Cook until all caramels are melted and smooth. Or melt in a small, heavy saucepan over low heat, stirring until melted and smooth.
  4. Add coconut and mix together. Spread over cooled brownies. Let cool and set for an hour.  Melt semisweet chocolate chips and stir until smooth.  Drizzle or spread over the coconut layer.  Let set for at least 20-30 minutes.  You may cut while chocolate is still soft for gooey texture or wait until it sets.
What's cooking, love? 

Thursday, September 27, 2012

Crock Pot Beef with Brown Rice

Crock Pot Beef - made September 22, 2012 from BS Recipes


This is another recipe I found on pinterest and it was originally Beef and Broccoli.  Um, yeah, sounds good but hold the broccoli.  Which I did.  In addition, I also modified the original recipe by doubling the amount of beef and adding a ton of cornstarch to thicken the sauce.  I like using my crockpot since it requires very little cooking effort on my part but I don't like how everything comes out so soupy.  So I took matters into my own hands and just kept adding cornstarch and letting it simmer for the last hour, uncovered, to help thicken it up some more.  If you are going to add broccoli (my mom was horrified that I didn't), add it in the last 30 minutes of cooking.

My laugh-at-myself moment with this recipe was when I went to Costco to buy the "boneless beef chuck roast".  Now, I know very little about different cuts of meat so I always try to get exactly what the recipe calls for.  I was stymied when all the meat packs at Costco read "beef top roast", "chuck pot roast" and a couple of other variations but nothing that exactly said "beef chuck roast".  So I went with whichever one had the smallest amount of beef since I wasn't cooking for an army.  I think it was the chuck pot roast.  Which worked out fine.  I only cooked this for about 4-5 hours and by then the beef was very tender and, thanks to a slew of cornstarch, the sauce had thickened up nicely.  I served it with some brown rice and it was delicious.


2 pounds boneless beef chuck roast, sliced into thin strips
1 cup beef consomme (I used one beef boullion cube dissolved in 1 cup of hot water)
1/2 cup soy sauce
1/3 cup brown sugar
1 tablespoon sesame oil
3 garlic cloves, minced
1/4 cup to 1/3 cup cornstarch
2 tablespoons sauce from the crock pot after being cooked
Hot cooked rice

1. Place beef in a crock pot.
2. In a small bowl, combine consomme, soy sauce, brown sugar, oil, and garlic. Pour over beef. Cook on low for 6-8 hours.
3. In a cup, stir cornstarch and sauce form the crock pot until smooth. Add to crock pot. Stir well to combine.
4. Cover and cook an additional 30 minutes on high (the sauce has to boil for it to thicken).5. Serve over hot cooked rice.

Cast Party Wednesday 

Tuesday, September 25, 2012

Apple Fritters

Apple Fritters - made September 22, 2012 from Seemingly Greek

I love apples.  I eat one almost every day as one of my fruit servings.  Fujis are my favorite but I'll eat almost any other kind as long as the texture isn't mealy (Red Delicious is a nonstarter - not crisp enough).  Apples are also one of the few fruits I'll bake with so I was quite open to this recipe for Apple Fritters (meaning: "deep fried and I can pretend it's good for me because it's got apples in it?  Winner!")

The batter was easy to put together.  Make sure your oil is hot enough or your fritters will absorb too much grease while it's frying.  Don't overcrowd the fritters in your pan and I recommend making them small.  I used an ice cream scoop to drop what was supposed to be uniform-size balls of fritters into the hot oil but let's just say, I got the rustic look on these whether or not I was trying to.  But that's okay, they're not meant to look picture perfect.  I do recommend frying these long enough to make sure they're cooked on the inside.  The outside will brown quickly but keep frying them an extra couple of minutes or so to make sure the insides are cooked.  You also want the outside to be a bit crispy.  If you don't fry them long enough, they'll be brown but will still be on the soft side when they cool.

After frying, let them drain on paper towels then cool slightly.  Cover or dunk in the glaze and let set.  These are best eaten soon after they're made.  I only had a couple and tried saving the rest but they softened up too much the next day, especially with the glaze. But fresh out of the fryer, they were good :).

1 generous cup all-purpose flour
1/3 cup sugar
1 teaspoon baking powder
dash salt
1 – 2 teaspoons cinnamon (depending on how much you love cinnamon, I used 1 1/2 teaspoons)
1/4 teaspoon nutmeg
1/2 teaspoon vanilla
1 tablespoon butter, melted
1 egg
1/3 cup milk + plus more if needed
1 – 1 1/2 cups chopped apple, your favorite kind for eating, peanut sized or smaller

oil for frying
milk and powdered sugar glaze for dipping or just powdered sugar for dusting
(About 1 cup pwd. sugar + 1 T. milk or more) 
  1. Heat oil in a pan with high enough sides to immerse the fritters in oil.  
  2. Mix all dry ingredients together then slowly add the wet ingredients minus the apple. 
  3. Carefully mix until well combined but do not overmix.  Gently fold in apple pieces. The batter should be the consistency of a light cake mix. 
  4. Once the oil is ready (when a test drop of dough floats to the top of the oil, a drop of water sizzles, or a piece of white bread browns in 60 seconds) then using a cookie scooper or soup spoon, place 4-5 balls of dough into the oil. Be careful not to overcrowd and watch carefully for the underside to turn golden brown, then gently flip over and continue frying until done. Adjust cooking times based on size of fritters and temperature of your oil, ideally around 365° F.  It is always a good idea to test one to ensure it comes out like you are expecting.
Chef In Training  BWS tips button

Monday, September 24, 2012

Chocolate Cake Balls

Chocolate Cake Balls - made September 15, 2012 from Cake Balls: Amazingly Delicious Bite-Size Treats by Robin Ankeny and Charlotte Lyon


I have been hearing about cake balls or cake pops for quite some time but I've been lagging on jumping on that bandwagon.  It sounded like a good premise: a truffle-sized ball of cake crumbles and frosting mixed together and enrobed in chocolate.  Every picture I've seen of it reminds me of truffles and hey, I like truffles.  I put off trying it though because I'm not big into frosting and that's 1/3 of what marks a cake ball.  Then I was asked to review a new cookbook, Cake Balls: Amazingly Delicious Bite-Size Treats by Robin Ankeny and Charlotte Lyon so it seemed like a good opportunity to try out cake balls, from the experts so to speak.

The pictures, recipes and directions in the book are quite good and if cake balls are your thing, I think this is a good book to have. I tried the basic chocolate cake recipe and the basic chocolate frosting recipe.  The cake was very easy to make and came out with a chocolatey, fluffy, cakey texture.  Likewise, the frosting came out well.  It was a bit sweet but I thought that would be a good complement to the dark chocolate flavor of the cake.  Then it came time to mix the two.  I followed the instructions religiously on how to make cake balls: crumble the cooled baked cake, mix the cake crumbles with the frosting, roll into truffle-sized balls, freeze for at least 2 hours, dip the balls in melted chocolate and let set.  

Thanks to clear directions in the cookbook, I think I made credible cake balls.  Unfortunately, however, much as I liked the cake and the frosting separately, it turns out I didn’t like them mushed together, even when enrobed in my favorite milk chocolate couverture.  It was too cloyingly sweet and the texture, while looking truffle-like, lacked the creaminess I associate with truffles.  Instead, it was like eating raw cake batter that had too much sugar.  It’s possible I didn’t bake the cake enough, a common trap the book warns against, although for once I baked until the toothpick came out clean from the center.  But, more than likely, cake balls are just not for me.  I’m not a frosting person to start with and mixing it with cake lent it too much sweetness with not enough cake to offset.  I also wanted and expected more cake than frosting in a cake ball and that wasn’t what I got.  So this is one bandwagon that's likely going to pass me by.

On the plus side, I'm likely to make the chocolate cake and frosting recipe again and make some cupcakes with it.


Basic Chocolate Cake
2 cups all-purpose flour
¾ cup unsweetened cocoa powder
2 teaspoons baking soda
½ teaspoon salt
2 teaspoons vinegar
1 cup milk
2 cups granulated sugar
2 eggs, room temperature
½ cup vegetable oil
1 cup water
2 teaspoons vanilla extract

1.     Preheat the oven to 350F and grease a 10-inch round cake pan.
2.     In a medium-size bowl, combine the flour, cocoa, baking soda and salt with a wire whisk and set aside.  In a separate small bowl or cup, stir the vinegar into the milk.
3.     In a large bowl, use an electric mixer to blend together the sugar, eggs, vegetable oil, 1 cup of water and the milk mixture. Add the vanilla and blend until completely combined.  Slowly add the dry mixture to the wet mixture until fully combined.
4.     Pour the batter into the cake pan and bake for 30 to 40 minutes, or until fully baked.  Let cool.

Basic Chocolate Icing
4 tablespoons unsalted butter
¼ cup plus 2 tablespoons cocoa powder
1 16-ounce package confectioners’ sugar
¼ cup plus 3 tablespoons milk, warm
1 teaspoon vanilla extract

1.     Use an electric mixer on medium speed to cream the butter.  Add the cocoa and mix well.  Slowly beat in the sugar, adding the warm milk until smooth.  Stir in the vanilla.

Sunday, September 23, 2012

Gnocchi Mac and Cheese

Gnocchi Mac and Cheese - made September 17, 2012 from The Cutting Edge of Ordinary blog

I was on a cooking spree earlier this week and this is the third of three recipes I made and probably the one where I most narrowly avoided giving myself food poisoning.  I did the grocery shopping thing at Trader Joe's because this needed three cheeses and I can assure you I had none of them in my house.  Plus I knew TJ's would have a wide selection of cheeses and I wouldn't have to do any questionable substitutions.  Ignore the fact that I stood in front of the cheese section for some time, looking baffled at so many different types of cheese.  I eventually read through all the labels and found the three I was looking for.  Gnocchi was easy enough to find in the pasta aisle.  I was still under the mistaken assumption at  the time that the garlic on my kitchen counter was viable so I did end up using my geriatric garlic powder on this when the time came.

Now I don't like mustard but I did have a small jar of Dijon mustard in my pantry from the last time I needed it for a recipe (which was probably another version of mac and cheese) so I thought I was good there.  I started out innocently enough - boil the gnocchi, melt the butter in a separate pan, stir in the garlic (powder), whisk in the flour and the milk.  I dropped in the teaspoon of Dijon mustard from the jar that was mostly full.  Then I wondered, since I had already opened it some time ago, whether it was one of those things that should've been refrigerated after being opened.  I scrutinized the faint writing on the glass jar and yep, sure enough, it said to refrigerate after opening.  I did waffle on whether I should forge ahead anyway but then I also noticed the expiration date on the mustard.  Which was about a month ago.  Hmmm.  Did I still go for it since it was already in my mixture?  And really, what's the worst that could happen?  A queasy stomach?  As someone once said, I'm a good stomach flu away from a size 2 so there could be upside, right?  Sigh. Yes, I actually did think about taking my chances with food poisoning because I'm a lousy lazy cook.

But in the end, sanity prevailed.  I threw out what I had mixed so far and started over again, this time leaving out the sketchy mustard.  The sauce was very easy to mix up and the cheeses melted obligingly for a creamy texture.  Because I needed some protein, I chopped up chunks of ham to throw in with the gnocchi and mixed both up with the sauce.  This doesn't make a ton of sauce so if you like/love cheesy sauces, you might want to double the recipe for a pound of gnocchi.  I was pleased with how this turned out but then again, I'm a sucker for this kind of thing.  The ham made a sweet complement to the gnocchi mac and cheese so I'm glad I added it.  Only warning though is gnocchi sits pretty heavily in the stomach and the cheese sauce puts the calorie count into the ozone.  I would recommend portion control, which isn't hard since gnocchi is so filling.  The gnocchi package said it was 3 servings but I was easily able to get 8 portions out of this recipe.

1 pound purchased or homemade gnocchi (I used whole wheat gnocchi from Trader Joe's)
2 tablespoons butter
2 teaspoons garlic, finely chopped
1 tablespoon all-purpose flour
3/4 cup milk
1 teaspoon Dijon mustard
1/4 cup shredded Gruyere cheese
1/4 cup shredded fontina cheese
Salt and white pepper to taste
1/3 cup shredded Parmigiano-Reggiano
Basil leaves for garnish, optional
  1. Preheat oven to 375 degrees F. Prepare gnocchi according to package directions. Drain and place gnocchi in a single-layer in a 1-1/2 quart shallow baking dish that has been sprayed with nonstick spray.  
  2. Melt butter in a medium saucepan over medium heat. Stir in garlic and cook until fragrant, about 30 seconds. Whisk in flour until it thickens and bubbles, then whisk in milk and Dijon. Continue to whisk mixture and cook until slightly thickened, about 3-5 minutes.
  3. Combine Gruyere and fontina, then add by the handful to milk mixture, stirring until melted before adding the next handful. Once all cheese is melted, season sauce with salt and pepper.
  4. Pour sauce over gnocchi and sprinkle with Parmigiano-Reggiano over top. Bake gnocchi until they puff and the cheese is golden and bubbly, about 25 minutes. Let gnocchi rest for 5 minutes before serving.  Garnish with basil if desired.

Friday, September 21, 2012

Lemon Ricotta Pasta

Lemon-Ricotta Pasta - made September 15, 2012 from Crumb blog

You have to click on the recipe title to go to the original blog this is from.  I say that because that's how the recipe should turn out.  It was originally scallops with lemon ricotta pasta but, ahem, I took some liberties with the recipe (you were expecting that one, right?).  In my defense, I started out intending to make the recipe as is.  But the wheels came off that bus when I couldn't find scallops at Trader Joe's which is where I was shopping to make this recipe a reality.  No problem, I knew I was making the Garlicky Baked Shrimp so I figured that would do and the scallop-less pasta would be the accompaniment.

Other than the scallops thing, I fared better following this recipe more religiously than the other recipe.  Except for the part where I only had 1 tablespoon of olive oil left in the bottle and hadn't bought a new bottle because I could've sworn I wasn't running that low on olive oil.  And I thought 475 g of ricotta cheese was a lot to use.  And I wasn't willing to make an entire package of pasta or else I'd be eating this thing for weeks.  So....I made some adjustments.  This turned out okay, if a bit bland.  I could probably have used more lemon juice or salt and pepper.  But it was good enough to eat with the shrimp. 

This is the original recipe, not the one I actually ended up making, although it was somewhat close:

1 box pappardelle or fettuccine pasta (I used whole wheat spaghetti)
12 large fresh sea scallops
4 tbsp good-quality olive oil, divided
1 tbsp butter
Zest of 1 lemon
1/4 cup lemon juice
1 1/2 cups fresh green peas, shelled and blanched (I used corn kernels)
4 tbsp fresh thyme, minced (preferably lemon thyme, if you have it - Trader Joe's didn't so I didn't)
Sea salt and freshly ground black pepper
1 container (475g) ricotta cheese
  1. Cook the pasta per package directions until al dente.
  2. While pasta is cooking, rinse scallops and pat dry. Heat 1 tbsp olive oil and 1 tbsp butter over high heat in a skillet until foamy. Sprinkle scallops with a little salt and pepper; place in skillet in single layer. Cook, turning once, until brown on outside and just opaque in center, about 2 minutes per side. Remove from pan and set aside.
  3. Drain pasta and return to the pot over low heat. Stir in lemon zest, juice, remaining 3 tbsp olive oil, peas, and thyme. Toss to coat, then season with salt and lots of pepper. Add the ricotta and mix gently until pasta is coated evenly.
  4. To serve, divide the pasta between four plates, topping each with three scallops and a sprig of fresh thyme.

Wednesday, September 19, 2012

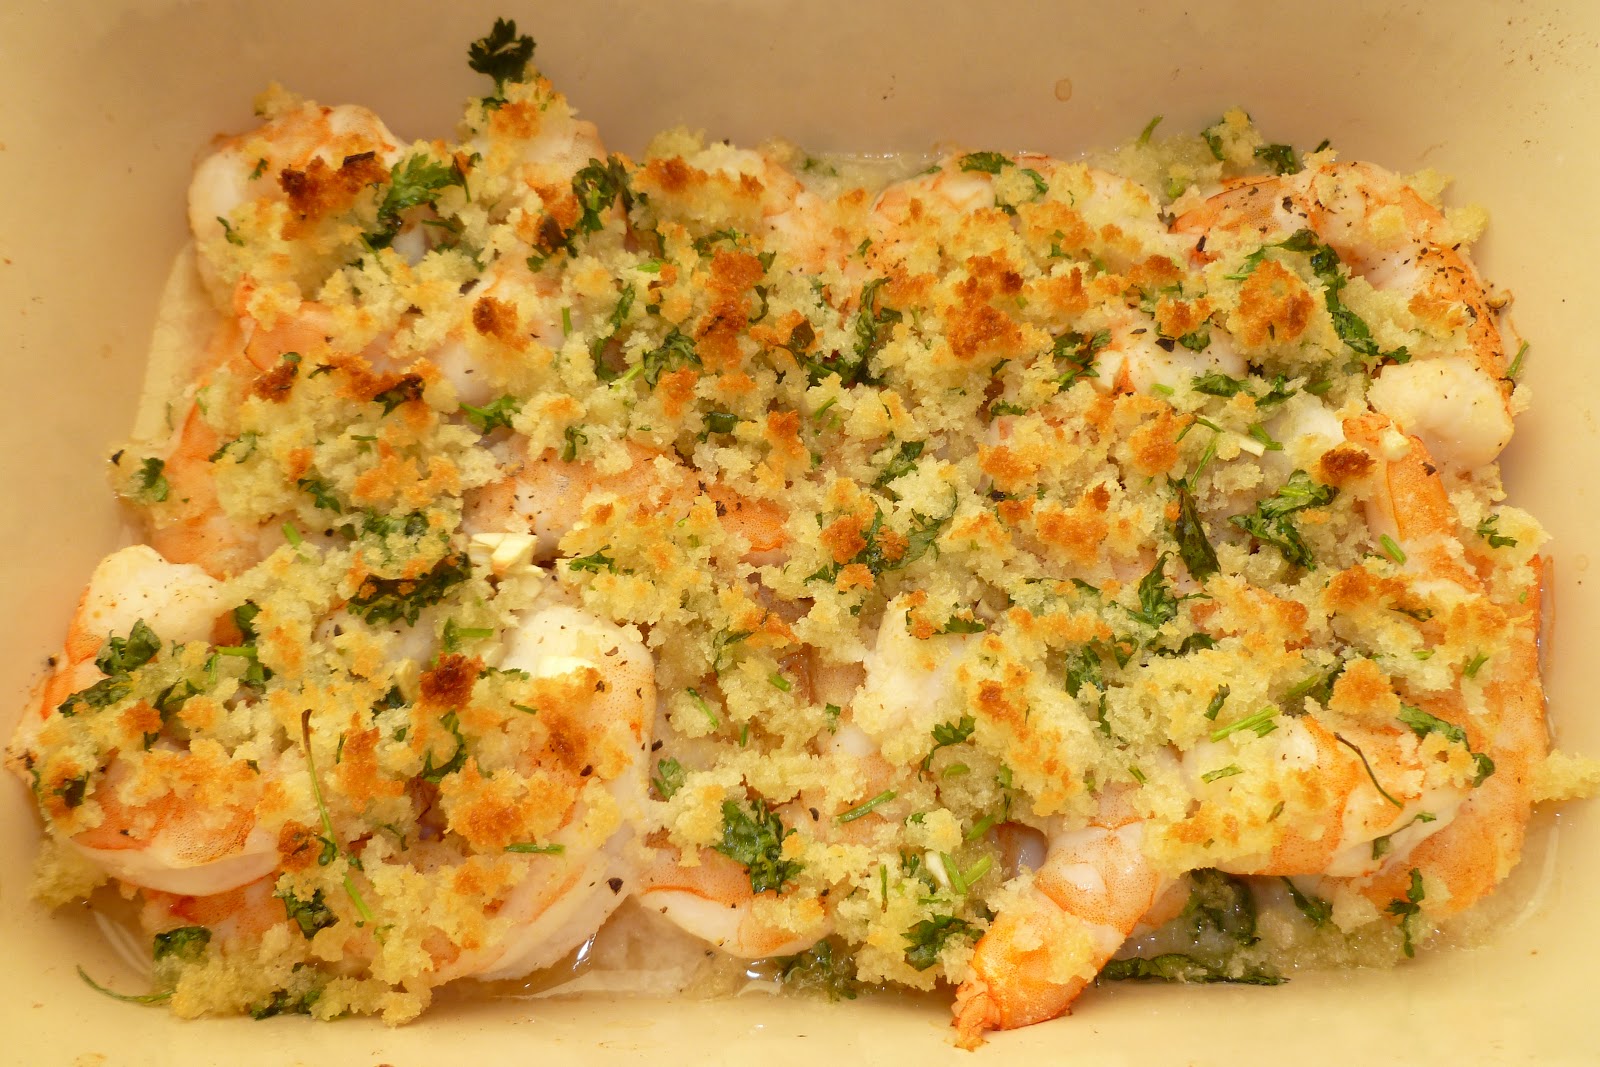
Garlicky Baked Shrimp

Garlicky Baked Shrimp - made September 15, 2012 from Normal Cooking's blog
When I started using pinterest, it was primarily to find good baking recipes and new dessert ideas from all the other bloggers out there.  What I hadn't counted on, but am glad about, is I've also come across some "real food" recipes that are simple enough for me to make.  I'll get lured in by a foodie picture of a scrumptious-looking dish and if the ingredient list isn't too long and the cooking steps aren't too complicated (remember, I'm barely a half step above Hamburger Helper in my cooking skills), I'll pin it and give it a whirl when I've completed the Herculean-to-me task of figuring out what ingredients I need (usually most of it), already have (typically very little of it) and what I need to buy, how much and where.

Case in point, this recipe for Garlicky Baked Shrimp.  I love shrimp.  It's easy enough to buy in a frozen pack - heads off, tails on - and keep in the freezer until I'm ready to cook it.  I'm not even squeamish about handling raw shrimp and peeling the tails off, thanks to having to help my mom during my formative years peel and devein shrimp.  The instructions were pretty straightforward and I thought I even had "most" of the ingredients.

I've listed the recipe as it was meant to be made but I will abashedly confess my shortcuts/misdemeanors.  I had a bulb of garlic I "borrowed" from my mom a few weeks ago when I intended to make a different recipe but never did.  So the garlic sat on my kitchen counter for awhile.  I don't know exactly how long but turns out it was long enough to shrivel up and dry out except for 2 cloves.  And even those were sketchy.  But I forged on and added garlic powder instead.  Never mind that it was months old and in a clump in the spice bottle.  It said it was garlic powder and that was good enough for me.  White wine.  I mentioned before I don't drink, right?  The only alcohol I have in the house is anything I had leftover from the last time I cooked that needed it.  Turns out I had red wine (don't know how long it's been opened) and sherry.  No white.  What the heck, I used the sherry. Italian-leaf parsley.  Didn't have that at Trader Joe's so whaddaya say to cilantro?  Good.

Despite my flexibility with the recipe, I thought this turned out pretty well.  If you ignore the fact that my Garlicky Baked Shrimp didn't have much real garlic in it.  And honestly, I love shrimp so I'm very forgiving over however it turns out.  I also have a low bar - as long as I don't give myself food poisoning, it's all good.

1 lb. raw shrimp, deveined and peeled (I pull the tails off beforehand too)
4 cloves garlic, minced
2 tablespoons white wine
salt and pepper
1/4 cup (4 Tbsp.) melted butter
1/2 cup Panko bread crumbs
2 Tbsp. fresh Italian-leaf parsley, chopped
half of a lemon (optional)
  1. Preheat oven to 425 degrees F.
  2. In a bowl, combine the shrimp, garlic, and white wine.  Stir to combine, then pour into a baking dish.  Spread out evenly, and then season with salt and pepper.
  3. In another bowl, use a fork to mix melted butter, Panko, and parsley until well combined.  With your fingers, sprinkle the mixture evenly in the baking dish over the shrimp.
  4. Transfer dish to oven and bake until the shrimp are pink and opaque, about 15-18 minutes.
Cast Party Wednesday  What's cooking, love?

Tuesday, September 18, 2012

Brown Sugar Snickerdoodles

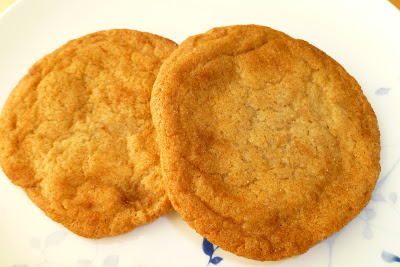
Snickerdoodles - made September 14, 2012 from Lovin' From the Oven blog


I have tried many snickerdoodle recipes and blogged about a few of them so I'm renaming these Brown Sugar Snickerdoodles to distinguish them from the others and because they do have brown sugar in them.  I wanted to try them when I saw the picture of them from Lovin' from the Oven's blog.  In her picture, the cookies were thick and looked moist.  Mine came out more flat, even baking them from frozen dough on a convection setting in my own.  I think it's because I had the butter out too long and it was more "room temperature" than I wanted.  When working with butter, especially for cookie doughs, you want it to be cool, not room temperature.  The butter will soften and warm up as you beat it and cream it with sugar and other ingredients.  If your butter is too soft, it could affect the texture of your finished product. However, I really liked the taste of these cookies, possibly more than the majority of snickerdoodle recipes I've tried.  I may need to make these again and work with cooler butter to see if that'll make thicker cookies.  Taste-wise, they were great and worth the workout I did the next day to burn off the calories.


1/2 cup butter (1 stick), softened 
1/2 cup granulated sugar 
1/3 cup brown sugar 
1 egg 
1/2 teaspoon vanilla 
1 1/2 cups flour 
1/4 teaspoon salt 
1/2 teaspoon baking soda 
1/4 teaspoon cream of tartar
For rolling:
2 tablespoons granulated sugar
1 teaspoon cinnamon
  1. In a large bowl, cream together the butter and sugars with an electric mixer on high speed. Add the egg and vanilla and beat until smooth.
  2. In another bowl, combine the flour, salt, baking soda, and cream of tartar.
  3. Pour the dry ingredients into the wet ingredients and mix well.
  4. Make the dough into dough balls and chill in the refrigerator for an hour or place in freezer bags in the freezer overnight.
  5. In a small bowl, combine the sugar with the cinnamon for the topping. Roll the dough balls in the cinnamon/sugar mixture and place onto an ungreased cookie sheet. Repeat for the remaining cookies.
  6. Bake the cookies for 12 to 14 minutes. The cookies may seem undercooked, but will continue to develop after they are removed from the oven. When the cookies have cooled they should be soft and chewy in the middle.
Makes 16 to 18 cookies

  Chef In Training

Saturday, September 15, 2012

Toasted Coconut Shortbread

Toasted Coconut Shortbread - made September 11, 2012 from Cookies for Kids Cancer Best Bake Sale Cookbook by Gretchen Holt-Witt

I like making this kind of cookie because during a busy work week, you can split the making of it into two manageable stages.  The first is to simply make the dough which is super easy to do, given the short list of ingredients.  The dough is also very easy to work with and shape into logs since it's not too soft or sticky.  Simple roll it into logs, wrap in waxed paper, place in freezer bags and chill in the refrigerator overnight or put in the freezer until you're ready to bake it.  If you put it in the freezer, let it thaw for about 20-30 minutes first before you slice it or else the dough will be too hard and may not slice cleanly (I discovered that firsthand).

The important thing with shortbread is to bake it long enough.  For once I don't advocate underbaking.  You want to fully bake it so it'll have that nice snap when it's cool.  With such a high butter content, it's harder to overbake shortbread, although it certainly is possible.  I liked these cookies; they reminded me of Pepperidge Farm cookies with their buttery taste and crisp snap.  The coconut is a nice touch but it isn't a very strong coconut taste so even non-coconut lovers may enjoy this.
½ cup sweetened flaked coconut

2 sticks (1/2 pound) unsalted butter, room temperature
¼ cup confectioners’ sugar
¼ cup granulated sugar
2 ¼ cups all-purpose flour
¼ teaspoon kosher salt

1.     Preheat the oven to 250°F.  Spread the coconut evenly on a cookie sheet, place in oven and bake until just golden, about 10 minutes.  Set aside to cool.
2.     Place the butter, coconut, and sugars in the bowl of a mixer fitted with a paddle and beat until smooth and creamy.  Scrape down the sides of the bowl, add the flour and salt, beat well and scrape again.  Form the dough into a 1 ½”-diameter log and cover with parchment paper.  Place the log in a resealable plastic bag and refrigerate at least 1 hour and up to 2 days or freeze up to 2 months.
3.     Preheat the oven to 325°F.  Line a  cookie sheet with parchment paper.
4.     With the tip of a very sharp knife, cut ¼” - ½” slices of the dough and place 2 inches apart on the prepared cookie sheet.  Bake until the cookies are just beginning to brown on the edges, around 20 minutes.  Transfer to a wire rack to cool.