Saturday, March 30, 2024

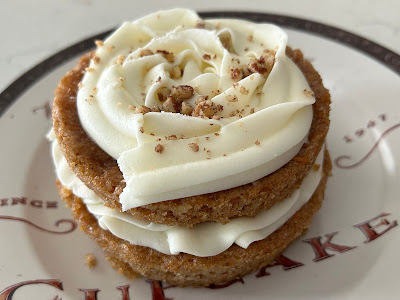
Crumbl Cookies review #68 - Carrot Cake

Crumbl Cookies review #68 - Carrot Cake, visited March 25, 2024
Crumbl's at it again with testing non-cookie offerings, namely small cakes that have an upcharge. It worked well (for me) with the Tres Leches Cake for $6.25, less so with the Cinnamon Square (I paid with loyalty points so I can't remember what it cost). Still, I was interested enough to try the carrot cake offering on tap this week for $5.93. 

The description says this is supposed to have "warm spices, coconut, pineapple, and carrots". Um, well, it had spices and carrots, I'll give you that. For the life of me, I couldn't find the pineapple or coconut. If I'd had, I would've considered this more of a hummingbird cake rather than a carrot cake. 
Ironically, I prefer my carrot cakes to only have carrots (I'm so glad this didn't have raisins) so you'd think I would've liked this cake just fine. Unfortunately, I didn't think it was anything special. It was baked well but the mouthfeel was a trifle dry. I don't think mine was overbaked; that just seemed to be how the recipe was. Plus the flavor wasn't that good; it didn't taste like carrot cake. I know carrots are in there as I could see them but it tasted more like a spice cake with spices that weren't that fresh. 
I have a favorite carrot cake recipe and Crumbl's version isn't as good as that one. Glad I tried it so now I know but it wasn't worth the upcharge and I won't be getting it again. Sorry, Crumbl, but your carrot cake cookie is way better than your actual carrot cake.

Monday, March 25, 2024

Brown Sugar Toffee Cookies from Two Peas and Their Pod

Brown Sugar Toffee Cookies - made dough February 24, 2024 from Two Peas and Their Pod 
2 1/4 cups all-purpose flour
1 teaspoon baking soda
1 teaspoon cornstarch
1/2 teaspoon salt
1/2 teaspoon ground cinnamon
3/4 cup unsalted butter, room temperature
1 1/4 cups dark brown sugar
1 large egg
1 teaspoon vanilla extract
1 cup toffee bits
  1. In a medium bowl, whisk together flour, baking soda, cornstarch, salt and cinnamon; set aside.
  2. In the bowl of a stand mixer fitted with the paddle attachment, cream together butter and brown sugar on medium speed until light and fluffy, 2-3 minutes. Scrape down sides and bottom of bowl to keep mixture even textured.
  3. Add egg and vanilla extract, mixing until combined.
  4. Add flour mixture in 2-3 additions, mixing on low speed, until just combined. Fold in toffee bits.
  5. Portion dough into golf ball size dough balls and flatten slightly. Cover and chill for at least 30 minutes.
  6. When ready to bake, preheat oven to 350 degrees F. Line baking sheets with parchment paper and evenly space dough balls. Bake 10-12 minutes or until edges are set and middles no longer look raw. Remove from oven and let rest on baking sheet for several minutes before transferring to wire rack to cool completely.
I love the concept of brown sugar and toffee in a cookie. It sounds so good, right? When I’ve made it in the past, I almost inevitably then say “good but a little too sweet for me.”
Fortunately, that wasn’t the case here. Yes, it’s sweet but not overwhelmingly so. Or else my sweet tooth was in fine form and didn’t blink. 
It does help, though, not to roll it in brown sugar before baking as many recipes direct. There’s no need for that with these cookies. 
They’re chewy and have good flavor. The toffee bits add a nice crunch once the cookies have cooled and I always love the brown sugar flavor in a cookie. The texture is nicely chewy with crisp edges that aren’t too crunchy or hard. 
The dough also handles really well. You could probably skip the chilling before baking step but I always prefer to do it, partly because I tend to make multiple cookie doughs at once but don’t have time to bake them right then. It’s easier for me to make several different doughs, chill or freeze them then bake everything off at once for care packages for Soldiers Angels.

These are sturdy cookies, meaning not too fragile, and pack and ship well, especially vacuum sealed. 

Tuesday, March 19, 2024

Stamped Cookies #37 from My Gorgeous Recipes

Stamped Cookies #37 - made dough March 1, 2024 from My Gorgeous Recipes
100 grams unsalted butter, softened
100 grams granulated sugar
1 large egg
1 teaspoon vanilla extract
1 teaspoon lemon extract
250 grams plain flour (all-purpose flour)
  1. In the bowl of a stand mixer fitted with the paddle attachment, cream together butter and sugar until combined. 
  2. Add egg, vanilla extract and lemon extract; beat until just combined. 
  3. On low speed, add flour in two additions, mixing until just combined and no floury streaks remain.
  4. Scrape out dough onto a large piece of parchment paper. Cover with another large piece of parchment paper and, with a plain rolling pin, roll to 1/3" thickness if using an embossed rolling pin or 1/4" if using cookie stamps. Keep covered and refrigerate for at least 30 minutes.
  5. Remove from refrigerator and remove top piece of parchment paper. Lightly dust with powdered sugar. Roll with embossed rolling pin or press and cut out with cookie stamps.
  6. Freeze stamped cookies, covered, for at least 1 hour.
  7. When ready to bake, preheat oven to 350 degrees F. Line baking sheets with parchment paper.
  8. Evenly space stamped cookies and bake 10-12 minutes. Remove from oven and let rest on baking sheet for several minutes before transferring to wire rack to cool completely.

I love, love using my Sanrio stamps. Yes, I’m a grown-ass adult but I still love me some cute stamped cookies. Although Hello Kitty is arguably the most popular and well known in the Sanrio portfolio, Little Twin Stars was my childhood favorite. My Melody is cute too and I learned all about Pusheen from a fellow adult Sanrio fan a decade ago. I like the look of Kuromi as well. Sorry though as for the life of me, I think the dog is Pochacco (?) but I don’t remember the frog’s name. (Keroppi?)

The beauty about this particular set of cookie stamps is they’re not too finely detailed but still turn out recognizable stamped cookies. I like using them to test out a stamped cookie recipe in case a stamp with finer details fails. Then I also test out stamps with finer details to see how the same recipe holds up. Either way I hedge my bets to end up with good baked stamped impressions.

As you can see from the pictures, I’m happy to say this recipe worked really well to deliver the stamped impressions faithfully after baking, both with the Sanrio stamps and the more detailed Anis Paradies cookie stamps. 

Flavor-wise, these are also good butter cookies. Not too rich, not too buttery and not too sweet. But also not too bland, which is sometimes a challenge with stamped cookie recipes as some of them use so much flour and cornstarch to hold the impressions that they lose flavor. I do recommend using real vanilla extract (none of that imitation stuff). The original recipe says to use lemon extract for the flavoring but I was giving most of these to my cousins, one of whom was 7 years old and I didn’t know how she felt about lemon flavor. She’s a self-proclaimed vanilla lover so I just doubled down on the vanilla extract to play it safe. Fortunately it worked out and she loved the cute little cookies. Even if you’re not 7 years old, give these a whirl to try out your cookie stamps. 
Side note: I got the Sanrio cookie stamps from Amazon and the Anis Paradies stamps from Kitchen Vixen and Gingerhaus on Etsy.

Saturday, March 16, 2024

Gourmet Thick Peanut Butter Cookies from Lady Behind the Curtain

Gourmet Thick Peanut Butter Cookies - made dough February 24, 2024 from Lady Behind the Curtain 
1 cup unsalted butter, softened
1 1/2 cups brown sugar, packed
1/2 cup granulated sugar
1 cup creamy peanut butter
2 large eggs
1 tablespoon vanilla extract
3 1/2 cups all-purpose flour
1/2 teaspoon salt
1 teaspoon baking powder
1 10-ounce bag peanut butter chips
1 cup peanuts, chopped
1/2 cup granulated sugar, for topping
  1. In the bowl of a stand mixer fitted with the paddle attachment, cream together butter, brown sugar and granulated sugar until light and fluffy, 2-3 minutes. Add peanut butter and beat until combined.
  2. Add eggs and vanilla extract, mixing until combined.
  3. In a medium bowl, whisk together flour, salt and baking powder. Add in 2-3 additions to butter mixture, mixing on low speed until just combined.
  4. Add peanut butter chips and chopped peanuts, mixing until evenly disbursed.
  5. Portion into 14 equal-sized dough balls and flatten slightly. Roll in granulated sugar. Chill, covered, for at least 1 hour.
  6. When ready to bake, preheat oven to 350 degrees and line baking sheets with parchment paper. Evenly space chilled dough balls, allowing room to spread. Bake 16-18 minutes or until edges are set and middles no longer look raw or shiny. Let rest on baking sheets for at least 10 minutes before transferring to wire rack to cool completely.
If you thought I was going to caveat this post with my usual "this was good but I'm indifferent to peanut butter so it was just okay", you'd be wrong. These cookies were fantastic, my indifference to peanut butter be damned.
I can't even tell you why I liked them so much other than they lived up to their name of being "thick" and the texture was perfect, not crisp or crumbly but not too soft and fragile. Just right. I didn't even mind the peanut butter chips or the granulated sugar coating.
A couple of caveats though: as you can see from the pictures, these hardly spread at all so they ended up being more like cookie mounds rather than thick cookies. I baked them from frozen dough which partially explains it but I don't think these would spread much even if baked right after mixing.
If you want the uniform thickness of a larger cookie like Lady Behind the Curtain has them on her blog, shape the dough into thick, flatter discs or basically the size and thickness you want the cookies to end up being since, really, these hardly spread at all.
They are a bit delicate while warm so let them cool completely. The cooled texture will be worth it. And defying my usual bias against nuts in cookies, these were perfect with chopped peanuts mixed in. Peanuts in the cooled cookie didn't soften and added a nice crunch to the thick cookie. 
My niece and her boyfriend are peanut butter lovers so I'll have to remember to make these for them next time I see them. If *I*, the indifferent-to-peanut-butter eater, really, really liked these, I imagine actual peanut butter lovers would love them.


Tuesday, March 12, 2024

Supersized, Super-Soft Chocolate Chip Cookies from King Arthur Flour

Supersized, Super-Soft Chocolate Chip Cookies - made dough February 1, 2024 from King Arthur Flour

I got this recipe from the King Arthur catalog but you can also find it online from their website. The recipe has more steps than your average cookie recipe so I just posted the screenshot rather than typing it out. Yes, I got a case of the lazies.
What makes this different from your typical chocolate chip recipe is the use of the tangzhong. Before that term freaks you out or makes this recipe sound hard, it’s simply cooking a portion of the flour with milk before adding it to the rest of the dough.
It’s a common technique used for making soft, fluffy milk bread, a hallmark of Asian bread which I love. In the case of chocolate chip cookies, presumably it makes it “super-soft” as the name proclaims. 
I’ve made so many chocolate chip cookie recipes in my lifetime that I’m always intrigued by a new way to make it and willing to give it a try. Which I did.
Since the cookies are meant to be super-sized, so are the dough balls. I didn’t even try to make these normal sized. But it did mean they baked up pretty big, in part because they also spread a lot. You can see from the picture that the taste test cookie was as big as a saucer. 
I have mixed feelings about this cookie. It was good, no doubt about it. I prefer my chocolate chip cookies to be crisp at the edges and chewy in the middle, not to mention buttery with brown sugar caramelized flavor. Which this cookie had in spades. So that was all good. 

My only reservations are because this baked big and spread big, by the time the middle was no longer raw but still slightly underdone (which is how I like them), the edges had baked to where they weren’t just crisp at the outer edges but rather crunchy almost a third into the center of the cookie. Good but not my first preference. The “super soft” part only really describes the middle of the cookie, not the outer edge. If I make these again, I would probably make them smaller. Still, for the chocolate chip lovers in your life who like thinner and crunchier cookies without being completely flat, this is a good one to test on them.


Friday, March 8, 2024

Red Velvet Brookies from Broma Bakery

Red Velvet Brookies - made dough February 24, 2024 from Broma Bakery 
2 1/2 cups all-purpose flour
3/4 cup cocoa powder
1 teaspoon baking powder
1/4 teaspoon baking soda
2 teaspoons kosher salt
1 cup unsalted butter, room temperature
1 cup packed light brown sugar
1/2 cup granulated sugar
2 large eggs
4 tablespoons red food coloring
1 tablespoon vanilla extract
2 cups white chocolate chips
  1. In a medium-size bowl, whisk together flour, cocoa powder, baking powder, baking soda and salt; set aside.
  2. In the bowl of a stand mixer fitted with the paddle attachment, cream together butter, brown sugar and granulated sugar until light and fluffy, 2-3 minutes.
  3. Add red food coloring and vanilla extract, mix to combine until color is evenly disbursed. Add eggs, one at a time, and mix until just combined.
  4. Add dry ingredients in two additions, beating on low speed after each addition, until just combined and no floury streaks remain. Do not overmix. Fold in white chocolate chips, reserving a handful.
  5. Divide dough into 12 equal portions, rolling into balls and flattening slightly. Cover and chill for at least 2 hours or overnight.
  6. When ready to bake, preheat oven to 375 degrees F. Line baking sheets with parchment paper. Evenly space 6 cookies to a sheet and bake one sheet at a time, for 15-17 minutes or until edges are lightly set and middle no longer look raw. Remove from oven and gently press reserved white chocolate chips over tops of cookies. Let rest on baking sheet for 10 minutes before transferring to wire rack to cool completely.
I love me a good red velvet cookie and this one was a good one. It's not super rich although I'd definitely pace yourself if you make the cookies as big as I did. The white chocolate pairs perfectly with the red velvet as it offers a little sweetness to offset the richness of the cookie. Yes, you can be rich and sweet and so can cookies. 

They didn't spread that much so they stayed nice and chubby. Whenever baking with white chocolate, try to tuck most of the white chocolate chunks inside the cookies so they don't burn during baking. You can always press more white chocolate chunks on top as soon as you take the cookies out of the oven like I did with the test cookie in the first picture.
Since I was shipping these, I didn't put the white chocolate on top of the other cookies as they would just make a mess if they melted en route to a desert country.
My only issue with these is I don't think you need the full 4 tablespoons of red food color that the recipe calls for. I ended up using less than 3 tablespoons with Americolor red food gel and it still seemed like a lot. Just use enough to achieve the red velvet color you want.