Saturday, July 17, 2021

Crumbl copycat Milk Chocolate Chip Cookies recipe compilation

Have you ever heard of Crumbl Cookies? If you haven't, I recommend checking out their website and keeping a Kleenex handy to wipe the drool from your screen. I won't repeat their story since they write it up so nicely on their website here but it's worth a look.


Sadly, there's no Crumbl where I live and I'd never heard of them until I was surfing Pinterest and kept seeing all these Crumbl copycat recipes. It was like the new copycat craze after Levain Bakery copycats. And like any good obsessive baker, I had to try a bunch of them for myself. At the time I made these, I had not had an authentic Crumbl cookie since there wasn't one in my area so I had nothing to compare the copycats too. I made my notes about them as I made each one but it was more to judge them as milk chocolate chip cookies rather than as Crumbl copycats.

To cut to the chase, these are all fine recipes. As long as you're using fresh, good-quality ingredients, it's hard to go wrong with whopping big chocolate chip cookies eaten warm with melting milk chocolate chunks. Truly. Rather than write out each recipe which would make this post too long for text instead of just pictures, I've summarized them in an Excel table at the bottom of this post and provided the links to each one underneath their picture so you can go directly to each site from which I got the recipes.

You'll notice from the dates that I made the doughs within the same 2-week timeframe but I will admit, I didn't bake each one and taste test them without having at least a week or three between taste-test cookies. Eating 6-ounce cookies need to be spaced out, even for me. I made a 6-ounce cookie from each batch then baked the rest as normal-sized cookies for military care packages. Win-win for everyone.

Now, since the taste test cookies, I did end up being able to try a genuine Crumbl cookie from an actual Crumbl franchise bakery. Turns out there's one 2 hours away from me. While even I won't drive 2 hours just for a cookie (er, at least I don't think I would), serendipitously, the Crumbl bakery was on the way to the Bay Area and was less than a mile out of my way when I did a road trip back to my geographic roots last month. So I got to try the original milk chocolate chip cookie as well as their Samoa cookie. Crumbl rotates their cookie flavors each week and I was lucky enough to catch the Samoa when I went.

Crumbl Milk Chocolate Chip cookie


You go inside the bakery to place your order then wait outside for them to give it to you. The retail space is small and shares space with an open kitchen so customers can see the baking activity. During these Covid times, only a limited number of people are allowed inside and most customers have to wait outside for their orders to be brought out in the signature pink Crumbl bakery box(es). 
Crumbl Samoa cookie


My 2 cookies came 1 to a box and were given to me warm. Think of a Mrs. Fields cookie back in its heyday but on steroids in terms of size, flavor and classy packaging. And price. I only had room in my belly for one cookie (at a time) so I only had half of the milk chocolate chip cookie while it was warm and while I was continuing on my road trip. Yes, it was delicious. I think it's hard to beat a well-made, warm chocolate chip cookie. It had a softer outside texture than a Levain Bakery cookie and was flatter but not flat. It also wasn't as sweet or as frankly overwhelming as a Levain cookie. I like both and you can't make me choose a favorite.

In terms of price, I paid $10 for 2 Crumbl cookies but that included the tip I left the bakery workers so, if memory serves, each cookie was $4. Which might seem a bit steep for a cookie but think of it as spending $4 for the experience, not just the cookie. Make sure to eat it warm though because that is part of the experience. 

I can't say any of the copycats were that close to the real Crumbl cookie but, in fairness, since I didn't eat them side by side at the same time, I may not be the best judge as I'm only going by memory over a span of 2 months' worth of cookies. I will say all of these copycat recipes are good chocolate chip cookie recipes. I would say the same thing of all the Levain Bakery copycats as well. Not quite the real thing but still good recipes, although I might have to give the nod to the recipe from Salt & Baker as my favorite of this batch of recipes that I tried. For all of these recipes though, I do advise double panning them for baking so the cookie bottoms won't get too hard or overbaked while the rest of the (giant) cookie catches up. In hindsight, I would also minimize the number of chocolate chips on the outside of the cookie. Tuck them inside the cookie dough before baking then as soon as you take the cookie(s) out of the oven, press the milk chocolate chips gently on the outside of each cookie. Since the bake time is so long on big cookies, the chocolate chips on the outside of the cookie will have a tendency to burn, especially if you bake at a higher temp or your oven runs hot. Better to press the chocolate chips on the outside of the cookie as soon as it's baked.

Copycat Recipes 
Salt and Baker

Salt & Baker (made dough April 4, 2021)


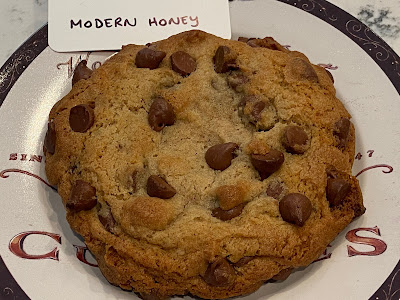
Modern Honey (made dough April 4, 2021)


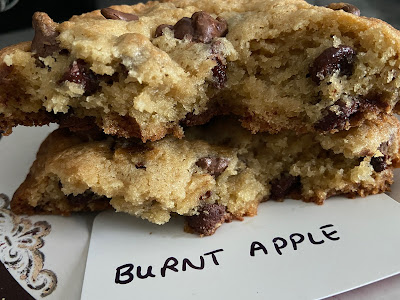
Burnt Apple (made dough April 4, 2021)


The Cafe Sucre Farine (made dough April 5, 2021)


Ivy Lauren blog (made dough April 5, 2021)


Let's Dish (made dough April 18, 2021)


Friday, July 16, 2021

Cornmeal Sugar Cookies

 Cornmeal Sugar Cookies - made dough June 26, 2021 from Yellow Bliss Road
I'm not quite sure how I feel about these. I tried them for something new beyond the typical sugar cookie. They spread a bit more than I would've liked but were nicely chewy and recognizable as a sugar cookie.
If you didn't know they had cornmeal in them, you might pause to wonder at the different flavor but it's easily figured out. There's a very slight grittiness from the cornmeal but not enough to distract.
I'm not sure if I loved the flavor though but it wasn't bad. If you want to try something different from a typical sugar cookie, this is a good option.
1 cup unsalted butter
1 1/2 cups granulated sugar
1 large egg
1 teaspoon baking soda
1/2 teaspoon cream of tartar
1 tablespoon vanilla extract
3/4 cup yellow cornmeal
1 3/4 cups all-purpose flour
  1. Cream butter and sugar in a large bowl until well combined and fluffy, 2-3 minutes. Add egg, baking soda, cream of tartar and vanilla; mix until combined. Mix in cornmeal and flour until just combined.
  2. Portion into dough balls (these cookies spread so don't make dough balls too large), cover and chill or freeze for several hours or overnight.
  3. When ready to bake, preheat oven to 350 degrees F. Line baking sheets with parchment paper. Roll dough balls into granulated sugar if desired (optional) and space evenly on prepared baking sheets. Bake for 9-12 minutes or until edges are set and middles no longer look raw. Remove from oven and let rest on baking sheets for 3-4 minutes. Remove to wire rack to cool completely.

Thursday, July 15, 2021

Snickerdoodles - half butter, half shortening

Snickerdoodles - made dough July 4, 2021 from Homemade Interest
Although I have my favorite snickerdoodle recipes here and here, both are made with all butter. Not a bad thing in my book but since I'm still mostly baking for Soldiers Angels' care packages going to hot climates, I'm temporarily trying to incorporate baked goods made at least partially with shortening to help with the shelf life en route and in triple degree heat.
Hence why I wanted to try out this recipe since it uses half shortening and half butter. While it doesn't unseat either of my favorite snickerdoodle recipes, it was still quite good so it just became my summer snickerdoodle recipe.

When making any cookie dough by combining shortening and butter, remember that cold butter out of the refrigerator will be much harder and more difficult to incorporate with the softer texture of solid shortening. If you try combining just the two together, it'll be more difficult to get the lumps out of the butter. And I'm not a fan of letting butter get to "room temperature" in hot weather as then you risk the butter becoming too soft before you can mix it which will impact the texture of your dough and make it softer and more greasy.
 

Instead, I recommend beating the butter for a minute or so to soften it and make it more creamy for mixing. Then beat it with the sugars first before adding the shortening; that'll help the ingredients incorporate with each other more easily while not risking butter lumps in your dough.

2 3/4 cups all-purpose flour
2 teaspoons cream of tartar
1 teaspoon baking soda
1/4 teaspoon salt
1/2 cup butter
1/2 cup shortening
1 cup granulated sugar
1/2 cup brown sugar
2 eggs
2 teaspoons vanilla extract

Coating
4 tablespoons granulated sugar
2 teaspoons cinnamon
  1. In a medium bowl, whisk together flour, cream of tartar, baking soda and salt; set aside.
  2. In the bowl of a stand mixer fitted with the paddle attachment, cream together the butter, shortening, granulated sugar and brown sugar. If your butter is cold, beat the butter separately first, add in the sugars then the shortening. Beat until fluffy and well combined, 2-3 minutes.
  3. Add the eggs, one at a time, followed by the vanilla; beat until combined.
  4. Add the flour mixture in 2 additions, mixing after each addition until just combined. Do not overmix.
  5. Portion dough into golf-ball-size dough balls, cover and chill or freeze for several hours or overnight.
  6. When ready to bake, preheat oven to 375 degrees F. Line baking sheets with parchment paper. 
  7. In a small bowl, combine granulated sugar and cinnamon. Roll dough balls in mixture, thoroughly coating each. Evenly space coated dough balls on prepared sheets. Bake for 8-10 minutes or until edges are set and middles no longer look raw. Let rest for several minutes on baking sheets then remove to wire rack to cool completely.

Tuesday, July 13, 2021

White Chocolate Macadamia Cookies as a pizookie

White Chocolate Macadamia Cookies - made dough May 30, 2021 from Just So Tasty 
Unfortunately I don't have any pictures of this recipe as normal cookies. I made them into dough balls when I first mixed the dough but, at my mom's request, I baked the dough balls in a 6-inch cast iron skillet, one every weekend for 4 weeks, so we could eat it with vanilla ice cream as a pizookie. Yeah, it was as good as that sounds. So good in fact that I never even baked an individual dough ball even for picture taking purposes. They were all sacrificed for our Sunday lunch pizookies. All for a good cause as these were delicious. Every single time. Crisp at the edges, chewy in the middle and the right balance of sweetness between the white chocolate chunks and the macadamia nuts. Don't forget the vanilla ice cream.
3/4 cup unsalted butter, melted and cooled
1 cup brown sugar
3/4 cup granulated sugar
1 large egg
1 large egg yolk
2 teaspoons vanilla extract
2 1/4 cups all-purpose flour
1 tablespoon cornstarch
1 teaspoon baking soda
1/2 teaspoon salt
2/3 cup macadamia nuts, lightly toasted, coarsely chopped
3/4 cup white chocolate chips
  1. In the bowl of a stand mixer fitted with the paddle attachment, beat together melted sugar, brown sugar and granulated sugar until combined.
  2. Beat in the egg, egg yolk and vanilla extract.
  3. In a separate bowl, whisk together the flour, cornstarch, baking soda and salt. Add in two additions to the butter-sugar mixture, mixing briefly after each addition until just combined.
  4. Fold in macadamia nuts and white chocolate chips.
  5. Portion dough into golf-ball-size dough balls, cover and chill or freeze for several hours or overnight.
  6. When ready to bake, preheat oven to 350 degrees F. Line baking sheets with parchment paper. Evenly space dough balls on baking sheets. Bake 8-10 minutes or until edges are golden brown and middles no longer look raw. Remove from oven, let cookies set on baking sheets for 5 minutes then remove to wire cooking rack to cool completely.

Sunday, July 11, 2021

Brown Sugar Shortbread

Brown Sugar Shortbread - made dough May 29, 2021 from Sally's Baking Addiction 
I uncharacteristically only have one picture of this shortbread and that's only because I was doing a baking marathon for Soldiers Angels' care packages and snapped pics of all the different cookies going into the packages. Which is a shame because this was an excellent shortbread cookie and deserved much more pictorial glory than I can offer.

I love shortbread and this combines the best of all worlds with a crisp texture or "snap" of a good shortbread and the caramelized buttery goodness of a good butter cookie. It's also great if you need a lot of cookies and are doing marathon baking sessions because you can make the dough ahead of time, shape into logs, chill or freeze then, when you're ready to bake, slice thickly and bake. This is the rare time I don't recommend underbaking because you want to bake these long enough to get that crisp texture. No muss, no fuss and really excellent flavor and texture. It's also good for people who prefer more plain cookies or have nut allergies.

2 1/4 cups all-purpose flour
1/2 teaspoon salt
1 cup butter, softened
1 cup light brown sugar
1/3 cup dark brown sugar
1 1/2 teaspoons vanilla extract
coarse sugar for rolling, optional
  1. In a small bowl, whisk together flour and salt; set aside.
  2. In the bowl of a stand mixer fitted with the paddle attachment, cream together butter, light brown sugar and dark brown sugar until combined and creamy. Add vanilla extract and mix to combine.
  3. Add dry ingredients in two additions, mixing until just combined after each addition.
  4. Divide dough in half on parchment paper and shape each half into an 8-inch log, about 2 1/2 inches in diameter. Roll in parchment paper and place in ziploc freezer bag. Chill for at least 4 hours or overnight. Dough can also be frozen but thaw in the refrigerator for an hour before baking to make slicing logs easier.
  5. When ready to bake, preheat oven to 350 degrees F. Line baking sheets with parchment paper. Unwrap logs from parchment paper and roll in coarse sugar, if using. Slice each log into equally thick slices. Evenly space on baking sheets. Bake 12-14 minutes or until golden brown around edges. Let cool on baking sheets for 5 minutes before removing to wire rack to cool completely.

Saturday, July 10, 2021

Homemade Biscoff Cookies

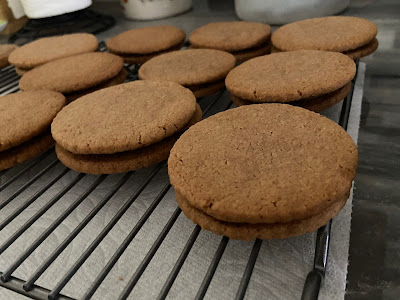
Homemade Biscoff Cookies - made dough June 26, 2021 from Kleinworth & Co
If you like all things cookie butter, I've got another winner for you. Cookie butter is made from Biscoff or cookie butter cookies. I'm sure there are other ingredients in there but that's the crux of it. 
I love both Biscoff cookies and cookie butter itself. I try not to buy the Lotus Biscoff cookies or Trader Joe's version of Speculoos cookies because - wait for it - I would eat it. A lot of it if I could. 
But I couldn't pass up a chance to make this homemade version of it. The original blog offered a simple version of the cookies: make dough, roll out, cut out, bake.
I went one step extra because...why not? I rolled them out, cut them out then for some of them, used a smaller cookie cutter to put a design in the middle because I had already planned to make these as sandwich cookies and wanted the filling to be visible in the center. Then, still being extra, I drizzled a few of them with melted cookie butter for a little more cookie butter goodness.

The only other thing I did differently from the original recipe was leave out the allspice simply because I didn't have any. I had all the other spices though and the cookie didn't suffer from the omission of the allspice (I don't think) because it really did taste like a Biscoff cookie/ Not quite as crunchy in texture but the flavor was definitely there.


Overall this was a great cookie. You can keep them plain or fancy them up like I did. Either way you can't go wrong because cookie butter....
1 cup butter
1/2 cup granulated sugar
1/4 cup brown sugar, firmly packed
1 teaspoon vanilla extract
2 cups all-purpose flour
1 tablespoons ground cinnamon
1/4 teaspoon ground nutmeg
1/4 teaspoon ground ginger
1/4 teaspoon ground allspice (I didn't have any so I left it out)
1/4 teaspoon ground cloves
1/2 teaspoon salt
1/2 teaspoon baking soda
  1. In the bowl of a stand mixer fitted with the paddle attachment, cream together butter, granulated sugar and brown sugar until well combined and fluffy, 2-3 minutes. Add vanilla and beat until just combined.
  2. In a separate bowl, whisk together the flour, cinnamon, nutmeg, ginger, allspice, ground cloves, salt and baking soda. Add to butter mixture in two additions, mixing briefly after each addition until just combined.
  3. Divide dough in half, place each half on a large piece of parchment paper, place another piece of parchment paper over it and roll out to 1/4" thickness. Chill for at least 30 minutes in the refrigerator. When chilled, remove from refrigerator and cut into desired shapes. Cover and chill or freeze for another 30 minutes or longer.
  4. When ready to bake, preheat oven to 350 degrees F. Line baking sheets with parchment paper. Evenly space cutout cookies on prepared sheets. Bake for 13-16 minutes or until cookies are set and show tiny fissures around the edges. Let rest on baking sheets for 5 minutes then transfer to wire racks to cool completely. Cookies will crisp up as they cool.

Friday, July 9, 2021

Amazing Chocolate Chip Cookies from 5 Boys Baker

Amazing Chocolate Chip Cookies - made dough July 1, 2021 from 5 Boys Baker
I've mentioned before that during the hot summer months when temps in the places I'm sending care packages to as a volunteer for Soldiers Angels get to triple digits - and I'm not talking low 100s but in the 115-120+ range - that the angel baker volunteers are recommended to send baked goods made with shortening  rather than butter to help with survival chances of making it through the heat en route to their final destination. 

Now you know that kills my butter-loving soul, right? Even with my constant inner voice reminding me "it's not about you", I still cringe when I bake with shortening instead of butter. It's hard, people. The struggle is real.

So I was pleased to find this recipe and I consider it a compromise since it's made half with butter and half with shortening. I was even more pleased that it really is an amazing chocolate chip cookie as the original blog advertised.
The shortening adds to the airy crispness of the cookie and the butter flavor still comes through to make it an excellent cookie. I'm keeping this for summer months baking.

1 cup shortening
1 cup butter, softened
1 cup granulated sugar
1 1/2 cups brown sugar
2 extra large eggs
2 teaspoons vanilla
4 cups all-purpose flour
1 teaspoon salt
2 teaspoons baking soda
2 cups milk chocolate chips
2 cups semisweet chocolate chips
  1. In the bowl of a stand mixer fitted with the paddle attachment, cream together shortening, butter, granulated and brown sugar until well combined and fluffy, 2-3 minutes.
  2. Add eggs and vanilla, beating until incorporated.
  3. In a separate bowl, whisk together flour, baking soda and salt. With the mixer on low, add to butter mixture in three additions, mixing after each addition until just combined. Fold in chocolate chips.
  4. Portion into golf-ball-size dough balls. Cover and freeze for several hours or overnight.
  5. When ready to bake, preheat oven to 375 degrees F. Line baking sheets with parchment paper and evenly space frozen dough balls. Bake 8 - 11 minutes or until the edges are set and the middles just barely no longer look raw. Remove from oven and let rest on cookie sheets for several minutes then remove to wire rack to cool completely.

Wednesday, July 7, 2021

Chewy Coconut Cookies

Chewy Coconut Cookies - made dough June 26, 2021 from Kirbie Cravings
I'm going to keep this short and blog out of order because, if you're a coconut lover, you need to scroll all the way down to the recipe and make these. Preferably now. You'll thank me later.

This is probably one of the best coconut cookies I've ever had. Normally I like my cookies to be soft and chewy with maybe a little bit of crisp at the edges. This was more crisp except for the center but that's part of what made them so good.

I made a couple of modifications which I noted in the recipe. Namely, I used vanilla extract instead of coconut extract because, much as I love coconut, I hate coconut extract and its metallic artificial taste. Vanilla extract worked just fine.

This is also perfect to make in the summer and hot temps because there's nothing to melt if you were to pack some for a picnic and eat one or five. Enjoy.


2 3/4 cups all-purpose flour
1 teaspoon baking soda
1/2 teaspoon baking powder
1 cup butter
1 1/2 cups granulated sugar
1 egg
1 teaspoon coconut extract (I used vanilla)
1 cup shredded unsweetened coconut (I used sweetened, flaked coconut)
  1. In a medium bowl, whisk together flour, baking soda and baking powder; set aside.
  2. In the bowl of a stand mixer fitted with the paddle attachment, cream together butter and sugar until fluffy and well combined, 2-3 minutes. Beat in egg and extract.
  3. Add the flour mixture in 2 additions, mixing briefly on low speed until just combined. Do not overbeat. Add coconut and mix just until combined.
  4. Portion dough into golf-ball-size balls and flatten slightly into thick discs. Smooth edges with your fingers so no coconut pieces stick out. Cover and chill or freeze for several hours or overnight.
  5. When ready to bake, preheat oven to 350 degrees F. Line baking sheets with parchment paper. Evenly space dough discs on prepared sheets. Bake 10-12 minutes or until edges are set and lightly golden brown and middles no longer look raw. Let rest on baking sheets for several minutes then transfer to wire rack to cool completely.

Friday, July 2, 2021

Triple Fudge Oreo Crunch Cookies

I don't normally bake with shortening but when sending military care packages to the Middle East during the summer months, that's exactly what we're advised to do. Because of the potentially long mailing time (typically my packages can get to their destination in 10 days to 3 weeks) and the triple digit heat, butter-based baked goods can go rancid.
Rancid is not a word anyone, baker or recipient, can look forward to. So I try to suppress my baking snobbery and go with shortening or partial shortening in recipes during the summer months.
Rather than experiment by subbing in shortening when butter is called for in an original recipe, I tend to use recipes that start off with shortening in the first place. No worries about substitution and someone else has already tested them out, right?
Such was the case here. I'm a fan of Oreos so it wasn't a hardship to pick this recipe to send out in desert-bound care packages. The flavor was good. The texture was more crisp than chewy which is the effect of the shortening. My snobbery had to be suppressed for safety and durability but this was a good stand-in for a butter-based cookie.

1 cup butter-flavored shortening
1 1/2 cups granulated sugar
2 large eggs
1 teaspoon vanilla
2 1/4 cups all-purpose flour
1/2 cup unsweetened cocoa
1 teaspoon baking soda
1 teaspoon salt
1 1/4 cups chocolate chips
12-15 Oreos, roughly cut into quarters
3/4 cup white chocolate chips
  1. In the bowl of a stand mixer fitted with the paddle attachment, cream together shortening and granulated sugar until light and fluffy, 2-3 minutes. Add eggs, one at a time, beating just until combined, after each addition. Beat in vanilla.
  2. In a medium bowl, whisk together flour, cocoa, baking soda and salt. Add to mixing bowl in two addition, mixing until just combined after each addition, until no flour streaks remain.
  3. Fold in chocolate chips, Oreos and white chocolate chips.
  4. Portion dough into golf-ball-size dough balls and flatten slightly. Cover and chill or freeze for several hours or overnight.
  5. When ready to bake, preheat oven to 350 degrees F. Line baking sheets with parchment paper and evenly space dough balls. Bake 9 - 11 minutes or until edges are set and middles no longer look raw. Cool cookies on baking sheets for 5 minutes then remove to wire rack to cool completely.