Tuesday, November 19, 2013

Cinnamon Sugar Banana Lumpia

Cinnamon Sugar Banana Lumpia - made November 16, 2013 from Imperial Sugar
Want a super easy dessert recipe with caramelized bananas in a crispy wrapper topped with caramel and nutella?  Then read on, MacDuff.  This is reminiscent of turon, a Filipino dessert of bananas and sometimes langka (jackfruit) rolled into a lumpia wrapper and fried to crunchy goodness.  This is the healthier version since it involves baking rather than frying.  But it still has the same goodness of a "fried" banana.  I was only making this for myself so I halved the amount of brown sugar and cinnamon and only used 1 banana that I sliced and distributed between two lumpia wrappers. I still have leftover brown sugar-cinnamon but I'll use that for another dessert.
You can get lumpia wrappers at any Asian grocery store.  My mom gets them from 99 Ranch and I get them from shopping in her refrigerator since I rarely go to 99 Ranch myself and she always has them on hand for making lumpia :). This was super easy to make and they really did get crunchy except in the middle but that was okay.  The bananas caramelized in the baking and paired well with the brown sugar and cinnamon it was dredged in.  The only caution is when you roll them up in the lumpia wrapper, roll them tightly so that none of the melting insides leak out.  Otherwise they won't be as pretty.

Mine didn't come out as nice-looking as the ones on the Imperial Sugar site.  I could've wrapped the banana slices more tightly in the wrapper and made them more cylindrical instead of flat.  The original directions about how to roll them aren't very clear other than rolling into a cylinder but I like to wrap them completely, including the sides so I bring the bottom of the wrapper up over the bananas, fold over the two ends to almost meet in the middle (like an envelope) and roll the whole thing into the top, keeping the seam down during baking.  Regardless of their appearance, this was really good as the lumpia wrapper did get crispy in the oven and the baked banana caramelized beautifully.  Top with a little melted nutella and some drizzles of caramel?  Heaven in a bite.
3/4 cup light brown sugar
2 teaspoons cinnamon
8 bananas, peeled and ends cut
8 lumpia wrappers*
confectioners' sugar for dusting, if desired
Salted caramel for drizzling 
Melted chocolate for drizzling
  1. Preheat oven to 400°F. Line a baking sheet with parchment paper.
  2. In a medium bowl, combine brown sugar and cinnamon.
  3. Working one at a time, dredge banana in cinnamon sugar mixture and place banana on lumpia wrapper. Bring bottom edge of wrap tightly over banana, rolling from bottom to top until the top of sheet is reached, being careful not to tear wrapper. Repeat with remaining wrappers and filling.
  4. Place wrapped bananas onto prepared baking sheet and lightly coat with cooking spray. Place into oven and bake for 20-25 minutes, or until golden brown.
  5. Serve immediately, garnished with confectioners sugar (optional) and drizzle with salted caramel and melted chocolate, if desired.
*If lumpia wrappers are not available, you can substitute egg roll/spring roll wrappers.

Monday, November 18, 2013

Carrot Cake - trying a new recipe

"Sinfully Delicious" Carrot Cake - made November 13, 2013 from Lou Lou Girls
in the light box, with flash
So, before I aborted the Whole 30 diet before the 30 days were up, I bought a huge pack of organic carrots at Costco.  Even eating one a day (and they were really sizable carrots), I wasn't going to be able to go through them all unless I transformed into a rabbit with an appetite on steroids.  I gave half of them to my parents but I still had too many to eat at my one-a-day pace.  So a new carrot cake recipe to try comes to the rescue.

I love carrot cake.  I don't make it often because carrots are a pain to grate and I grate them the old-fashioned way with my almost-falling-apart-but-not-enough-to-justify-buying-a-new-one grater (yeah, I'm cheap when I feel like it). Plus carrot cake isn't very healthy because of the oil in the batter and the cream cheese frosting.  Much as I don't care for cream cheese, carrot cake should only be eaten with cream cheese frosting.  It's an unwritten rule in baking. One which I adhere to so much that I had to make a special trip after work to Costco to buy a block of cream cheese. Okay, it wasn't so special since Costco is literally on my way home from work so I stopped by after I had run at the gym.  Only, you know how you go to Costco and remember 3 other things you need?  I was so intent on buying the other stuff "while I was there anyway" that, yep, I walked out of Costco, got home, put away what I'd bought and realized I'd forgotten to get the cream cheese. Oy. So I stopped off again the next night to buy it.
in the light box, without flash
Baking cakes on weeknights is tricky for me because I have to get whatever I make mixed, in the oven, baked, out, cooled and frosted in time for me to get to bed at a decent hour.  I rarely bake a cake when I work late, run errands, go out or when I workout after work unless I'm working out while it's in the oven. There just isn't enough time.  For this particular cake, I threw together the dry ingredients in a bowl before I left for work so that once I got home, it was an easy matter of peeling and grating the carrots and mixing all of the ingredients together while my oven preheated. The frosting is easy to make once the cake is out of the oven and cooling. I frosted it before I went to bed then cut it into squares before I left for work in the morning.  You never want to cut a cake or brownies until the last minute before serving or the cut edges will dry out.

Overall, I thought this cake had a great texture (soft and fluffy) and the flavor was good but what kept it from being great is I could taste the oil.  At first I worried that my oil might've gone rancid as that's usually when I can taste oil.  But I checked the bottle and nope, it's still good for another eight months.  Then I thought maybe this recipe uses more oil than typical but I compared it against my favorite carrot cake recipe and they both use 1 cup of oil, albeit the other ingredients are in different proportions. So I'm not quite sure what it is.  The cake is still good but it doesn't depose Jim Fobel's recipe as my favorite.  I still have a few more carrots left so I think I will keep experimenting with new carrot cake recipes a couple more times.
my camera isn't good enough to take great pictures without natural light
2 cups flour
2 teaspoons baking soda
2 teaspoons baking powder
1/2 teaspoon salt
3 teaspoon cinnamon
1/2 teaspoon nutmeg
4 eggs
1 cup oil
1/4 cup butter, melted
1 cup white sugar
1 cup brown sugar, packed
2 teaspoon vanilla
3 cups carrots, grated (I used 1 large and 1 medium carrot)
  1. Preheat oven to 325 degrees. Grease and flour the pans that you will be using.
  2. In a bowl, combine eggs, oil, butter, sugars, and vanilla until light and fluffy.
  3. Mix together in a bowl, flour, baking soda, baking powder, salt, cinnamon, and nutmeg.
  4. Add the dry ingredients to the wet mixture and mix for about 2 minutes.
  5. Add the grated carrots. You can add nuts and raisins if you want.
  6. Pour the batter into the cake pans and bake 45 to 50 minutes. To check to see if its done, insert toothpick and if it comes out clean, its done.
  7. Cool completely before you frost the cake. 
Frosting1 stick of butter (4 ounces)
1 package of cream cheese (8 ounces)
2 teaspoons vanilla
4 cups powdered sugar
  1. In a bowl, beat together cream cheese, butter, and vanilla until creamy. Add powder sugar and beat until fluffy. Be sure to scrape down the sides of the bowl and beat a little longer.

Restaurant Review: Lillie Mae's House of Soul Food

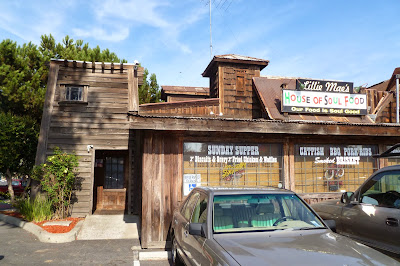
Lillie Mae's House of Soul Food - lunch November 14, 2013
A friend recommended Lillie Mae's House of Soul Food saying she'd heard good things about it.  That's usually all I need to try out a place so when a coworker and I met for lunch, I suggested we try out this place.  It's in a bit of a weird location, kitty corner from a Costco and right near the airport.  I'd been to that Costco before but had never noticed the restaurant.

It's got a bit of a "dive" vibe but that only made me more hopeful because you know those types of places can have really good food.  The menu was also right up my alley with ribs, chicken, and beef, all offered in bbq sauce or, in the case of the chicken, you can also get it fried.  There was also a good selection of sides, including my favorite sweet potato fries.

Depending on your choice, you can choose a lunch of under $10 or pay a few dollars more for a combo for $12-$15.  Since I wanted to try a little variety, I opted for the combo of BBQ pork ribs and chicken with sweet potato fries.  My coworker got the brisket with sweet potato fries and sweet tea.
BBQ Pork Ribs, BBQ Chicken and sweet potato fries
The good: the sweet potato fries were excellent, crisp on the outside and mealy inside and not greasy.  The sauce for the BBQ was also quite good, not too sweet and just really good flavor. For the price, they give you a generous helping so if you like barbecue, you're getting your money's worth.

The less good: the chicken was tender but the pork ribs were not.  I think I'm spoiled with my mom's bbq ribs that just fall off the bone and you could cut with a fork.  These ribs were much more hefty and chewy.  Alas, they only offered butter knives so cutting through it was even harder.  Two generous ribs were also covering the chicken underneath and they all had to share the same plate as the sweet potato fries and two halves of a slice of whole wheat bread.  So eating was rather awkward.
Beef brisket and sweet potato fries
My coworker's choice of the brisket was more manageable on her plate and I had a taste.  They seemed to use the same barbecue sauce so it was good although still not as tender as I've had in other places. Her sweet tea, according to her, was also really sweet.  Similar reviews on yelp suggest that you may want to dilute the sweet tea with some water.  I don't know if the restaurant was having an off day or I just ordered the wrong thing.  I hate to give a bad or even lukewarm review based on just one visit but unfortunately, I can't say I had anything that I would be dying to come back for. If anyone else would want to go, I'd certainly go along and try something else to give it another chance.

Sunday, November 17, 2013

Coconut Battered Shrimp (low carb, paleo, Whole 30)

Coconut Battered Shrimp - made October31, 2013 from Ditch the Wheat
Back when I was eating the Whole 30 way, I found a plethora of recipes using coconut.  I'm more used to baking with coconut but since you're not supposed to consume sugar, dairy or grains on Whole 30, my usual options weren't - well - an option.  However, this coconut shrimp recipe was.
I had a canister of coconut flour in my pantry that I had bought some weeks ago because, at the time, I was planning on making a dessert recipe that called for it.  I never got around to making that particular recipe but it was handy for making this one. I had never cooked or baked with coconut flour before so I wasn't sure what to expect.  But I found out soon enough.  It turns out coconut flour makes a thick batter.  And that it doesn't adhere very easily to shrimp.  I had the devil of a time getting it to stay on the shrimp long enough for me to roll it in coconut and drop it into the hot coconut oil. 
Several key learnings: coconut itself browns very quickly so you don't want to leave it in the oil for too long or it'll burn.  Fortunately shrimp cooks quickly so undercooking it isn't a big risk.  By the time your coconut turns golden brown, the shrimp should be cooked as well.  I also discovered that you can't have coconut oil at too high of a temperature or it'll burn all on its own.  At first I thought it was the coconut itself burning then when my oil got dark too soon, I realized I had the burner on too high.  Lastly, I learned neither coconut flour nor coconut oil is easy to work with unless you know what you're doing. Which I didn't before and I hope I do now.  Mine didn't come anywhere as nice looking as the one from Ditch the Wheat but I thought it was still pretty tasty.  It's really hard for me to mess up shrimp to the point I wouldn't like it though.
2 eggs
2 ½ tablespoons coconut flour
¼ tsp of baking powder
dash of Salt & pepper
1 tsp of your preferred seasoning *optional
8 medium sized shrimp, without the shell
½ cup or more of unsweetened coconut flakes
  1. Preheat your deep fryer to 325 degrees F.
  2. In a bowl whisk the eggs.
  3. Add the coconut flour, baking powder, salt & pepper, and any additional seasoning.
  4. Mix until the batter is smooth.
  5. Put the shredded coconut flakes in a separate bowl.
  6. One at a time, place the shrimp in the batter and using your hands mold the batter around the shrimp and then immediately dip the batter covered shrimp in the coconut flakes.
  7. Press the coconut flakes all over the shrimp and set aside.
  8. Repeat for each shrimp.
  9. Place about 3-4 shrimp at a time in the deep fryer, flipping once when the underside of the batter is golden.
  10. The shrimp is done when it floats to the top, both sides of the batter are golden brown and the shrimp is a pink color.

Saturday, November 16, 2013

Rolo-Stuffed, Twix-Topped Brownies

Caramel & Twix Brownies - made November 8, 2013
We're entering into that time of year where I don't experiment as much with new recipes and go back to tried and true ones.  Mostly because I bake a lot of my holiday gifts and don't want to take a chance with something not turning out. Not with my baking schedule and deliverables.  However, that's not to say I can't put a little twist on something to give it a different spin. And this is also where I say I'm not going to be experimenting with new recipes but that ends up being a lie.  But this time, for these brownies, it's the truth.
I had some caramel-filled chocolates and a bag of Twix from my aborted Halloween night and there's no better place to put them than in brownies.  I had also made Texas Vanilla Cake with Chocolate Frosting earlier for work but forgot that one frosting recipe made more than I wanted to use on the cake so I had leftover frosting as well.  So it was a perfect aligning of the stars to put it all together into one decadent brownie.
I made these for my 13-year-old nephew's birthday party - I figured a bunch of teenage boys could mow through some chocolate treats fairly easily so I needed a recipe that made a 9 x 13 pan.  Click on the links below for the actual recipes to put these together or else use your favorite brownie recipe and chocolate frosting recipe. Note: these are best eaten the day they're made while the shortbread in the Twix is still crisp.  They do ultimately soften because of the moistness of the ganache and exposure to air.
  1. Make the brownies and fold chopped up chunks of caramel-filled chocolates such as Rolos into the batter (optional but adds decadence if you so choose - I left out the nuts)
  2. Drop the chocolate frosting over the top of the baked brownie right when you take it out of the oven and spread smooth.  You can use a half recipe of the one I linked to or your own.  Just don't use a buttercream frosting as that will just melt into a greasy mess.
  3. Sprinkle with chopped up Twix while the frosting is still soft/melt-y and before it sets.
  4. Let cool completely, cut and serve.

Friday, November 15, 2013

Bakery Review: la Terra Bakery

La Terra Bakery - visited October 4, 2013 & October 25, 2013
la Terra Bakery is in the same little strip mall as Gochi Japanese Fusion Tapas so I discovered it when I went to Gochi for the first time.  Anything that says "bakery" demands my immediate attention and investigation. So I popped in to take a look and see what I could get for dessert after lunch. The inside can be considered spacious or sparse, depending on your interpretation. Upon chatting with the lady behind the counter, we discovered they had only been open a little more than a month from the time of our first visit back in early October. 
While it has some of the same elements as a typical Asian bakery in its filled breads, individual packaging and baked wares spread out on trays on a table, it's also got a few differences.  The price points are a little higher and some of the flavors and offerings were more inline with an American bakery.  There was a nice lady behind the counter who offered us samples from a covered tray and explained what the different products were, including that they made most of the products from organic and natural ingredients.  Some of their offerings were also gluten-free.
By the counter was a refrigerated glass case of their more fancy, individual desserts as well as small, whole cakes.  The packaging on the individual desserts was reminiscent of a fancy French bakery which I thought added a touch of class.  Individual cake slices were prettily decorated, on a silvery foil liner and - a stroke of genius - carefully covered with a stiff plastic wraparound to protect the cut slices from drying out. You don't see that kind of care in packaging in most bakeries and, as abhorrent as dry cakes are to me, is much appreciated.
I bought a slice of red velvet cake to have for later and was pleased with the care they took in packaging it up for me to take. But - unfortunately - the packaging was the best part of the cake. I tried to like it because I wanted to write a rave review about the bakery and give them some positive exposure, especially since they're so new. But in all honesty, I couldn't based on the red velvet cake alone.  It didn't really taste like anything.  The cream cheese frosting overwhelmed the more subtle (very subtle) chocolate of the cake so it seemed like I was eating more of a red-dyed cake than a chocolate red velvet cake.

Red Velvet Cake Slice - $3.75
Which is one reason why I had put off writing this blog post - I wanted something more positive to say and I didn't want a negative review to be based on only one of their products.  So there was nothing left to do but return to la Terra Bakery the next time I met a friend for lunch at Gochi and try out a couple of other products.
Nutella Rolls - $2.50
I sampled the sweet potato bread (not pictured) from the sampling section by the cashier.  I liked the texture of the bread (similar to Hawaiian King sweet rolls) but, just like my sweet potato biscuits, I couldn't taste the sweet potato. So I didn't buy the for-sale version of the sweet potato rolls but instead bought the hazelnut chocolate version of the sweet rolls (2 to a package) and a container of a mix of chocolate and vanilla shortbread cookies.
I fared better with these two selections than with the red velvet cake.  I warmed up the nutella rolls in the microwave for 10-12 seconds, like I do with the breads I buy at Asian bakeries, and they were good. The texture was soft and the chocolate added some decadence. The shortbreads were good as well although, in all honesty, they were something I could make myself.  But they made for a sweet snack and saved me the trouble of making 2 different shortbreads just for a few cookies. They had the added advantage of not being too sweet, too chocolaty or too buttery - they were just....nice.
Vanilla & Chocolate Shortbread Cookies - $3.75
I can't say this is the most glowing review I've written for a bakery but it's an honest one and I still think it's worth going to la Terra to try out their products (I plan to try a few more next time I'm in the area in case I hit upon any favorites), especially to support a small business just starting out.
Vanilla Shortbread Cookie

Chocolate Shortbread Cookie

Thursday, November 14, 2013

Bakery Review: Crixa Cakes Bakery & Cafe

Crixa Cakes - summer 2013
I've never been to Crixa Cakes personally but my niece has brought me baked goods from there a couple of times and everything has been pretty good so they're well worth a write up, sight unseen. Their website is a little bit odd and somewhat hard to navigate if you're trying to find out more about the origins of the company or what their storefront looks like.  It appears their site is catered more to letting people know about their offerings and how to order them rather than much about the bakery itself.  But that's okay; what I've tried of their products is worth showcasing.
Their offerings appear to change on any given day or season.  The two cakes pictured here are what my niece brought me on one of her visits over the summer but neither appear to be on offer on their current website.  This is a chocolate layer cake with a raspberry filling.  The cake itself was pretty good, a light chocolate sponge with a light-textured, not-too-sweet chocolate frosting.  I don't care for raspberries with my cake so I ate around them.  It looks like they either used a raspberry soaking syrup or that was just from the raspberries themselves and their juice soaked into the cake.  I would've preferred something more purely chocolate but any raspberry-chocolate lover would enjoy this cake.
The coconut cake, the next one I tried, was absolutely delicious. The vanilla cake was perfectly baked, the filling appeared to be a coconut pastry cream and the coconut frosting married to it very well.
I still scraped off some of the frosting because I'm not a frosting person but it helped that it had coconut flakes in it as well. This is something I'd get again if I could.
The two other things I've tried from Crixa Cakes were their flourless chocolate cake and some kind of apple cake.  Both appear on their website so if they have it available when you go there, I recommend them.  From what I can remember, the flourless chocolate cake was silky yet also had a light, airy texture, presumably from beaten eggs or egg whites but it was more like a mousse than a chiffon because of its moistness. The apple cake was pure deliciousness, not too sweet, not too tart but just good.

Someday I will have to visit Crixa Cakes in person and peruse their offerings myself.  I'll probably walk out with more than 2 cake slices but it would be worth it to try more of what they have.

Wednesday, November 13, 2013

Spinach Quiche (paleo, Whole30)

Spinach Quiche - made October 30, 2013 from Paleo Diet Lifestyle
Ooh, look, something healthy on my blog - can you believe it?  AND, I actually ate it too. This is a spinach quiche that is paleo friendly and Whole 30 compliant.  I heard about Whole 30 from online fitness friends and, in seeking to shed some poundage before the holiday eating begins, I thought I'd give it a try. I want the wiggle room in my waistband for the serious holiday eating, you know.  And that was even after I found out eating the Whole 30 way means no sugar, no dairy, no grains, no legumes and, for any drinkers out there (I'm not one), no alcohol.  In other words, all the food that makes life worth living are probably not on this eating plan.  The lengths I go to in order to keep my clothes fitting, preferably loosely.
I will confess up front that I did not make it the whole 30 days.  I lasted 11 days and lost 3 pounds which so far have remained off.  It was too restrictive for me with my baking tendencies and social life of eating out.  But hey, while I was on the program, this quiche met all the Whole 30 guidelines.  As long as you use canned coconut milk instead of the one in cartons (try an Asian grocery store or the Asian aisle at Target or regular grocery stores for canned coconut milk).  And preferably organic spinach if you can get it.  Cage-free eggs help too.  You get where I'm going with this: all natural, healthy ingredients grown and harvested in the most humane way possible with very little to no additives and preservatives. I like eggs and I don't mind spinach if it's cooked enough and I can eat it with something else.  This quiche was easy to make but I forgot to salt and pepper it before I baked it so it came out a little bland.  But it was decent and filling. If I sound lukewarm about it, well, yeah, it's because it doesn't have cheese, milk or a crust underneath it.  But it'll do.
5 large eggs
1 ½ cups fresh spinach, chopped
½ medium onion, chopped
1 clove garlic, minced
½ cup coconut milk (canned)
½ tsp baking powder
Sea salt and freshly ground black pepper to taste
  1. Preheat oven to 350 degrees F.
  2. In a large bowl, whisk the eggs and coconut milk together. Continue whisking while adding the rest of the ingredients.
  3. Grease a 9” pie dish and pouring in the mixture. Bake the quiche for about 30 minutes, or until cooked through in the center.

Tuesday, November 12, 2013

Mississippi Mud Brownie Pie

Mississippi Mud Brownie Pie - made November 9, 2013 from Key Ingredient
I'm renaming this pie to make it a little more descriptive.  The pictures don't look as good as if I had taken them when the frosting wasn't set and still glossy.  But when it sets, the chocolate appears dull.  Fortunately, that didn't affect the taste.  With its original elements of chocolate, marshmallows and more chocolate, this defines Mississippi Mud the way it should be.  As is my new habit, I swapped out the marshmallows called for in the original recipe with Midnight Milky Ways from my Halloween candy stash. I was dealing with a bunch of coughing and sneezing on Halloween so I ended up NOT passing any candy out that night (parents can thank me for not sneezing on their little costumed darlings).  Which meant I was left with the bags I had bought beforehand, unopened and with absolutely no interest on my part in consuming them.  Except in baked books. 

This was called a "pie" so I baked it in a 9-inch round springform as it called for but I think it would've been better either in an actual pie pan for that pie authenticity or even in an 8-inch square baking pan to easier cutting and portioning to give away.  Because you know I only bake to give away. Whichever pan you bake it in, you're probably going to want to cut this into small pieces.  I thought the brownie part was really good, moist and fudgy.  I'm less enamoured of the Midnight Milky Ways; while they're a better substitute for me than pure marshmallows because I don't like marshmallows, I didn't like them in this as much as I did in the Mississippi Mud Brownies I made previously.  And I think that's because I didn't like the frosting on this one - it was too sweet for me and somewhat gritty.  I think it would've been better with a cooked frosting or at least something hot enough to melt the powdered sugar and make a smoother frosting.  As it was, the topping made this a little too rich for my blood.  If I did it over again, I would keep the brownie base, top it with chunks of Milky Way Caramels and drizzle it with a little chocolate frosting but not blanket it completely. Sometimes less is more.
3/4 cup flour
1 cup granulated sugar
1/4 cup unsweetened cocoa powder, sifted
1 teaspoon baking powder
1/4 teaspoon salt
4 ounces butter, melted
2 large eggs, beaten
2 teaspoons vanilla
1/2 cup chopped toasted pecans, optional (I left them out)
1 cup chopped Midnight Milky Ways

Frosting
2 ounces butter, melted
1 ounce (1/4 cup) cocoa powder, sifted 
2 ounces (1/4 cup) evaporated milk
8 ounces (1 cup) powdered sugar, sifted
  1. Preheat the oven to 350 degrees. Butter a 9 inch spring form pan set aside. 
  2. Whisk together the flour, sugar, cocoa powder, baking powder and salt in a bowl. 
  3. Beat together the butter, eggs and vanilla. Add to the dry ingredients and mix until smooth. Stir in the toasted nuts. 
  4. Pour into the prepared pan. Bake on a middle shelf of the oven for 25 to 30 minutes, or until a toothpick inserted in the center comes out clean. 
  5. Immediately sprinkle the marshmallows on top and return to the oven for a few minutes to melt the marshmallows. Remove from the oven and carefully spread the chocolate frosting over top. 
  6. To make the chocolate frosting mix all ingredients together in a bowl, beating with an electric whisk until smooth and thick. Spread on the hot marshmallows. Let cool completely. Cut into wedges to serve.

Monday, November 11, 2013

Bakery Review: Sheng Kee

Sheng Kee Bakery - visited several times
 
Sheng Kee Bakery was started by a mother in Taipei, Taiwan and her children have continued with their baking tradition in the Bay Area.  They have 12 locations and I've been to three of them without even realizing they were a chain.  I just knew I liked their products.

Like many Asian bakeries,they have a plethora of filled breads and rolls, individually wrapped and displayed along with cakes.  The packaged breads and pastries fill trays lined on the shelves and, like Paris Baguette, it's a self-serve model where you take a tray and a pair of tongs and help yourself.
Whole cakes are displayed in a refrigerated glass cakes and are also typical of the cakes offered at most Asian bakeries: lots of fruit adornments inside and atop the cakes, leaning towards chiffons and whipped cream frostings and nothing too sweet. As a stereotype, many Asians don't like things that are all that sweet.  So it goes without saying that I'm not your stereotypical Asian since my sweet tooth works just fine and is happy to put in overtime.  Not surprisingly, cakes are something I don't get at Asian bakeries, not because of the sweetness level but because I don't like fruit in my cakes.  And I'm not a huge fan of chiffon cakes either. 
What I do get at Asian bakeries, however, are their bread products.  My top 3 go-to favorites are the cocktail bun, the baked pork bun and the coconut roll.  The cocktail bun is similar to what's served at dim sum but they're sold in bigger sizes at the bakeries and dwarf their more petite dim sum brethren.  The filling for a cocktail bun is coconut, butter and sugar so don't confuse it with a custard bun which is filled with, you guessed it, custard.
I like to get the baked version of the pork bun rather than the steamed one because the bread is better.  Asian bakeries sometimes sell the steamed version as well but they serve it hot or at least from the warmer near the cash register.  I can't remember if Sheng Kee does but I think I've been in one that does.
My last favorite is the coconut roll.  It's similar to the cocktail bun and I'm sure the ingredients are the same but might be proportioned differently. Think of the coconut roll as akin to a cinnamon roll but shaped like palmiers without the palmier flakiness.  Instead it has the bread-y consistency of the cocktail bun and instead of the cinnamon filling that a cinnamon roll has, it has a coconut filling. It's hard to describe if you haven't had it before; all I know is I love it because I love bread and coconut.
Lastly, you'll notice the prices for each of the products I've mentioned and yes, another plus to Asian bakeries is you can get cheap, tasty baked goods.  My normal trifecta of filled breads comes to less than $4. While other Asian bakeries have similar pricing, I prefer going to Sheng Kee because their particular versions of what I get are better (to me).  The ratio of filling to bread is just right in both the cocktail bun and coconut roll.  The baked pork bun could use a little more filling but the bread is pretty good. I like to pop each one into the microwave for 10-12 seconds before consuming.  The bread will warm up just slightly and be the perfect consistency with the filling.