Monday, June 15, 2020

Teriyaki Ramen Chicken

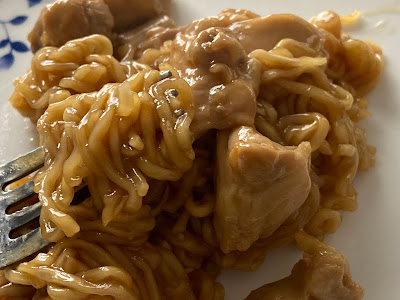
Teriyaki Ramen Chicken - made May 26, 2020 from Good Cook
When I was a poor college student and even during my post-graduate student days when I had a car payment, housing payments and student loan repayments, I had the quintessential eating plan of ramen noodles to make my food budget stretch. Back in the olden days, you could even get them on sale for 20 packs for a dollar. Nowadays, technically the prices have quadrupled or more but that just means they went from a nickel to twenty cents, sometimes a quarter.
That's still affordable (thankfully!) but nowadays, you don't have to be satisfied with following the ramen noodle directions to boil water, add noodles and seasoning and serve. One trolling session through pinterest and you can get all sorts of ideas that basically just treats them as cheap noodles to serve as a base for many noodle dishes.

I ended up making this dish twice, partly because I like ramen noodles (I know, I know, they're not that healthy but noodles....) and partly because I made some mistakes that were easy to rectify the second time around so I did.

I rewrote the directions so I can save you the trouble of making the mistakes I did, namely to make a slurry with the cornstarch and some of the water before adding to the noodles so you don't add the cornstarch in one dry powdery lump that then congeals into multiple gelatinous lumps among your noodles. #yourewelcome

The original version was also a bit too salty for me so I cut back on the soy sauce and filled in with more water instead. The result was more sweet than salty but that suited my taste buds just fine.

4 boneless, skinless chicken thighs, diced
2 cloves garlic, minced
2 tablespoons cornstarch
1 cup water, divided
1/3 to 1/2 cup soy sauce (if using 1/3 soy sauce, add enough water to fill 1/2 cup)
1/4 cup brown sugar
2 tablespoons rice vinegar
2 bricks of ramen noodles (without the seasoning packets)
sesame seeds for garnish
  1. Heat large saucepan with a drizzle of olive oil. When hot, add diced chicken and cook, stirring with a wooden spoon, until cooked through. Add garlic and stir.
  2. Whisk cornstarch with 1/4 cup of the 1 cup of water until a smooth slurry forms (no lumps).
  3. Add soy sauce, cornstarch slurry, remaining water, brown sugar, rice vinegar and ramen noodles. Stir to combine and cover for several minutes until noodles have softened, 5-6 minutes. Stir mixture to coat the noodles with sauce. Serve warm, garnished with sesame seeds if desired.

Saturday, June 13, 2020

Soft and Chewy M&M Cookies

Soft and Chewy M&M Cookies - made May 17, 2020 from Tastes Better From Scratch
At the time that I made these, I had planned to use red, white and blue M&Ms for the military care package they were going into. Unfortunately, Target didn't have those M&Ms when I went there and gone are the days when I went hunting around to different stores for ingredients.

So I made do with what I had and that was pastel M&Ms. Yeah, I know, a little out of season and probably looked odd when the package was opened but I always figure cookies are cookies and have to taste better than MREs, right?

This was a pretty good recipe. Like a regular chocolate chip cookie, it had crisp edges and the middle was chewy. I have to say, though, that I'm not a huge fan of M&M cookies. I like how they look and how, if you have the "right color" M&Ms, you can tailor them for particular holidays for a great festive look. But I don't eat M&Ms as a rule and they add more sweetness to a cookie than I normally go for. If you do like M&M cookies though, this is a good recipe to try.

2 cups all-purpose flour
1/2 teaspoon baking powder
1/2 teaspoon baking soda
1/2 teaspoon salt
3/4 cup butter, softened
1/2 cup granulated sugar
3/4 cup brown sugar, firmly packed
1 egg
1/2 tablespoon vanilla extract
1 cup mini chocolate chips (I used regular-size)
1 cup M&Ms
  1. Combine flour, baking powder, baking soda and salt in a medium bowl; set aside.
  2. Combine butter, sugar and brown sugar in a large mixing bowl; beat until well combined.
  3. Add egg and vanilla; mix until combined.
  4. Gradually add dry ingredients and beat on low speed until just combined. Stir in chocolate chips and M&Ms.
  5. Portion into golf-ball size balls, cover and chill or freeze for several hours or overnight.
  6. When ready to bake, preheat oven to 375 degrees F. Line baking sheets with parchment paper. Evenly space dough balls on baking sheets and bake 8 to 10 minutes or until edges are set and middles are no longer raw. Remove to wire rack to cool completely.

Thursday, June 11, 2020

Instant Pot Beef Stroganoff

Instant Pot Beef Stroganoff - made May 21, 2020, modified from Tastes Better From Scratch
Another easy Instant Pot recipe, no fuss, and only a few ingredients. I did have to go out and buy a new can of Cream of Mushroom soup though as it turns out the lone cane in my pantry expired in 2013. Oops.

I modified the recipe as the original one only called for 8 ounces of noodles and I had a 12-ounce package. I didn't want to bother with leftover noodles as you never know when I'll feel like cooking again (seriously, that can of soup expired 7 years and 2 moves ago). I compensated for the extra noodles by adding more chicken broth.
I will also confess I didn't read the original directions that closely and instead of adding the sour cream at the end after the instant pot turned off, I added it in the beginning along with all the other ingredients. Oops #2. Fortunately, it didn't seem to have affected the dish as this turned out pretty well.
It isn't fancy and food snobs might think it's barely a step above Hamburger Helper but it worked well enough for me. This is the kind of dish I like making as it requires little effort, tastes good to my not-that-discerning palate and is easy to portion into individual meals for later during my non-cooking periods.

1 pound ground turkey
salt and pepper to taste
1 tablespoon minced garlic
1 10.5-ounce can cream of mushroom soup
3 cups chicken broth
12 ounces wide egg noodles
heaping 1/3 cup sour cream
  1. Set instant pot to saute mode, spray bottom with nonstick cooking spray and when hot, saute ground turkey. Break up the meat, stirring, and season with salt and pepper. When cooked, add garlic and stir. Turn off saute mode.
  2. Add cream of mushroom soup, chicken broth and sour cream, stirring to combine. Add egg noodles and submerge as much as possible in the liquid. Cover instant pot and set to sealing position. Turn on manual setting for 4 minutes. When cooking is complete, use quick release. Remove lid and stir mixture. Serve warm.

Tuesday, June 9, 2020

Hot Milk Cake

Hot Milk Cake - made May 19, 2020 from Mildly Meandering
I've gone back to sending homemade baked goods in care packages going to deployed military service members. It looks like the mail services are getting (somewhat) back to normal so I'm baking again.
Cakes can be a little risky to send as they dry out more easily than cookies or brownies but I vacuum sealed these to give them a fighting chance.
The "hot milk" part of the title refers to heating up the milk before adding it to the batter. This turned out to be a good vanilla butter cake, a bit dense in texture like a pound cake but with good flavor. Mine didn't come out looking as dense or moist as in the original blog but I don't think I overbaked it since it wasn't dry. I hope it survived in the mail.
12 tablespoons butter
1 cup whole milk
4 large eggs
2 cups granulated sugar
1 teaspoon vanilla extract
2 cups all-purpose flour
2 teaspoons baking powder
pinch of salt
  1. Preheat oven to 350 degrees F. Line a 9 x 13 baking pan with foil and lightly spray with nonstick cooking spray.
  2. Combine butter and milk in saucepan over medium heat and stir until butter is completely melted.
  3. Beat eggs for 5 minutes on medium speed. Gradually add sugar and beat until combined. Add vanilla extract, flour, baking powder and salt; beat just until combined.
  4. Add melted butter and milk mixture and beat on low speed until combined. Pour into prepared pan.
  5. Bake 35-40 minutes or until toothpick inserted near the center comes out clean or with a few moist crumbs.

Sunday, June 7, 2020

Instant Pot Mac and Cheese

Instant Pot Mac and Cheese - made May 16, 2020 from The Salty Marshmallow
Editor's note: I'm not gonna lie - all the things happening in our country right now is taking its toll on me like anyone else. So if my writeups are brief and/or flat, there's a reason. 
Back to my Instant Pot. It's just too easy to use and now that I'm cooking as often as I am, it's my go-to gadget for meals.

This was easy to put together but I would recommend using the full cup of milk. I only used 1/2 cup and the sauce was fine when it was first cooked but after it had cooled and when I portioned it out to store in the freezer and refrigerator for future meals, the sauce turned out dry and stringy.

I think that naturally happens with pasta dishes since the noodles/elbow macaroni absorb so much liquid. So it's best to err on the side of a little too much liquid rather than not enough.

I like mac and cheese more than I should but I haven't quite cracked making it well.


16 ounces uncooked elbow macaroni
4 cups chicken broth
2 tablespoons butter
1 teaspoon Sriracha
1 teaspoon garlic powder
1/2 teaspoon pepper
1/2 teaspoon salt
2 cups cheddar cheese, shredded
1 cup mozzarella cheese, shredded
1/2 cup Parmesan cheese, shredded
1/2 cup to 1 cup whole milk
  1. Add the uncooked macaroni, chicken broth, butter, hot sauce, garlic powder, pepper and salt to the Instant Pot. Place the lid on the pot and set to sealing. Cool on manual function, high pressure for 5 minutes then do a quick release when the cycle has completed.
  2. Add the milk then the cheese to the pot in 3-4 handfuls, stirring after each addition until smooth and creamy. Season to taste.

Friday, June 5, 2020

Biscoff Cut-Out Cookies

Biscoff Cut-Out Cookies - made dough May 8, 2020 from Bake at 350
The team lead for my Angel Baker team from Soldiers Angels shared this recipe on our group Facebook page so of course I had to try it because cookie butter...
The funny thing about cookie butter is it doesn't actually have that strong of a flavor. At least not in cookie dough. It's easy for the cookie butter to be overwhelmed by other flavors so I tend to only combine it with just vanilla or leave plain.

I went the plain route with this and used cookie butter as the filling to sandwich the cookies together. This makes a good sandwich cookie. Unfortunately I don't think it would survive being mailed overseas in hot weather so I'm not going to be able to use it in my Angel Baker care packages to deployed military service members. Er, more for me?


2 teaspoons baking powder
1/4 teaspoon salt
3 cups all-purpose flour
1 stick butter, cut into chunks
1/2 cup Biscoff spread
1/2 cup granulated sugar
1/2 cup brown sugar
1 egg
1/4 cup heavy cream
  1. In a medium bowl, whisk together baking powder, salt and flour; set aside.
  2. In the bowl of a stand mixer fitted with the paddle attachment, cream together butter, biscoff spread, granulated sugar and brown sugar until combined.
  3. Add egg; beat until just combined. Add heavy cream and beat until just combined.
  4. Add flour in three additions and beat on low speed after each addition until just combined; do not overbeat.
  5. Divide dough into two portions and pat into thick discs. Wrap in plastic wrap and chill for at least 30 minutes.
  6. When chilled, roll out to 1/4" thickness. Cut into desired shapes and place in freezer while oven preheats.
  7. Preheat oven to 350 degrees. Line baking sheets with parchment paper and evenly space cookies. Bake 8-12 minutes, until edges are set and middles no longer look shiny or raw. Remove from oven and let set on baking sheets for several minutes. Remove to wire cooling racks and let cool completely.

Saturday, May 30, 2020

Bakery-Style Chocolate Chip Muffins

Bakery-Style Chocolate Chip Muffins - made May 6, 2020 from Little Sweet Baker
I don't have the talent to make really good muffins. You know the kind I'm talking about: crunchy muffin top, fluffy interior, good mouthfeel. And good flavor, of course. Unfortunately I don't remember that I don't possess this talent until after I've made muffins. Then it comes back to me.
Not that these muffins were bad, per se. But I have high standards for muffins and these didn't reach those heights. I mean, they were okay. But they didn't look as good as the one from the original blog (so make sure you click on the post title to take you there and you can see what I mean).
They're best fresh as the muffin top does have a little "crunch" (in a good muffin-top-ish way) but that top softens over time. Like in less than a day.
The insides weren't quite fluffy either and had a slightly dry mouthfeel. And I didn't overbake them, I swear. But if I stack them against an actual bakery muffin or a Costco muffin (I love those poppyseed Costco muffins), this didn't do it for me. User error? Maybe. I may have a heavy hand with muffin batter. This is a known issue. Which I'm sure I'll forget the next time I want to try a new muffin recipe.

2 1/2 cups all-purpose flour
1 tablespoon baking powder
1 teaspoon baking soda
1/2 teaspoon salt
1/2 cup unsalted butter, melted and cooled
1 cup granulated sugar
2 large eggs
1 cup buttemrilk
1 tablespoon vanilla extract
1 1/2 cups chocolate chips
  1. Preheat oven to 425 degrees F. Line a 12-cup muffin tin with paper liners.
  2. In a large bowl, toss together the flour, baking powder, baking soda, salt and chocolate chips. Set aside.
  3. In a medium bowl, whisk together the melted butter, eggs, buttermilk and vanilla. Slowly add to the dry ingredients. Gently fold together until just combined. Do not overmix.
  4. Divide the batter into the 12 muffin cups and bake for 5 minutes at 425 degrees F. Reduce the oven temperature to 375 degrees F and bake for another 12-15 minutes or until a toothpick inserted in the centers comes out clean. Do not overbake. Serve warm.