Sunday, February 13, 2022

Butterscotch Toffee Brownies

Butterscotch Toffee Brownies - made February 5, 2022 from All-American Cookie Book by Nancy Baggett
1 cup all-purpose flour
1/2 teaspoon baking powder
1/8 teaspoon salt
Generous 3/4 cup packed light brown sugar
1/2 cup (1 stick) unsalted butter, slightly softened
2 teaspoons vanilla extract
2 large eggs
1/3 cup toffee bits
1 cup sweetened flaked coconut
  1. Preheat oven to 325 degrees F. Line a 9 x 9-inch baking pan with foil and lightly spray with nonstick cooking spray.
  2. In a medium bowl, whisk together flour, baking powder and salt; set aside.
  3. In the bowl of a stand mixer fitted with the paddle attachment, beat together butter, brown sugar and vanilla until well combined and creamy, 2-3 minutes. Add eggs, one at a time, beating after each addition until combined. Add dry ingredients and beat on low speed until just combined; do not overbeat.
  4. Stir in toffee bits and coconut. Spread batter in an even layer in prepared pan and smooth top. Bake for 30-35 minutes or until top is golden and a toothpick inserted near the center comes out clean or with a few moist crumbs, not raw batter. Remove from oven and let cool completely before cutting and serving. 
Back to the baking books for this. This might be more appropriately called Coconut Toffee Blondies instead as that's primarily what they are. I took some liberties with the original recipe as it suggested chopped pecans be included in the batter. I don't like nuts in my blondies or brownies unless (rarely) they're sprinkled on top. But not mixed into the batter. Nuts soften and steam in the batter during baking and the baked result is just a texture annoyance to me.
I did take the suggestion of adding coconut to the batter however which turned these properly into coconut bars. I only had less than 1/3 bag of toffee bits though so these are more coconut than toffee. Which I don't mind.
As with most blondies, these are cakey more than "fudgy". The taste was pretty good but then, I like coconut. The brown sugar adds a nice caramel (or butterscotch) flavor so if those flavor profiles are to your taste, this is a good and easy blondie to make. It's good for non-chocolate lovers (whoever they are) and if you leave off the toffee bits and don't add nuts, this would also work for people with tree nut allergies.


Thursday, February 10, 2022

Crumbl Copycat Oreo Cookies with Buttercream Frosting

25 Oreo cookies (not Oreo Thins or Double Stuff)
1 cup + 1 tablespoon flour
3 tablespoons cornstarch
1/4 cup cocoa powder
1/2 teaspoon baking soda
1/4 teaspoon baking powder
1/4 teaspoon salt
1/4 teaspoon cream of tartar
1 stick butter, softened
1/4 cup granulated sugar
3 tablespoons brown sugar
1/4 cup powdered sugar
1/3 cup oil
1 large egg

Buttercream frosting
1/2 stick butter, softened
1 cup powdered sugar
1/2 - 1 tablespoon heavy cream
1 teaspoon vanilla extract

Garnish: additional Oreos, coarsely chopped, for topping frosted cookies
  1. Preheat oven to 350 degrees F. Line baking sheets with parchment paper.
  2. In a food processor, grind Oreos until finely crushed.
  3. In a medium bowl, combine crushed Oreos, flour, cornstarch, cocoa powder, baking soda, baking powder, cream of tartar and salt; set aside.
  4. In the bowl of a stand mixer fitted with the paddle attachment, cream together butter, brown sugar, powdered sugar and granulated sugar until well combined, light and creamy.
  5. Add egg and oil; mix until combined. Scrape down sides of bowl to keep mixture even textured.
  6. Add dry ingredients in two additions, mixing after each addition until just combined. 
  7. Portion dough into 10 equal portions and shape into thick discs. Evenly space on prepared baking sheets. Bake for 8-9 minutes or until edges are set and middles no longer look raw. Remove from oven and let cookies cool on baking sheet for 5 minutes before transferring to wire rack to cool to lukewarm.
  8. While cookies are cooling, make frosting: cream together butter, powdered sugar, 1/2 tablespoon heavy cream and vanilla until light and fluffy. Add the other 1/2 tablespoon of heavy cream if frosting seems too thick.
  9. Spread frosting on lukewarm cookies and sprinkle with crushed Oreos. Serve immediately.
The best news for my sweet tooth and the worst for my waistline and my wallet is that a Crumbl finally opened up in my 'hood. Not super close but less than 10 miles which is infinitely better than the 100 miles previously. So...yay! Oh no! Yay!

I'm as susceptible as the next cookie lover to the Crumbl craze. When I first discovered them, I was all into their milk chocolate chip cookie, a staple on their weekly menu and I tried any number of copycats for them. But it's only lately that I've cottoned onto the craze of their weekly changing specialty flavors. 

The week that the local Crumbl franchise opened, one of their specialty flavors was the Oreo cookie topped with buttercream and garnished with Oreo cookie crumbs. So I tried out the copycat for it from Lifestyle of a Foodie who does a great number of Crumbl copycats on her blog. I deliberately made the copycat before I went to the Crumbl opening and tried the real thing. I wanted to judge it on its own merits rather than assessing it as a copycat to anything.


I'm glad I did as I can honestly tell you this is a great cookie. Made up of Oreo cookie crumbs guarantees it will have the Oreo flavor. But I also liked the soft texture. The edges are light and crisp thanks to the oil in the dough and the middle was soft and chewy.

The only thing that was a bit much for me was the frosting. It's pretty rich and I don't think I beat it enough to get the lighter texture of a Crumbl frosting. Plus I piped it over the taste test cookie for aesthetics and that meant more frosting than should be on any cookie. I coarsely chopped real Oreos for the garnish instead of crumbs, mostly because I like Oreos and wanted the chunks, not the crumbs. 

I could only eat one cookie of this and even that I had to spread over time and scrape off most of the frosting after I took the pictures above. It was good but pretty rich. I sent the rest of the frosted, non-taste-test cookie to a friend in a care package. I needed to clear the way for the real thing which I did get at Crumbl the next day.

Pictures from the real Crumbl
Opening Day (February 4, 2022)

Staff busy and hard at work to keep up with demand

It was fun to go on opening day and great to see so many fellow Crumbl cookie lovers. I was also glad to see so many people turned out as I take that as a good sign for the success of the franchise.
Chocolate Featuring Oreo

So here's the real thing - the chocolate cookie featuring Oreos. While the copycat version mirrored the taste pretty closely (the cookie itself, not so much the frosting), the original cookie still reigns in terms of texture. Big, cakey but not too cakey and soft; it's hard to describe unless you're already familiar with their cookies. The texture is amazing. It's like a cake but not as light, still a cookie but a soft, chewy cookie.
Topped with vanilla cream cheese frosting and garnished with Oreo crumbs

The texture is the most elusive thing to capture for me. I can make good cookies, I can even make great cookies. But I can't fully replicate the soft crumb of a Crumbl cookie. It isn't just about following a copycat recipe, no matter how good that recipe is. It's also mirroring how it's mixed, portioned and baked with the equipment they have, not the oven I have. But in any case, trying out copycats are still fun. And now I have the luxury of getting the real Crumbl cookies in my area. Back to the yay....


Monday, February 7, 2022

Olive Oil Brownies

Olive Oil Brownies - made January 28, 2022 from Baking with Dorie by Dorie Greenspan
1/2 cup olive oil
5 ounces bittersweet chocolate, coarsely chopped
1 cup (136 grams) all-purpose flour
1/4 cup (21 grams) unsweetened cocoa powder
1/2 teaspoon fine sea salt or 3/4 teaspoon fleur de sel
1/2 teaspoon freshly ground black pepper
2/3 cup (133 grams) granulated sugar
3 cold large eggs
1 cold large egg yolk
  1. Preheat oven to 325 degrees F. Line an 8-inch baking pan with foil and lightly spray with nonstick cooking spray.
  2. In the top half of a double boiler set over hot water, combine olive oil and bittersweet chocolate. Whisk until chocolate is completely melted and mixture is smooth and combined. Remove from heat.
  3. In a separate bowl, whisk together flour, cocoa powder, salt and black pepper.
  4. Add granulated sugar to melted chocolate mixture and stir to combine. Add eggs and egg yolk, one at a time, whisking after each addition until smooth and combined.
  5. Stir in dry ingredients and mix until combined. Pour batter into prepared pan and smooth into an even layer.
  6. Bake 28 to 30 minutes or until a toothpick inserted near the center comes out with a few moist crumbs, not raw batter. Cool completely before cutting and serving.
Much as I love Dorie Greenspan and her recipes, I admit I was a little skeptical about trying out this recipe. I didn't mind using olive oil and actually wanted to try this recipe primarily because it uses olive oil and I have this Baking Blend Olive Oil a friend had given me that I wanted to try out.
No, it wasn't the olive oil but the black pepper that gave me pause. Pepper? In a brownie? I was a tad nervous whether they would turn out and how they would taste. 
But faint heart and all that so I forged ahead with it. Fortunately, my fears were unfounded. This made a thick batter similar to my go-to recipe for brownies although it wasn't quite as fudgy as mine. But still, it was fudgy enough. More importantly, the black pepper in it was fine. You actually can't really taste it but I could tell there was something different about it. 
To be honest, I only had a sliver as I was packaging these up for care packages. But what I did taste was pretty good - fudgy, chewy, chocolaty with yes, a little bit of a bite. Which is why she's Dorie Greenspan and I just follow recipes in cookbooks, lol. So if you're looking for something a little different, give these a try and see what you think.


Saturday, February 5, 2022

My Riff on a Crumbl Copycat of Twix Caramel Cookies

Crumbl Copycat Twix Caramel Cookies (Riff'd) - made January 22, 2022 from Lifestyle of a Foodie
Cookies
1/2 cup unsalted butter, softened
1/4 cup vegetable oil
1/4 cup granulated sugar
1/4 cup brown sugar
1 large egg
1 teaspoon vanilla extract
2 cups plus 2 tablespoons all-purpose flour
1/4 teaspoon salt
1/4 cup cornstarch
1 teaspoon baking powder

Good quality caramel or make your own by melting 7 ounces caramels with 1/4 cup heavy cream

Chocolate topping
1/2 cup Nutella
1/2 cup semisweet chocolate chips, melted
1 cup feuilletine or Rice Krispies
  1. Make the cookie base: In a mixing bowl, cream together the butter, oil, brown sugar and granulated sugar until well combined. Add egg and vanilla; mix to combine.
  2. In a separate bowl, whisk together flour, cornstarch, baking powder and salt. Add in two additions to butter mixture, mixing after each addition until just combined.
  3. Portion dough into 8 even-sized portions and pat into a thick disc. Flatten slightly with the bottom of a glass but keep thick. Cover and chill for 30 minutes in the refrigerator.
  4. When ready to bake, preheat oven to 350 degrees F. Line baking sheet with parchment paper. Evenly space chilled dough discs. Bake 8-10 minutes or until edges are slightly golden and middles no longer look raw or shiny. Cool 10-15 minutes.
  5. Warm caramel slightly so it's pourable but still thick and not runny. Place a generous spoonful over each cooled cookie.
  6. Make Nutella crunch topping: In the top half of a double boiler over hot water, melt generous 1/2 cup of semisweet chocolate chips and scant 1/2 cup of Nutella. Stir until completely melted and combined. Add feuilletine or Rice Krispies, stirring to coat completely. Top a generous spoonful over caramel and smooth into an even layer.
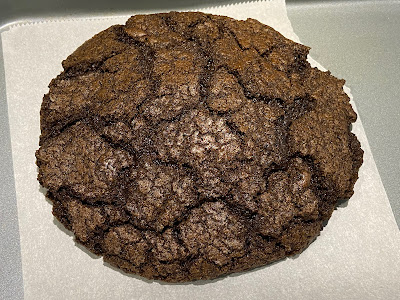
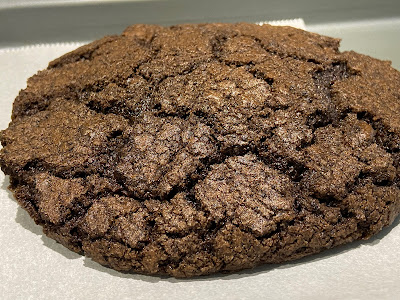
You're probably going to start seeing a lot of Crumbl copycat recipes in the foreseeable future. I'll explain why in a later post. For now, let's go with this one for the Crumbl Twix cookie.
I've never had the real thing at Crumbl as they weren't on offer the few times I've been passing the closest one to me over the mountain pass of the Sierra Nevadas on my way to and from the Bay Area. Even I won't drive almost a hundred miles "just" for a cookie. Don't think I hadn't thought about it but my sweet tooth lost that common sense war.
However, I did have this jar of caramel that I needed to use before it expired and it seemed like the perfect time to try a copycat recipe of that Twix cookie: shortbread cookie base, caramel layer and chocolate topping.

I say in the directions to let the cookies cool completely before adding the caramel. You can see I advise that based on my own (impatient) mistakes. I wanted to try the cookie somewhat warm so I rushed that whole caramel spreading process. Oops. You definitely want to click on the blog post to go to the original recipe from Lifestyle of a Foodie so you can see how neatly it's supposed to be done. Mine look a little more, er, homemade.

Where I did my own riff of this was in the chocolate topping. Rather than plain chocolate or a simple ganache, I melted chocolate chips and nutella (equal parts) then added feuilletine flakes for crunch.

They were amazing. If you don't have feuilletine flakes, Rice Krispies will do. They will just look a little more chunky but will add the crunch just fine.
When the cookies cool, the toppings do firm up, as the chocolate sets. For maximum enjoyment, I recommend warming up for 10-15 seconds in the microwave to let the chocolate topping soften. 
I also liked the shortbread base of this cookie, firm but not hard. Chewy with good butter flavor (use fresh butter and real vanilla extract, please). I can't swear how authentic it is but like I always say with all of the Crumbl copycat recipes I've tried so far, they're good cookies in their own right.


Wednesday, February 2, 2022

Cream Cheese Chocolate Chip Brownies

Cream Cheese Batter
2/3 cup semisweet chocolate chips, melted
1 egg
8 ounces cream cheese, softened
1/3 cup granulated sugar
2 tablespoons flour
1/2 teaspoon vanilla

Brownie batter
1/2 cup butter, melted
1/4 cup cocoa powder
2 eggs
3/4 cup granulated sugar
1 teaspoon vanilla
1/8 teaspoon salt
1 cup milk chocolate chips

Frosting
1/4 cup semisweet chocolate chips, melted
2 ounces cream cheese, softened
1/2 teaspoon vanilla
2 cups powdered sugar
1 tablespoon milk
  1. Preheat oven to 350 degrees. Line an 8 x 8" pan with foil and lightly spray with nonstick cooking spray; set aside.
  2. Cream Cheese batter: in a medium bowl, stir together melted chocolate chips, egg, cream cheese, sugar, flour and vanilla until smooth; set aside.
  3. Brownie batter: in a large bowl, whisk together melted butter and cocoa powder until combined and smooth. Beat in eggs, sugar, vanilla and salt until well combined.
  4. Add cream cheese batter to brownie batter and mix until incorporated. Fold in chocolate chips.
  5. Pour batter into prepared pan, smooth into an even layer. Bake for 30-35 minutes or until a toothpick inserted in the middle comes out with a few moist crumbs. Cool completely.
  6. Prepare frosting: blend together melted chocolate and cream cheese until smooth. Add vanilla and mix to combine. Gradually add powdered sugar, beating until smooth and combined; thin with milk if needed for a spreadable consistency. Spread over cooled brownies.
The original recipe called these Cream Cheese Chocolate Chip Brownies but I think these would be more accurately called Chocolate Cream Cheese Brownies. Mostly because the brownie is made of chocolate cream cheese.
Rather than the typical cream cheese brownie of making a cream cheese batter and a brownie batter that then get swirled together, this has you making both batters then mixing them completely together for a homogenous chocolate brownie batter. Hence, chocolate cream cheese.
The result? Genius. I loved the texture on this brownie. Dense and fudgy without being overwhelming. For those like me who aren't a huge fan of the tang of cream cheese, you don't get it in this brownie. The cream cheese contributes more to the fudgy texture rather than the flavor. I even liked the frosting - and you know I'm not a fan of frosting.
But this made just the right of frosting and also didn't have the tang of cream cheese. Overall, a great brownie.
Just one cautionary note: the recipe says to bake for 30-35 minutes. I ended up baking mine for almost an hour before I was satisfied with the toothpick test. The batter is creamy and thick so don't expect a completely "clean" toothpick test. A few moist crumbs or something beyond raw batter is fine. Every oven is different so go by the toothpick test and appearance. Mine developed a bit of a crust before I deemed them done enough to take out. But the frosting takes care of that.