Saturday, November 13, 2021

Bakery Review: Naughty Cake from Misha's Cupcakes

Naughty Cake from Misha's Cupcakes - ordered via Gold Belly on October 14, 2021 
A recent trend in decadent desserts is to throw a bunch of different things together into one dessert. Think of it as a sweet version of turducken only instead of a chicken, turkey and a duck mashing together, you've got multiple layers of different cake flavors filled and frosted into one cake with cookies and brownies decorating the outside. Thus you have the Naughty Cake from Misha's Cupcakes.
Or if you want to be more accurate, the description on Gold Belly is: This naughty 6-inch, 5-pound cake has layers of chocolatey brownie, a chocolate chip cookie layer, red velvet cake and Oreo cake, and it's topped with dark chocolate ganache and garnished with Oreo and chocolate chip cookies.
Whew. That's a lot of sweets in one dessert. So naturally, it caught my eye and me wanted the Precious. However, my inner Smeagol beat back Gollum for quite some time because this 4-layer, 6-inch cake costs $99. I can justify and rationalize almost anything to do with sweets and supporting a small business but even for me, that was a little too extra. 
So thank goodness for Gold Belly sales! They had a 1-day sale and this was $30 off. Okay, that brought it just within my price-rationalizing range of $69, shipped. Done.
One early word of warning though: don't order if you're allergic to styrofoam. As you can see from the pictures, that's what it comes packed in, not just dry ice. Which I found surprising as I didn't think vendors shipped perishables in styrofoam packing peanuts anymore. With dry ice packets and air packets, yes, but not styrofoam. I know people who are allergic to styrofoam so this gift wouldn't do for them. 


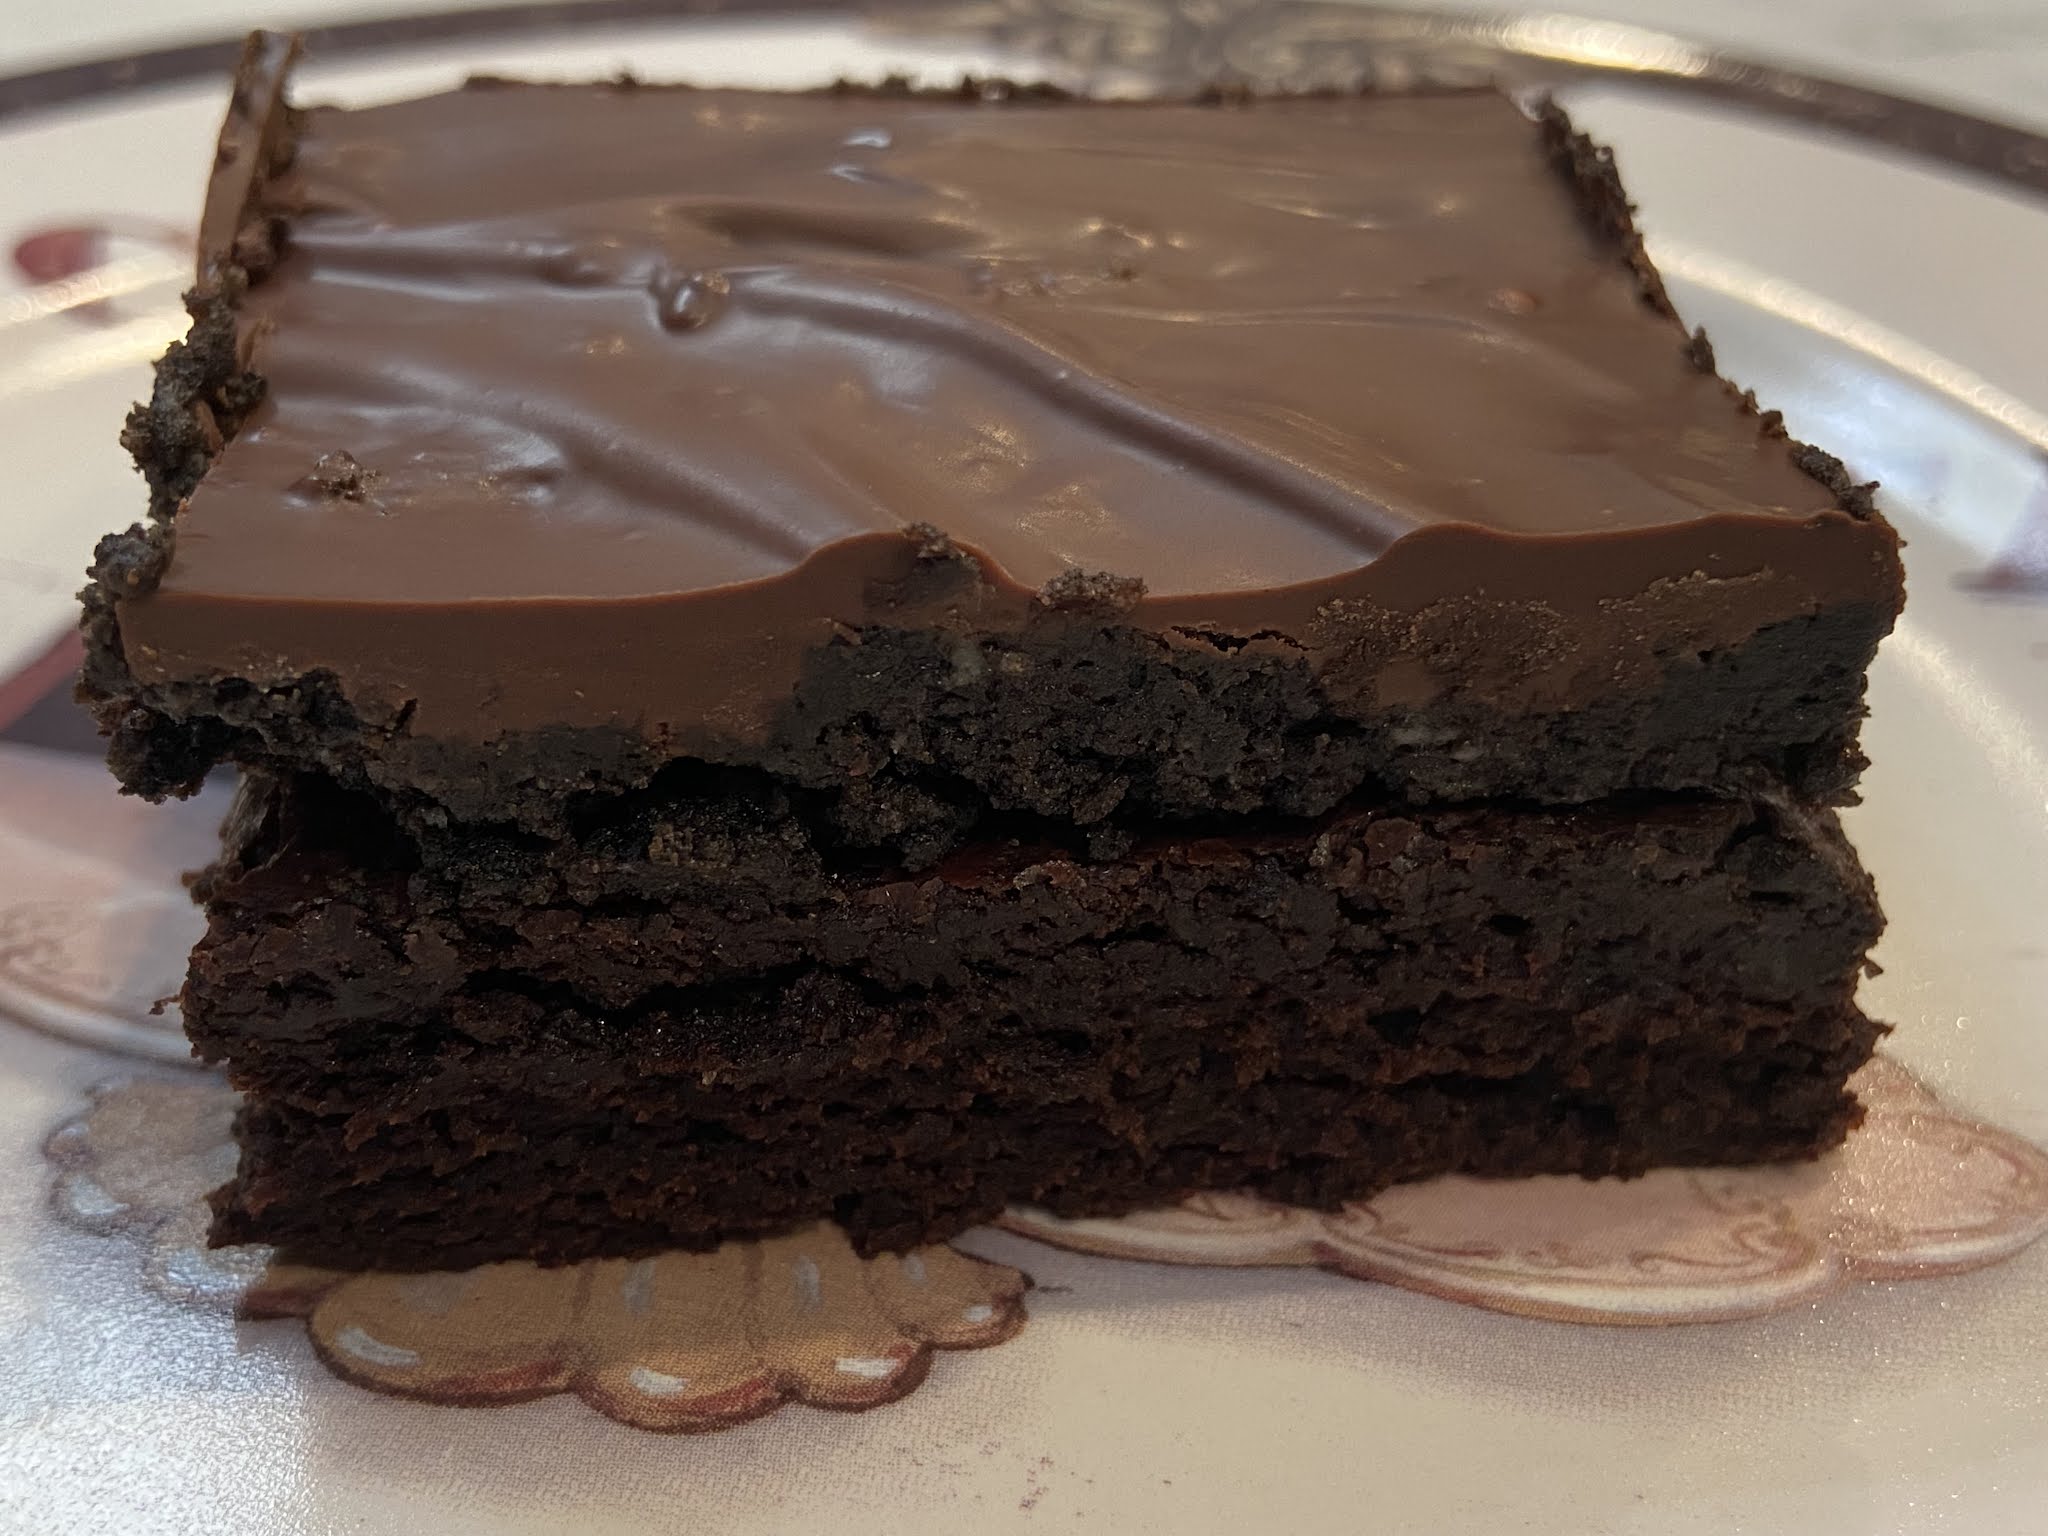
As for the cake itself, I have a mixed review. I liked three of the four layers. The one layer I didn't care for was the chocolate chip cookie layer. Unlike the other layers, it's meant to be like those chocolate chip cookie cakes some people are so fond of. Unfortunately, I'm not one of those people. Never have been. If I want a chocolate chip cookie, I'd rather have an actual cookie, not a cake version of it. So that layer didn't work for me. It was also a bit dry.

The other three layers, as proper cake layers, were absolutely fantastic. I can't pick a favorite as they were all good: perfect cakey texture, moist, good flavor. One of the layers was supposed to be a brownie layer but it was light and more like a chocolate cake. Either way, I still liked it.
The brownie garnishes on top of the cake were more like proper brownies with a dense fudgy texture. I also enjoyed those. The mini chocolate chip cookies garnished around and on top of the cake, not quite so much. Again a little dry.
Overall, I think I liked the concept of this cake more than the actual cake. Perhaps because I've become more of a purist and am not into multiple combinations of dessert or I prefer simpler baked goods but this kind of cake is a bit too much for me. I'm glad I tried it as now I know and it is an impressive cake to give and share with a crowd. I thought the 6-inch size would only serve a few but given the 4 layers of cake, you could probably share this with a good 8-10 of your friends or even more people.


Friday, November 12, 2021

Smoked Gouda Carbonara

Smoked Gouda Carbonara - made October 22, 2021 from Food and Wine 
1 pound spaghetti
5 large egg yolks
1 large egg
1 cup (4 ounces) finely shredded Gouda, plus more for serving
kosher salt
black pepper
1 tablespoon extra-virgin olive oil
6 ounces slab bacon, finely diced
3/4 teaspoon crushed red pepper
  1. In a large pot of salted boiling water, cook the pasta until al dente. Drain, reserving 1 cup of the cooking water.
  2. In a large bowl, beat the egg yolks with the whole egg, the 1 cup of Gouda, 1/2 teaspoon of salt and 2 teaspoons of black pepper. Very gradually whisk in 1/2 cup of the reserved cooking water to temper the eggs.
  3. In the large pot, heat the olive oil. Add the bacon and cook over moderate heat until rendered but not crisp, 5 to 7 minutes. Add the pasta, crushed red pepper and 1/4 cup of the reserved pasta cooking water.
  4. Cook, tossing, until the pasta is coated, 1 to 2 minutes. Scrape the pasta mixture into the large bowl and toss vigorously until creamy, 1 to 2 minutes. Add more cooking water if needed. Season with salt and pepper. Divide the pasta into bowls and serve, adding more Gouda as desired.
I think I almost broke my arm patting myself on the back on how well this turned out. And before you think that's quite immodest, remember my cooking skills are very rudimentary. Which is a nice-to-myself way of saying not giving myself food poisoning is success. Yes, my bar is that low because, also yes, I have accidentally given myself food poisoning with a dish I once made (that "best by" date on a carton of sour cream at that time was wrong, btw). Thankfully I was the only one who ate it. But still, that's why my expectations aren't high when it comes  to cooking. 
So I was very happy that I successfully made carbonara without the eggs ending up being scrambled. This made a rich, thick sauce coating, not too much sauce but not too little either. The pasta ended up absorbing most of the sauce but it wasn't dry. Still, you might want to err on the side of using less pasta.
The key to carbonara is having everything in place so you can toss the pasta with the sauce while everything is hot. It's the heat from the just-boiled pasta and the hot pasta water tempered into the egg mixture that will cook the eggs. And by cooking, I mean thickening, not scrambling. The hot water has to be tempered into the egg mixture or you risk scrambling the eggs. The heat from the noodles should be hot enough to thicken the egg mixture if you toss them right away. Don't let them cool or the eggs won't cook enough to thicken and you'll just be left with eggy mixture and an increased risk of food poisoning. The smoked Gouda also adds a nice creaminess to the sauce.


Wednesday, November 10, 2021

Orange Juice Cake with Honey-Orange Glaze

1 1/4 cups all-purpose flour
3/4 cup granulated sugar
2 teaspoons baking powder
1/2 teaspoon salt
1 tablespoon orange zest
1 large egg
1/2 cup buttermilk
1/3 cup sour cream
1/4 cup orange juice
1/4 cup canola or vegetable oil
2 teaspoons orange extract or vanilla extract

Glaze
1/4 cup orange juice
3 tablespoons honey
1 tablespoons unsalted butter
2 to 2 1/2 cups powdered sugar
1 to 3 teaspoons orange zest or to taste

  1. Preheat oven to 350 degrees F. Line an 8 x 8-inch pan with foil and lightly spray with nonstick cooking spray.
  2. In a large bowl, whisk together flour, granulated sugar, baking powder and salt. Whisk in the orange zest.
  3. In a separate bowl, whisk together egg, buttermilk, sour cream, orange juice, oil and orange extract until combined. Add mixture to the dry ingredients, stirring with a spoon or spatula until just combined. Do not overmix.
  4. Spread batter evenly in prepared pan. Bake 27-30 minutes or until a toothpick inserted near the center comes out clean or with a few moist crumbs. Poke holes generously in top of cake. Let cool while you make the glaze.
  5. In a medium-size, microwave-safe bowl, combine orange juice, honey and butter. Heat for 1 minute or until butter has melted. Add confectioners' sugar and whisk until smooth. Pour over cooling cake. Sprinkle with orange zest.
This is a basic, straightforward orange cake. I wasn't paying attention to the bag of oranges I bought and ended up with "pink navel" oranges. Unfortunately, they weren't that juicy and even more unfortunately, they didn't taste that orangey.

I relied on using the zest (which was at least orange) for most of the orange flavor as I didn't feel I got it from the juice. So I'm a little tepid about this cake, likely more because of the oranges I used rather than anything to do with the recipe itself since Averie Cooks typically has great recipes.
I posted the honey-orange glaze as written on her site but I only made a simply orange glaze with orange juice, powdered sugar and a little vanilla extract. Since the oranges weren't very orange-tasting, I didn't want to jeopardize the orange flavor even further by adding honey. 
Flavor aside, this cake did deliver on a cakey texture, which I liked. Next time I'll have to try these with regular oranges.


Monday, November 8, 2021

Amish Sugar Cookies

Amish Sugar Cookies - made October 13, 2021 from Taste of Home 
1 cup butter, softened
1 cup granulated sugar
1 cup vegetable oil
1 cup confectioners' sugar
2 large eggs
1 teaspoon vanilla extract
4 1/2 cups all-purpose flour
1 teaspoon baking soda
1 teaspoon cream of tartar
  1. In the bowl of a stand mixer fitted with the paddle attachment, cream together butter and granulated sugar until well combined and no butter lumps remain. Add vegetable oil and confectioners' sugar; beat until smooth. Add eggs, one at a time, and vanilla, mixing after each addition just until combined.
  2. In a separate bowl, whisk together flour, baking soda and cream of tartar. Add dry ingredients to mixing bowl in 3 separate additions, mixing until just combined after each addition. Do not overmix.
  3. Portion dough into golf-ball-size dough balls, cover and chill for several hours or overnight.
  4. Preheat oven to 375 degrees F. Line baking sheets with parchment paper and evenly space dough balls. Bake until edges are lightly browned and middles are set, 8-10 minutes. Remove from oven and transfer to wire cooling rack to cool completely.
I can't testify as to the authenticity of whether these really are Amish or not since I've never been to Amish country or tried any of their baked goods (although I'm a fan of Amish quilts). But that's what the recipe title says so I'm going with it.
This is a simple, basic sugar cookie. The vegetable oil adds to the airy crispness around the edges while the butter contributes to the chewy texture of the middle and the overall flavor of the cookie. I changed the directions slightly to make beating the butter and oil a little easier. To avoid butter lumps, beat the butter only with the granulated sugar first to get a mixture that's easier to incorporate with the oil. Then add everything else.
I always like a classic vanilla or butter cookie and this one delivers.


Saturday, November 6, 2021

Triple Dark Chocolate Truffle Brownies

10 tablespoons unsalted butter
1 1/4 cups granulated sugar
1/4 cup plus 3 tablespoons regular cocoa powder
1/4 cup plus 3 tablespoons dark cocoa powder
1/4 teaspoon salt
1 teaspoon vanilla extract
2 large eggs
1/2 cup all-purpose flour

Truffle Layer
4 ounces cream cheese, cubed, room temperature
30 Oreo cookies

Chocolate Coating
1 1/2 cup semisweet chocolate chips
3 teaspoons shortening
  1. Preheat oven to 325 degrees F. Line a 9 x 9 baking pan with foil and lightly spray with nonstick cooking spray.
  2. Place butter, both cocoa powders and sugar in a large microwave-safe bowl and microwave for about 1 minute and 30 seconds or until butter is melted. Whisk mixture until combined. 
  3. Stir in salt, eggs and vanilla, mixing until combined. Add flour and mix until just combined.
  4. Pour batter into prepared pan and smooth top. Bake for 22-25 minutes or until toothpick inserted near the center comes out slightly moist with a little bit of batter left on it. Cool completely in pan.
  5. Prepare truffle layer: in a large food processor, pulse Oreo cookies into a fine crumb. Add cream cheese and pulse until a dough-like consistency forms and cream cheese has been fully incorporated into Oreo crumbs.
  6. When brownies are completely cool, dollop chunks of the truffle mixture over brownie and smooth into an even layer.
  7. Prepare the chocolate coating: in a small bowl, melt the chocolate chips and shortening in 30-second increments in the microwave until completely melted. Whisk until smooth and pourable. Pour the chocolate on top of the truffle layer and spread with a small metal spatula into a smooth, even layer. Refrigerate for 20 minutes to allow the top to set. Remove from refrigerator and let come to room temperature before cutting and serving.
I've had this recipe on my pinterest board for awhile. I didn't have "dark cocoa" and had been using the Kirkland cocoa powder from Costco (the light-colored cocoa in the picture above) for my baked goods. But I was running out of the Kirkland and couldn't find it during my last Costco run so I ordered my beloved Pernigotti cocoa (the darker colored cocoa in the picture) from Chef Shop (female-owned small business).
I still had some of the Kirkland cocoa and with the Chef Shop cocoa arriving, it seemed like a good time to try out this recipe. It's got a brownie base (make sure you stir the batter enough to get to the glossy stage above), followed by a Oreo-cream-cheese layer and topped with a melted chocolate chip layer.

Note that I don't call the top layer "frosting". It's simply chocolate chips melted with a little shortening then you chill it to let it set and harden.

This was a good brownie. The brownie layer itself was a good fudgy brownie. Not sure I was an equally huge fan of the oreo "truffle" layer. I keep baking with Oreos and I keep finding I prefer Oreos in their pristine, straight-from-the-package state. That's not the fault of the brownie; it's just a taste preference for me.
Fortunately for all of us, I don't really bake just so I can eat a pan of brownies. I bake to try out recipes and I'm fortunate enough to have opportunities to share the end results with others. Win-win.


Friday, November 5, 2021

Pumpkin Spice Buttermilk Cake

2 1/4 cups all-purpose flour
2 teaspoons baking powder
1 teaspoon baking soda
2 teaspoons cinnamon
1 teaspoon ground allspice (I used pie spice)
3/4 teaspoon nutmeg
1/2 teaspoon ground ginger
1/4 teaspoon ground cloves
1/2 teaspoon salt
1 1/3 cups canned pumpkin
3/4 cup buttermilk
1 teaspoon vanilla
1 cup unsalted butter, room temperature
1 cup granulated sugar
1/4 cup brown sugar
3 large eggs

Frosting
3/4 cup unsalted butter, room temperature
8 ounces cream cheese, softened
3/4 teaspoon vanilla
1/2 teaspoon cinnamon
3 cups powdered sugar
1 tablespoon milk
  1. Preheat oven to 350 degrees F. Lightly spray a Bundt pan with nonstick cooking spray and lightly flour; set aside.
  2. In a medium bowl, whisk together flour, baking powder, baking soda, cinnamon, allspice, nutmeg, ginger, ground cloves, and salt; set aside.
  3. In another bowl, whisk together pumpkin, buttermilk and vanilla; set aside.
  4. In the bowl of a stand mixer fitted with the paddle attachment, beat the butter, granulated sugar and brown sugar until creamy and fluffy, 2-3 minutes. Add eggs, one at a time, beating after each addition until just combined.
  5. Alternately add the flour mixture and buttermilk mixture, beginning and ending with flour mixture, mixing after each addition until just combined. Do not overmix.
  6. Pour into prepared Bundt pan and bake for 40-45 minutes or until a toothpick inserted in the thickest part of the cake comes out with a few moist crumbs. Cool for several minutes then loosen the sides and center with a small rubber spatula. Invert onto a serving plate and let cool.
  7. Frosting: Beat together butter and cream cheese until well combined and creamy, about 2 minutes. Add vanilla and cinnamon and mix to combine. Add powdered sugar, 1/2 cup at a time, beating after each addition. Add milk and mix until combined, Spread over cooled cake.
After my baking fail with the Glazed Orange Bundt Cake, I tried to curb my underbaking tendencies and let this one bake long enough until I was absolutely sure it was done and before I got freaked out that it had baked too long and was going to be dry.

Fortunately, pumpkin adds a lot of moisture to a cake so it's harder to overbake it. Not that it can't be done, I'm sure, but you have a little more wriggle room with pumpkin.

I loved how this turned out. Great texture and great flavor. This does have a lot of spices and I ended up substituting pie spice for the allspice because I didn't have any allspice. That worked out fine. I used to be more simplistic in my use of spices in baking as I pretty much only liked cinnamon in baked goods.
But since I've become such a Penzey's fan and my spice drawer is full, I've become much more open to trying recipes that use a plethora of spices. They worked well in this cake and nothing says autumn baking than a pumpkin dessert. If anyone still goes to potlucks or bakes for office mates these days, this is a great cake to bring.


Wednesday, November 3, 2021

Red Velvet Sheet Cake

Red Velvet Sheet Cake - made October 10, 2021 from I Heart Eating
2 cups all-purpose flour
1 1/2 cups granulated sugar
1 teaspoon baking soda
1/4 teaspoon salt
1 cup butter 
1 cup water
1/4 cup unsweetened cocoa powder
2 large eggs, cold
1/2 cup buttermilk
2 teaspoons vanilla extract
2 tablespoons (1 ounce) red food coloring

Cream Cheese Frosting
8 ounces cream cheese, softened
2 tablespoons butter, softened
1 teaspoon vanilla
2 1/2 - 3 cups powdered sugar
1-3 tablespoons buttermilk
  1. Preheat oven to 350 degrees F. Line a 15 x 10-inch or 9 x 13-inch pan with foil and lightly spray with nonstick cooking spray; set aside.
  2. In a medium bowl, whisk together flour, sugar, baking soda and salt.
  3. In a heavy saucepan over low heat, combine butter, water and cocoa powder. Bring to a boil, whisking constantly until combined.
  4. Remove from heat and stir in eggs, buttermilk, vanilla and food color, whisking until well combined. Stir in flour mixture until combined.
  5. Pour batter into prepared pan. Bake for 20-30 minutes or until a toothpick inserted near the center comes out clean. Cool completely.
  6. Frosting: beat together cream cheese, butter and vanilla until combined. Beat in powdered sugar and enough buttermilk for desired consistency. Frost cooled cake and cut into squares.
I'm not a great food photographer. I know there are classes that teach you how to do it well but I haven't taken any. We're getting into that time of the year where natural light is available in a smaller and smaller window of time during the day. That's my lead in as to why some of my foodie pictures are going to show up a little dark or under unnatural light.
Nevertheless, that doesn't detract from the deliciousness of this cake, no matter how it shows up in the pictures. This is everything a sheet cake should be: easy to make, no fuss, great flavor and has the perfect cakey texture. I need to make this kind of cake more often as it really was delicious.
The only annoying thing with red velvet cake with cream cheese frosting is the red velvet cake crumbs that show up quite starkly against the frosting and makes it look messy. You can minimize that by chilling the frosted cake and slicing with a knife dipped in hot water (and wiped dry before cutting) then cleaning off the knife after each cut.
As you can tell from my pictures, I didn't have or take that kind of time and effort. I made this for the weekly distribution to the local houseless population and, along with the other cakes I made that week, I needed to slice it up, package each piece and get everything ready for the porch pick up the organizers were kind enough to do when I bake something. But if taste is more important than looks for you, make this cake.


Monday, November 1, 2021

Glazed Orange Bundt Cake

3 cups (315 grams) sifted cake flour, spooned and leveled
1 teaspoon salt
1 teaspoon baking powder
1/2 teaspoon baking soda
1 cup unsalted butter, room temperature
1 2/3 cups granulated sugar
4 large eggs, room temperature
1 teaspoon vanilla extract
zest from 2 oranges (about 2 packed tablespoons)
1/2 cup fresh orange juice
1/2 cup buttermilk, room temperature

Orange Glaze
1 1/4 cups (150 grams) sifted confectioners sugar
zest of 1 orange
2-3 tablespoons fresh orange juice
1/2 teaspoon vanilla extract
  1. Preheat oven to 350 degrees F. Lightly coat a Bundt pan with nonstick cooking spray and lightly flour; set aside.
  2. In a medium bowl, whisk together the flour, salt, baking powder, baking soda; set aside.
  3. In the bowl of a stand mixer fitted with the paddle attachment, beat the butter on high speed until smooth and creamy, about 1 minute. Add the sugar and beat on high speed for 2 minutes. Beat in eggs and the vanilla until combined. Beat in orange zest and orange juice.
  4. On low speed, alternately add the dry ingredients and buttermilk, mixing after each addition just until incorporated. Do not overmix.
  5. Pour batter into prepared Bundt pan and smooth top. Bake 45-55 minutes or until a toothpick inserted in the thickest part of the cake comes out clean or with a few crumbs. Let cool for several minutes then loosen the sides and center of the cake from the pan. Invert onto serving plate.
  6. While the cake cools, make the glaze. Whisk the confectioners' sugar, 2 tablespoons of orange juice, zest and vanilla until combined. Add additional orange juice if desired for a thinner consistency. Drizzle half the glaze over the warm cake. Let cake cool completely and drizzle remaining glaze over it.
Confession time: I did this cake a disservice by taking it out too soon before it had fully baked. Normally I don't mind a slightly underbaked cake, especially a pound cake or any kind of cake because I can't abide a dry cake. Which is what usually occurs when a cake is overbaked. But I took this out too soon, not because of my preference for a moist cake but because I was fooled by the toothpick test.
When I inserted the toothpick into the cake after it had baked for 50 minutes, it came out clean. But turns out that was a false positive. The cake wasn't raw but the texture would've been better and less dense if I had baked it a few minutes longer. I should've known better as my oven typically takes longer to bake things than what the recipe calls for. 50 minutes was too good to be true.
Of course by the time I realized it was underbaked, I had already glazed it so it was too late to put back into the oven to bake some more. You can tell it's underbaked by the picture below. The very bottom of the cake has the right texture. But the cake didn't bake long enough for that texture to make it to the rest of the cake. Oops.
Underbaking the cake also affected the taste. Because I hadn't baked the cake long enough, the cake itself didn't have much flavor. Most of the orange flavor came from the glaze. I'll have to try making this again as recipes from Sally's Baking Addiction are almost always pretty amazing but my attempt wasn't. User error.