Wednesday, October 20, 2021

Texas Sheet Cake Brownies

Texas Sheet Cake Brownies - made September 27, 2021 from Averie Cooks 
1/2 cup (1 stick) unsalted butter 
6 ounces dark or bittersweet chocolate, chopped coarsely
3/4 cup granulated sugar
2 large eggs
1 tablespoon vanilla extract
1 tablespoon brewed coffee, optional
1 teaspoon instant espresso powder, optional
3/4 cup all-purpose flour
1/2 teaspoon salt

Frosting
1/4 cup unsalted butter
3 tablespoons milk
3 tablespoons unsweetened cocoa powder
1 3/4 to 2 cups confectioners' sugar
1 teaspoon vanilla extract
3/4 cup chopped walnuts or pecans, optional
  1. Preheat oven to 350 degrees F. Line an 8 x 8-inch pan with foil and lightly spray with nonstick cooking spray.
  2. In the top half of a double boiler set over hot water, melt butter and chocolate, whisking until completely melted and smooth. Add granulated sugar and stir to combine. Add eggs, vanilla, coffee and espresso (if using) and stir to combine.
  3. Add the flour and salt; stir until just combined. Pour batter into prepared pan and smooth top. Bake for 20 to 25 minutes or until a toothpick inserted near the center comes out with a few moist crumbs, not raw batter. Cool on a wire rack while making the frosting.
  4. Frosting: in a medium saucepan, combine butter, milk and cocoa powder, stirring until butter is melted and whisking until combined. Let come to a boil and let boil for 15 seconds before removing from heat.
  5. Add 1 3/4 cups confectioners sugar and vanilla, whisk until smooth and combined. Add additional 1/4 cup confectioners' sugar if you want a thicker frosting. Add nuts if desired. Spread frosting evenly over brownies, smoothing top with small metal spatula. Let cool completely before cutting and serving.
I had made the brownie version of Texas Sheet Cake before, originally called Essence of Chocolate Squares and it's one of my favorite brownie recipes on my blog. Which is saying something if you counted up all the brownies I've posted over the years.
So it's going to be high praise when I say this version of it from Averie Cooks is also delicious and probably going to be one of my go-to recipes whenever I want a frosted brownie.
The texture and flavor were on point. These aren't as rich as the Essence of Chocolate Squares as the frosting layer isn't as thick but it's still really amazing.


Monday, October 18, 2021

Bakery Review: Sweet Potato Pound Cake from Southern Girl Desserts

Southern Girl Desserts - placed order on September 29, 2021, received October 6, 2021
I first heard of Southern Girl Desserts when they competed on Cupcake Wars. Back in the days when I watched TV on a regular basis, that was my go-to show for entertainment. I believe they won, btw.
I had seen their product offerings on Gold Belly before but hadn't ordered anything. The dessert I was most interested in was their Giant Sweet Potato Pound Cake but it retailed for $89. Even though that price included free shipping and when you take into account the cost of shipping and packaging not to mention what full-size cakes in many retail bakeries cost, that doesn't make it an unreasonable price. But...it still gave me pause. 
I mean, I like to support small business and all and this is a black-female-owned small business which I also want to support but almost $90 for a pound cake that I could likely make myself or at least something close was pause-worthy.
Then it went "on sale" on Gold Belly, for $69 with free shipping. On the website for Southern Girl Desserts, they also sell the same pound cake for $75 but that's if you're lucky enough to live nearby and can pick up from their store. Which I'm not. While $69 still seemed a bit steep, yup, you guessed it, I talked myself into it. Pause over.

As with everything I've bought from Gold Belly so far, everything comes so well packaged. It also arrived promptly when it was supposed to. I ordered it on September 29 and it arrived on October 6 in great condition, well wrapped and in cool storage packing.

The package also comes with these cards that give some background info on the owners and how to enjoy the cake.


This cake is not for the faint of heart or dainty. When they say "giant" they mean "giant". It's a huge bundt cake and the middle is filled with some sort of amazing sweet potato filling and glaze. 
But wait, there's more. It isn't just a sweet potato pound cake. There's a layer of sweet potato filling inside the cake as well that is as deliciously amazing as the cake part. 
You know, up-post, where I said I could probably make something similar to this? That was a lie. Even if I tried, I think I could only nail down the sweet potato pound cake part, at best. This is more than that, from the sweet potato layer inside the cake to the sweet potato filling in the center of the Bundt cake hole to the glaze. 

Another good thing about this cake is it freezes well. Since even I can't eat a giant anything unless I want to assume giant proportions myself, I sliced it up and put the individually wrapped slices in the freezer so I could enjoy a piece at a time at my leisure in the future and have more to share with others when the time comes.
This particular sale is over at Gold Belly but if you're a new customer, you can use my Referral Code to get $15 off your order (disclaimer: I get $15 off my next order as well). I have to admit, cheap as I am sometimes, I'd probably pay full price for this amazing cake next time. It's a serious option for Thanksgiving dessert if you want something beyond the traditional pie and to wow your guests around the dining table.


Sunday, October 17, 2021

Kentucky Butter Cake with Rum Sauce

2 cups granulated sugar
4 large eggs
1 cup (2 sticks) butter, softened
2 teaspoons rum or vanilla extract
1 cup buttermilk
3 cups all-purpose flour
1 teaspoon salt
1 teaspoon baking powder
1/2 teaspoon baking soda
  1. Preheat oven to 325 degrees F. Generously spay a Bundt pan with nonstick cooking spray and lightly flour.
  2. In the bowl of a stand mixer fitted with the paddle attachment, cream together granulated sugar and butter until combined and creamy. Add eggs, one at a time, mixing briefly until just combined, after each addition. Add buttermilk and rum or vanilla extract; mix just until combined.
  3. In a separate bowl, whisk together flour, salt, baking powder and baking soda. Add half of the dry ingredients to the butter mixture and mix until just combined. Add remaining dry ingredients and mix until just combined.
  4. Pour batter into Bundt pan and smooth top. Bake for 55-60 minutes or until a toothpick inserted in the thickest part of the cake comes out with a few moist crumbs. Remove from oven and let cool for several minutes before loosening sides of cake and center with a spatula rubber spatula. Turn over on a cake plate.
Rum Sauce
3/4 cup granulated sugar
1/3 cup butter
3 tablespoons water
2 teaspoons rum or vanilla extract
  1. Combine all sauce ingredients in a saucepan and cook over medium heat, whisking until combined and fully melted. Do not boil. Poke holes over cake and pour sauce over cake.
Sometimes I'm hesitant to make southern desserts. Ever since I made "Southern Tea Cakes" and someone from the South disparaged the version I posted and basically suggested I should stop trying since I knew nothing about it, it's made me a little gunshy. I can't remember her exact words (although apparently I did log it in the post where I wrote about it when I clearly still remembered it) but, 5 years later, it's true that you can never forget how someone made you feel. In that case, this person made me feel chastised, defensive and very skeptical about the legend of Southern hospitality and manners.
I got over the feeling, thanks to another Southerner who did embody kindness and grace and shared her grandmother's recipe for the tea cakes. But since then, I've been leery about trying other Southern desserts as I really didn't need someone else to smack me around about it.
But, hey, you have to get over stuff like that or else you give it too much power and meaning. So back I go, wading into the South, with this recipe for Kentucky Butter Cake. This is from The Southern Lady Cooks so I'm going to assume she knows what she's talking about. Coincidentally, I also found two other recipes for Kentucky Butter Cake that was almost the exact same as this one, one from another blog who got it from allrecipes.com and another one from a culinary cozy mystery set in Kentucky. 
I say "almost" the same as the only difference with this one is the addition of rum in the cake and in the glaze. Otherwise, the ingredients and the measurements were the same. Which is unusual as usually a recipe with the same name may have the same ingredients but they're often in different measurements (think of chocolate chip cookie recipes). But nope, the amount of flour, butter, sugar, number of eggs, etc were all the same. So I'm going to assume this is a representative recipe for Kentucky Butter Cake.
Which turned out to be a pretty good butter pound cake. I was slicing these up to be given away so I wasn't going to serve it with copious amounts of butter sauce. One recipe of the butter sauce turned out to be too much for merely glazing the cake so I ended up making two cakes and used the butter sauce to glaze both cakes. That worked out fine. And I channeled that Southern hospitality to pass these out to our local homeless population.


Friday, October 15, 2021

Pumpkin Coffee Cake

Pumpkin Coffee Cake - made September 27, 2021 from Chef Savvy
2 cups all-purpose flour
1 teaspoon baking soda
1/2 teaspoon baking powder
1/2 teaspoon salt
1 tablespoon pumpkin pie spice
1 cup pumpkin puree (not pumpkin pie filling)
1/2 cup light brown sugar
1/4 cup granulated sugar
1/2 cup canola oil
1/4 cup milk

Streusel Topping
1/2 cup all-purpose flour
1/4 cup unsalted butter, cold
1/3 cup light brown sugar
1/2 teaspoon pumpkin pie spice

Glaze
1/2 cup powdered sugar, sifted
1 tablespoon milk
  1. Preheat oven to 350 degrees F. Line a 9 x 9-inch baking pan with foil and lightly spray with nonstick cooking spray.
  2. In a large bowl, whisk together flour, baking soda, baking powder, salt and pumpkin pie spice.
  3. In a medium bowl, combine pumpkin puree, light brown sugar, granulated sugar, oil and milk. 
  4. Add dry ingredients and mix until just combined. Do not overmix.
  5. Pour batter into prepared pan and smooth top.
  6. Make streusel: In a small bowl, combine flour, brown sugar and pumpkin pie spice. Cut in butter until mixture resembles coarse sand. Squeeze handfuls of streusel together to make clumps. Sprinkle top of cake batter with streusel topping.
  7. Bake for 30-35 minutes or until a toothpick inserted near the center comes out with a few moist crumbs. Cool for 30 minutes.
  8. Glaze: combine powdered sugar and milk, whisking until smooth. Drizzle over cooled cake.
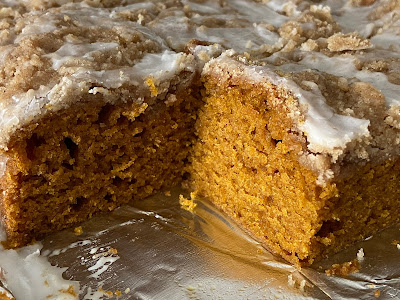
If you want a seasonal, easy-to-make dessert, here you go. This pumpkin coffee cake is good for breakfast (oh, just me?) or afternoon tea. It's also good for making for a crowd since it's easy to put together, slice up and package for distribution.

For the streusel, I forever follow Martha Stewart's advice to gather the streusel in large handfuls to make big clumps before scattering over the cake. They bake up more crisp that way and provide a nice texture contrast to the soft fluffiness of the cake.

This cake bakes up moist and tastes amazing. Let the glaze set before cutting. The combination of soft cake, crunchy streusel and sweet glaze makes each forkful bliss for the taste buds.


Wednesday, October 13, 2021

Nutella-Stuffed Browned Butter Blondies

1 cup Nutella
10 tablespoons butter
2 cups dark brown sugar, packed
4 ounces cream cheese, softened
2 teaspoons vanilla 
2 large eggs
2 cups all-purpose flour
1 teaspoon baking soda
1/2 teaspoon salt
1/4 cup Nutella
  1. Line a small baking sheet with wax paper. Measure 1 cup of Nutella and use two spoons to divide the Nutella into 12 dollops on the wax paper, about 2-3 teaspoons each. Place the sheet in the freezer.
  2. Preheat oven to 350 degrees F. Line an 8 x 11 x 2" baking pan with foil and lightly spray with nonstick cooking spray.
  3. In a small saucepan, melt the butter over medium heat, stirring until butter foams, smells nutty and browned bits appear at the bottom of the pan. Remove from heat and pour into a bowl. 
  4. In the bowl of a stand mixer fitted with the paddle attachment, beat together the brown sugar and cream cheese until well combined. Pour in the hot browned butter and beat until combined and slightly fluffy, about 2 minutes. Add in the vanilla then the eggs, beating after each addition.
  5. In a separate bowl, whisk together the flour, baking soda and salt. Add to butter mixture and mix until just combined.
  6. Fold in 1/4 cup Nutella, leaving some streaks swirled into the batter. Pour into prepared pan and smooth into an even layer with small spatula. 
  7. Remove the Nutella from the freezer. Use your fingers to push each dollop of Nutella into the dough, distributing them evenly. Smooth the dough over the Nutella with a spatula.
  8. Bake for 27-30 minutes, until golden brown on top and the edges are set. Let cool completely before cutting and serving.
This one's for the Nutella lovers who can't get enough Nutella. The key is to freeze the 12 dollops of Nutella first so you can be sure to get pockets of liquid goodness even after the blondie has been baked and cooled. Otherwise, the recipe is pretty simple and straightforward to follow. I didn't have an 8 x 11" pan so I baked it in a 9 x 9" pan and it worked fine. These turned out a bit gooey so I think it could've used a few minutes longer in the oven. The top formed a crust, which I didn't love, but the taste was still good.


Monday, October 11, 2021

Apple Pie #1

Apple Pie - made September 23, 2021, adapted from The Sensible Mom 
2 1/2 cups flour
2 1/2 tablespoons sugar
1 teaspoon fine sea salt
8 tablespoons vegetable shortening, well chilled (place in freezer 15-20 minutes before using)
12 tablespoons unsalted butter, well chilled and cut into 1-inch pieces (place in freezer 15-20 minutes before using)
5 to 6 tablespoons ice water
  1. In a large bowl, whisk together the flour, sugar and salt
  2. Scatter the vegetable shortening over the flour mixture and using either two butter knives, a pastry cutter or your hands, cut the shortening into the flour mixture until the mixture resembles coarse sand.
  3. Scatt the butter over the coarse flour mixture and repeat the same process.
  4. Sprinkle ice water over the flour mixture, one tablespoon at a time. Press the dough together with a spatula after each tablespoon. Stop adding ice water once the dough has come together.
  5. Divide the dough evenly in half. Flatten each half and shape into disks. Wrap the disks tightly with plastic wrap and refrigerate for 1 hour.
  6. When ready to use the dough, remove from refrigerator and let sit for 10 minutes. Place on a large piece of parchment paper and roll out in a round shape to 1/4" thickness. Handle the dough as little as possible. Cover and refrigerate while you prepare the filling.
Filling
3 large Granny Smith apples, peeled, cored and sliced
3 large Cortland, McIntosh or Braeburn apples, peeled, cored and sliced
3/4 cup plus 1 tablespoon granulated sugar
1 tablespoon light brown sugar
2 tablespoons flour
1 tablespoon lemon juice
1/4 teaspoon fine sea salt
1/4 teaspoon nutmeg
1/2 teaspoon cinnamon
1 egg white, lightly beaten
  1. Place a rimmed baking sheet on oven rack in the lowest position in oven. Preheat oven to 500 degrees.
  2. In a large bowl, toss the apples with 3/4 cup granulated sugar, brown sugar, flour, lemon juice, salt, nutmeg and cinnamon. Set mixture aside.
  3. Place one rolled out dough in bottom of pie pan. Pour the apples onto the unbaked bottom crust, mounding in the middle. Lay the top crust over the apples, trim excess pie dough around the edges and seal and crimp the edges.
  4. Cut 4-5 vent holes in the top of the pie crust. Brush the top crust with beaten egg white then sprinkle the remaining tablespoon of sugar over the crust.
  5. Place the pie on the hot baking sheet then reduce the oven temperature to 425 degrees F. Bake at this temperature for 20-25 minutes or until the top crust is golden brown. Then rotate the baking sheet and reduce temperature to 375 degrees F. Bake another 30-35 minutes, until the top crust is a deep golden brown and the apple juices are bubbling. Remove pie from oven and let cool before serving.
I love apple pie. You'd think I know how to make one from scratch after all the years of baking. But I rarely bake pies, partly because it's not a dessert I can easily share with others, either in care packages or, even pre-pandemic and pre-retirement, in the communal kitchens at the companies I've worked at.
The other reason is I'm one of those people who suck at making pie crust. My pie crust making is everything all the pie recipes warn you against: don't overhandle the dough or you'll get tough crusts. You know how you supposedly get better at something the more you practice? HAHAHAHA *wipes tears*.
I suppose I could use that as an excuse of why I can't make a decent pie crust since I rarely bake pies from scratch. But I really want to learn. So I'm trying again. I'm going to number my efforts so I can keep track how many times and how long it's going to take me.
I got off to a dubious start with this first attempt. I didn't actually intend to make a Dutch Apple pie. I was trying for the traditional double crust pie. Except my pie dough just wasn't coming together and was still too dry and floury. Then I accidentally knocked part of the crumbly dough off the counter and ended up with just over half of the pie crust still sitting on the counter. The rest was scattered on the kitchen floor. Sigh.
But no need to let (yet another) mishap stop me. So I swept the floor and soldiered on with the surviving pie dough. It wasn't enough to make a double crust so I ended up making a rather thick bottom crust. 

The Dutch Apple Crumb topping is from 5 Boys Baker
The Dutch Apple Crumb topping is from 5 Boys Baker
1 cup flour
1/2 cup granulated sugar
1/2 cup light brown sugar
1 teaspoon cinnamon
1/2 cup cold butter, cubed

Cut all ingredients together to form a streusel with coarse crumbs. Squeeze handfuls of the streusel together and scatter evenly over the top of the pie. 
It was a good way to save the pie and it turned out to be amazing with the filling. The filling was also quite good. The bottom pie crust? Yeah, not so much. It's not that it was too tough, although I can't claim it was that flaky either. But because I was so afraid of over-handling the pie dough that I didn't roll out the crust enough and it was a bit thick. 

So I would say this pie only half turned out. I used a combination of Granny Smith apples and Envy apples and the filling was amazing, not too tart and not too sweet, with the streusel topping adding some crunchy texture.  
I still haven't conquered pie dough but I'm feeling confident about my pie filling skills. Back to the pie dough drawing board because, as you can imagine, a crustless pie is mostly just a cobbler and I already know how to make cobbler, lol.