Monday, April 14, 2014

Restaurant Review: The Pasta Market

The Pasta Market - takeout on April 4, 2014 and April 8, 2014, 3.5 stars on yelp, 170 reviews
The Pasta Market is the place my cousin Christine recommended for takeout pasta. The one I was looking for when I ended up at Bon Chon Chicken the first time around. Turns out I needed to go just a little farther to the next strip mall over. Their menu is posted outside on the glass wall so you can take your time perusing their selections before going inside and placing your order. Although they also have menus inside if you missed it outside, both mounted and as paper copies at the counter.
It was fairly empty the first time I went but I was a bit on the early side, just before 6 pm. They offer the standard selections of different pastas (spaghetti, angel hair, linguine, fettuccine, gnocchi) in various sauces (marinara, bolognese, pesto, alfredo, carbonara) as well as filled pastas like tortellini, cannelloni, ravioli and lasagna. You can also opt to add more vegetables or proteins like chicken, shrimp, etc to your pasta dishes for an extra charge. To further carbo load, there are also pizza and calzone options as well as specialty entrees like veal parmigiana, linguine vongole, and sandwiches. So basically, the Italian version of a Chinese menu.
Most, if not all, of the orders come with your choice of breadsticks or garlic bread. The first time I went, I chose the breadsticks as the guy behind the counter said that's what they were known for. They were good but ironically I preferred the garlic bread that I tried on my second visit.
Breadsticks with cheese spread for dipping
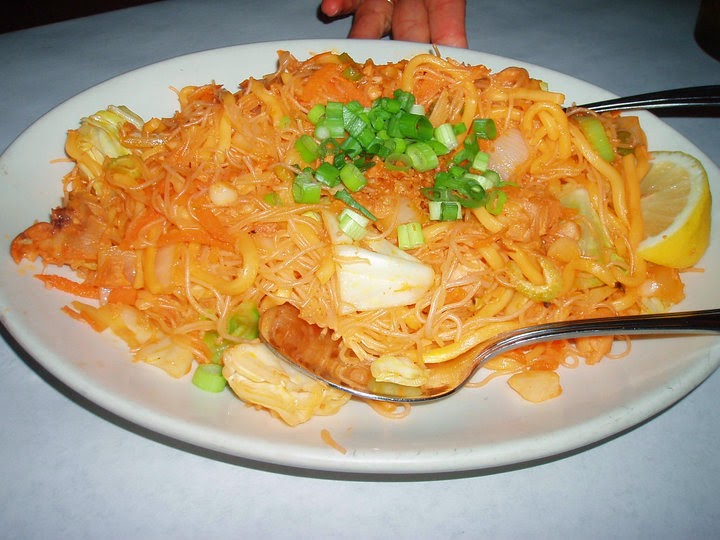
The first time I went, I ordered the spaghetti and meatballs in meat sauce - my comfort food. They give a pretty decent-sized portion for something less than $10 so I more than got my money's worth. Moreover, they give a lot of sauce proportionate to the noodles (at least to me) so I ended up boiling my own angel hair pasta and adding it to the original dish. So I got 3 meals out of the 1 order. That's one way to make my takeout dollars stretch.
I don't know that I would call it gourmet Italian cuisine. It's okay. I don't have a very high bar for pasta so it suited me just fine. Moreover, it was convenient and at the right price point for a takeout meal. You can order at the counter when you arrive and they have your order ready within 5 minutes or you can call ahead to place your order and pick it up when you're ready. A boon for busy working families or overworked non-cooks who want a different option than Lean Cuisine at the end of a work day. Ahem.
Spaghetti and Meatballs
The staff was very nice both times I've gone. They're friendly and courteous, they ask if you want plastic utensils when you pick up your order and they provide extra packets of Parmesan for sprinkling over the pasta. They also accommodated my request both times for different noodles (angel hair for the spaghetti & meatballs and spaghetti noodles instead of linguine for the carbonara). I know it's just as easy for them to boil one type of noodle than another but I appreciated the flexibility and customer service.
The only thing I would caution is they do have a tendency to overcook their pasta; at least both of the orders I tried on 2 separate visits were over done. So if you like your pasta al dente, you may want to specify that or else lower your expectations.
Chicken Carbonara
The carbonara was good too and I appreciated the generous amounts of chicken and prosciutto in it as most places tend to skimp on the protein. As with the spaghetti, there was more than enough carbonara sauce for me to add my own noodles and once again, I got three servings out of one order from this one as well. If you're like me and don't cook, having 1 takeout meal feed you for 3 days (okay, yes, that did strike me as sounding just a little bit pathetic) means 2 days you don't have to worry about "what's for dinner?" Pathetic or not, I'll take it.
Garlic Bread
On my second visit, I finally noticed that to the right of the counter where you place your order, they had a refrigerated display case of desserts. How I missed that the first time around I can't explain. I made up for the oversight by choosing a slice of chocolate cake, "just to see" what it was like.
Normally, I'm very cynical about these things and didn't have high expectations of something sold out of a display case that isn't in a bakery. Color me wrong because I thought the chocolate cake was excellent. The cake layers were moist and whatever mousse/filling they used between the layers was delicious. It was heavier than a mousse but not sickly sweet like a frosting. It had the consistency of a creamy cheesecake but not the flavor or tang of a cheesecake. So I don't know what it was other than a dense, yummy mousse. Don't forget the part where I don't usually like frosting or creamy desserts. So for me to like this when it was mostly creamy, frosting-like confection is something.
Chocolate Cake - $3.95
It was pretty rich and normally I'd have a few bites of something like this then leave the rest for the next day just to exercise portion control. This time around, I told myself to put a sock in it and enjoyed it all on the same day. Granted, I had to spread the bites out over a 2-hour period but I still ate it all. And licked my fork.

Sunday, April 13, 2014

Easter Jewel Cookies

Easter Jewel Cookies - made dough April 11, 2014, baked April 12, 2014 from Saving You Dinero
For the past few years, for Easter, I've made some kind of "nest" or basket dessert recipe. I've done Nutella Rice Krispie Easter Baskets, Chocolate Easter Baskets made out of chocolate and pretzels, and Almond Joy Brownie Easter Nests. Traditional Easter desserts can also include carrot cake or anything with lemon to capture the springtime essence. You'll notice that my Easter creations tend to center around using Cadbury mini eggs. Meaning the only reason I make something is to serve as an excuse to buy my annual bag of mini eggs and put them on top of something. This year I was out of nest/basket ideas and a search for "Easter cookies" came up with a horrifyingly beautiful assortment of iced and decorated cookies. The kind that's out of the reach of my decorating skills. But I did find this recipe from Saving You Dinero and loved it for its simplicity (links in post title).
It's essentially a little butter cookie you bake and then you push a mini egg into the center (the original recipe called for peanut M&Ms but I took liberties) as soon as you take the cookies out of the oven. The pastel colors represent springtime and you remain loyal to the Easter icon of the eggs. I also like it because if you have kids, they can easily help you with this recipe. Even if they're too young for the actual making of the dough, at least they can have the fun of pushing the mini egg into the cookie. They can "help" and it's a fun family activity - always a good way to celebrate Easter.
I really liked these cookies. Not only do they have the springtime Easter cuteness factor, but they're also quick and easy to make, you make the dough ahead of time and freeze so you can bake them on your schedule, and most importantly, they taste good. Use fresh butter (of course) to get that butter goodness taste shining through. The cookies don't spread if you bake from frozen dough, something I highly recommend. Make the dough balls small to keep them proportional to the size of the Cadbury mini eggs. These are especially good if you eat them lukewarm as the chocolate inside the candy shell, while not melt-y, will be soft. As always, do not overbake these. The cookies won't turn brown except on the bottom so time them and don't leave them in for too long or they'll easily become dry. Baked just right, they're a little bite of buttery goodness. Just like peanut butter blossoms seem to be a traditional cookie at Christmas, I think these just became my go-to Easter cookie.
1 cup unsalted butter, softened
1 cup granulated sugar
2 eggs
1 teaspoon vanilla extract
3 1/2 cups all-purpose flour
1/2 teaspoon baking powder
1/4 teaspoon salt
pastel M&Ms or Cadbury mini eggs
  1. Cream butter and sugar in a large mixing bowl. Mix in egg and vanilla until well incorporated then add flour, salt and baking powder slowly.
  2. Split dough in half and wrap in plastic. Refrigerate for 1 hour. Alternatively, you can form into dough balls and freeze 12 minutes prior to baking.
  3. Preheat oven to 350 degrees F.
  4. If you haven't already, shape dough into small balls about the size of a walnut and place 2 inches apart on baking sheets lined with parchment paper.
  5. Bake for about 10-12 minutes, until lightly browned on the bottom edges. Do not overbake.
  6. Remove from the oven and immediately press one pastel M&M or Cadbury mini egg into the center of each cookie. Remove from baking sheet and allow to cool completely.

Saturday, April 12, 2014

Almond Joy Twix Bar Cookies

Almond Joy Twix Bar Cookies - made April 4, 2014 from Just a Pinch
This is a half-fail/half-success experiment. But I can't tell you which half is which. When I saw the picture on pinterest, I was "me-likey" because it had a crust, it had coconut, it had chocolate. You could also add almonds to make it more Almond-Joy-like. I didn't need as much as the original recipe dictated so I only made a half recipe and baked it in an 8 x 8 inch pan.
I went further off the beaten path because instead of melting bittersweet chocolate for an even chocolate layer on top, I decided to be oh-so-clever and instead sprinkle the top with chopped almonds and chocolate chips and, in the last few minutes of baking, chopped up Twix bars. Why? Well, a couple of weeks ago I took it into my head to clean out and organize my pantry. I discovered I had ingredients past their expiration date (those went regretfully into the trash), a leftover bag of Twix from Halloween (it should probably bother me that it's been that long yet according to the Twix people, it wasn't at the "use by" date yet), and a hoard of C&H light brown, dark brown and powdered sugar. I also had 3 large bags of coconut in my freezer. So it was time to use those up, especially the Twix.
I think this bar cookie was a good concept but I don't know that I loved it in my execution. Baking a half recipe in a smaller pan made it just a tad too thick, especially when it's mostly made up of coconut. I love coconut but sometimes you can have too much of a good thing. If you decide to make a half recipe, I'd bake it in a 9 x 9 pan instead. I also thought the chopped up Twix was a little jarring and didn't add anything to the cookie. I would've been better off making it more like a magic cookie bar with the almonds and chocolate chips sprinkled on top and omitting the Twix. Or melting the chocolate and pouring it on as the top layer like the original recipe did.
10 tablespoons unsalted butter, room temperature
3/4 cup light brown sugar, packed
2 1/2 cups flour
1/2 teaspoon salt
2 14-ounce cans sweetened condensed milk
28 ounces shredded coconut (I used sweetened flake coconut)
1 teaspoon vanilla extract
5 cups bittersweet chocolate chunks
  1. Preheat oven to 350 degrees F. Line a 9 x 13 pan with foil and spray with nonstick cooking spray. For thinner bars, you can use a jelly roll pan.
  2. In a small bowl, cream butter and brown sugar until combined. Add the flour and salt. Mix to combine until it resembles chunky bread crumbs. (Note: it will not form a dough.) Transfer into the prepared pan and evenly press into an even layer. Bake for 8 minutes.
  3. Prepare coconut topping: In a large bowl, combine the sweetened condensed milk, coconut and vanilla. Spread over the crust and bake for another 20-25 minutes, until it begins to brown. If you're not going to make the chocolate layer, you can sprinkle chopped toasted almonds and chocolate chips on top of the coconut before baking.
  4. Chocolate topping: melt the chocolate over a double boiler set over hot water. Stir until melted and smooth. Pour over cooled coconut bars and spread into an even layer. Allow to cool then refrigerate until set, about 1 hour. Cut into squares.

Friday, April 11, 2014

Restaurant Review: Bon Chon Chicken

Bon Chon Chicken - dinner on April 2, 2014, 4 stars on yelp
If my coworker is the Queen of Cheap Eats, I am the Empress of Takeout. If you've been tracking my posts lately, you'll notice I haven't made a "real food" recipe in awhile. And my restaurant reviews have been as steady as ever. So I'll sum up the obvious and say I haven't been cooking. When I'm not meeting friends for lunch or dinner, I've been stopping at various places on my way home and getting takeout. I don't do fast food so it's never McDonald's but luckily for me, there are a lot of small restaurants that offer takeout orders.
I stumbled upon Bon Chon Chicken, mostly because I was searching for a place my cousin Christine recommended called The Pasta Market and I turned into the wrong strip mall. Rather than trying to find the right place, I decided I might as well scope out Bon Chon since I was already in the parking lot. The easiest way to describe it is it's like Korean KFC. You can buy various size meals with different amounts of chicken pieces: drumsticks, wings and "white meat" which turned out to be breast pieces breaded and fried. Their breading isn't as heavy as KFC and you can choose between regular garlic and spicy garlic. Side orders include fries, sweet potato fries, rice, kimchi rice and biscuits. See? Korean KFC.
Bul Go Gi Rice plate
They also offer more traditional Korean entrees like Bul Go Gi. I only intended to buy dinner for that night but I was tired and didn't want to go trolling for lunch or dinner the next day so I upped my order to a medium chicken white meat with sweet potato fries and an order of the Bul Go Gi rice plate. It came to almost $30 which I thought at first was a bit expensive. Bon Chon offers dine-in options as well as takeout orders. I ordered at the counter then sat down to wait for my order. In the 5-10 minutes I waited, a fairly steady stream of people came in. There was never really a line but as soon as one person left, another one came in, most of whom seemed to be picking up orders they'd called in. The dining area wasn't quite full while I was there but they seemed to do a pretty good takeout business.
Medium Chicken order - White Meat only
I thought the white meat chicken and the sweet potato fries were pretty good. I couldn't finish it all and ended up eating half the sweet potato fries and 3 pieces of chicken. And none of the Bul Go Gi so I reserved that for the next day. The Bul Go Gi was good too although I wasn't thrilled that it came with a salad that they had already put dressing on (I hate dressing) and the beef pieces were mixed in with onions, greens and other roughage I don't like. I ended up separating out the meat and the rice and it was enough for 2 servings. My $30 Bon Chon order actually saw me through 5 meals so it didn't out to be that expensive after all. And I have a new source for sweet potato fries - bonus.
Sweet Potato Fries

Thursday, April 10, 2014

Brown Sugar Butterscotch Cookies

Brown Sugar Butterscotch Cookies - made dough March 29, 2014 from Two Peas and Their Pod
I don't bake with butterscotch very often as it can sometimes be too sweet for me, depending on what I bake it in. But every once in awhile, I'll try something with it. It pairs especially well with banana and with brown sugar so this cookie recipe caught my eye as a viable candidate. I've also been busy enough lately that my time to bake has been more limited than usual. When that's the case, cookies are my fallback position. It takes me 10-15 minutes to make the cookie dough and portion them into dough balls to put in the freezer then when I have another 15 minutes on a different day, it's easy to bake off a sheet.
Plus, truthfully, I almost always freeze cookie dough before baking it, no matter what the directions say. Something I often forget to mention when I'm blogging a new cookie recipe. Oftentimes, I'll copy and paste the original recipe as is from wherever I got it and 95% of the time, the standard cookie recipe has you preheating the oven, mixing the cookie dough and baking the cookies right away. 95% of the time, I actually don't do that. I make the dough, portion it, freeze it and bake the cookies from frozen dough. It keeps them thicker and there's nothing more convenient than baking pre-homemade dough whenever you have time and need fresh cookies. So I did modify the directions for these to incorporate the freeze-before-you-bake part.
Mine didn't come out as thick as the ones pictured from Two Peas and Their Pod, probably because I underbaked them and they sank as they cooled. That's a good thing because these came out chewy and moist. I only used a scant cup of butterscotch chips because I really didn't want these to be too sweet with too many butterscotch chips. But they were just fine. The brown sugar flavor went very well with the butterscotch and this was a nice little cookie.
2 1/4 cups all-purpose flour
2 teaspoons baking soda
1 teaspoon cornstarch
1/2 teaspoon salt
1/4 teaspoon ground cinnamon
3/4 cup unsalted butter, room temperature
1 1/4 cups dark brown sugar
1 large egg
1 teaspoon vanilla extract
1 cup butterscotch chips
  1. In a medium bowl, whisk together flour, baking soda, cornstarch, salt and cinnamon. Set aside.
  2. Place the butter and dark brown sugar in the bowl of an electric stand mixer. Beat on medium speed until light and fluffy, about 3 minutes. Scrape down the sides of the bowl with a spatula. Add the egg and vanilla. Beat on medium speed until combined.
  3. With the mixer on low, slowly add the dry ingredients. Mix until just combined. Stir in the butterscotch chips.
  4. Form dough into tablespoon or golf-size balls. Place in refrigerator or freezer until thoroughly chilled, at least 1 hour or more.
  5. When ready to bake, preheat oven to 350 degrees F. Line a large baking sheet with parchment paper and place cookie dough balls evenly on sheet. Bake cookies for 10-12 minutes or until lightly browned around the edges. Do not overbake. Cool on the pan for 2 minutes then transfer to wire rack to cool completely.

Wednesday, April 9, 2014

Restaurant Review: Red Kwali

Red Kwali - lunch on April 1, 2014, 2.5 stars on yelp
I was going out to lunch with a coworker and another friend and we had originally planned to go to Dish Dash but when we got there, we were told the wait would be 30 minutes for a table. Now, while we might be able to get away for lunch, no way did any of us have time to wait 30 minutes then be able to eat lunch. It was a work day after all. So we decided to go next door and try out Red Kwali. It bills itself as Malaysian Thai food, similar to Banana Leaf just across the street.
The restaurant was a decent size and there were still empty tables so we thought our chances were good at getting in and out fairly quickly. Unfortunately, what we didn't take into account is there seemed to be one hostess and one server for the entire restaurant. Meaning, it took awhile for us to get seated and it took awhile longer for someone to take our orders. Once we ordered, the food took an okay amount of time to come out, not that quick but it didn't seem as long as it took for us to order.
The prices were pretty standard for a restaurant catering to the business crowd. Most entrees were in the $10-15 range and came as rice plates. My friend chose the eggplant dish since she said it's not something she makes herself so she always tries to choose what she doesn't cook when she goes out to eat.
Eggplant
I have the same criteria but in my case, since I don't cook, the world's my oyster when it comes to choosing from a restaurant menu. You'll never hear me say, "Oh, I make Black Pepper Beef all the time so I think I'll go with the Pineapple Chicken today." Instead it's "ooh, pineapple sweet and sour chicken, I'll have that."
Pineapple Sweet and Sour Chicken
I thought the dish was pretty decent. There wasn't too much extra stuff besides the chicken and it was easy for me to pick out what I didn't eat and just stick to the chicken and rice. Rice was just standard, not like Gochi or even Tribu but good enough. And the chicken was flavorful. Overall, I liked the one entree I tried (we didn't have time or room for dessert) but I wasn't impressed with the relatively slow service so next time, if I have to wait for a meal anyway, I'd rather wait at Dish Dash.

Monday, April 7, 2014

Restaurant Review: Tribu Grill

Tribu Grill - lunch on March 30, 2014, 3 stars on yelp
My parents and I go out to lunch every Sunday after church. We usually go to the same handful of restaurants in their town, typically something close to our church or where I need to go afterwards to do my errands (cough*Target*cough). But once in awhile we'll go a bit farther than the norm and such was the case when we go to Tribu Grill.
Tribu opened up a few years ago and it's a Filipino restaurant. We actually don't eat at Filipino restaurants that often, not because we don't want to support them because we do. But my mom is such a good cook that there's seriously no Filipino restaurant as good as her cooking. My dad's side of the family also has some legendary cooks, you know, the kind who never measure anything, just cook by taste and crank out family favorites at the drop of a hat. That's how my mom cooks too and between her, my aunts and my cousins, they've set such a high bar that the rest of the family is spoiled. It's like being raised by people who make the best, most tender, flavorful steaks but when you go out to eat, everyone else serves beef jerky. I don't like beef jerky.
Daing na Bangus (milk fish)
But sometimes, we do take the plunge and Tribu is one of the few places we'll go for Filipino food. Because they're good. Their rice is good and their entrees are good. A lot of Filipino cooking is fried and badly made Filipino food is greasy and can be fatty. Tribu is a notch above that so it is one place my snobby taste buds enjoy. I ordered the Pork BBQ rice plate and the pork was tender and whatever marinade and sauce they used for it was delicious. I even ate more rice than I normally do because most Filipino dishes go really well with rice. Tribu's price points are fairly reasonable with some entrees under $10 and others reaching closer to $15.
BBQ Pork with Rice
The main reason I like to go to Tribu is to get the bibingka for dessert. There are several different kinds of bibingka and the one at Tribu is a cakey butter coconut cake baked in banana leaves, covered with melted butter and sprinkled with sugar, coconut, cheese and salted egg. The cheese and salted egg are traditional additions but I prefer it with just the butter, sugar and coconut. I think Tribu pre-makes their bibingka then just warms it up because it's always served warm yet this time, when we got to the middle, it was still a little cold. Fortunately that didn't detract from the taste. I think they make theirs with wheat flour rather than just rice flour as the texture was cakey more than chewy. Chewy is what you'd get with all rice flour like the other kind of bibingka I've made before. I like this kind too and need to go looking for recipes to duplicate Tribu's.
Bibingka
Inside of the bibingka
When we've gone to Tribu in the past, mostly when they first opened, they served their entrees in the more traditional bamboo servers lined with banana leaves. On our last visit, they seem to have gone mainstream with just regular plates. That's too bad as I liked that "native" feel. Chicken Inasal, below (from a prior visit), is grilled chicken with a special sauce. It's good but when I had it at Tribu, I thought it was a bit greasy. Which is odd, considering it's supposed to be grilled, not fried.
Chicken Inasal
Their Chicken BBQ, however, is delicious. Whatever marinade they use for the chicken is amazing and it's always fork tender. Granted, chicken's typically a safe bet but still, this is delicious. If you're trying to introduce someone to Filipino food, although this is pretty Americanized, it's a good choice.
Chicken BBQ
Pancit is a traditional Filipino noodle dish, as prevalent to Filipinos as chow mein is to the Chinese. I like pancit but rarely order it when we go out because, you guessed it, I love my mom's pancit and am prejudiced against everyone else's.
Pancit Miki Bihon

Sunday, April 6, 2014

Quadruple Chocolate Soft Fudgy Pudding Cookies

Quadruple Chocolate Soft Fudgy Pudding Cookies - made dough March 29, 2014 from Averie Cooks
Whenever I search pinterest, when I see a picture of chubby, moist, yummy-looking cookies, even before I see the source site, I always think it's from Averie Cooks and 99% of the time I'm right. I've come to think of it as her baking signature and it's always the kind of cookies I like best: thick, chewy, moist and delicious. And I don't think I've ever been wrong whenever I make one of her cookie recipes. I'm not wrong on this one either.

Pudding cookies, aka cookies with pudding mix in them, are almost always soft in texture and moist, thanks to the pudding mix. Because this one is chocolate, you can add "fudgy" to the description as well. I thought this would pack more of a chocolate punch but it doesn't. Don't get me wrong, it's plenty chocolatey but it's not super, stop-your-molars-in-their-tracks chocolatey. That's not a bad thing because then you can eat more. Oh wait, that's just me. For optimal taste and texture, let these cool almost completely to room temperature. If you eat them when they're too warm, you'll miss out on the fudgy texture and instead just get gooey mush. In which case, just top it off with ice cream and eat like a decadent hot fudge sundae. Oh wait, that's just me again.

3/4 cup unsalted butter, softened
3/4 cup light brown sugar, packed
1/4 cup granulated sugar
2 large eggs
2 teaspoons vanilla extract
1 4-ounce package chocolate instant pudding mix (not sugar-free or cook n serve)
1/4 cup unsweetened cocoa powder
2 cups all-purpose flour
1 teaspoon baking soda
pinch salt, optional and to taste
1 cup semisweet chocolate chips
5 ounces bittersweet chocolate, chopped into chunks
  1. In the bowl of a stand mixer fitted with the paddle attachment, combine the butter, sugars, egg, and vanilla; beat on medium-high speed until creamed and well combined, about 4 minutes.
  2. Scrape down the sides of the bowl and add the pudding mix and cocoa powder; beat on low speed until just combined, about 1 minute.
  3. Scrape down the sides of the bowl and add the flour, baking soda, and salt if using; beat on low speed until just combined, about 1 minute.
  4. Add the chocolate chips and chocolate chunks. Beat on low speed until just combined, about 30 seconds. Reserve a handful of the chips and chunks to add to the last of the dough after you make into dough balls to make sure the chips are evenly distributed.
  5. Using a large cookie scoop or a 1/4-cup measure, form dough into golf-ball-size dough balls. Place in refrigerator or freezer until thoroughly chilled, at least 2 hours.
  6. When ready to bake, preheat oven to 350 degrees F. Line baking sheets with parchment paper and place dough balls on baking sheet, spaced at least 2 inches apart. Bake for 10 minutes or until edges have set and tops are just set. Do not overbake. Cookies will firm up as they cool.

Saturday, April 5, 2014

Butterscotch Bread Pudding

Butterscotch Bread Pudding - made March 29, 2014 from Kitch Me
I ran a 10K this morning. It was my first race in several years. I used to run a lot more races a few years ago but burned out after my third half marathon so while I kept up with the running (more or less), I stopped with the races. Until earlier this year when, thanks to the enabling efforts of a runner friend plus a temporary loss of sanity, I decided I would sign up for my fourth half marathon. It's on my bucket list to run a half in under 2 hours. The closest I've come to was 2:04 when I did the San Jose Rock n Roll Half Marathon. That was on a mostly flat course and was the first half I'd ever run. I ran two more after that but they were in San Francisco and if you've ever been to SF, you know for the small land mass where they've got to chart 13.1 miles throughout the city, hills are inevitable. The best time I've done on a half in San Francisco was 2:08 because of those damned hills.
So I knew I had to choose a course with flat terrain if I had any hope of a sub-2 half. Which is why I signed up for the Disneyland Half Marathon in August. But since I hadn't run a race in the last 2 years and Disney needs a qualifying time to determine which corral you're put in, I had to run a 10K before June. Hence my 10K this morning. Otherwise I'd be put in the very last corral with the walkers. Erk. No thanks. Race report potentially to follow in a future blog post (I haven't decided yet).
What does all this have to do with Butterscotch Bread Pudding? Um, nothing. The closest connection is probably carbo-loading --> bread --> bread pudding. Except I made this a week ago and didn't eat it for the 10K as fuel nor should I probably advocate it for training. In any case, the main reason I made this is because I had a lot of milk to use up and this called for 4 cups. Which actually turned out to be too much. I've made bread pudding before and this is a lot of liquid for the amount of bread in the recipe. I ended up using over a pound of challah and even then I still had a lot of liquid. Contrary to the directions, I let the bread soak for several hours before I baked it. I don't think I baked it long enough although it had puffed up and the top was getting dry. When I sliced into it after it had cooled, there was still some liquid on the bottom that hadn't baked in yet the top was dry. Not a good combo. The taste was good and the top half of the bread pudding the next day was better since it had softened. But the bottom half was wet. Not moist but wet. To modify this recipe, I would recommend using a pound of bread and only 3/4 of the liquid mixture. Let it soak for several hours or overnight before baking.
10 3/4-oz day-old loaf bread, torn into small pieces (I used over a pound of challah)
4 cups milk
2 cups brown sugar
1/2 cup butter, melted
3 eggs, beaten
2 teaspoons vanilla extract
1 cup butterscotch chips
  1. Preheat oven to 350 degrees F. Butter a 9 x 13-inch baking pan.
  2. In a large bowl, combine bread, milk, brown sugar, butter, eggs, vanilla and butterscotch chips; mixture should be the consistency of oatmeal. Pour into prepared pan. (I let it soak in the mixture for over 4 hours.)
  3. Bake in preheated oven for 1 hour, until nearly set. Serve warm or cold.

Thursday, April 3, 2014

Restaurant Review: Orenchi Ramen

Orenchi - dinner on March 26, 2014, 4-star rating and 2952 reviews on yelp
Outside Orenchi, 15 minutes before opening
I first went to Orenchi back in July of last year and always meant to write up the review but I couldn't find the pictures I took on my first visit. I finally went back there for dinner last week so I have another shot at it. I've actually been dying to write this review because the Orenchi experience is hysterical. It's funnier if you're not a huge, die-hard, I-live-for-ramen sort of person because then you'll think it's as crazy as I do. If you are a fanatical ramen lover, you'll just roll your eyes at me and tell me I don't get it. Fair enough.
Inside Orenchi, 10 minutes before opening
I met my friend Jenny there for dinner. She arrived 30 minutes before they opened and put our name down on the waiting list that Orenchi keeps in the foyer. We were #9. Still half an hour to go before opening and the waiting list was already 9 lines deep. I got there 15 minutes before opening and noticed people already gathered outside as I parked my car. I didn't think it was too bad but then I got inside and there were a lot more people inside the small foyer. And it got even more crowded with every minute that ticked by. As in, standing room only crowded. For ramen. My coworker, Queen of Cheap Eats, was the one who first told me about Orenchi and she's a seasoned veteran of the place. Her advice is to go before they open, put your name on the waiting list then go do your errands or whatever and just come back at opening time. Sound advice and I 'm glad Jenny got there when she did or we would've had to wait even longer. As it was, once they opened for business, it was very orderly as they called the names in order on the waiting list and started seating people. I don't know what time the #1 signup was there and I'm not sure I want to know. They must love ramen.
Inside Orenchi as they start seating people by the waiting list order
The interesting thing about Orenchi, beyond its wild popularity (check out their reviews on yelp, linked above), is it defies all conventional wisdom about owning, operating and growing a restaurant. First, their location sucks. Truly. It's in a dying strip mall next to a Grocery Outlet Bargain Market. There's not much else there so if you go to this strip mall, you're going there for a specific purpose, probably to go to Orenchi. Second, the place is small. One of the reasons there's always a crowd waiting to get in is they can't seat very many people at any one time. So customers wait. And wait. Third, they're only open a limited number of hours: 2 hours for lunch and 3-4 hours for dinner, depending on the day of the week. They're also closed on Mondays. It's like they don't want that many customers.
But the funny thing is, they get a huge number of customers day in, day out. Conventional wisdom aside, if your success metrics include a cult-like following who don't mind your location, your limited hours and wait times plus large crowds every single hour you're open, then Orenchi is any restaurateur's dream. Do you know of any other ramen place that has almost 3000 reviews that averages to 4 stars? It's mind boggling.
How do they do it? What's the secret sauce? For me, it always starts with the food. For any eating establishment to succeed, you have to serve good food. In Orenchi's case, since they're famous for their ramen, you should expect their ramen to be good. And it is. I took snapshots of parts of their menu so you can see their claim to fame, including boiling their broth for at least 18 hours before serving. For my part, while I'm no ramen expert, I will say their ramen is delicious. The broth is amazing and, unlike other ramen places, it's consistently good throughout the whole bowl, i.e. it doesn't get more salty as you keep eating it. The noodles are a perfect chewy consistency, the soft-boiled egg which so many reviewers rave about is perfectly done and the pork topping is delicious (I ordered it as an extra topping). Considering their popularity, their prices are pretty reasonable  - $9 for a standard bowl - and the portion sizes are decent, i.e. I can't imagine eating more than the serving they give you.
I was less thrilled with the appetizers though. The first time I went to Orenchi last year, I had gotten the Karaage. Too salty. The Chicken Karaage from Kahoo is better. This time around, I got the deep fried shrimp spring roll. Too greasy and I was disappointed that they used little shrimp plus fillers (roughage) for the filling instead of prawns or a mostly shrimp mixture. I wouldn't get either again. Jenny got the Wasabi Octopus as an appetizer. I don't eat raw or octopus so I have no idea what it tasted like and I forgot to ask Jenny if she liked it.
Wasabi Octopus
Service seemed pretty quick. Our ramen took awhile to come out and we wondered if it was because we had ordered appetizers and they were spacing out when they'd bring us the ramen. Otherwise, the wait staff moved quickly and were very nice. We sat at the counter to free up a table for the waiting list below us and could see into the kitchen where they were dishing out bowl after bowl of ramen. Before long, the tables were full yet I could see the same amount of people crowding in the foyer waiting their turn. The crowd didn't dissipate.
Deep Fried Shrimp Spring Roll
When we left, there was a good-sized crowd outside as well waiting to be able to get into the foyer so they could wait some more. From my friends who are regular patrons of Orenchi, this is a daily and nightly occurrence. I'm going to confess that while I thought their ramen was good and I'd certainly go back, I'm not such a ramen lover that I'd be willing to wait 15-30 minutes (or more) to get a table every time. The inconvenience isn't worth it to me but clearly, I'm outnumbered on that sentiment. Kudos to Orenchi for building such a loyal following....even though as a non-ramen fanatic, I think it's just a little bit crazy.
Orenchi Ramen with Pork Topping