Tuesday, April 23, 2024

Cinnamon Coffee Cake with Streusel Crumb Topping from Go Go Go Gourmet

Cake
1 stick (4 ounces, 8 tablespoons) butter, softened
3/4 cup granulated sugar
1 teaspoon vanilla
1 large egg
2 cups all-purpose flour
2 teaspoons baking powder
pinch of salt
3/4 cup whole milk

Filling
3 tablespoons butter, softened
1 tablespoon cinnamon
1/2 cup all-purpose flour
1/2 cup brown sugar, packed

Topping
5 tablespoons butter, softened
1 tablespoon cinnamon
3/4 cup all-purpose flour
1/2 cup brown sugar, packed
  1. Preheat oven to 350 degrees F. Line a 9 x 9 baking pan with foil and lightly spray with nonstick cooking spray.
  2. In the bowl of a stand mixer fitted with the paddle attachment, cream together butter and sugar until light and fluffy, 2-3 minutes. Add vanilla and egg; mix to combine.
  3. In a small bowl, whisk together flour, baking powder and salt. Add half the dry ingredients to butter-sugar mixture and mix to combine.
  4. Add milk and mix to combine. Add remaining dry ingredients and mix until combined and no floury streaks remain, scraping down sides and bottom of bowl to keep mixture even textured.
  5. Make filling: in a small bowl, mix together butter, cinnamon, flour and brown sugar until well combined and no large butter lumps remain.
  6. Make topping: in a medium bowl, mix together butter, cinnamon, flour and brown sugar, cutting the butter into the dry ingredients. Use your hands to squeeze large handfuls of the streusel mixture together into large clumps.
  7. Spread half the batter evenly n the bottom of the prepared pan. Sprinkle with the filling mixture, covering batter completely. Gently dollop the remaining batter over the filling, covering as much as possible without dislodging the filling.
  8. Squeeze clumps of the topping together to form large crumbs before dropping on top of the batter. Cover top as much as possible with the topping mixture. Press gently into batter for the crumbs to adhere.
  9. Bake 40-45 minutes or until a toothpick inserted near the center comes out with a few moist crumbs.
I’ve been giving financial literacy workshops in my area lately and for each session, I bake something to share with the participants. It gives me a chance to try a new recipe that I can’t send in a military care package since it would take too long to get there and I wouldn’t risk mold or staleness in sending cakes, even if vacuum sealed. Plus I like a good bribe to entice people to attend.

I liked this recipe. The cake part was fluffy and the cinnamon swirl running through it gave it extra flavor while the streusel topping gave it a little crunch without using nuts. The glaze tops it with a bit of sweetness.
When you make the streusel, squeeze it into large clumps with your hands. Grab a handful and make a fist. Then break the larger chunks into slightly smaller pieces. This helps from just having streusel dust as a topping and the chunks add to the crunch when baked. My glaze was a bit runny so you can't see it very well as it absorbed into the top after a few minutes. I didn't measure when I made the glaze but it's made of powdered sugar, milk and vanilla extract. If you want a thicker glaze, just cut back on the milk or use more powdered sugar.

Friday, April 19, 2024

Crumbl Cookies review #69 - Maple Cream Sandwich

Crumbl Cookies review #69 - Maple Cream Sandwich, visited April 18, 2024
If it seems like I've been slowing down on the Crumbl reviews, it's because I've been slowing down on the Crumbl eating. I don't know if I've reached saturation point on eating their cookies but I probably have on trying out their flavors. There haven't been a lot of new-to-me ones, much less new ones I was interested in eating.
So when the Maple Cream Sandwich came out, I decided to try it, more out of habit than real interest in the cookie. I like the fact that it was a sandwich cookie (2 cookies for the price of 1, especially with their recent price increases) and that it was stamped with a maple leaf which I thought was pretty. I didn't like that it was chilled but that's fine since I always let chilled cookies come to room temperature before eating anyway.

Truth be told, I wasn't a fan of this cookie. I liked the cookies themselves, upholding their end of the sandwich. Flavor was good and texture was great, exactly what I like about Crumbl cookies with their soft, slightly underbaked interiors. I was not a fan of the maple cream cheese icing. At all. As in, after one bite, I scraped it off and just ate the quarter cookies (I split the cookie into quarters and only had a quarter piece). I'm not a big maple fan to begin with unless it's maple syrup over pancakes or waffles. But the maple cream cheese filling wasn't worth the calories to me. Glad I tried it, pass on it in the future.
The rest of the lineup also wasn't interesting to me since I've already tried what I wanted to try from it in days gone by: the Cinnamon Square and Red Velvet White Chip. Plus the Cinnamon Square was sold out when I went so it wasn't an option anyway. I kinda miss the days when I was really into Crumbl and couldn't wait for the weekly menu to drop and to try out new cookie flavors and test cookies. Now, I feel like I'm moving more into indifference. Even repeat flavors I loved in the past haven't been enough to get me to buy more cookies. While my wallet and waistline thank me, my sweet tooth soul misses the old thrill and anticipation. Ah well, I'm sure I'll find other baked goods to obsess over in the future.

Tuesday, April 16, 2024

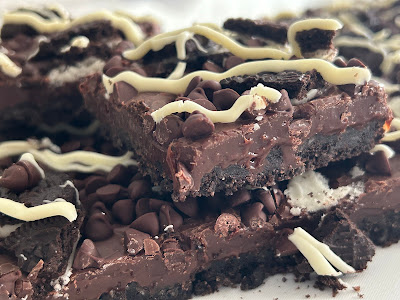
Triple Chocolate Oreo Bars from Cookies and Cups

Triple Chocolate Oreo Bars - made March 29. 2024 from Cookies and Cups 
1 16.6-ounce package of Oreos
1/2 cup butter, melted
1/4 teaspoon salt
1 14-ounce can sweetened condensed milk
1 teaspoon vanilla extract
1 cup semisweet chocolate chips
1/2 cup milk chocolate chips
1/2 cup mini chocolate chips
1 cup white chocolate chips, melted
  1. Preheat oven to 325 degrees F. Line a 9 x 13-inch pan with foil and lightly spray with nonstick cooking spray.
  2. Set aside 8 Oreos. Place the rest in a gallon ziploc bag and crush with a rolling pin. 
  3. Empty the Oreo crumbs in a medium-sized mixing bowl. Add melted butter and salt, mix to combine. Press mixture into an even layer in bottom of prepared pan.
  4. In the top half of a double boiler set over hot water, combine sweetened condensed milk, vanilla extract, semisweet chocolate chips and milk chocolate chips. Stir until combined and melted.
  5. Pour melted mixture over Oreo layer and smooth into an even layer. Chop remaining Oreos into chunks. Sprinkle chopped Oreos and mini chocolate chips evenly over the filling. Bake 20-22 minutes. Cool for 1 hour.
  6. Melt the white chocolate chips and drizzle over the brownies. Let set before cutting and serving.
Here’s an easy bar cookie recipe if you’re short on time and need to feed a crowd. It’s fastest if you pulverize the Oreos in a food processor but once you’ve got the Oreo cookie crumbs for the bottom layer, the rest of the process goes quickly.

The sweetened condensed milk forms the top for the creamy layer and is a little rich. If you want a more chocolate punch, cut back on the milk chocolate chips and increase the semisweet chips. I followed the recipe as written and was okay with it but I have a high tolerance for sweet over chocolate. 


I liked the look of these, especially with the white chocolate drizzle to contrast with the dark chocolate and Oreos. The top layer was creamy-sweet, tempered with the dark Oreo crust and complemented by the white chocolate drizzle. This is a good bar cookie to serve to a crowd, especially anyone with nut allergies since this doesn’t contain nuts. 


Thursday, April 11, 2024

Stamped Cookies #38 - Custard Cream Biscuits

Stamped Cookies #38: Custard Cream Biscuits - made dough March 28, 2024, posted by Shane Wingerd from Molded Cookies of the World Facebook group
For the biscuits 
3 tablespoons whole milk
1 tablespoon vanilla extract
½ teaspoon bakers ammonia 
225g (7.9oz) unsalted butter, softened 
115g (4oz) caster sugar or baker’s sugar (you want the smaller crystals) 
1/2 teaspoon salt 
340g (12oz) all-purpose flour 
125g (4.4oz) Bird’s Custard Powder

For the filling 
300g (10.5oz) confectioners’ sugar 
150g (5.25oz) unsalted butter, softened 
4 teaspoons Bird’s Custard Powder 
1 teaspoon vanilla extract 
  1. In a small cup or bowl, combine the milk, vanilla extract, and Baker’s Ammonia, then set aside to allow it to dissolve. 
  2. Place the butter, salt and sugar into the bowl of your mixer and beat until fluffy. 
  3. Meanwhile, whisk the flour and Bird’s Custard Powder together in a small bowl. 
  4. When the butter is fluffy, begin drizzling the milk/vanilla mixture into the mixing bowl while the paddle continues to run on medium speed. It may look a little strange at first, but keep beating it and it will all come together into a beautiful homogenous mass. 
  5. Add the flour/custard powder mixture and beat together until you have a ball of smooth dough. (It takes a bit of time, but it will come together – if it doesn’t, add an additional teaspoon of milk). 
  6. Shape the dough into a long oblong shape about ½ inch in depth. Wrap in plastic wrap and chill for at least 20 mins to firm up the dough. 
  7. Once firm, roll the dough out, on a lightly floured surface, to a thickness of 5mm. Use a springerle mold, cookie stamp or embossed rolling pin with a shallow pattern. If you use deep pattern molds, the cookies will not bake all the way through before the edges begin to over-brown. 
  8. Place the resulting cookies on parchment lined baking sheets; you can place them fairly close together as they will not spread.
  9. Chill the baking sheets for 20 more minutes or at least as long as it takes to preheat your oven to 325 degrees F conventional or 300 degrees F for convection. 
  10. Remove baking sheets from refrigerator and bake for 8-10 mins, or until the edges begin to turn a pale golden-brown color. Let the cookies sit on the baking sheet for about 3 minutes before moving them to a wire rack with an offset spatula to cool and crisp up. 
  11. For the filling, cream together the confectioners’ sugar, butter, custard powder and vanilla extract in a mixer until smooth and light. 
  12. Spoon a teaspoon of the filling onto one of the biscuits and evenly spread to the edges using a small offset spatula or place the filling in a pastry bag and pipe the filling onto the biscuit. Top with another biscuit. Repeat until all the biscuits and filling has been used up. The biscuits will keep in an airtight container for up to 1 week. 
I got this recipe from a Facebook group that specializes in stamped cookies. Members post recipes in the files and, due to the nature of the group, the recipes are the ones that would be good using with cookie stamps to keep the impressions.
I had seen other people post their pictures using this recipe and their stamped impressions always held beautifully so I knew I had to try it. Side note: since this is a British recipe, remember the Brits call cookies "biscuits", hence the recipe name. But they really are cookies and not the American version of "biscuits".
It took awhile for me to finally get all the ingredients together, namely the baker's ammonia, the custard powder and the superfine sugar. Yes, I could probably have used baking soda and regular granulated sugar but since I went to the trouble of sourcing Bird's custard powder (amazon), I figure I might as well stay true to the recipe and get the other ingredients as well to make as accurate a rendition of the recipe as possible.

As you can see from the stamped impressions after baking, the effort was worth the trouble. These turned out beautifully. My only mistake was chilling the dough a trifle too long as then the stamps didn't make as sharp an impression without me pressing down much harder than normal. Some I had to redo as I wasn't satisfied with the impression not being clear enough.
Still, this recipe worked well and tasted pretty good. It's not quite a straightforward vanilla or vanilla custard flavor but it's similar. The texture, if not baked for too long, isn't quite crisp but isn't quite soft either. It's somewhere in between. I preferred baking it an extra couple of minutes to get the crisp without the cookies turning too hard.
The filling was good too and paired well with the cookie. I'd definitely make this again. Except now I need more Bird's custard powder.

Thursday, April 4, 2024

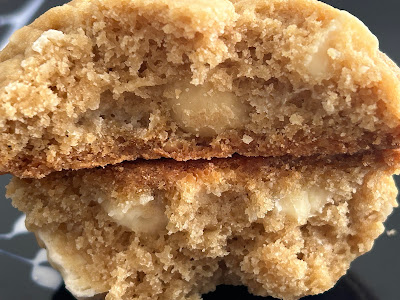
White Chocolate Macadamia Nut Cookies from Buns in My Oven

White Chocolate Macadamia Nut Cookies - made dough March 2, 2024 from Buns in My Oven 
1/2 cup butter, melted
1/2 cup brown sugar
1/4 cup granulated sugar
1 large egg
2 teaspoons vanilla extract
1 2/3 cups flour
1/2 teaspoon baking soda
1/2 teaspoon salt
1/2 cup macadamia nuts, roughly chopped
1/2 cup white chocolate chips
  1. Preheat oven to 350 degrees F. Line baking sheets with parchment paper.
  2. In the bowl of a stand mixer fitted with the paddle attachment, cream together butter, brown sugar and granulated sugar.
  3. Add egg and vanilla extract, mixing to combine.
  4. Add flour, baking soda and salt, mixing on low speed until just combined. Stir in macadamia nuts and white chocolate until evenly disbursed.
  5. Portion into golf-ball-size dough balls and flatten slightly. Evenly space on prepared baking sheets and bake for 11 minutes. Let rest on baking sheets for 5 minutes then transfer to wire rack to cool completely.
I think I overbaked these, a rare mistake. And by overbaked, by my standards, that means I baked them to what most people bake them to and I didn't underbake them. Because they weren't dry. They just weren't the moist "fudgy" texture I prefer in my cookies.

These didn't spread much so I suspect I also had a slightly heavy hand with the flour. My volume measurements tend to weigh on the heavier side than most other bakers'. The dough handled beautifully though and wasn't dry or crumbly so maybe these are supposed to stay mostly the shape they're baked in.

In any case, the flavor was excellent and a perfect marriage of white chocolate and macadamias set against a backdrop of a brown sugar cookie. Next time I would make the cookies a little flatter and take them out of the oven perhaps 1-2 minutes earlier.

Saturday, March 30, 2024

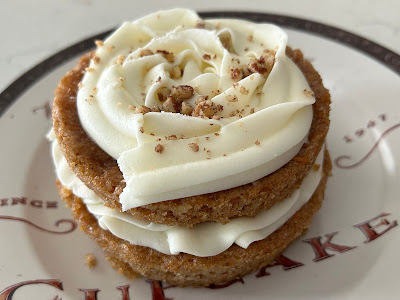
Crumbl Cookies review #68 - Carrot Cake

Crumbl Cookies review #68 - Carrot Cake, visited March 25, 2024
Crumbl's at it again with testing non-cookie offerings, namely small cakes that have an upcharge. It worked well (for me) with the Tres Leches Cake for $6.25, less so with the Cinnamon Square (I paid with loyalty points so I can't remember what it cost). Still, I was interested enough to try the carrot cake offering on tap this week for $5.93. 

The description says this is supposed to have "warm spices, coconut, pineapple, and carrots". Um, well, it had spices and carrots, I'll give you that. For the life of me, I couldn't find the pineapple or coconut. If I'd had, I would've considered this more of a hummingbird cake rather than a carrot cake. 
Ironically, I prefer my carrot cakes to only have carrots (I'm so glad this didn't have raisins) so you'd think I would've liked this cake just fine. Unfortunately, I didn't think it was anything special. It was baked well but the mouthfeel was a trifle dry. I don't think mine was overbaked; that just seemed to be how the recipe was. Plus the flavor wasn't that good; it didn't taste like carrot cake. I know carrots are in there as I could see them but it tasted more like a spice cake with spices that weren't that fresh. 
I have a favorite carrot cake recipe and Crumbl's version isn't as good as that one. Glad I tried it so now I know but it wasn't worth the upcharge and I won't be getting it again. Sorry, Crumbl, but your carrot cake cookie is way better than your actual carrot cake.

Monday, March 25, 2024

Brown Sugar Toffee Cookies from Two Peas and Their Pod

Brown Sugar Toffee Cookies - made dough February 24, 2024 from Two Peas and Their Pod 
2 1/4 cups all-purpose flour
1 teaspoon baking soda
1 teaspoon cornstarch
1/2 teaspoon salt
1/2 teaspoon ground cinnamon
3/4 cup unsalted butter, room temperature
1 1/4 cups dark brown sugar
1 large egg
1 teaspoon vanilla extract
1 cup toffee bits
  1. In a medium bowl, whisk together flour, baking soda, cornstarch, salt and cinnamon; set aside.
  2. In the bowl of a stand mixer fitted with the paddle attachment, cream together butter and brown sugar on medium speed until light and fluffy, 2-3 minutes. Scrape down sides and bottom of bowl to keep mixture even textured.
  3. Add egg and vanilla extract, mixing until combined.
  4. Add flour mixture in 2-3 additions, mixing on low speed, until just combined. Fold in toffee bits.
  5. Portion dough into golf ball size dough balls and flatten slightly. Cover and chill for at least 30 minutes.
  6. When ready to bake, preheat oven to 350 degrees F. Line baking sheets with parchment paper and evenly space dough balls. Bake 10-12 minutes or until edges are set and middles no longer look raw. Remove from oven and let rest on baking sheet for several minutes before transferring to wire rack to cool completely.
I love the concept of brown sugar and toffee in a cookie. It sounds so good, right? When I’ve made it in the past, I almost inevitably then say “good but a little too sweet for me.”
Fortunately, that wasn’t the case here. Yes, it’s sweet but not overwhelmingly so. Or else my sweet tooth was in fine form and didn’t blink. 
It does help, though, not to roll it in brown sugar before baking as many recipes direct. There’s no need for that with these cookies. 
They’re chewy and have good flavor. The toffee bits add a nice crunch once the cookies have cooled and I always love the brown sugar flavor in a cookie. The texture is nicely chewy with crisp edges that aren’t too crunchy or hard. 
The dough also handles really well. You could probably skip the chilling before baking step but I always prefer to do it, partly because I tend to make multiple cookie doughs at once but don’t have time to bake them right then. It’s easier for me to make several different doughs, chill or freeze them then bake everything off at once for care packages for Soldiers Angels.

These are sturdy cookies, meaning not too fragile, and pack and ship well, especially vacuum sealed.