Tuesday, February 26, 2013

Orange Soda Cake

Orange Soda Cake - made February 23, 2013, recipe invented by me

I was toying with the idea of making a cake using orange soda since I had a lone can of orange soda left over from when I was having guests.  I used the Kahlua Cake recipe as a base to start from and modified a bit just to try and come up with a recipe that also uses buttermilk.  I added oil too to ensure it would be soft and moist.  I'd like to be able to say this cake turned out to be a successful invention....but I can't.  The batter was silky smooth and seemed promising.  The cake turned orange with the addition of the soda and the flavor was good.  The texture was also moist and cakey.  Problem is it turned out to a little too moist, especially since I glazed it with a glaze of powdered sugar and enough orange soda to make it a runny consistency.  I think some of the glaze seeped into the cake to moisten it further when it didn't really need further moisture.  You can tell from the top of the slice that it was a tad too wet.  Next time I think I would leave out the oil or cut the amount in half.  Ah well, not all inventions can be successes.

(recipe as I made it)

1 box yellow cake mix
1 4-ounce package vanilla instant pudding mix
4 eggs
1/2 cup oil (try using only 1/4 cup or omitting altogether)
1/2 cup buttermilk
1 cup orange soda (I used regular Fanta)
  1. Preheat oven to 350 degrees.  Liberally spray a Bundt cake pa with nonstick cooking spray.
  2. Sift lumps out of the cake mix and pudding mix.  Add eggs, oil, buttermilk and orange soda and beat with the paddle attachment of a stand mixer until batter is smooth (2-3 minutes).
  3. Pour into prepared pan and bake for 50-60 minutes or until a toothpick inserted near the middle comes out with a few moist crumbs or barely clean.

Sunday, February 24, 2013

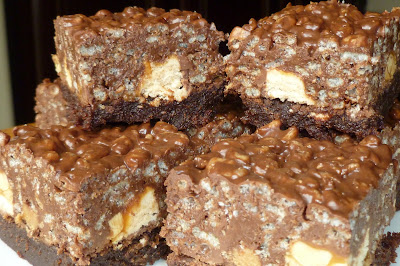
Peanut Butter Crunch Brownies

Peanut Butter Crunch Brownies - made February 18, 2013, recipes adapted from Katherine Hepburn's Brownies from saveur.com and Crack Brownies from McConkie Menu

I've already made essentially this same brownie as Peanut Butter Cup & Snickers Brownies but by the time I realized it, I had already started making these.  So then I felt free to experiment and modify the recipes.  I think these came out better than the other recipe, partly because I didn't make them as thick as the last one so they were easier to eat.  I was still looking for ways to use the dark chocolate peanut butter I got from amazon so I incorporated it in the topping in addition to the peanut butter.  And I like a lot of crunch in the topping so I was generous with the rice krispies.  

I spent the past week at our company headquarters in Florida so I made these brownies the night before I left to bring to my Florida coworkers. I wrapped up two pieces in an individual "package", boxed them up in a cardboard box to keep them from being crushed in my luggage and got on the plane with what felt like 10 lbs of brownies in my carry-on.  But it was worth the effort as I was able to hand them out to almost everyone I met with on the first day and they were pretty well received.  You always know something's a success when you get thank you emails with subject lines like "OMG", someone who claimed to be in a bad mood that day perked right up when he ate one, and when one coworker liked his so much he offered to buy them off the coworker who got the last pieces.  Score.
Brownie base
16 tablespoons (8 ounces) unsalted butter, plus more for greasing
4 ounces unsweetened chocolate
2 cups sugar
4 eggs, beaten

1 teaspoon vanilla extract
1/2 cup flour

1/2 teaspoon salt
1 heaping cup chopped-up Snickers and peanut butter cups (mix 'em up and be generous)

Topping
1 cup salted peanuts, optional (I left them out)
1 1/2 cups milk or semisweet chocolate chips (I used semisweet)
3/4 cup dark chocolate peanut butter (can substitute creamy peanut butter)
3/4 cup creamy peanut butter
1/2 tablespoon butter
1 1/2 cups rice krispies cereal (you can add more if you want more crunch)
  1. Heat oven to 325°. Line a 9 x 13 pan with foil and lightly spray with nonstick cooking spray.
  2. Melt the butter and the chocolate together in a 2-quart saucepan over low heat, stirring constantly with a wooden spoon. Remove the pan from heat and stir in the sugar.
  3. Add the eggs and vanilla and stir to make a smooth batter. Add the flour, and salt; stir until incorporated.
  4. Pour the batter into the baking pan and spread evenly. Bake until a toothpick inserted into the center comes out clean, 40–45 minutes. 5 minutes before the brownies are done, remove and top with peanuts (if using), Snickers and peanut butter cups.  Finish baking (do not overbake.)
  5. Meanwhile, melt chocolate chips, peanut butter and butter.  Stir in cereal.  Remove brownies from oven and pour chocolate mixture evenly over top.  Let cool to room temperature before cutting and serving.

Friday, February 22, 2013

Chewy Brownies - crunch-ized

Chewy Brownies - made February 16, 2013 from Treats Truck Baking Book by Kim Ima

This brownie is signified by a small world moment I had on my New Orleans trip last month.  In chatting with one of the couples on the tour, one of them, Craig, mentioned that his cousin Kim had a treats truck business (think of a food truck that sells sweets) and had even written a baking book.  It rang a bell in my mind and sure enough, it turns out that I had Kim's Treats Truck cookbook in my baking book arsenal, thanks to one of my friends who had given it to me for a birthday gift.  What a cool coincidence.

I used the Chewy Brownie recipe in Kim's book to make the base for these brownies.  They came out perfectly fudgy and of course, I'm addicted to the nutella crunch topping I like to use on plain brownies.  It just adds that little extra.

3/4 cup butter
3 ounces unsweetened chocolate
2 ounces dark chocolate
1 1/4 cups sugar
2 eggs
1 1/2 teaspoons vanilla extract
3/4 cup flour
1 tablespoon cocoa powder
Nutella Crunch Topping (click on link for recipe)

  1. Preheat oven to 350 degrees.  Line a 9" x 9" pan with foil and lightly spray with nonstick cooking spray.
  2. Melt the butter and chocolates in the top half of a double boiler set over hot water.  Whisk to combine.
  3. Beat the eggs in a bowl and stir in the vanilla.
  4. When the butter and chocolates are melted and whisked smooth, take it off the heat and stir in the sugar, then the eggs and vanilla/  Add the flour and cocoa powder and stir well with a spoon until smooth.
  5. Pour the brownie batter into the prepared pan.
  6. Bake for 30-35 minutes or until a toothpick inserted in the center comes out with a few moist crumbs.  If desired, add the nutella crunch topping several minutes after taking the brownies out of the oven.  Let cool completely before cutting into bars.

Monday, February 18, 2013

Cadbury Mini Eggs Blondies

Cadbury Mini Eggs Blondies - made February 1, 2013 from Chef in Training
I made these awhile back but had a few other things I was trying to get up so this got temporarily delayed.  But since Easter will be looming shortly and stores now carry Easter candy, now's the time to sink your teeth into these.  I love Cadbury mini eggs.  Not to be confused with Cadbury creme eggs or caramel eggs.  These are the milk chocolate mini eggs with the candy shell coating.  Like M&Ms on steroids but much, much better. I usually buy a bag once a year and can make it last me quite while by savoring a couple (or 5) every other day or so.  In recent years though I keep forgetting to buy a bag and when I did, I kept forgetting to eat them.  I actually think these were from last year.  Fortunately the bag was unopened so I figure they were still fresh enough.  Rather than eating them like popcorn, I decided to use them for this blondie recipe.

I don't normally make blondies because a lot of the ones I've tried are a trifle too sweet for me.  But this was a good recipe from Chef in Training.  It's got a nice brown sugar caramel toffee flavor and the Cadbury mini eggs offer a good crunch and chocolate flavor to pair with it.  Don't underbake too much or it'll be too mushy (but don't overbake it either).

2 cups all-purpose flour
1/2 teaspoon baking soda
1/2 teaspoon salt
3/4 cup unsalted butter, melted
1 cup packed brown sugar
1/2 cup white sugar
1 tablespoon vanilla extract
1 egg
1 egg yolk
2 cups milk chocolate mini eggs
  1. In a medium-size mixing bowl sift flower, baking soda and salt together.
  2. Melt butter over medium heat. Once melted add to the bowl of your electric mixer. Cream together with sugars.
  3. Add in vanilla and eggs mix until creamy.
  4. Slowly add in flour mixture until it is incorporated.
  5. Fold in Mini Eggs.
  6. Spread batter into a greased 8×8, 9×9, or 11×7 baking dish. (I made mine in an 8 x 8 pan for thicker bars.)
  7. Bake at 325 for about 40 minutes or until a tooth pick is inserted in the center and comes out clean.
  8. Let the bars cool for 30 minutes before slicing.

Sunday, February 17, 2013

Slow Cooker Pot Roast

Slow Cooker Pot Roast - made February 9, 2012 from Bubble Crumb

Back in early January, in my renewed promise to myself to cook more and eat out less, I went to Costco to buy the main meal ingredients I planned to cook with: pot roast, chicken breasts, pork chops and shrimp.  Throw in my baking staples like butter, eggs, sugar and flour and "somehow" I walked out having spent almost my entire grocery budget for the month with 27 days left in January to go - yikes. Fortunately, I underestimated just how far anything I buy at Costco actually goes.  Case in point, thank goodness for my freezer because I'm still eating what I bought from that early January trip.

What I've done with all of the savory dishes I've posted this year is divided them into individual sizes (real individual sizes, not restaurant portions), placed each serving in small tupperware containers and put them in the freezer.  During the week, I take out a couple a day to thaw out and have one for lunch and one for dinner.  It takes all the work out of cooking during the week and I rotate between the dishes I've made so I don't eat the same thing twice in a day.  This recipe uses up the chuck roast I bought and, 6 weeks after that Costco run, I still have a dozen mini meals in the freezer, half a pack of shrimp, some chicken breasts and half a package of beef left to see me through February.  Whew.

I modified this recipe from Bubble Crumb.  Past experience with crock pot cooking has taught me no matter what I make, the resulting sauce comes out watery.  So I only used 1 can of cream of mushroom soup and half a can of water.  I omitted the mushrooms because I don't like them but the rest of the recipe I kept the same.  Sure enough, it was still thinly soupy but I thickened it with a good spoonful of cornstarch mixed with a little water to make a paste.  If pot roast is your comfort food, this is standard fare and similar to the pot roast I remember my mom making when I was growing up.  What I like about it is I could let it cook in the crock pot until it was literally fork tender and not have to worry about it becoming dry.  And I mean plastic-fork tender. 

1 (10.75 ounce) can condensed cream of mushroom soup
1 (1 ounce) package dry onion soup mix
1/2 can water
basket of baby portabella mushrooms cut in half, optional (I left them out)
2 tablespoons red wine vinegar
2 tabelspoons Worcestershire
5 1/2 pounds pot roast
salt & pepper to taste

Brown and sear meat (you can skip this step if you wish - I did).  Place in slow cooker, combine remaining ingredients and pour over pot roast.  Cook on low for 6 hours or until tender.

Friday, February 15, 2013

Cinnamon Sugar Popovers

Cinnamon Sugar Popovers - made February 8, 2013 from mom.me
I love popovers.  They're so easy to make and take almost no time at all.  Plus when you have to use up milk, this is a good way to do it.  Mine turned out a little holey in the middle because of the small amount of oil I greased the muffin tin with seemed to have gathered in the middle and sunk.  Regardless of appearance though, these were really good, especially with the cinnamon sugar topping.  Eat warm.

2 eggs
1 cup whole milk
1 cup all-purpose flour
1 tablespoon unsalted butter, melted
1/2 teaspoon salt
1/2 teaspoon vanilla
1/2 teaspoon cinnamon
5 teaspoons vegetable oil

For the cinnamon sugar topping:
1/2 cup sugar
1 teaspoon ground cinnamon
1/4 cup unsalted butter, melted

1. Blend the eggs and milk together in a blender until combined. Add flour, melted butter, salt, cinnamon and vanilla until smooth and bubbly, about one minute. Let the batter rest for 30 minutes.
2. While the batter is resting, preheat the oven to 450 degrees. Pour 1/2 teaspoon of oil into each muffin cup, using only the outer 8 tins (leave the center ones empty—they won’t heat as evenly). Adjust oven rack to lowest position and make sure there’s not a rack directly above—remember your popovers are going to rise and you don’t want another oven rack to squish them. After the batter has rested 20 minutes, place pan in oven to heat the oil. You want the pan to have a good 10 minutes in the oven to heat.
3. After batter has rested, remove pan from the oven and, working quickly, divide batter among the 8 muffin cups. Return to oven and bake for 20 minutes (don’t open the oven door). Then lower heat to 350 degrees and continue to bake until popovers are golden brown, about 15 minutes more. After removing from the oven, gently flip them out onto a wire rack.
4. For the cinnamon sugar topping: mix the sugar and cinnamon in a small bowl. Thoroughly brush each popover all over with the 1/4 cup of melted butter, then dredge each puff generously in the sugar mixture. Enjoy warm.

Makes 8 popovers

Tuesday, February 12, 2013

Chocolate Peanut Butter Valentine Cookies

Chocolate Peanut Butter Valentine Cookies - made February 10, 2010, recipe adapted from the Peanut Butter and Chocolate Kiss Cookies (click on title to go to original recipe)

These are just an adaptation of the Peanut Butter and Chocolate Kiss Cookies I've been making for years.  I make these for my dessert party during the holidays and no matter how many other treats I've made or how many new offerings I have, there's also someone who declares the Peanut Butter Kiss Cookies their favorite.  I put a little twist on my usual recipe though and instead of peanut butter, I substituted Dark Chocolate Peanut Butter that I found on amazon.  It's essentially dark chocolate and peanut butter combined.  However, using it in the cookie dough somewhat nullified the chocolate so it didn't come out as chocolaty as I had hoped.  But it still tasted pretty good.  For more of a chocolate punch, I would probably add a bit of dark chocolate cocoa powder, decreasing the amount of flour by the same amount of cocoa powder you add in.  Start off with a couple of tablespoons as the swap and see how you like it.

And again, if you need a Valentine-themed treat at the last minute, instead of using Hershey kisses as the topper, swap in peanut butter hearts (the Valentine version of Reese's peanut butter cups).  They went nicely with the cookies and, schmaltzy as it might be, I liked the cuteness factor when presenting a plate of these.  I took them into work and they went pretty fast.

½ cup butter, room temperature
½ cup dark chocolate peanut butter
¾ cup packed brown sugar
¼ cup granulated sugar
1 egg
1 teaspoon vanilla extract
¼ teaspoon salt
1 ¾ cups all-purpose flour
1 teaspoon baking soda
3 tablespoons granulated sugar (for rolling)
Peanut-butter-filled chocolate hearts or Hershey kisses or peanut butter cups

1. Preheat oven to 375˚F.
2. In a medium bowl, beat together butter, peanut butter, brown sugar, ¼ cup granulated sugar, egg, vanilla and salt until light and fluffy.
3. Add flour and baking soda, beating until thoroughly blended.
4. Shape dough into 48 balls, using a rounded teaspoon for each. Roll balls into 3 tablespoons granulated sugar.
5. Place 2 inches apart on ungreased baking sheets. Bake 8-10 minutes or until light golden. Immediately top each cookie with a candy kiss, carefully pressing down firmly.
6. Remove cooks from baking sheets, cool on racks. Makes 48 (1 ¾”) cookies.

Monday, February 11, 2013

Valentine Brownies - put a heart on it

Valentine Brownies - made February 9, 2013 from Saltbox House
Valentine's Day kinda crept up on me.  It's not like I didn't know it was on February 14.  More like, wow, it's already February.  And then, it's not even early February anymore.  In my defense, a lot of occasions/holidays seemed to come stacking up on top of each other all at once and I just couldn't keep up.  Chinese New Year (didn't get to do anything with this although now I'm dying for a cocktail bun), Mardi Gras (King Cake - check), Valentine's Day and of course, the annual arrival of Girl Scout cookies which is always good for a cookie theme or two.  But you (or I) can always "cheat" with a shortcut.  I didn't do anything fancy or Valentine-y like a cutesy play with red velvet or anything pink or red.  But you have to go with chocolate for Valentine's Day and that's what I did with this frosted brownie recipe from Saltbox Lunch.  My cheat was embedding a chocolate heart on top of each piece, burrowing it into the thin layer of frosting so it would adhere.  Tada - Valentine brownies.  Work with me here.  I sent these to my nieces for a Valentine's care package.  The brownies are a nice, basic fudgy brownie and the frosting, while a tad sweet, is a good complement to it.  I had hoped to find caramel-filled chocolate hearts so you're not just eating a big chunk of chocolate on top of the brownie but I couldn't find any when I did an emergency run to the store to Valentine-ize these (yes, I know that's not a word).  But I like how they turned out and satisfy my criteria for a Valentine's treat.  So if you're pressed for time and need a fast treat to mark the occasion, just go with the chocolate hearts - your friends and family will still love you.


1 cup unsalted butter
1/2 cup cocoa, sifted
2 cups flour
2 cups sugar
4 eggs
4 teaspoons vanilla
  1. Preheat oven to 350 degrees.  Line a 9 x 13 pan with foil and spray lightly with nonstick cooking spray.
  2. Melt butter and stir in cocoa, whisking until smooth.
  3. Add sugar then eggs and vanilla extract.  Add flour and mix until smooth.  Do not overmix.
  4. Spread batter into prepared pan and bake for 20-25 minutes or until toothpick inserted near the center comes out with moist crumbs.  Let cool 10 minutes then frost.
Chocolate Frosting
1/4 cup butter, softened
1/4 cup milk
1/4 cup cocoa
3 cups powdered sugar
Dash of Salt
  1. Whisk cocoa and powdered sugar together.  
  2. Beat in softened butter then milk.  Beat until smooth.  
  3. Frost brownies 10 minutes after you remove them from the oven.  When cool, cut into squares and place a heart-shaped chocolate at the center of each square.

Sunday, February 10, 2013

King Cake - Get Your Mardi Gras On

The King Cake made from the NOLA mix
Tuesday, February 12 is Mardi Gras.  On my New Orleans trip, I mentioned earlier that my friend Jen brought me, amongst other things, a slice of King Cake from Gambino's Bakery.  So I got to taste authentic king cake from a fabulous bakery during Mardi Gras season - yay me.  And, being me, I also bought a king cake mix (yes, that three-letter word) to bring home with me so I could try making a king cake on my own.
The box of goodies Jen brought me from Gambino's
The King Cake from Gambino's, surrounded by Mardi Gras beads
There are plenty of recipes out there for making King Cake from scratch.  And someday I want to try this one from Emeril Lagasse. I have to admit I copped out with a mix for 2 reasons: 1) it was locally made and certified to have been made in Louisiana so I had to support their local economy - hey, it's not like it's Pillsbury or Betty Crocker from my grocery store :) and 2) honestly, I didn't want to go out and buy purple, green and yellow sugars separately, lol.  Easier to get them all in the mix.
The King Cake Mix I bought in New Orleans

King Cake is essentially a brioche dough, with a ribbon of brown sugar cinnamon (or praline sugar) running through it, baked in an oval shape, glazed with royal icing and sprinkled with the aforementioned Mardi Gras colors.  Tradition decrees that a plastic baby (or sometimes a much more edible pecan) is hidden amongst the slices and whoever finds that plastic baby in their piece is responsible for hosting the next round of Mardi Gras parties.  (Note to any novice bakers: you do NOT bake the plastic baby inside with the cake - it'll melt and make your cake unsafe to eat.  The baby is usually tucked underneath the slice of cake after baking and serving.)  I'm a personal fan of the Mardi Gras colors and I like a good brioche as much as the next person so it's hard not to like king cake.  


The mix made for a soft dough which was a little concerning but I followed the instructions to the letter and hoped for the best.  After the first rising, the dough was still soft so I had to flour it liberally to handle it.  I didn't bother with a rolling pin since it was so soft and I was able to shape it out into a rectangle with my hands, brush it with melted butter, sprinkle the praline sugar all over it and roll it up, jelly roll style.  With careful handling, it wasn't too hard to bring the ends together to form an oval and pinch the edges shut.  Then I let it rise a second time until it had doubled in size then I baked it off.  I didn't bother brushing with egg wash to make it brown nicely since it was going to get covered in glaze anyway.  The glaze packet also came with the mix and was likely just powdered sugar that I added vanilla and a little milk to until it was the consistency I wanted.  The fun part was sprinkling the colored sugars on top: purple for justice, green for faith and gold for power.

The king cake from the mix actually wasn't bad.  It was a little more cakey than the one from Gambino's (that one was really good) but still tasty and the "cake" (more like a brioche) was complemented nicely by both the sweetness of the glaze and the crunch of the colored sugars.  Next time I definitely want to make one from scratch and see how it turns out.

Saturday, February 9, 2013

Asian Pork Chops

Asian Pork Chops - made February 2, 2013, found on pinterest

I wish I could attribute this to the original site like I normally do but I found it on pinterest and the recipe was in the text while the pin only led back to a jpg file of the picture.  So, sorry to whoever it is that I can't give you credit for it but I don't know who you are.

This was another slow cooker recipe that suited my cooking skills.  I had pretty thick pork chops so I ended up cooking them for longer than the recipe said to, mostly because I like them to be fork tender. It was pretty good, probably made better because it was so simple.

P.S. If you notice my write-ups have been brief lately and I'm not participating in link parties like I used to, I'm just short on time these days so I'm just getting the posts up when I can and letting everything else go by the wayside for the moment.

Mix 1/2 cup soy sauce, 1/2 cup ketchup, 1/2 cup light brown sugar, 2 cloves minced garlic, and black pepper to taste. Put meat in the crock pot (2.5 pounds boneless pork chops). Pour the sauce mixture over the meat, cook on low for about 5 hours (I had it on high for 2 hours then on low for 5-6 hours until the pork chops were fork tender).