Wednesday, May 27, 2020

Cast Iron Flank Steak

Cast Iron Flank Steak - made April 21, 2020, adapted from Our Life Tastes Good
I think this is the first real-food recipe I've posted in awhile that didn't involve my Instant Pot. But I also love my cast iron skillet (Lodge pan, made in the USA).
In a perfect world, this would be easy to make. Marinate it first then sear the meat over high heat to lock the juices in, let rest, then cut and serve. But....this is me we're talking about. For some reason, I'm incapable of successfully searing meat. I know how to do it and I understand the concept. But I suck at it. I think it's because I've set off the smoke alarm too many times while cooking. So I'm always leery about searing the meat for too long and risking the smoke alarm outing my efforts. Which means I never sear the meat for long enough and I'll end up with somewhat browned outsides and a completely raw inside.
I'm not even talking "medium rare" or "rare". More like "raw". I'm Filipino. We don't do "raw". So I do what every non-cook does when the meat isn't cooking well. I cut the steak pieces smaller and cook them that way. Don't judge - it works! More or less. The marinade on this was pretty good although cumin is not my favorite flavor. If it's yours, then this is a great marinade. Especially if you know how to sear meat properly.
1/2 cup olive oil
3 tablespoons Worcestershire sauce
1/4 cup fresh lemon juice
1 tablespoon garlic, minced
1 teaspoon ground cumin
1/2 tablespoon chili powder
1/2 teaspoon red pepper flakes
1 tablespoon sugar
1 teaspoon salt
1/2 teaspoon black pepper
2 pounds flank steak, cut into strips if desired
  1. Combine marinade ingredients except for flank steak in small mixing bowl. Whisk to combine. 
  2. Place flank steak into gallon-size ziptop bag and pour marinade into bag. Zip to close tightly. Refrigerate for at least 30 minutes and up to 8 hours.
  3. Heat 12-15" cast iron skillet over medium high heat. Remove flank steak from marinade and discard marinade. Place steak in hot skillet and sear for about 5 minutes or until a crust forms on one side. Using tongs, turn steak over. Sear on other side for another 5 minutes or until cooked to 120 degrees F. Remove from skillet and rest for 5-10 minutes. Slice thinly across grain before serving.

Sunday, May 24, 2020

One Bowl Chocolate Cake

One Bowl Chocolate Cake - made May 4, 2020 from Crunchy Creamy Sweet
My pictures aren't very good as I wasn't paying a lot of attention or putting in much effort to take them but don't be put off by that. This is a delicious chocolate cake recipe.
Bonus points that it's also easy to make. As in one-bowl easy where you put all the ingredients in a bowl, mix, pour into pan and bake.
The texture is a perfect cakey texture, meaning not too heavy or dense (like a pound cake) and not too light or airy (like a chiffon). I always liken it to the texture of a box cake mix but better with more genuine chocolate flavor. The batter is thin because it has so much liquid in it but that's what contributes to the soft cakey texture when it's baked.
Pouring the frosting on top of the warm cake when it comes out of the oven is also reminiscent of a Texas sheet cake and is also equally delicious. If you want a simple, easy-to-make, delicious chocolate cake, you can't go wrong with this one.

1 cup all-purpose flour
1 cup granulated sugar
1/4 unsweetened cocoa powder
1 teaspoon baking soda
1/2 teaspoon baking powder
1/4 teaspoon salt
1 large egg
1/2 cup vegetable oil
1/2 cup buttermilk
1/2 cup hot water

Frosting
5 tablespoons unsalted butter
1/4 cup unsweetened cocoa powder
1 1/4 cups powdered sugar
2 to 3 tablespoons milk
1/2 teaspoon vanilla extract
  1. Preheat oven to 350 degrees F. Line an 8-inch square baking pan with foil and lightly spray with nonstick cooking spray.
  2. In a large bowl, whisk together flour, sugar, cocoa, baking soda, baking powder and salt. 
  3. Add egg, oil, and buttermilk; whisk well. Add hot water and whisk until batter is smooth. Pour into prepared pan.
  4. Bake for 25-30 minutes or until a toothpick inserted near the center comes out clean or with a few moist crumbs.
  5. Make frosting: melt butter in a saucepan over medium-low heat. Add cocoa powder and whisk in. Cook for 2 minutes; do not boil. Remove saucepan from heat and whisk in powdered sugar. Add vanilla and milk, one tablespoon at a time. Pour over warm cake and spread evenly with a spatula. Let cool before cutting.

Saturday, May 23, 2020

Sweet Potato Biscuits

Sweet Potato Biscuits - made April 16, 2020 from The Free Range Life
Here's a simple biscuit recipe if you have some extra sweet potatoes on hand and are looking for something to do with them. Like if you happened to buy a bag at Costco, let's say, and there are only so many sweet potatoes you can eat. Just me?
Anyway, I'm not a good biscuit maker. Too heavy a hand, can't resist the temptation to mix too much and keep trying-not-trying to mix in the flour enough. As you can tell by the pictures, I wasn't successful.
Still, this recipe survived my heavy-handed biscuit mixing technique. Or lack of. It's pretty dense (once again, just me?) but it's crunchy when first baked and when you slather a warm biscuit with butter, it's hard to go wrong.
This does soften later due to the moisture from the sweet potatoes so I recommend eating warm out of the oven. It has good sweet potato flavor even if I wouldn't describe this as "flaky".
2 cups flour
1/2 teaspoon salt
3 teaspoons baking powder
4 tablespoons butter
1 1/2 cups cooked, mashed sweet potatoes
1-3 tablespoons milk if dough is too dry
  1. Preheat oven to 425 degrees F.
  2. Combine flour, salt and baking powder in large bowl. Cut in butter until mixture resembles coarse meal.
  3. Add sweet potatoes and mix. If dough is too dry, add milk, 1 tablespoon at a time.
  4. Pat into a thick, round disc on a floured surface. Cut out rounds with a biscuit cutter and line in a lightly greased cast iron skillet or baking sheet.
  5. Bake for 10-15 minutes or until lightly browned. Serve warm.

Tuesday, May 19, 2020

Instant Pot Chicken Alfredo

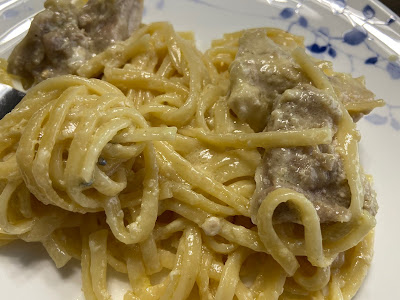
Instant Pot Chicken Alfredo - made April 28, 2020 from Shugary Sweets
I would say this recipe couldn't be easier to make but apparently, there is a way for it to fail. And you can trust me to find that way. The original recipe said using frozen chicken breasts is fine. I tried it with frozen boneless, skinless chicken thighs. Uh, I don't recommend frozen chicken at all. By the time the 8 minutes pressure cooking time plus the 8 minutes of natural release time was up, the chicken was still raw in parts. Ugh.
I took the chicken out, sliced it into smaller pieces, put back in the pot, set the pot to Saute mode and finished cooking the chicken that way. The noodles were pretty soft by then but at least I'm not going to kill myself with salmonella poisoning. And you don't have to either.

Taste-wise, this is good, although usual disclaimer that Alfredo sauce is pretty rich, thanks to the heavy cream and Parmesan cheese and the oil separated from the cheese after it cooled and was reheated the next day. Which wasn't very appetizing, truth be told. So a little will go a long way.

1 1/2 cups chicken broth
1 1/2 cups heavy whipping cream
1 teaspoon garlic, minced
8 ounces fettuccine noodles, broken in half
1 pound chicken breasts (I used boneless, skinless chicken thighs)
1 cup Parmesan cheese, shredded
salt and pepper to taste
  1. Layer in ingredients in order listed in Instant Pot: chicken broth, heavy whipping cream, garlic and noodles, covering noodles completely in liquid. Do not stir. Top with chicken.
  2. Secure lid and, with vent in sealed position, set on Manual for 8 minutes. Once completed, allow to naturally release for another 8 minutes then do a quick release. 
  3. Open carefully, remove chicken and add Parmesan cheese. Stir to combine. Slice chicken and add back to pot. Salt and pepper to taste. Stir and allow dish to sit for a few minutes for sauce to thicken. Serve warm.

Tuesday, May 12, 2020

Brown Sugar Butter Cookies

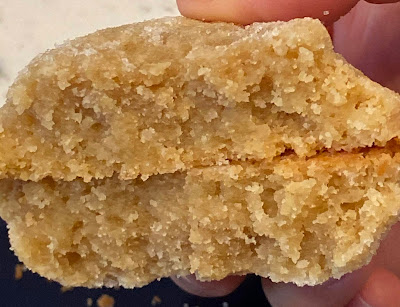
Brown Sugar Butter Cookies - made April 19, 2020 from Tastes of Lizzy T
 I already have a favorite sugar cookie recipe and now it turns out I have a favorite brown sugar cookie recipe. Yup, this one.

Everything I liked about my favorite sugar cookie recipe are the same things I like about this brown sugar cookie recipe, mainly the taste and the soft, dense texture. In fact, I might like this one even a tad bit better because the brown sugar gives it that little extra punch in the flavor department.

For something simple and straightforward, this is a good cookie to make, no muss, no fuss. It doesn't spread much and stays thick. As always, I make the dough, portion into dough balls then freeze until I'm ready to bake them.
I made these to send in a care package to a friend (in the US) and they also held up well in the domestic mail.

1 cup unsalted butter
3/4 cup brown sugar (5 ounces)
1 large egg
1 teaspoon vanilla extract
2 1/4 cups all-purpose flour (10 ounces)
1/2 teaspoon baking powder
1/2 teaspoon salt
1/2 cup granulated sugar for rolling, optional
  1. Cream butter and brown sugar together in a stand mixer fitted with the paddle attachment, scraping down the sides of the bowl as needed. Add egg and vanilla extract; mix to combine.
  2. In a separate bowl, whisk together flour, baking powder and salt. Add dry ingredients to butter-sugar mixture and mix until just combined. Do not overmix.
  3. Portion dough into golf-ball size dough balls and flatten slightly into thick discs. Cover and chill or freeze several hours or overnight.
  4. When ready to bake, preheat oven to 350 degrees F. Line baking sheets with parchment paper. Roll dough balls/discs in granulated sugar if desired. Evenly space on prepared baking sheets and bake for 10-12 minutes until the edges are set and the middles no longer look raw. Cool on baking sheets for 3-4 minutes then transfer cookies to wire rack to cool completely.

Tuesday, April 28, 2020

Instant Pot Teriyaki Chicken

Instant Pot Teriyaki Chicken - made April 14, 2020 modified from Five Heart Home
Yup, another Instant Pot recipe. I think I've forgotten how to cook any other way so that may be all the "real food" cooking you're going to see for awhile.
This made a lot of sauce, at least for the amount of chicken I used, so if you're also carb comfort eating, this goes well with rice.
The sauce was pretty good, not too tart or sour but also not too sweet, as some (jarred) teriyaki sauces can be. The ingredients are also pretty straightforward. If I can find any small silver lining in these pandemic times, it's that I'm using ingredients I have on hand, some of which (like rice vinegar) have been barely touched in my pantry.

1/2 cup soy sauce
1/2 cup honey
3 tablespoons rice vinegar
2 tablespoons water
4 cloves garlic, minced
2 teaspoons ginger
1/2 teaspoon crushed red pepper flakes
8 bone-in chicken thighs

3 tablespoons cornstarch
3 tablespoons cold water
  1. In a medium bowl, whisk together soy sauce, honey, rice vinegar, water, garlic, ginger and red pepper flakes. Place chicken in the bottom of the Instant Pot, pouring a little sauce between the layers and the rest over the top.
  2. Seal the lid and cook on Manual for 10 minutes. When cycle has completed, allow to naturally release for 5 minutes then vent to a quick release.
  3. Remove the lid carefully, remove chicken thighs to a foil-lined baking dish and broil in oven for several minutes until browned. 
  4. In the Instant Pot, set to saute mode. In a small bowl, whisk together cornstarch and water until cornstarch has dissolved. When sauce starts bubbling in Instant Pot, add cornstarch slurry and whisk sauce to combine until thickened. Cancel Saute function and add browned chicken back to sauce. Serve warm.

Thursday, April 23, 2020

Instant Pot Cream Cheese Spaghetti

Instant Pot Cream Cheese Spaghetti - made April 16, 2020, modified from Spicy Southern Kitchen
I've seen versions of this recipe making the rounds on pinterest so I thought I'd try it as a variation of the Instant Pot Spaghetti I made earlier that turned out pretty well.
Unfortunately for me, this one didn't turn out quite as well as the first but I think the mistakes I made could easily be remedied for a better dish. For one thing, for any instant pot spaghetti recipe, not just this one, don't use thin noodles like angel hair pasta. Even pressure cooking this at 6 minutes which is what I did made the noodles too mushy, especially when reheating later. Plus angel hair noodlesstuck together more than thicker noodles would have. Regular spaghetti or fettuccine noodles would've been better.
The other issue is more of a personal preference thing but I thought this was just a little too creamy for me due to the cream cheese. Which I should've expected but alas, I underestimated just how rich and creamy the cream cheese would make it. If creamy sauce is your thing, this is great. If not, cut the cream cheese in half.


I didn't have Italian seasoning so I made up my own substitute which is easy to do if you have basil, oregano, rosemary and thyme. I also only had an 18-ounce jar of spaghetti sauce instead of the 24-ounce jar called for in the original recipe so I used all of the 6-ounce can of tomato paste and increased the amount of water by 1/4 cup. That worked pretty well and I'm glad I don't have leftover tomato paste to worry about using later.
1 pound lean ground beef
1 teaspoon garlic powder
1/2 teaspoon salt
2 teaspoons Italian seasoning (I substituted 1/2 teaspoon dried basil, 1/2 teaspoon dried oregano, 1/2 teaspoon dried rosemary, 1/2 teaspoon thyme)
1/4 teaspoon black pepper
1/4 teaspoon crushed red pepper flakes
1 6-ounce can tomato paste
12 ounces uncooked thin spaghetti
2 3/4 cups water
1 18-ounce jar spaghetti sauce
1 8-ounce block cream cheese, cut into pieces and softened (decrease to 4 ounces if you don't want super creamy sauce)
1/3 cup freshly grated Parmesan cheese
  1. Turn on Instant Pot to Saute mode and brown ground beef, stirring to break up large clumps. Drain excess grease.
  2. Turn Instant Pot off and add garlic powder, salt, Italian seasoning (or substitutes), pepper, crushed red pepper and tomato paste. Stir to mix.
  3. Break dry spaghetti noodles in half and layer over ground beef mixture.
  4. Pour in water and spaghetti sauce, ensuring noodles are submerged in liquid. Do not stir.
  5. Place lid on and set to pressure cook (manual setting) for 6-8 minutes (6 for thin noodles, up to 8 for regular noodles).
  6. When Instant Pot is finished, do a quick pressure release. Remove lid and add cream cheese and Parmesan cheese, stirring into mixture. Replace lid and let sit for 5 minutes to completely melt the cheeses. Stir and serve warm.

Monday, April 20, 2020

Bread Machine Honey Oatmeal Bread

Bread Machine Honey Oatmeal Bread - made April 9, 2020, modified from Happy Hooligans
To partially echo my previous post, an observation off the bat: there seems to have been an astonishing shortage of flour and yeast lately, second only to the Great Toilet Paper Shortage in stores. Is the lost art of homemade bread baking making a comeback? I, for one, hope so because I love bread. LOVE. So much so that, at the risk of having my Filipino card revoked, I love bread more than rice. I can go days without eating rice. I prefer not to go without bread for any length of time.

This is how small the bread container is - makes a 1-lb loaf

dough in the proofing stage

That said, I rarely make bread at home. So rarely, in fact, that I bought a mini breadmaker years ago (in COVID-19 timelines, that would be back when dinosaurs roamed the earth) and can't even remember the last time I used it. I know it was before my Marie Kondo decluttering phase which was at least 5-7 years ago. I didn't know whether my bread machine brought me joy because at the time I bought (and used it), I wasn't attaching emotions to my inanimate possessions and couldn't remember what feelings my long-dormant bread machine evoked back when I actually used it.
But, despite my somewhat successful decluttering (I really did get rid of a lot of stuff), for some reason, I couldn't bring myself to get rid of my breadmaker. Maybe because it was expensive, even in the mini size. Maybe because I really do love bread and was unwilling to part ways with an appliance that could make it. Maybe because I thought "someday" I would make bread more often.

Now, during these times, I'm extremely glad I held onto it. Being short of flour was never a danger for me because, hello, baker here. My pantry is never low on flour, shortage in the stores or not. Plus, hi, Costco shopper also present. I buy the organic flour that Costco sells as two 10-pound packs. So it takes me awhile to go through flour, especially since I've cut back on baking lately. This recipe calls for bread flour and lo and behold, I had a 5-lb bag of that as well. But what really pushed me to bust out my breadmaker was coming across yeast at Winco. They didn't have piles of yeast packs but there were enough that I snagged three of the 3-packs and there was still plenty of yeast left. I kept 2 individual packs for myself and mailed the rest off to friends who wanted to bake bread and were lamenting the yeast shortage in their local stores.
I modified this recipe because, as mentioned, I only have a mini breadmaker. I can't remember how much it can hold but from how small it is, probably nothing larger than ingredients for a 1-pound loaf. The original recipe calls for putting this on a "1 1/2-lb" bread setting. I don't have that setting on my breadmaker. So I just cut the ingredients to either 2/3 or 3/4 of the recipe and hoped that would work (spoiler: it did).
Like the breadmaking version of an instant pot, the great thing about bread machines is you put everything in the machine, close it, press a button and go away for several hours. After that, voila, fresh bread. Similar to making spaghetti or other pasta dishes in the instant pot, you do have to put everything in a particular order and you don't stir it once you do. Nope, just layer in the ingredients with the wet ingredients first then the dry ingredients and lastly the yeast. Then go away.
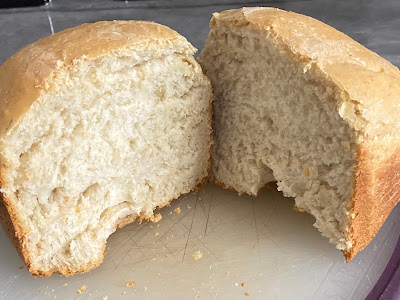
But make sure you come back when the bread machine is done because, wow, this bread is amazing. I loved it. It had just the right texture, not too dense but not too light and it was delicious. The oatmeal itself somehow "melted" into the dough because there are no distinct oatmeal flakes in it but I think it helps give the bread some structure. I don't normally like honey and you can't taste it in the bread but it is a tiny bit sweeter than generic white bread. I set my bread machine on the soft crust setting which was perfect to complement the chewiness of the inside. I'm so glad I (literally) dusted off my bread machine and made this bread. I'll be making it again, probably multiple times. Or at least until I run out of yeast.
A couple of bread and bread machine baking tips: make sure your water is warm (100-110 degrees F is optimal). Too hot and it'll kill the yeast. Too cold and it won't activate the yeast as well. Also, don't let the salt touch the yeast when you layer in your ingredients. Separate it with the flour. Salt interacting with the yeast too soon will kill your yeast.

In the pictures, you'll see a loaf made with the original recipe cut in half. I've since made this bread 3 more times and gradually increased the ingredients until it more fully filled the pan. Those measurements are what I list below.

Modified for a 1-lb loaf (see original post from Happy Hooligans for full recipe)
6 ounces water, 100-110 degrees F
3/4 teaspoon salt
1 generous tablespoon honey
3/4 tablespoon softened butter
1/3 cup quick cook oats (I used old-fashioned and it was fine)
1 7/8 cups bread flour
1 1/4 teaspoons active dry yeast
  1. Place water, honey and butter at the bottom of bread machine pan. Add oats, salt and bread flour then yeast.
  2. For my mini bread machine, I chose the basic loaf setting with a soft crust. My machine said it would take 3 hours. That worked well. Your bread machine may have different settings. If you make the full recipe, I would chose a basic bread setting that would take between 2 1/2 to 3 hours.