Saturday, December 3, 2016

Jumbo Chocolate Chip Cookies

Jumbo Chocolate Chip Cookies - made dough November 12, 2016, adapted from Fearless Baking by Elinor Klivans
I went through another bout of going through my baking books and pulling out a recipe to try from one of them. Not being sick of chocolate chip cookies yet (or ever), I thought these would be promising. Having come from by bout of Levain copycat recipes, I thought I'd add these to the repertoire.

Alas, no. There was nothing wrong with the flavor of these but honestly? They spread, they were thinner than I would've liked and they reminded me of my early baking days when I was futilely trying to recreate Mrs. Fields' chocolate chip cookies. My, how far I've come since those old baking days. Because these were dismayingly ordinary. No thickness, no chubbiness, nothing intriguing unfortunately. The taste was fine but more Nestle Tollhouse than Levain Bakery.

So, after the taste test cookie baked/spread so thin, I used the rest of the dough for "pizzookies". Meaning I baked the dough balls in single serving ramekins and served them warm with vanilla ice cream at our Thanksgiving lunch. They worked just fine then. Now you know - next time you have cookie dough that spreads too much, just bake them in ramekins and serve them warm with ice cream. When you bake them in ramekins, they literally can't spread any further than in the ramekin and those kinds of doughs are actually better to use as ramekin desserts since they're generally pretty buttery and definitely not cakey when baked that way.
1 1/3 cups all-purpose flour
1 teaspoon baking soda
1/2 teaspoon salt
1/4 pound (1 stick) unsalted butter
2 ounces shortening
3/4 cup packed light brown sugar
1/4 cup granulated sugar
1 large egg
1 teaspoon vanilla extract
1 1/2 cups (9 ounces) chocolate chips
  1. Whisk together flour, baking soda and salt; set aside.
  2. Cream together butter and shortening until blended. Add brown sugar and granulated sugar; beat until combined. Add egg and vanilla extract and beat until just combined.
  3. Add dry ingredients and beat until just incorporated; do not overmix. Fold in chocolate chips.
  4. If dough is soft, chill briefly, 20-30 minutes. Portion into golf-ball-size dough balls, cover, and chill or freeze for several hours or overnight.
  5. When ready to bake, preheat oven to 350 degrees F. Line baking sheet with parchment paper. Evenly space cookies on baking sheet and bake for 10-12 minutes or until edges are golden and middles are just barely not shiny or raw. Let cool on cookie sheet for 5 minutes then remove to wire rack to cool completely.

Thursday, December 1, 2016

Holiday Cookie Compilation

I still have a couple of new recipes to put up from what I tried out in November but for the first day of December, I thought I'd put up this compilation of holiday cookies I've blogged about in the past. They're good year round but in case you want to do a little holiday baking, these are good contenders to bring to cookie swaps, holiday gatherings and giving as gifts. Some because they're pretty, some because they look festive for the season and all because they're delicious.


Tuesday, November 29, 2016

Edge of Darkness Bars

Edge of Darkness Bars - made November 14, 2016 from Baking Style by Lisa Yockelson
Can you tell I went on a brownie kick in November? I keep saying it was to use up leftover Halloween candy and that's true. But I also can make brownies in my sleep and when I need something to bring to friends or to have an emergency stash in case I end up going somewhere unexpectedly - and I'm incapable of arriving empty-handed - brownies freeze well and are easy to transport so they're a no-brainer for the holidays.
Plus I was combing through my Lisa Yockelson baking books and, as I've often mentioned, while I can't tell the difference between her multitude of brownie recipes, I can attest that they turn out well every.single.time.
This was no exception. I list the full recipe below but I cut the recipe in half and baked these in a 9" baking pan. They still baked up reasonably thick but were still a manageable bite. Cut them into small pieces though as they are rich. If brownies aren't rich and decadent, there's almost no point to making them and certainly to eating them.
For this particular batch, I used up the last of my Snickers bars from Halloween. And yes, that's the only time I actually ate a Snickers all year. Because look at that picture - sheer decadence.

2 cups unsifted, bleached all-purpose flour
2/3 cup unsifted bleached cake flour
1/2 teaspoon baking powder
1/2 teaspoon salt
1/2 cup plus 2 tablespoon unsweetened alkalized cocoa powder
1 pound (4 sticks) unsalted butter, melted and cooled to tepid
10 ounces unsweetened chocolate, melted and cooled to tepid
6 ounces bittersweet chocolate, melted and cooled to tepid
10 large eggs
4 cups superfine sugar (I used regular granulated sugar and it was fine)
4 teaspoons vanilla extract
  1. Preheat oven to 325 degrees F. Line a 9 x 13 pan with foil and lightly spray with nonstick cooking spray.
  2. Sift together the all-purpose flour, cake flour, baking powder, salt and cocoa powder.
  3. Whisk together the melted butter and melted chocolates in a medium-size mixing bowl until smooth. 
  4. In a large bowl, whisk the eggs just to mix. Add the sugar and beat for 1 minute. Blend in the melted butter-chocolate mixture and the vanilla extract.
  5. Whisk in the flour mixture, mixing slowly to form a batter, scraping down the sides of the mixing bowl with a rubber spatula to keep the batter even-textured.
  6. Pour the batter into the prepared pan and smooth the top with a metal spatula. Bake for 36 to 39 minutes, or until just set and a toothpick inserted near the center comes out with a few moist crumbs. Cool completely before cutting and serving.

Saturday, November 26, 2016

Pumpkin Buttermilk Cake with Cream Cheese Frosting

Pumpkin Buttermilk Cake - made November 8, 2016, adapted from Cake Central
In honor of National Cake Day today and Thanksgiving week/month which still counts as pumpkin season in my book, here's something to celebrate both.  The original recipe called for roasting a pumpkin and using that in the cake. I have never bought a pumpkin in my life and the only pumpkin I know comes out of the Libby's can as pumpkin puree. I know just enough to pick the can that says "puree" and not the one that says "pumpkin pie filling". So it probably can go without saying that I substituted that can of pumpkin puree for "real pumpkin".
I don't know what kind of difference that made and I'm sure people who've baked directly with the real thing might be cringing but, since I don't know differently, I thought this cake turned out pretty well.  It's a nicely seasonal cake, appropriate for more novice bakers who want to bring out something simple for a holiday gathering. You mix it up like a basic cake, pour into a Bundt pan and, the baking gods willing, it comes nicely intact out of the pan. Let it cool then frost with your favorite cream cheese frosting recipe.
Pumpkin isn't a strong flavor, hence the spices in the recipe. If you don't like a lot of spice, you can omit the cloves and increase the cinnamon. I love cinnamon and my absolute favorite is the Vietnamese cinnamon from Penzey's. Seriously, I even give it away for gifts along with my favorite recipe(s) for snickerdoodles. Matter of fact, if you want a holiday or hostess gift idea, make up a batch of these snickerdoodles, print out a copy of the recipe on holiday stationery, wrap up the cookies in holiday packaging (those cookie plates or festive boxes from Michaels work well), include a small jar of Penzey's Vietnamese cinnamon and affix the recipe with your gift tag.
1 15-ounce can pumpkin puree
¾ cup granulated sugar
¾ cup packed dark brown sugar
½ cup butter, softened
4 large eggs
1 teaspoon vanilla extract
3 cups all-purpose flour
2 teaspoons cinnamon
½ teaspoon ground cloves
1 teaspoon baking powder
½ teaspoon baking soda
½ teaspoon salt
⅔ cup buttermilk
  1. Preheat oven to 350°F. Generously spray a Bundt pan with nonstick cooking spray and dust with 1 tablespoon flour.
  2. Place granulated sugar, brown sugar, and butter in a large bowl; beat with mixer at medium speed 3 minutes or until well blended.
  3. Add eggs, 1 at a time, beating well after each addition. Beat in pumpkin puree and vanilla.
  4. Lightly spoon 3 cups flour into dry measuring cups and level with a knife.
  5. Combine flour and cinnamon, cloves, baking powder, baking soda and salt in a bowl, stirring well with a whisk. Add flour mixture and buttermilk alternately to sugar mixture, beginning and ending with flour mixture.
  6. Spoon batter into prepared pan. Bake at 350° for 55 minutes or until a wooden pick inserted in center comes out clean. Cool in pan 10 minutes on a wire rack. Remove from pan, and cool completely on wire rack.
  7. If desired, frost with cream cheese frosting: beat 1/4 cup butter and 8 ounces cream cheese until blended and creamy. Add 1 teaspoon vanilla and briefly mix to combine. Add up to 2 - 2 1/2 cups powdered sugar, depending on desired taste and consistency. Beat until smooth. Frost cooled cake.

Wednesday, November 23, 2016

Lemon Semolina Cake

Lemon Semolina Cake - made November 6, 2016 from the Culinary Institute of America
I first blogged this recipe in the early days of my blog, almost 7 years ago. It's no coincidence that I put up a lemon recipe around this time of year again. My lemon tree is madly producing lemons and I can't keep up. This doesn't use a lot of lemons, just two or three, depending on the size and juiciness of the lemons but it makes a good cake, a bit different than the normal lemon buttermilk pound cake that I typically make to use up lemons. The semolina flour is what makes it a little different from the norm and gives it a slightly grittier texture.

If you click on the post title and see the original post from seven years ago, you'll see how I skimped on posting pictures and how non-picture-worthy that particular cake was. Fortunately, this time around, I was able to get the cake out of the pan more or less intact so it looks a bit better. It still has a very plain appearance but taste is more important than looks (to me) and this makes a good lemon cake.

It's best eaten warm though so after you brush it with the soaking syrup, feel free to cut into it a few minutes later for the best texture. Even after it's cooled to room temperature, I like to warm it up in the microwave for 10-15 seconds to revive the fluffiness of the texture. If you want to dress it up a little more, make a simple lemon glaze by combining powdered sugar with enough lemon juice for the consistency you want, pour it over the cake and sprinkle with sugared lemon zest.
Cake
10 ounces butter
14 ounces sugar
6 ounces eggs
Zest from 2 lemons
1 pound sour cream
1 teaspoon vanilla
8 ounces cake flour
5 ½ ounces semolina flour
½ teaspoon salt
1 teaspoon baking soda

Soaking syrup
½ cup lemon juice
¼ cup water
½ cup sugar
  1. Sift dry ingredients. Whip butter, sugar, zest and vanilla.
  2. Slowly add eggs. Alternate dry ingredients with sour cream in 3 additions.
  3. Pour into buttered and floured molds, ¾ full.
  4. Bake at 325˚F – 350˚F, depending on shape (lower temp for large cake and longer baking time, higher temp for smaller loaf, 30-35 minutes).
  5. Melt together ingredients for the syrup. Pour over the cake while the cake is hot. Put cake on icing grate, poke holes into cake, dab on syrup 3 to 4 times and give time between each time for syrup to soak in.

Saturday, November 19, 2016

Almond Shortbread

Almond Shortbread - made dough October 29, 2016 from Julia's Album
Another holiday cookie possibility if you want something easy to mix up, can be made ahead of time, baked off whenever you need it and however many you need and is delicious.
First, the dough is quick and easy to make, not to mention handles beautifully, meaning it isn't dry or crumbly nor is it sticky and wet. Instead, it's easy to shape into logs before wrapping and putting into the refrigerator or freezer until you need it. I recommend freezing it until you're ready to bake then simply take out and let thaw for 10-15 minutes before slicing.
Second, the beauty of this is it's literally a "slice and bake" cookie. So when you're ready to bake, simply slice off the number of cookies you need. The important thing is to slice the cookies of even thickness. You don't want them too thick or they'll need to bake too long to get them to optimal crunch. You don't want them too thin or thin at the edges and thick in the middle or they won't bake evenly and your edges will be overbaked/too brown while the middles will be underbaked or "just right".
But it isn't hard to slice evenly and after that, you can crowd them a little on the baking sheet since they don't really spread. Make sure to bake long enough that the edges are brown but also that the middles have some color. This is the rare time I don't advocate underbaking. You want to bake long enough to get a beautiful golden color plus to get that "snap" of shortbread once it's cool.
This is also a delicious tea cookie; it would go well for an afternoon tea party or in holiday gifts. Just bake it off at the last-minute though and make sure it's stored in an airtight container. These are best consumed the day of baking to get the optimal crunch and flavor.
1 cup (2 sticks) unsalted butter
1 cup confectioners' sugar
1 teaspoon amaretto liquor (I used vanilla extract)
1/4 teaspoon salt
2 cups all-purpose flour (dip and sweet method)
3/4 cup almonds, chopped or sliced, toasted
  1. In a large mixing bowl, cream butter, sugar, amaretto and salt until smooth and creamy.
  2. With mixer on low speed, add flour and mix until dough forms.
  3. Fold in almonds with a rubber spatula.
  4. Form dough into 2 rectangular logs. Wrap each log in plastic wrap. Freeze logs for at least 40 minutes in the freezer then 20 minutes in the refrigerator.
  5. Preheat oven to 325 degrees F. Line baking sheets with parchment paper.
  6. With a sharp knife, cut dough into 1/4" thick slices, arrange them on baking sheets 1" apart. Bake until edges are edges, about 12 minutes. Cool on baking sheet for 10 minutes then transfer to wire rack to cool completely.

Tuesday, November 15, 2016

Dark Shadows

Dark Shadows - made November 6, 2016 from Baking Style by Lisa Yockelson
After Halloween, I always make brownies. Not that I need an excuse to make brownies but the timing is always good since that's how I use up leftover Halloween candy. I don't get a lot of kids trick or treating in my neighborhood. Some years I don't get any at all. I think that's a combination of not many kids in the neighborhood and/or I often don't get home from work early enough to make my house a worthy stop on Halloween night.
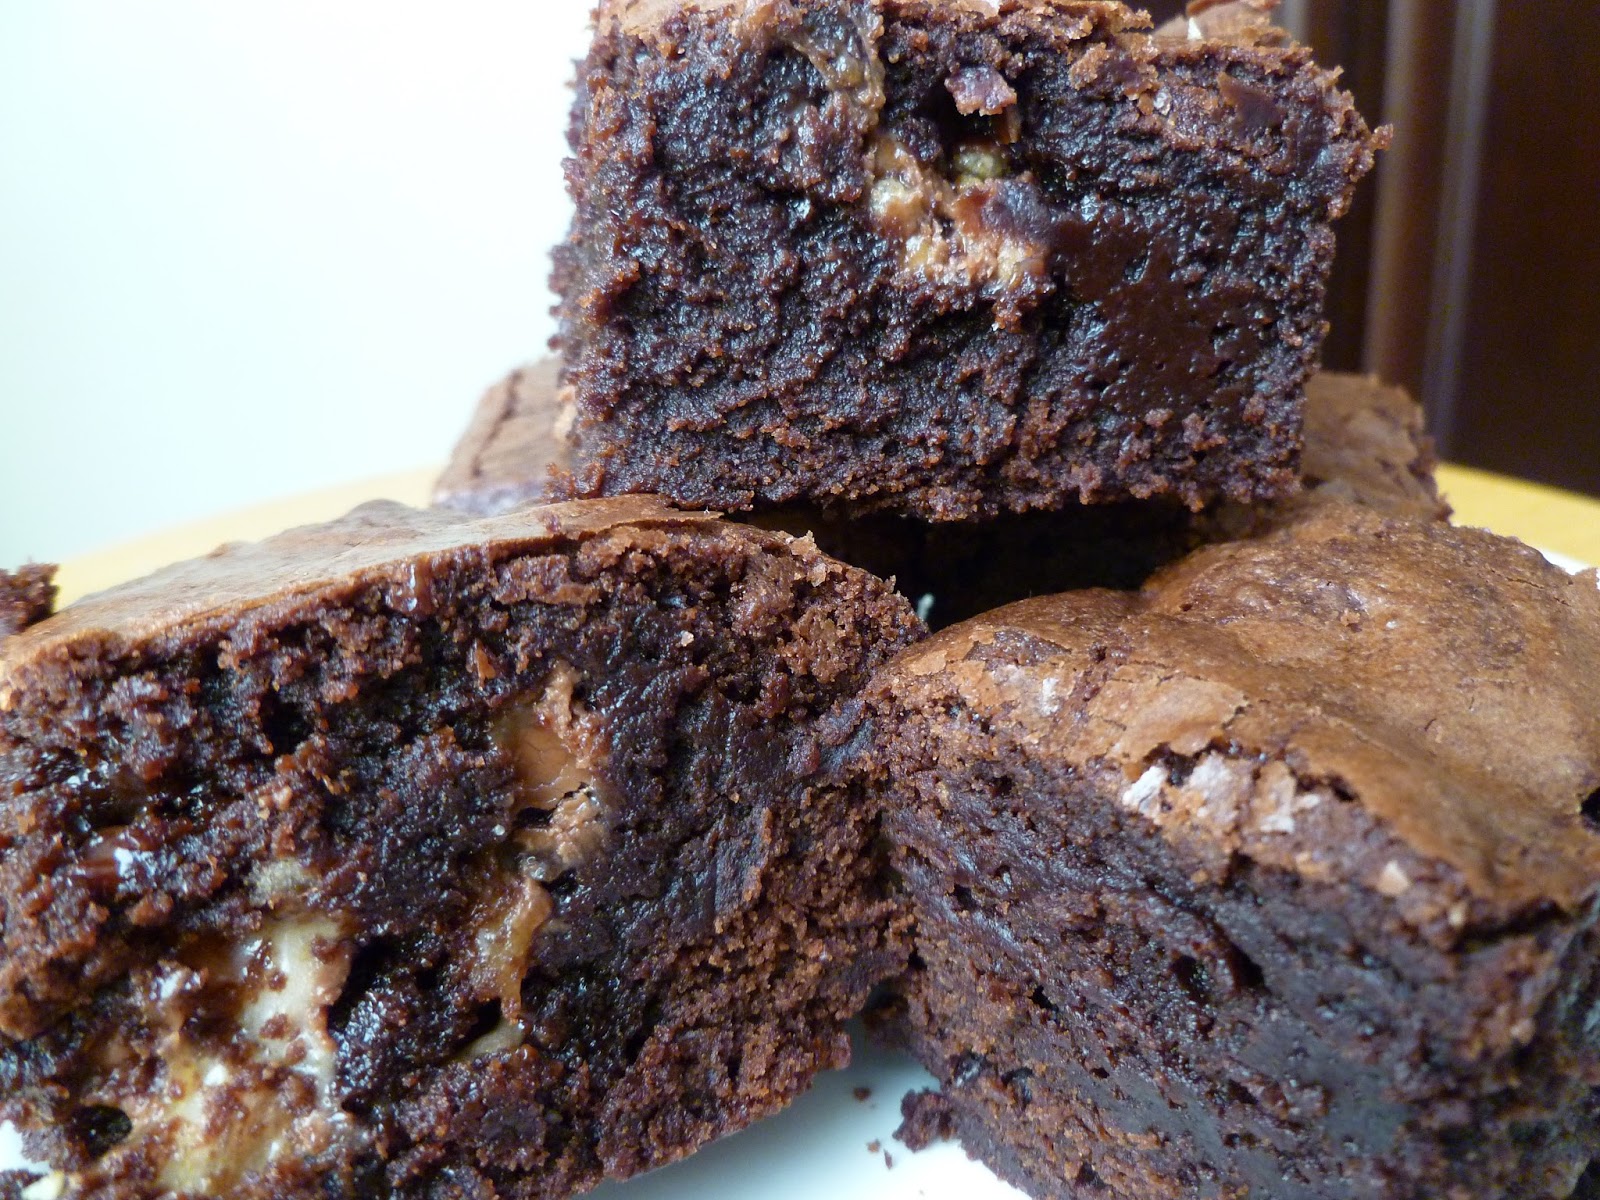
I've learned to buy a bag or two of candy just in case and I've also made a habit of making brownies shortly after Halloween to use up that candy. I'm a chocolate snob so I don't really eat Halloween snack size "grocery store" chocolate (see, told you I was a chocolate snob) unless it happens to be baked into a rich, fudgy, dense brownie.

Which is exactly what this is. The original recipe called for a full 9 x 13 pan of brownies but I didn't need that many so I cut the recipe in half and baked it in an 8" x 8" pan. Which is what I usually do when cutting a 9 x 13 recipe in half since I didn't want the brownies to be too thin. For these brownies, however, I think I could've gotten away with using a 9" x 9" pan. The 8" pan made the brownies a bit thick. Nothing wrong with that but you need to be careful about baking brownies that are too thick. The corners and the top will be done first and you risk overbaking a crust on the top and drying out the corners while the middle is still raw.
I don't like a crust on my brownies so next time I would bake in a slightly larger pan or, stick with the 8" pan but scoop out some of the batter and bake it in an individual ramekin for my own "molten brownie" dessert, served warm with vanilla ice cream. In case you need ideas....
2 cups unsweetened alkalized cocoa powder
1 cup unsifted bleached all-purpose flour
1/2 cup unsifted bleached cake flour
1/2 teaspoon baking powder
1/2 teaspoon salt
3/4 cup miniature semisweet chocolate chips
1 pound (4 sticks) unsalted butter, melted and cooled to tepid
2 ounces bittersweet chocolate, melted and cooled to tepid
8 large eggs
2 1/4 cups superfine sugar
1 3/4 cups firmly packed light brown sugar
4 teaspoons vanilla extract
seeds from 1 small vanilla bean, scraped clean
  1. Preheat oven to 325 degrees F. Line a 9 x 13" baking pan with foil and lightly spray with nonstick cooking spray. 
  2. Sift together the cocoa powder, all-purpose flour, cake flour, baking powder and salt. Toss the chocolate chips with 3/4 teaspoons of the sifted mixture in a small bowl.
  3. In a medium-size mixing bowl, whisk the melted butter and melted chocolate until combined.
  4. In a large mixing bowl, beat the eggs just to mix. Add the superfine sugar and beat for 30 seconds to mix but not add volume. Blend in the light brown sugar. 
  5. Blend in the melted chocolate-butter mixture, vanilla extract and vanilla bean seeds, mixing slowly with a whisk until thoroughly incorporated. 
  6. Add the dry ingredients and whisk slowly into the mixture until just combined, scraping down the sides with a rubber spatula to keep even-textured. The batter will be thick. Fold in chocolate chips.
  7. Scrape batter into prepared pan and smooth top with flexible palette knife.
  8. Bake for 40-44 minutes or until just set and a toothpick inserted near the center comes out with a few moist crumbs. Cool completely before cutting and serving.