Friday, February 14, 2014

Red Velvet Nutella Lava Cakes

Red Velvet Nutella Lava Cakes - made February 7, 2014 from Half Baked Harvest
Ah, the crowning glory of my Valentine treats for the week. This is something you can make at home for you and your sweetie that takes relatively little time and effort yet is fitting decadence to mark the occasion. If you have these dessert shell pans, it'll be even easier. I got the original recipe from Half Baked Harvest but with my dessert shell pan, I went with the lazy baker's version of molten chocolate cake.
Which means you bake the cake batter in the dessert shell pan, making sure to grease them well so the cakes will come out easily and intact when you turn the pan over. One recipe below filled my 6-cavity pan perfectly.
Then you fill the cavities almost to the top with nutella. If your nutella is a bit on the solid side because it's cold, warm it up in the microwave just enough to be easy to pour or spoon into the cavity. You want it somewhat flowing and soft because this is the lava part.
Next step is to drizzle (be generous) salted caramel over the whole thing. I used ready-made salted caramel from Trader Joe's but you can use whichever you like, including making from scratch.
Finally, don't forget the ice cream. Right before you serve this, top it off with a scoop of vanilla ice cream and dig in. This is best served when the cake is still slightly warm, the nutella and salted caramel are melty-warm and the ice cream is newly scooped. You'll get that flowing lava/molten chocolate effect although in this case it'll be molten nutella and caramel. I'm okay with that.
If you don't own a dessert shell pan, I've left Half Baked Harvest's original recipe as is below so you can do it the non-lazy way and include the ganache filling that'll make up your molten center. I didn't have heavy cream at the time I made this so I opted for the nutella filling. Just don't overbake the cake because you do want it moist, regardless of filling or no filling. What I liked about my version is this took almost no time to make. I worked from home last Friday, logged off at 5:30, turned my oven on, made up the batter while the oven was preheating and after baking, unmolding, and adding the nutella filling, salted caramel and ice cream, I was taking my first bite of this by 6 pm. No lie. Didn't take me that long to consume it either. Easiest dinner I've ever made, ha.
4 ounces bittersweet chocolate, chopped
1/4 cup unsalted butter
3 tablespoons all-purpose flour
1/4 teaspoon kosher salt
3 large eggs
1/3 cup granulated sugar
1 teaspoon vanilla extract
1-2 teaspoons red food coloring
coconut whipped cream, whipped cream or ice cream, for serving (optional)


Ganache
4 1/2 ounces (about 3/4 cup) semi-sweet chocolate chips
1/2 cup canned coconut milk or heavy cream
1/2 tablespoon vanilla extract

  1. Make the ganache: in a microwave safe bowl add the chocolate and coconut milk (or heavy cream). Microwave on high for 30 second intervals, stirring between each until melted. Once melted stir in the vanilla extract. Cover and place in the fridge.
  2. Grease 6 (4 ounce) ramekins or 4 (6 ounce ramekins) and place on a baking sheet.
  3. Heat the chocolate and butter together on low in a small saucepan, stirring until just melted. Remove from the heat and stir in the flour and salt until smooth.
  4. Add the eggs to a large mixing bowl. Using an electric mixer beat the eggs and slowly add the sugar until the eggs are pale in color, about four minutes. Add the vanilla extract and food coloring, mix until combined. Pour in the melted chocolate mixture and use a rubber spatula or wooden spoon to fold the chocolate into the eggs until just combined. Divide the mixture among the prepared ramekins.
  5. Spoon about 1-2 heaping teaspoons of the chilled ganache (you will not use it all) into the center of the ramekins. Use a spoon to scoop the red velvet mixture over the ganache. Cover the ramekins and place in the fridge for 15 minutes.
  6. Meanwhile preheat the oven to 350 degrees F. After 15 minutes remove ramekins from the fridge and place in the oven. Bake for 10-20 minutes (10 minutes for 4 ounce ramekins and 18 minutes for 6 ounce ramekins). Loosen the edges of the cakes with a butter knife and turn out onto plates. Serve immediately with whipped cream or vanilla ice cream.

Thursday, February 13, 2014

Restaurant Review: Gombei

Gombei - dinner on January 26, 2014
I've eaten at Gombei multiple times so I was surprised to discover I hadn't done a review of it yet. My friend Cindy was the one who first introduced me to Gombei months ago and since then, I've returned with other friends but more often with my cousins. It's a convenient meeting place for my cousin Christine and me and this time around, our other cousin Ellen joined as well as my cousin Chris, Christine's brother, who was in town for the day. Christine's son, Vanilla King, was there as well but since I had literally just come back from driving half the day returning from Southern California where we visited two more cousins (yes, I have a lot of cousins, big extended family), I hadn't had time to bake so no snickerdoodles or vanilla cake for Vanilla King this time around - sorry, kid.
We were there early since Chris still had a 3-hour drive back home so the restaurant was pretty empty. Later on it would be more crowded and we would likely have had to wait for a table but since we were there at 5 pm, we were one of the first ones seated. At Gombei, you can sit at a table or at the sushi bar. We opted for a table.
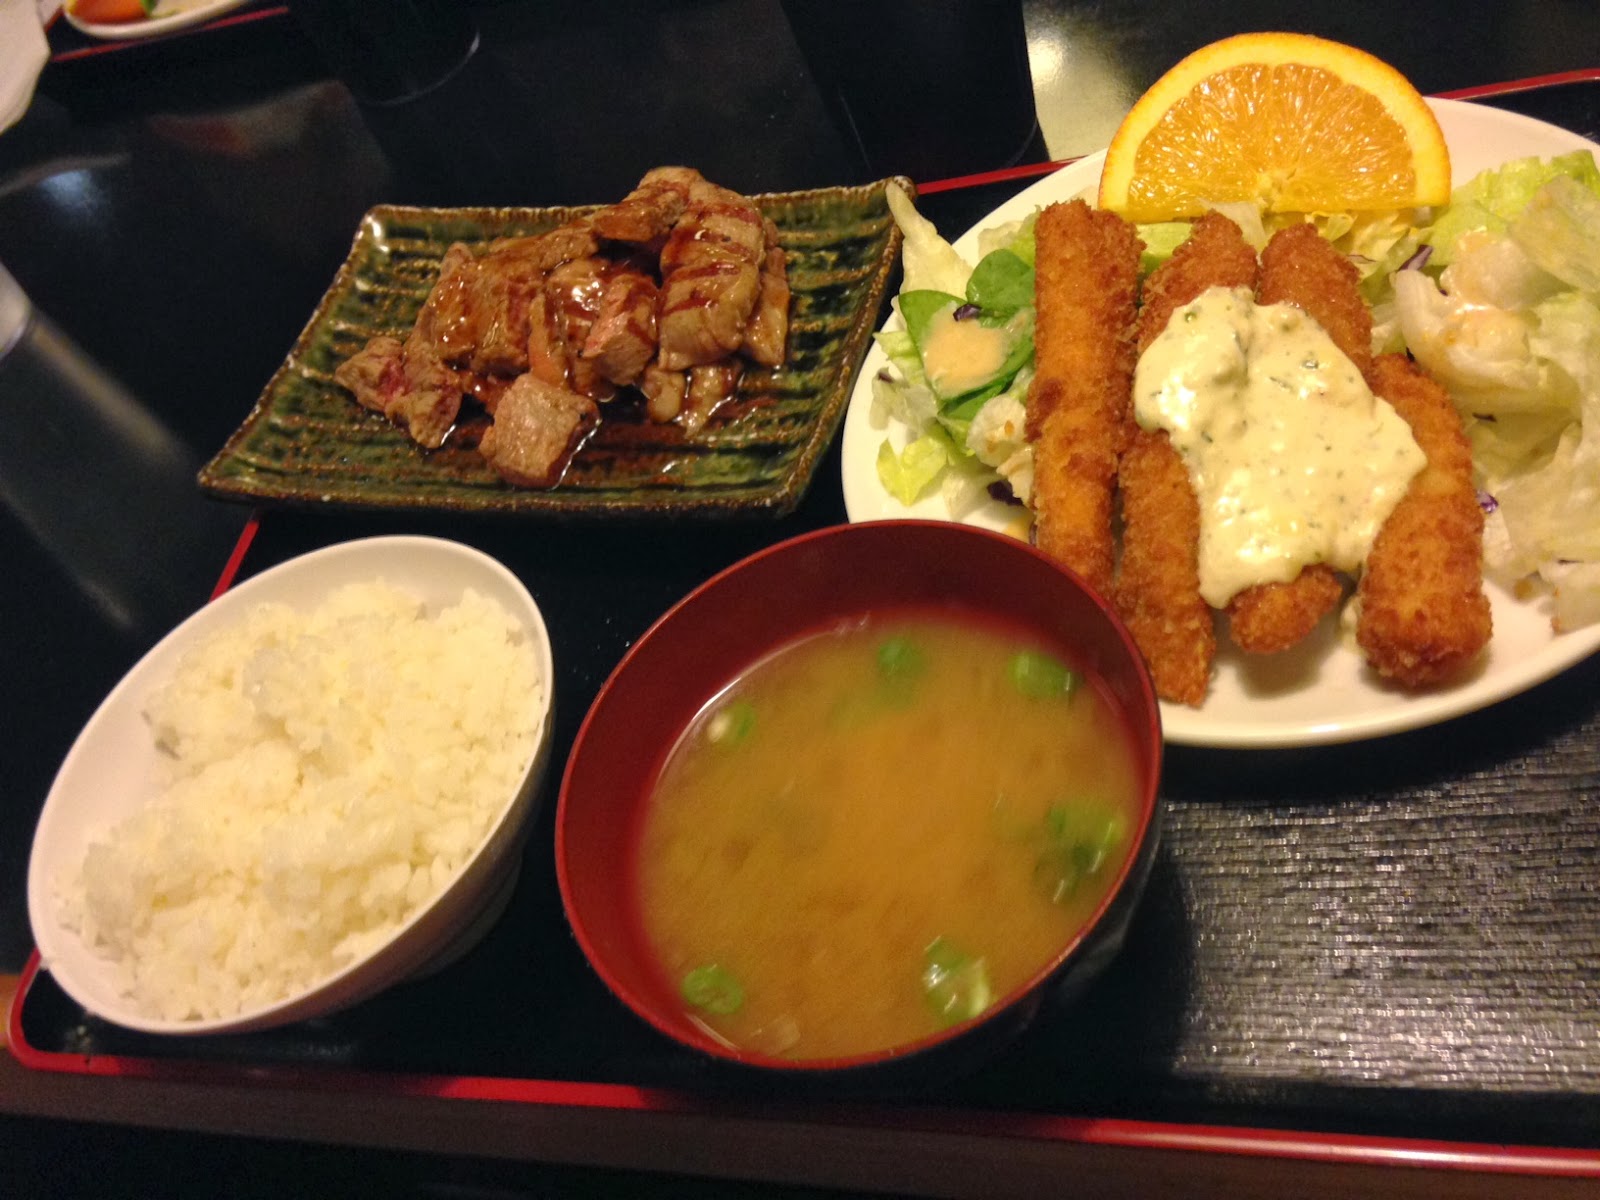
When I first went to Gombei, I had ordered the beef teriyaki don - grilled beef in teriyaki sauce atop a bowl of moist rice. It was sublime. The rice isn't as good as at Gochi but still good nonetheless. I like this dish because it's simple and non-fussy. Meaning I don't have to pick out stuff I don't eat, like onions or mushrooms or bean sprouts. Yes, I'm one of those people who will painstakingly pick out whatever's in the dish that I don't like before I'll eat it. Remember Banana Leaf when they made a mistake and included bean sprouts in my pad thai? Yeah, I picked out every single bean sprout from that sucker. Fortunately, with the beef teriyaki don at Gombei, that's not a problem; it's just beef and rice. I've had the chicken katsu don as well and that's pretty good too with the soft-cooked scrambled egg on top but it comes with onions that I didn't want to take the time to pick out so I went back to my mainstay and got the teriyaki beef this time around.
Beef Teriyaki combination plate
There was a period of time when I went to Gombei that the quality of their entrees had gone down. The beef was tough and they included more fatty pieces in it. When I asked for the meat to be cooked to medium, it came out a combination of medium well and medium rare but not medium. So I haven't been back in awhile. Fortunately, this time around, they were back up to snuff as when I had first eaten there and everything was done well. Or at least medium.
Udon and tempura 
Besides or in addition to the entrees, you can also order various types of sushi which is what my cousins opted to do. As you know, I don't eat sushi so I didn't pay much attention to what they were checking off on the strip of paper that listed all the sushi choices which we turned into the waiter who came to take our orders. I don't know what any of it tastes like either but they are sushi aficianados so I assume it met their taste standards. All I did was take pictures :).

Gombei is reasonably priced for lunch with most entrees under the $10 price point. Dinner is a little more expensive for basically the same food and I haven't noticed a difference in their portion sizes between lunch and dinner. There are more menu options for dinner but if you're a basic chicken or beef teriyaki eater like me (for connoisseurs of Japanese food, insert eye roll here), you can get whatever you prefer at either meal. They do get crowded for both lunch and dinner though so I'd recommend getting there a little early if you want to avoid the rush. Service tends to suffer a bit when they're very busy but when they're not, they're pretty prompt.

Chocolate Truffles

Chocolate Truffles - made February 11, 2014 from The Pioneer Woman
I've mentioned before that I've started recording episodes of The Pioneer Woman to watch whenever I have time. Usually it's when I'm working out in the morning. I like to watch food shows to remind me why I'm working out in the first place. The more I want to eat empty calories, the more I give to my workout. It's my way of maintaining balance in my world.

I recently watched the chocolate episode where Ree makes up chocolate treats then Ladd and the kids deliver them to their friends in town. One of the treats she makes is these chocolate truffles. This isn't red velvet, heart-shaped or pink or red but chocolate is a big component of Valentine's Day so I had to make these for Valentine week. This is the easy cheater's version because it just involves melting two kinds of chocolate with a can of sweetened condensed milk and adding vanilla. None of that boiling cream and pouring over chopped chocolate to make the traditional truffle filling. I also knew the sweetened condensed milk would make for a smooth truffle center. Sold.
The other advantage to this recipe is you can make the truffle mixture one night, chill it overnight then finish it off the next day. Which is what I did because I didn't have a weeknight where I had time to do everything from start to finish in the same night. I got home late from work the night I made the filling but it took only a few minutes to melt the chocolates with the sweetened condensed milk, beat in the vanilla, cover and place in the fridge to chill. These were meant to be dark chocolate truffles but the bittersweet chocolate I was using was pretty high end and I knew that would be really dark so I added a little over 4 ounces of milk chocolate as part of the semisweet chocolate portion to lighten it up a little.
After chilling overnight, the mixture was solid rock so I did have to let it sit out a bit....okay, I cheated and microwaved it for 10 seconds to soften it enough for me to scoop out the truffles. I would recommend chilling these initially only until the mixture is firm enough to scoop and hold its shape so you don't have to do the microwave thing. Then you can chill them further once they're scooped out. I was originally going to enrobe them all in the milk chocolate and leave them as is but I wasn't happy with how the plain ones looked (not as smooth) so I enrobed them in a thin coating then rolled them in chopped toasted almonds while the coating was still soft so the nuts adhered easily. They turned out much better this way and I enjoyed the texture contrast with the almonds plus it cut the richness of the filling. The truffle center was more like fudge than a truly creamy ganache truffle center but it was still pretty good. For the easy version of truffles, I recommend going with this one.

8 ounces high quality semisweet chocolate (I used a mix of milk chocolate and semisweet)
8 ounces high quality bittersweet chocolate
1 14-ounce can sweetened condensed milk
1 tablespoon vanilla extract
8 ounces milk chocolate candy melts
Sea salt for garnish or chopped toasted almonds, optional
  1. Heat chocolates and sweetened condensed milk in a double boiler over medium low heat until chocolate is melted and mixture is smooth. Stir in vanilla to combine.
  2. Remove from heat, cover and refrigerate for 2 hours (I chilled mine overnight). Or, to make it easier, chill only for 15-20 minutes, just long enough for the mixture to become firm enough to hold its shape when scooped out. When they've been scooped, you can chill further if desired. 
  3. Once chilled and rolled into small balls, dip in melted milk chocolate coating, enrobing completely. Lay on wax paper and sprinkle with sea salt or roll in chopped toasted nuts while chocolate coating is still soft. Let cool until chocolate coating has set.

Wednesday, February 12, 2014

Red Velvet Sugar Cookie Bars

Red Velvet Sugar Cookie Bars - made February 8, 2014 from The Recipe Critic
Get that bottle of red food coloring back out for this recipe. It's red velvet time again. While I do like red velvet in most forms, I'm a little picky on which type of red velvet recipes to try. There are some that barely contain any chocolate and have more red food coloring than cocoa. I've learned to pass on those because those are barely chocolate flavored and seem more like food dyed red than real red velvet. A good red velvet should actually have a chocolate taste. If it doesn't, it's just not good red velvet (duh). This is where I think red velvet gets a bad rap because anything can be colored red and called red velvet but if it's not going to taste like chocolate, what's the point?
So what's my criteria for what could potentially be good red velvet? For one thing, depending on the proportion of the other ingredients, it should have a reasonable amount of cocoa. By reasonable, I don't mean 2 teaspoons for an entire 9 x 13 cake. The minimum I look for is 1/4 cup and even then, I make sure to use a good dark cocoa for maximum chocolate flavor.
I'm not usually big on sugar cookie bars but I was captivated by the photos on pinterest that someone had pinned from The Recipe Critic. And one picture is usually all it takes to get me to pin something and go back to it later to try. This is super easy to make and came out pretty well. You almost have to tell people it's a sugar cookie bar because at first glance it'll look like a dry brownie or a dense cake and might be wrongly judged as such. It's not "fudgy" like a brownie but it's moist for a bar cookie and a sugar cookie. I really liked this bar cookie for its taste and texture. Just try not to think of how much red dye #5 is in it and you'll be fine.
To make it even fancier for Valentine's Day, you can also sprinkle it with red and/or pink sprinkles or, like The Recipe Critic, make it more elegantly classy with white sugar pearls (check out how hers look by clicking on the recipe title above). I left mine unadorned because I was taking it to work and figured, as adults, my coworkers didn't need sprinkles on their baked goods. Plus, with the cream cheese frosting, I didn't know how long it would be before the colored sugar crystals melted into the frosting and became more like a canvas of paints running together than sugar sprinkles glittering on top of the bar cookie. Not that my coworkers seemed to have minded one way or the other since the 9 x 13 pan's worth of bar cookies disappeared before the end of the morning - always a good sign.
3⅓ cups flour
¼ cup unsweet­ened cocoa
½ teaspoon salt
1 teaspoon bak­ing pow­der
1 cup butter, softened
1½ cups sugar
2 eggs
2 teaspoons vanilla extract
2 Tablespoons (one 1-ounce bottle) red food coloring

Cream Cheese Frosting
2 8 Oz cream cheese, softened
½ cup butter, softened
2 cups sifted powdered sugar
1 teaspoon vanilla
  1. Preheat oven to 350 degrees. Line a 9×13 inch pan with foil and lightly spray with nonstick cooking spray.
  2. In a medium bowl, whisk together flour, cocoa, salt, and baking powder. Set aside.
  3. In a mixing bowl, cream together 1 cup butter softened and sugar until light and creamy. About 2-3 minutes. Beat in the eggs, vanilla, and food coloring until combined.
  4. Add the flour mixture until a soft dough forms. Press into the bottom of the 9×13 inch pan. Bake for about 20 minutes until the edges start to pull away from the sides and a toothpick entered into the center comes out clean. Allow to completely cool before frosting.
  5. To make the cream cheese frosting, Beat together the cream cheese and butter. Add the powdered sugar and vanilla. Beat together until smooth. Frost the top of the bars. Cut into squares and serve.

Restaurant Review: Buca di Beppo

Buca di Beppo - dinner on January 25, 2014
When we were down in Southern California visiting my cousin(s) a few weeks ago, we had dinner at a Buca di Beppo: me, my parents, my sister, my cousin, her husband and their two kids. Buca di Beppo is a chain of family-style Italian restaurants. If you've ever been to one, you know it's going to be the last place to go for a romantic dinner for two so skip it for your Valentine's Day dinner. Furthermore, you never want to go with a group of people fewer than 6. Even more is better.
That would be because Buca di Beppo is almost always crowded, certainly noisy and most of all, they serve a ton of food. Each dish is meant to be shared family style. If there are only two of you, prepare to get only one entree to share and even then, you'll probably end up with leftovers to take home. It's much better to go with a crowd so you can get a variety of dishes to split. "Regular"-size entrees start at around $20 but they typically serve 3-4 or more people so, with a large group, the per person cost can be pretty reasonable. But the key is to go with a bunch of people. With just 6 adults and 2 small children, we were pushing the limit by getting the garlic bread appetizer and 3 entrees. Even then we still ended up with leftovers.
Garlic Bread appetizer
I don't know that I would call it gourmet Italian food but it's generally pretty good. If you're an Italian food snob and prefer your pasta from Italy and tomatoes harvested from vineyards in Tuscany, this may not be the place for you. If you're coming with a large party and want "safe" dishes that can appeal to a variety of palates, Buca is a good option. I first discovered it in business school when my friends and I traveled in large packs before b-school events and the one in Palo Alto could easily accommodate groups of our size. With so many options to choose from, it was easy to let those who had a strong preference order and the rest of us ate whatever was put in front of us.
Prosciutto-Stuffed Chicken
For this family visit, we mixed it up a bit with the Prosciutto-Stuffed Chicken (really good), Shrimp Florentine (tasty) and my comfort food of choice, spaghetti and meatballs. The meatballs were huge so this was a fitting dish for a carnivore (that would be me) as well as a carb-lover (also me).
Shrimp Florentine
And you all know me well enough to know I usually like to get dessert when I eat out but Buca di Beppo is one of those places where you (or at least I) are(am) often too full at the end of the meal to have any room for dessert. Even water gets filling at the end. This is not a place to go if you're on a diet, especially if you don't exercise strict portion control. It's also not somewhere you go for a quiet dinner for two because, besides the large portion-sized entrees, all of the Buca di Beppo restaurants I've gone to have been crowded and noisy. If you tried whispering sweet nothings to your date, I'm afraid you'd end up shrieking it at him or her just to be heard. I'm not sure I've ever even seen a table for two at a Buca.
Spaghetti with Meatballs - sorry for the blurry picture)
Although, speaking of dates, on the night we went, it must have been some kind of Winter Formal type of evening for the local high school because many of the long tables were filled with teenagers, the guys in suits and the girls in really short gowns. Really short. Or I'm just old and way past 16 to appreciate teenage couture.

Tuesday, February 11, 2014

Valentine M&M Sugar Cookies

Valentine M&M Sugar Cookies - made dough February 7, 2014 from So We Think We Can Cook
As I look at my repertoire for Valentine-themed treats, I realize so many of them are red velvet in some shape or form. I like a good red velvet but I also believe in all things in moderation, including food dyes. So here's one way to forego the food color but still stay on theme - add Valentine M&Ms to it. All the pink, red, fuschia and white M&Ms you like. At first I was going to make a chocolate chip M&M cookie or a Monster cookie but I decided to go with a sugar cookie so the girly colors would show up better against a more pale cookie. Plain M&Ms work better for this type of cookie than peanut M&Ms, simply because they're not only flatter and won't stick out as much in a sugar cookie but also because I don't like peanuts in a non-peanut butter cookie.
The only thing I don't like about baking with M&Ms, plain or peanut, is the ones on the outside will inevitably crack during baking so they're just not as pretty when baked. The colors also bleed into the cookie so they're just not as pretty. I tried to circumvent that with these cookies by withholding a handful of M&Ms and pushing them into the cookies as soon as I took them out of the oven. It sort of worked. They look better in the pictures but because of the candy shell, didn't melt and adhere to the baked cookies as much as I would've liked. Despite how it sometimes looks, this is a good cookie option for kiddie Valentine parties. Kids like M&Ms, you don't have to worry about peanut allergies with the plain M&Ms and the only food coloring is in the M&Ms instead of the teaspoons or tablespoons of red food dye that goes into red velvet baked goods (that'll be tomorrow's recipe, ha).
1 cup butter, softened
1 1/2 C sugar
2 eggs
1 1/2 t vanilla
3 C flour
2 t baking powder
1 t baking soda
1 t cream of tartar
dash of salt
1 medium bag (12 oz) Plain M&M's, Valentine edition
  1. Cream the butter and sugar for about 3 minutes, or until fluffy.&nbsp
  2. Add the eggs and vanilla and mix for 2 more minutes.&nbsp
  3. In a separate small mixing bowl combine all dry ingredients. Add to the butter mixture and mix until well combined. 
  4. Pour in your M&M's and mix just until combined. Form into round balls (about 2 inches in size) and lay onto a cookie sheet (or chill or freeze for several hours). Press the tops down slightly. 
  5. When ready to bake, preheat oven to 350. Bake for 8-10 minutes or until you see the cookies start to crack. If desired, press remaining M&Ms over the tops of baked cookies as soon as you remove from the oven.

Monday, February 10, 2014

Red Velvet Peanut Butter Blossoms

Red Velvet Peanut Butter Blossoms - made dough February 1, 2014 from I Am Baker
Did you know Valentine's Day is one of the easiest occasions to decorate baked goods for? I don't like to decorate my food and I'm not good at it but V-day is the one "holiday" I find easy to bake sweets apropos for the occasion. All you need is a heart-shaped cookie cutter, red food color, Valentine-colored candies and sprinkles, and chocolate hearts. Seriously. To prove it to you, I'm going to devote the next few baking posts leading up to Hallmark's Cupid's holiday to Valentine-themed treats. And by Valentine, I mean heart shapes and red and pink up the wazoo, fit to take to your child's school party, your company Valentine potluck (does anyone actually have those?) and, by Friday, even something for a romantic dinner for two.
An easy start is red velvet so get that bottle of red food color ready. How many versions of red velvet baked goods can I make over the years? I don't know; I'm still in discovery mode. Which continues with this red velvet twist on peanut butter blossoms or, as initially called on my blog with my favorite recipe for them, Peanut Butter and Chocolate Kisses. You can trot out the Valentine's Day theme with the red velvet version and literally top it off with hearts - Dove's milk chocolate hearts, that is. Remember, it's February. You can't get too schmaltzy with too many hearts.
I enjoyed the taste and texture of this version. It wasn't as peanut buttery as the original version which was okay by me as I like the added chocolate punch. I like eating this cookie best when it's just barely lukewarm as by then the cookie has cooled enough for the texture and flavor to be optimal but the chocolate heart is still soft and melt-y when you bite into it. If you're serving this for any type of Valentine's Day-related occasion, this is a fun cookie to make....and eat.
1 bag Hershey's Kisses (substitute chocolate hearts if you wish)
1/2 cup (1 stick) butter, room temperature
3/4 cup creamy peanut butter
1 1/3 cups sugar
1 egg
2 tablespoons milk
2 teaspoons vanilla
1 teaspoon red gel food coloring (I used Schilling red food coloring)
3 tablespoons unsweetened cocoa
1 1/2 cups all purpose flour
1 teaspoon baking soda
pinch salt
1/4 cup red sanding sugar
  1. Preheat oven to 375 degrees F (only if baking immediately).
  2. Beat butter, peanut butter, and sugar in stand mixer for about 2 minutes on medium speed. Reduce speed to low and add egg, milk, vanilla and red food coloring. Mix for about 30 seconds to incorporate, then increase speed to medium high and blend until light and fluffy.
  3. In a separate bowl, sift cocoa, flour, baking soda and salt. With mixer on low speed, add flour mixture to sugar mixture and beat until just combined.
  4. Shape dough into 1" balls. If desired, chill for at least 1 hour. When ready to bake, preheat oven to 375 F. 
  5. Pour red sanding sugar into shallow bowl. Roll dough balls in sanding sugar and place on cookie sheet lined with parchment paper about 2 inches apart.
  6. Bake for 8 to 10 minutes. While cookies are baking, unwrap Hershey Kisses or heart-shaped Dove chocolates. When cookies are done, remove from oven and immediately place Hershey Kiss or Dove heart in the center of each cookie. Cool to room temperature.

Sunday, February 9, 2014

Restaurant Review: Pick Up Stix

Pick Up Stix - lunch on January 25, 2014, Valencia, CA
A few weeks ago, I drove my parents down to Southern California to visit one of my cousins in the hospital. It was just a short weekend trip since I had work but we wanted to see my cousin in person so we decided to make the 5-hour drive over the weekend and come back the next day. I had another cousin in the area and my sister was flying in the same morning; we were going to meet at my other cousin's place so we could all go to the hospital together. We left early Saturday morning and got there around noon. Now, in Filipino culture, unless you're arriving with food for your host, it's typically bad form to come at mealtime, hungry and expecting to be fed. Which is why we stopped off at a strip mall on our way to get lunch first.
Pick Up Stix appears to be a chain but they seem to be primarily in Southern CA as their website locator doesn't show any in the Bay Area, only in So Cal. I'd never heard of them before but when we walked in, it seemed like a fancier Panda Express with similar price points and open seating. But instead of pointing to your order behind glass displays that hold trays of food, you actually order it at the register and they bring it to your table.
House Special Chicken with rice and potstickers
They offer lunch combos with rice or noodles, an entree and either potstickers, cheese wontons or an egg roll. I have to say I was pleasantly surprised. It's not haute cuisine but for under $10 a combo, it was good enough. I got the house special chicken combination with potstickers and I thought it was decent. The chicken was in bitsy pieces and I would've preferred larger chunks but at least it wasn't breaded and the sauce was tasty, albeit a trifle sweet.
Shrimp and Vegetables with rice and egg roll
They do offer a good selection of entrees so there's something for everyone. Not sure how authentic it is for Chinese food but for a fast, cheap place, this is a good option. The people behind the counter were very friendly and polite which was nice. All in all, it served its purpose well.
Mongolian Beef with cheese won tons

Frosted Lemon Sugar Cookies

Frosted Lemon Sugar Cookies - made dough January 24, 2014, baked on February 2, 2014 from Lulu the Baker
Sometimes it's annoying when I have a carton of milk to use up and I keep finding recipes that only use a tablespoon of it. On the flip side it's also annoying to find recipes that only use 1 tablespoon of milk and I have none in the house and don't want to buy a carton just to use 1 tablespoon (First World problem). I decided I'd rather be annoyed by the first instance than the second one because the first scenario means I already have the milk on hand and I can keep searching for more recipes that use it. Don't worry if you didn't follow that logic, I'm just thinking out loud.
This recipe used lemons, milk and cream cheese, all ingredients I had in abundance. It had the added advantage that I could make the dough when I had a spare 15 minutes, freeze it then bake it off and make the frosting when I had more time. Like during this year's very lopsided, uninteresting Super Bowl game where I had only the commercials to entertain me.
These make good "tea" cookies, i.e. if you want something cute and small to serve at an afternoon tea. The texture of the cookie was a cross between a butter cookie and a sugar cookie, halfway between cakey and chewy at the same time. The frosting dresses these cookies up a bit. They weren't as lemony as I expected and I think that was because the cream cheese in the frosting competed with the tang of the lemon. If you want it more lemony, I recommended increasing the amount of zest in the cookie dough and possibly not doing a cream cheese frosting but a pure lemon royal icing instead.
Cookies
1/2 cup butter, softened
1/2 cup crisco
1 cup sugar
1 teaspoon vanilla
1 egg
1 tablespoon lemon zest
2 1/2 cups flour
3/4 teaspoon salt
1/2 teaspoon baking soda
1 Tablespoon milk
1 Tablespoon fresh lemon juice

Frosting
1/4 cup butter, softened
4 oz cream cheese, softened
1/2 teaspoon vanilla
1/2 pound powdered sugar
pinch of salt
fresh lemon juice

  1. Preheat oven to 350°F. In the bowl of an electric mixer, cream butter, crisco, and sugar until fluffy. Add vanilla, egg, and lemon zest; mix. 
  2. In a separate bowl, sift together flour, salt, and baking soda. Add dry ingredients to mixer and combine. Add milk and lemon juice, and stir until completely incorporated. 
  3. Roll dough into tablespoon-sized balls and place on a greased baking sheet. Bake for 10-12 minutes, until cookies are just beginning to turn golden on the edges. Remove from oven and cool completely before frosting.
  4. To make the frosting, beat butter and cream cheese until smooth and well mixed. Add vanilla. Add powdered sugar and salt. Stir. Mix in fresh lemon juice until the frosting reaches a spreadable consistency.

Saturday, February 8, 2014

Smitten Ice Cream

Smitten Ice Cream - January 24, 2014
You'd think that as much as I love desserts and sweets, I would be more up to date on the latest foodie scene. But it took two friends telling me (coincidentally on the same day) about Smitten ice cream before I was even aware it existed. If you click on the link above in the post title, it'll take you to the Smitten's website and you'll see Smitten's started off when Smitten founder Robyn Sue Fisher decided ice cream was better made using liquid nitrogen for fast, small-batch freezing and achieving a creamy texture. She could make it to order and provide instant gratification with freshly churned ice cream.
There's a Smitten's attached to Whole Foods that just opened up and it was serendipitously located within walking distance from Paul Martin's of the "you have to be out by 6:30" fame so we decided to forego the $9 desserts at Paul Martin's and go check out Smitten Ice Cream instead.
This location had a select number of flavors with the flavor of the month being the Meyer Lemon Gingersnap. I was tempted to try out the chocolate but the salted caramel caught my eye and wouldn't let go so that's what I got. You can order a small, regular or pint. None of us had any intention of ordering as much as a pint since we planned to eat it there but the small looked tiny to me and my friend Karen, like it could barely hold half a scoop of ice cream so we opted for the regular. I mean, c'mon, it's ice cream - why skimp? My cousin Ellen was more prudent and got the small.
The "Brrr" machine - with the help of liquid nitro, churns out ice cream very quickly
The finished product
We ordered separately and didn't know what each was getting but it turns out all three of us ended up getting the salted caramel so, in hindsight, we might've been able to split a pint after all. You can also pair your ice cream with add ins or sauces but I went for the plain version to get the full, unadorned flavor of the salted caramel.
The texture was creamy as advertised and I enjoyed the salted caramel flavor. I definitely want to try the chocolate and vanilla flavors next. Overall, this was good ice cream. I don't know that it was worth $6 for the regular as I'm not enough of an ice cream gourmand to be able to distinguish between a liquid-nitro frozen ice cream versus a pint of premium Ben & Jerry's (sorry, Robyn Sue Fisher) but it was a good novelty experience to try out.
I will say Ellen got the last laugh on me and Karen because the small turned out to be 2 scoops of ice cream and for something that rich and creamy, 2 scoops is plenty. The regular size Karen and I each got was 3 scoops of ice cream and that was a trifle too much, especially since we'd already eaten dinner. Of course, both Karen and I finished our 3 scoops anyway because we paid all that money for ice cream and we didn't want it to go to waste (just to our waists). And this is why we've been friends since college - we think alike.