Sunday, June 19, 2011

Frosted Banana Cake

Frosted Banana Cake - made June 11, 2011 from Indulge by Claire Clark (book #128)


Happy Father's Day to all the dads out there, including my own who would prefer non-chocolate desserts (no, I'm not adopted) so I timed this non-chocolate dessert for posting today.  I'm back from the trip for my nieces' graduation but am still catching up on posting last week's baking.

Can you tell I was on a baking frenzy on June 11? This was the fourth thing I baked that day.  I got caught off guard with overripe bananas again.  I could peel them and put them in the freezer until I was ready to bake with them but I wanted to try this banana cake recipe so I thought I might as well use the overripe bananas I had on hand immediately.  I'm still on a quest to find a banana cake recipe that'll make a banana cake similar to the one from my favorite bakery, Icing on the Cake, in Los Gatos.  I've made ones that had great taste but not the same texture as Icing on the Cake's.  So I continue to persevere.

This one is made with oil instead of butter so I thought it would be moist.  It also has dark brown sugar which I thought would give it a more caramel flavor.  It was pretty easy to put together and it made a one layer cake with a nice thickness.  The cream cheese frosting was also the perfect amount for it.  Overall, I thought this cake was good but I don't know that I would consider it spectacular.  I guess my expectations were too high and once again, I'm "too picky".  It didn't have the fluffy texture I was hoping for like the one Icing on the Cake's banana cake has and I thought it could've used a bit more flavor.  It had goodness but I was looking for greatness.  So I'm back on the hunt for the best banana cake recipe.  Or else heading to Icing on the Cake.

One last tip about banana cakes - it's one of the few cakes where I think it actually tastes better the day after you bake it.  I'm all about freshness of cakes but the additional day gives the time for the flavor to develop even further.  The taste test piece I tried on the day I made and frosted this was good but the sliver I tried the next day was even better.


6 ounces all-purpose flour, sifted
2 ½ teaspoons baking powder
6 ounces dark brown sugar
2 medium eggs
4 tablespoons vegetable oil
6 ounces ripe bananas, mashed to a pulp
1 ¾ ounces pecans

Frosting
2 ¼ ounces cream cheese
6 ¾ ounces powdered sugar, sifted
4 ½ ounces unsalted butter, at room temperature
1 teaspoon vanilla extract
1 ¾ ounces pecans, chopped

1.   Preheat the oven to 325⁰F.  Grease a round 8-inch springform cake pan and line the bottom wit parchment paper or grease 10-12 muffin tins.
2.   Sift the flour and baking powder together.  Place the sugar, eggs and oil in a large bowl and whisk with an electric mixer on medium speed for about 4 minutes, until pale and fluffy.  Add the sifted flour mixture and the bananas and mix on low speed for 30 seconds.  Stir in the pecans.  Pour the mixture into the prepared pan or muffin tins and bake for about 40 minutes for the round cake, 20 minutes for muffins, until the top springs back when pressed gently and a skewer inserted into the center comes out clean.  Leave in the tin to cool completely before frosting.
3.   For the frosting, combine all the ingredients except the pecans in a bowl and beat until pale and fluffy.  Spread the frosting over the cake with a palette knife and sprinkle with the chopped pecans.  Dust with powdered sugar if desired.

Friday, June 17, 2011

Brownies....again

Brownies - made June 11, 2011 from Chocolate Obsession by Michael Recchiuti and Fran Gage (book #127)


Now that the search box functionality is working again, if you were to search for "brownies" on my blog, that would probably render you the most prolific search results.  The majority of what I make seem to be brownies.  Can't help it.  Brownies are so easy to make and I love baking and eating them.  And the last recipe only made an 8" pan and I needed more than that to take to my nieces' graduation party.  So I looked for another brownie recipe to try.

You might have heard of Michael Recchiuti Chocolates.  He has a little store at the Ferry Building in San Francisco, amongst other places.  He came and spoke at my class graduation in Baking & Pastry Arts at the Culinary Institute of America in St Helena.  One of my classmates mentioned he was famous for his homemade marshmallows.  Not being a fan of marshmallows, I haven't ever tried them but that didn't stop me from acquiring his cookbook shortly thereafter.

This brownie recipe is interesting in that it has you melt half the unsweetened chocolate into the batter and then cut up the other half into chunks and basically add them to the brownie batter as you would chocolate chips.  I have to admit my skepticism with that plan.  I've tried unsweetened chocolate before and even mistakenly used them once as chips in a cookie recipe many years ago when I was a fledgling baker and didn't know any better.  Yuck.  It's bitter and there's no good mouthfeel to it at all, not even with the high end unsweetened chocolate.  So I skipped that part of the directions and instead, added my favorite Nutella crunch topping to dress up these brownies.  Overall, these were pretty good.  The brownies themselves baked to a nice thickness and they were fudgy-moist, all you can ever ask for from a good brownie.  Use a high-quality unsweetened chocolate and you won't be sorry.  These went over pretty well at the graduation party yesterday.


5 ounces 100% unsweetened chocolate, coarsely chopped, divided into halves
8 tablespoons (4 ounces) unsalted butter with 92% butterfat, cut into 1-inch pieces
2/3 cup (3 ½ ounces) unbleached all-purpose flour
½ teaspoon kosher salt
3 (6 ounces) extra-large eggs, at room temperature
1 teaspoon pure vanilla extract, preferably Madagascar Bourbon
1 ¼ cups (9 ounces) granulated cane sugar

1.       Preheat the oven to 325⁰F.  Line the bottom of an 8-inch square baking pan with parchment paper and liberally coat the paper and the pan sides with flavorless vegetable oil. 
2.       Put 2 ½ ounces of the chocolate and the butter in a medium stainless-steel bowl and set over a pot of simmering water.  Heat, stirring occasionally, until the chocolate and butter melt and are fully combined and the mixture is smooth.  Lift the bowl from the pot.  Set aside.
3.       Sift the flour and salt together into a bowl.  In another bowl, combine the eggs and vanilla extract and whisk together by hand until blended.  Whisk in the sugar.
4.       Whisk the egg mixture into the chocolate.  Add the flour and the remaining 2 ½ ounces chocolate to the batter and, using a rubber spatula, mix well.
5.       Pour the batter into the prepared pan.  Spread it evenly with a small offset spatula.
6.       Bake on the middle shelf of the oven until the top gives slightly to the touch and a skewer inserted into the center of the brownie comes out with some batter clinging to it, about 30 minutes.  Let cool completely in the pan on a wire rack, then cover with plastic wrap and refrigerate until cold.
7.       Run a table knife around the edge of the pan to loosen the sides of the brownie, and then slide the brownie, still on the paper, onto a work surface.  Using a ruler to guide you and a sharp knife, cut into sixteen 2-inch squares.  Store in an airtight container in the refrigerator for up to 3 weeks.


Button

Wednesday, June 15, 2011

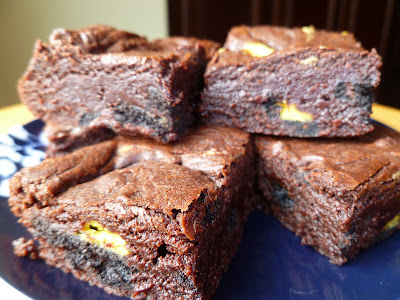
Oreo-ized Brownies

Out of This World Brownies - made June 11, 2011 from Desserts by the Yard by Sherry Yard (book #126)


My beautiful nieces (I'm a doting aunt, they are beautiful inside and out, and there's no changing that adjective when I refer to them) are graduating from high school this week.  As part of my starting my new job, I asked for the 2 days off ahead of time so I could fly down to attend their graduation.  There's no way I could miss it.  Also as part of my role as the doting aunt, I always bake before I go down there and arrive with my luggage packed with chocolate and sugar.  Typically it's almost always brownies since they travel well and I like to think I've successfully passed on my love of brownies and chocolate to the next generation.

The picture for this in Sherry Yard's book looked so fudgy and moist it practically shrieked, "Me! Me! Bake me!"  Its official name is Out of This World Brownies and Sherry Yard includes a cute story about why she named it that.  I'm taking the liberty of renaming it to signify the "springtime" Oreo cookies I chopped up and added to it.  "Springtime" is referring to the liberty the Oreo cookie people took in having sunshiny yellow filling instead of the traditional white filling.  I would've preferred the white filling but this is what they had at Target when I went so this is what I'm using.  Actually I had originally bought these Oreos to make Oreo-stuffed chocolate chip cookies, something I've been seeing all over the blogosphere lately but I needed brownies so I repurposed some of the package of Oreos to these.  The cookies will be a future experiment.  I have to admit, Oreos are another exception to my sweet tooth snobbiness against store-bought cookies.  I love Oreos.  I rarely buy them though and mostly when I'm going to use them in baking.


These brownies were quite good - perfect fudgy texture and all chocolaty goodness.  They deserve the "out of the world" moniker.  They were so good that I don't think the Oreos were really necessary.  These brownies would be perfectly fine plain without any add ins.  The taste and texture stand alone.  But don't be afraid to experiment either.  Oreos are almost never a bad idea.

¾ cup plus 2 tablespoons all-purpose flour
¼ teaspoon salt
4 ounces (1 stick) unsalted butter, chopped
1 ounce unsweetened chocolate
7 ounces bittersweet chocolate, preferably Scharffenberger, finely chopped (I used Valrhona)
2 large eggs
1 cup sugar

1.       Place a rack in the middle of the oven and preheat the oven to 350⁰F.  Line an 8-inch square baking pan with aluminum foil and spray the foil with pan spray.
2.       Sift together the flour and salt and set aside.
3.       Melt the butter, unsweetened chocolate, and bittersweet chocolate in a microwave-safe bowl at 50% power for about 2 minutes or in a heatproof bowl set over a saucepan of simmering water.  Stir with a rubber spatula until the mixture is smooth.  Allow to cool to tepid (90⁰F).
4.       In the bowl of a stand mixer, beat together the eggs and sugar until fluffy.  Using a whisk, gently beat in the butter and chocolate.  Fold in the flour.
5.       Scrape the batter into the pan and place in the oven.  Bake, rotating the pan from front to back halfway through, for 25 to 30 minutes, until slightly firm to the touch and a crust has formed on top.  A toothpick will not come out clean.
6.       Allow to cool in the pan on a rack to room temperature.  Cut into 2-inch squares.

Tuesday, June 14, 2011

Banana Souffle with Molten Chocolate Center

Heavenly Banana Souffle Surprise - made June 9, 2011 from Spago Chocolate by Mary Bergin and Judy Gethers (book #125)


I'm getting into a (slight) groove of working full-time, juggling my workouts and fitting in a baking experiment here and there during the week instead of loading up the baking just on the weekends.  Although it definitely depends on the recipe and how quickly I can put it together and how much effort it takes.  Not to mention how long to write up the blog post.

Souffles are actually pretty easy to throw together and they typically have a short baking time.  It's important to have everything ready to go quickly once the whites are whipped up and your oven is at the proper temperature.  A souffle gets its airy texture from the stiffly beaten egg whites that get incorporated into the souffle base.  Done properly, they can be quite good but if you're planning to serve them to guests at a party, you need to time things carefully.  They're at their most impressive when you first take them out of the oven because they'll be high and lofty then.  But the more time that goes by, the more they'll deflate since once you take the heat away, the hot air that puffed up the egg whites will dissipate and your souffle will "de-puff" to a dismaying crater.

But, to some people's consternation (including mine), it's hard to eat a souffle at its literal peak because it's simply too hot.  So something's gotta give.  You can often get around this by deliberating destroying the puffiness (after everyone's admired it, of course) and cutting into the middle to drop a spoonful of whipped cream, creme fraiche or ice cream.  That'll help cool the inner heat bomb of the souffle while providing a hot/cold contrast in every spoonful.

I had high (haha) hopes for this banana souffle.  The picture looked so good in the Spago Chocolate baking book.  And looks-wise, mine turned out reasonably pretty.  However, my disappointment was in the texture.  I baked it for 11 minutes as the recipe directed and the tops got nicely golden brown so I thought all was fine.  Except once I cut into the crust, the souffle underneath was just....mostly warm egg whites.  Ugh.  And you can barely taste the banana flavor.  I tried leaving another batch in the oven for longer and that turned out better to get the proper souffle texture.  The melted chocolate in the middle was the best part but it overwhelmed the banana flavor to the point that you could barely taste it.  There actually seemed to be too much egg white for the small amount of banana souffle base.  I would recommend cutting the egg whites down from 5 to 4 and see if that's any better.  Now I remember why I don't usually make souffles (unless it's chocolate).  Just can't get into the texture.


1 large or 2 medium (5 ounces) ripe bananas
1 tablespoon banana liqueur or lemon juice
3 egg yolks
1/3 cup granulated sugar
5 egg whites
1 teaspoon vanilla extract
3 ounces bittersweet chocolate, coarsely chopped
Softened unsweetened cocoa powder
Sifted confectioners’ sugar

1.   Place the rack in the lowest part of the oven and preheat the oven to 400⁰F.  Brush six ¾-cup ovenproof soufflĂ© dishes with melted butter and invert so that the excess butter will run off.  Coat well with granulated sugar, tapping out any excess sugar.  Arrange the dishes on a flat baking tray and set aside.
2.   Puree the bananas and place in a large bowl.  Pour the banana liqueur over and mix well.  Set aside.
3.   In a medium bowl, using a whisk, whip the egg yolks with 2 tablespoons of the sugar until pale yellow.  Stir into the bananas and combine thoroughly.
4.   In the large bowl of an electric mixer fitted with a whip or beaters, on medium speed, whip the 5 egg whites until frothy.  Add the remaining sugar and the vanilla, turn the speed to high and beat until the whites are thick and shiny and hold their shape.
5.   Stir a little of the whites into the banana mixture to lighten, then turn the mixture back into the whites and fold through quickly and completely with a large rubber spatula.  Do not overmix.  Using a large spoon, spoon the batter into the prepared soufflĂ© dishes, half filling each one.  Divide the chocolate, place in the middle of the batter in each dish, and continue filling each dish to the very top.
6.   Bake 11 minutes.  The tops will be slightly firm and lightly browned.  Remove from the oven and sift a little cocoa powder and then confectioners’ sugar over the tops.
7.   Serve immediately.

Lark's Country Heart

Monday, June 13, 2011

Ways to use basil?

Blogging out of baking order again and this isn't even a baking post but a call for savory recipes that use basil.  My basil plants are thriving, thriving and doing more thriving.  Not that I don't love making pesto out of them but at some point I will be pesto'd out.  Last night I harvested some basil, chopped it up and added it to the topping of a whole wheat pizza.  Yum.

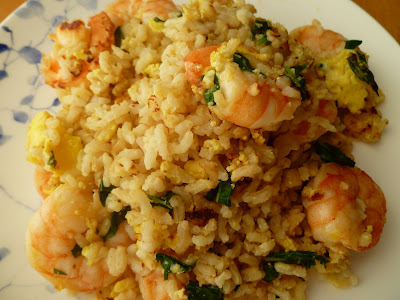
Tonight I harvested some more basil and did a quick stir fry with shrimp.  There isn't even a recipe for this - I just browned some minced garlic in a little olive oil, stir fried with shrimp and basil, added a little egg for scramble and brown rice plus a dash of soy sauce - voila, dinner.  That's about the level of my fledgling cooking skills so if you have any recipes for easy, preferably protein-focused dishes that use up basil, please share!


On another note entirely, I finally figured out how to make brown rice in my rice cooker.  Like any good Asian, I own a rice cooker.  It makes perfect white rice.  But whenever I've tried making brown rice in it, the brown rice is always still hard little pebbles of grain when the rice cooker says it's "done" and turns itself off.  A trick my mom taught me is to soak the brown rice for several hours first then cook it in the rice cooker, 2 to 1 (2 parts water to 1 part brown rice).  I tried it and it worked perfectly.  Brown rice is healthier, has more fiber and you get full on a lesser amount than with white rice.  I may never eat white rice again.

Sunday, June 12, 2011

Chocolate Revel Bars

Chocolate Revel Bars - made June 7, 2011 from Better Homes and Gardens Cookies (book #124)


Welcome to any new followers and thank you for all the comments on the various posts.  I may not be able to reply to all of them or follow everyone's blog but I do read all the comments and check out as many blogs as I can.

This is some kind of specially printed book as one half of it is an "Any Day Treats" cookie book and the other half, turned upside down and printed as the back half is a "Christmastime Treats" book.  This recipe is from the Any Day cookie book half.

This is another one of those crowd pleaser type recipes where it has a little something for everyone - oats, chocolate, nuts - and is made similar to the peanut butter fudge bars.  I have to admit though I was a little off my groove when making this one - I deliberately used a 9 x 13 pan instead of the larger pan the recipe specified but I discovered too late that I was low on semisweet chocolate chips so I supplemented my meager stash with Lindt and Valrhona semisweet chocolate bars.  Which would've been fine but instead of 1 1/2 cups or approximately 9 ounces of chocolate chips, I ended up using 12 ounces of chocolate, thinking I needed 2 cups instead of 1 1/2 cups.  Oh well, there's no such thing as too much chocolate, right?  Second inadvertent mistake is because I had these in the oven while I was working out, I didn't check on them until my workout was nearly done and by then, the bars looked a little too done.  Oops.  Clearly I need to get better at multi-tasking after a workday.

But fortunately they survived my haphazard baking (in)attention and they weren't burnt or dry.  However, I would only classify these as just "okay".  Similar to how the peanut butter fudge bars were made, this has some of the cookie dough as a bottom crust, covered with a chocolate layer then topped with bits of the rest of the cookie dough.  Good in theory but in taste - just okay.  There's nothing wrong with it and most people would probably like it but bear in mind I'm very picky about my dessert calories.  Desserts should be more than just okay.  To make these better, I recommend adding a teaspoon of cinnamon to the oatmeal batter to liven up the flavor and possibly substituting a caramel or dulce de layer for the chocolate layer so you get more of a brown sugar/caramel oatmeal bar.  Otherwise, save yourself the calories.

Tops are a bit too brown

1 cup butter, softened
2 ½ cups all-purpose flour
2 cups packed brown sugar
2 eggs
2 teaspoons vanilla
1 teaspoon baking soda
3 cups quick-cooking rolled oats
1 ½ cups semisweet chocolate pieces
1 14-ounce can (1 ¼ cups) sweetened condensed milk
2 tablespoons butter
½ cup chopped walnuts or pecans
2 teaspoons vanilla

1.     In a very large mixing bowl, beat the 1 cup butter with an electric mixer on medium to high speed about 30 seconds or till softened.  Add about half of the flour to the butter.  Then add the brown sugar, eggs, 2 teaspoons vanilla, and baking soda.  Beat till thoroughly combined, scraping the sides of the bowl occasionally.  Beat in the remaining flour.  Stir in the rolled oats.  Set the oat mixture aside.
2.     For filling, in a medium saucepan, heat chocolate pieces, sweetened condensed milk, and the 2 tablespoons butter over low heat till chocolate is just melted, stirring occasionally.  Remove from heat.  Stir in the walnuts or pecan and 2 teaspoons vanilla.
3.     For crust, press two-thirds (about 3 1/3 cups) of the oat mixture into the bottom of an ungreased 15 x 10 x 1-inch baking pan.  Spread the chocolate mixture over crust.  Drop the remaining oat mixture by rounded teaspoons on top of chocolate layer.
4.     Bake in a 350˚F oven about 25 minutes or till the top is lightly browned.  (Chocolate mixture will still look moist.)  Cool in pan on a wire rack.  Cut into bars.  Makes 60.

Saturday, June 11, 2011

Golly Polly's Doodles

Golly Polly's Doodles - made June 11, 2011 from I'm Dreaming of a Chocolate Christmas by Marcel Desaulniers (book #123)

When eaten warm, the peanut butter center is molten

I'm blogging out of baking order to post this today because tomorrow, June 12, is National Peanut Butter Cookie Day!  Now the traditional peanut butter cookie we all know and love is the one with the cross hatches, sometimes sprinkled with sugar, and sometimes made with creamy peanut butter or crunchy peanut butter.  My personal favorite is made with chocolate chips because, heretical as this might be to peanut butter purists, I mostly like peanut butter only when it's paired with chocolate.  So I'm going with this peanut butter-flavored chocolate cookie with a dollop of peanut butter filling inside.  This may not be your grandma's peanut butter cookie but hey, we all have to honor cookies our own way.

The chocolate cookie dough was very easy to work with and shape around the filling.  It wasn't too sticky or too dry/crumbly but just right.  I ended up only getting 15 filling balls instead of 17 and even then, I ended with too much chocolate cookie dough.  You might want to double the filling recipe if you want to make these cookies as is.  I ended up getting creative and used the remaining dough to wrap around Hershey Kisses, chunks of Snickers and whole Oreo cookies, just to see how they'd turn out.  If you bake with kids, this is a good recipe to make with them and have them choose different "fillings" to put inside the cookie.  Once it's all wrapped around whatever filling you decide, it's hard to tell what's inside and part of the fun after baking them is discovering which one you got.

Note that the recipe says to bake these for only 6 minutes so don't take your eye off of them or they'll be overdone.  I was a little skeptical about baking them for such little time but it turned out to be perfect, at least in my oven.  The chocolate cookie was soft and when eaten warm, the peanut butter filling was molten.  This was like eating an upscale version of a peanut butter cup in cookie form.  The key is using a rich dark cocoa for the chocolate cookie dough so you get a deep dark chocolate flavor that's complemented by the sweeter peanut butter filling.

An upscale version of a Reese's peanut butter cup in cookie form

Doodle Dough
1 ½ cups all-purpose flour
½ cup unsweetened cocoa powder
½ teaspoon baking powder
½ teaspoon salt
8 tablespoons (1 stick) unsalted butter, cut into 1-tablespoon pieces and softened
¾ cup granulated sugar
¼ cup creamy peanut butter
1 large egg
1 teaspoon pure vanilla extract

Doodle Filling
¼ cup creamy peanut butter
¼ cup confectioners’ sugar

1.     Preheat the oven to 375F.  Line a baking sheet with parchment paper.
2.     In a sifter, combine the flour, cocoa, baking powder, and salt.  Sift onto a large piece of parchment or wax paper.
3.     Place the softened butter, ½ cup of the granulated sugar, and the ¼ cup peanut butter in the bowl of a stand electric mixer fitted with a paddle.  Mix on low for 1 minute, then on medium for 1 minute more.  Stop and scrape down the sides of the bowl and the paddle.  Mix on medium-high for 1 minute.  Scrape down again.
4.     Add the egg and vanilla and beat on medium for 30 seconds; scrape down again once they have been incorporated, about 30 seconds.  Remove the bowl from the mixer and use a rubber spatula or your hands to finish mixing the ingredients until thoroughly combined.  Chill the dough in the refrigerator while making the filling.  (Do not keep the dough in the refrigerator for more than 20 minutes; otherwise  the dough will be difficult to form into the desired shape.)
5.     Make the doodle filling: Place the ¼ cup peanut butter and the confectioners’ sugar in a clean bowl of a stand electric mixer, then beat on medium for 10 seconds.  Remove the bowl from the mixer, and use a rubber spatula to finish mixing until the ingredients are thoroughly combined.  Portion 17 level teaspoons of the filling onto a piece of parchment or wax paper.  Roll each portion into a smooth, round ball.
6.     Using 1 heaping tablespoon, portion 17 pieces of dough.  Roll each portion of dough into a smooth round ball, then flatten each ball in the palm of your hand into a 3-inch-diameter circle.  Using your thumb, make a small indentation, then fold the dough around the filling and roll it into a smooth, round ball.  Roll the balls in the  remaining ¼ cup granulated sugar to coat.
7.     Place the Doodles on the prepared baking sheet about 1 inch apart widthwise and 2 inches apart lengthwise.  Bake on the center rack of the preheated oven for 6 minutes, until barely firm.  (Overbaking will cause these cookies to become hard.)  Remove the cookies from the oven and transfer to a wire rack to cool to room temperature.  Store in a tightly sealed plastic container.