Friday, August 16, 2024

Apple Cake with Maple Butter Glaze from Lisa Yockelson

Apple Cake with Maple Butter Glaze - made July 27. 2024 from Baking Style by Lisa Yockelson
3 cups unsifted bleached all-purpose flour
1 teaspoon baking powder
1 teaspoon baking soda
3/4 teaspoon salt
1 3/4 teaspoons ground cinnamon
1 teaspoon freshly grated nutmeg
1/2 teaspoon ground allspice
1/4 teaspoon ground ginger
1 1/2 cups granulated sugar
1/2 cup firmly packed dark brown sugar
3 large eggs
1 cup canola oil
2 teaspoons vanilla extract
3 1/2 cups peeled, cored and coarsely shredded apples

Maple Butter Glaze
2/3 cup pure maple syrup
4 tablespoons unsalted butter, cut into chunks
pinch of salt
1/2 teaspoon vanilla extract
  1. Preheat oven to 350 degrees F. Lightly spray a 9-inch Bundt pan with nonstick cooking spray and lightly flour.
  2. Sift together the flour, baking powder, baking soda, salt, cinnamon, nutmeg, allspice and ginger.
  3. In the bowl of a stand mixer, beat together the granulated sugar, dark brown sugar, and eggs on moderate speed for 2 minutes. With the mixer running, add the oil in a thin, steady stream; beat on moderate speed for 2 minutes. Blend in the vanilla extract and apples.
  4. On low speed, add the sifted mixture in 2 additions, scraping down the sides of the mixing bowl.
  5. Pour into prepared pan. Bake for 1 hour, or until risen, set and a toothpick inserted into the cake comes out clean or with a few crumbs.
  6. While cake is baking, make the glaze: place the maple syrup, butter, and salt in a small, heavy saucepan and bring to simmer over medium-low heat, stirring occasionally. Simmer for 1 minute. Stir in the vanilla extract and remove from heat. 
  7. Cool the cake in the pan for 10 minutes. Loosen with a small spatula then invert onto a cooling rack. Lift off the pan. Paint the warm glaze over the top and sides with a soft pastry brush. Cool completely and store in an airtight container.
This is the second dessert I made for Ronald McDonald House when I brought over the lemon bars. I wanted to make this recipe, not only because it's from one of my favorite cookbook authors and I've been wanting to try this recipe for awhile, but also because it uses maple syrup. One of my friends from Vermont gave me this real Vermont maple syrup. While I enjoy syrup on my pancakes as much as the next person, what I like even better is using food gifts as ingredients for what I bake. (Side note: one of the best gifts you can give a baker is some kind of ingredient they can use - you'd literally be giving a gift that keeps on giving.)
Since I was making this as a Bundt cake to give away and you can hardly give away a Bundt cake with a slice missing (seriously, please don't do that - it's tacky), I reserved some of the batter to bake into a small ramekin. That was my tester. Since it was smaller than the Bundt, it baked faster, but in essence, it was the same as the larger cake.
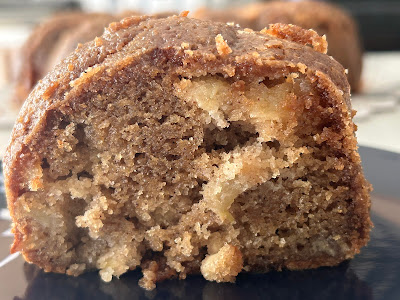
As you can tell from the ingredients, this is an oil-based cake. It doesn't contain butter so it's not going to give a buttery flavor or a fluffy texture. This was dense but moist. Not like a pound cake either which, while dense, also can have a soft crumb. I say all that so that you don't underbake this cake. If you do, the texture will be gummy rather than moist. The toothpick test may also be misleading as it can come out "clean" but still be a bit underdone. Best thing to do is actually time it (mine baked for exactly an hour but each oven is different) and go by appearance (top should look "dry" with a few cracks) as well as the toothpick test. 
Overall, I liked this cake. Although there are a lot of spices in it, it didn't taste overly spiced; it was just the right blend. No one spice overwhelmed the flavor profile and I liked the texture as well. This is more like an oil-based carrot cake but with apples. It's best made in autumn when apples are at their peak season but it worked well enough now for this cake.
Below is the slice from the Bundt cake but I only took it out for the picture so you can see the inside texture of the Bundt version then I neatly put it back into the sliced cake, covered it and delivered it to Ronald McDonald House.

Tuesday, August 13, 2024

Lemon Curd Squares from Williams-Sonoma Dessert

Lemon Curd Squares - made July 27, 2024 from Williams Sonoma Dessert by Abigail Johnson Dodge
Crust
1 cup (140 grams) all-purpose flour
1/3 cup (70 grams) granulated sugar
1/2 teaspoon salt
1/8 teaspoon ground cinnamon
1/2 cup (4 ounces) cold, unsalted butter, cut into 1/2-inch pieces

Filling
3/4 cup (160 grams) granulated sugar
2 tablespoons all-purpose flour
pinch of salt
1 teaspoon finely grated lemon zest
3 large eggs, room temperature
1/2 cup fresh lemon juice
3 tablespoons heavy cream

confectioners sugar for dusting
  1. Preheat oven to 350 degrees F. Line an 8 x 8-inch baking pan with foil and lightly spray with nonstick cooking spray.
  2. In a food processor, combine the flour, sugar, salt and cinnamon. Pulse briefly until blended. Add the butter pieces and pulse until dough forms moist crumbs and sticks together when pinched, about 1 minute. Press the dough into the bottom and 1 inch up the sides of the prepared pan. Bake the crust until pale golden, 20-22 minutes. Let crust cool completely on rack. Reduce oven temperature to 325 degrees F.
  3. Make the filling: whisk together the sugar, flour, salt and zest. Add the eggs, lemon juice and heavy cream; whisk until just blended. Carefully pour mixture over the baked crust.
  4. Bake until the filling is set but still jiggles slightly when the pan is gently shaken, about 20 minutes or longer if using a metal pan. Let cool on a rack for about 30 minutes. Cool completely before lightly dusting with confectioners sugar and cutting and serving.
Although I have a long-standing, battle-tested recipe for lemon bars, every once in awhile, I test out a new recipe for them. I'm on this never-ending, Marie-Kondo-style quest to thin out my recipe book collection but before I give any cookbook away, I flip through the pages and gather up any recipe I might want to try. I've hung onto this one for awhile from the Williams Sonoma dessert cookbook and am finally getting around to testing it. 
I signed up to provide desserts again for the families staying at Ronald McDonald House and thought this would be a good option as a summer evening dessert. You make the crust in a food processor and keep pulsing until a dough forms. That was easy enough. I didn't build up the crust on the sides as there wasn't that much dough and I wanted a thicker bottom layer as the crust.
The lemon curd was quite thin and liquidy compared to my other recipe and made a thicker layer than the crust. I forgot to tap the pan gently before sliding it into the oven so you can see all the air bubbles that rose to the surface during baking. Fortunately, with lemon bars, you can cover those popped air bubbles and craters with a good dusting of powdered sugar.

If you're a fan of tart lemon curd filling, this one's for you. If you prefer a thicker curd layer than crust, this is also for you.
I myself am a bit ambivalent about both. I thought these were a trifle too tart for me. Which wasn't surprising given the 1/2 cup of fresh lemon juice the recipe called for (my go-to recipe only uses 3 tablespoons). I would've liked a thicker crust as well. Overall it was good but probably something I wouldn't make again, at least not for me. For lemon aficionados, it's a good option.

Saturday, August 10, 2024

Crumbl Cookies review #78 - German Chocolate Cake

Crumbl Cookies review #78: German Chocolate Cake - visited August 7, 2024
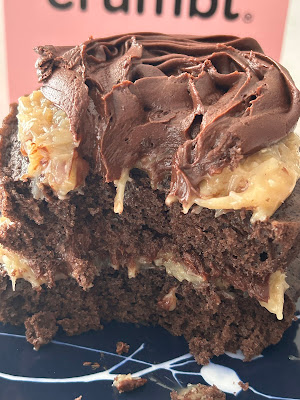
Ah, German Chocolate Cake, how much do I love thee? Enough to eat and enjoy but not enough to make with any regularity. So I was glad to see it was the cake offering at Crumbl this week. Not a full size cake but enough for 2-3 servings for one person.
I was especially glad it was on offer this week since I didn't like any of the cookies on the regular menu. They're not my thing but for posterity, here's what they were: Semisweet Chocolate Chunk, Strawberry Ice Cream Bar, Monster ft M&Ms, Blueberry Crumb Cake and Mint Chip Ice Cream.
But German Chocolate Cake is definitely my thing: chocolate, coconut and I don't even mind the pecans. I wouldn't mind eating German Chocolate Cake without the nuts but then it wouldn't be a true German Chocolate Cake, would it?
There's a $1.49 upcharge at my store for the cake so, on top of the single cookie price, it was $5.98 plus tax for a total of $6.47. 
I liked this cake. It wasn't too overwhelmingly richly chocolatey but still had good chocolate flavor. It had a tad too much chocolate frosting for me but the coconut pecan frosting helped offset that. I think the coconut pecan frosting was the best part of the cake. I wouldn't eat it on its own but it paired perfectly with the light cakey chocolate cake layers. Between the two chocolate cake layers, the coconut pecan frosting and the chocolate frosting on top, it was also so tall that it barely fit into the single serving pink Crumb box. Never a bad thing.

Thursday, August 8, 2024

Chocolate Oatmeal Cookies from Charlotte Siems

Chocolate Oatmeal Cookies - made dough July 17, 2024 from Charlotte Siems 
1 cup (2 sticks) unsalted butter
1 cup granulated sugar
3/4 cup brown sugar, packed
2 large eggs
2 teaspoons vanilla
1 1/2 cups all-purpose flour
1/2 cup unsweetened cocoa powder
1 teaspoon baking soda
1/2 teaspoon salt
3 cups old-fashioned oats
  1. Preheat oven to 350 degrees F. Line baking sheets with parchment paper.
  2. In the bowl of a stand mixer fitted with the paddle attachment, cream together butter, granulated sugar and brown sugar until light and fluffy, 2-3 minute.
  3. Add eggs and vanilla, mixing until combined.
  4. In a separate bowl, whisk together flour, cocoa powder, baking soda and salt. Add dry ingredients to mixing bowl in 2 additions, mixing on low speed after each addition until just combined.
  5. Mix in oats until evenly disbursed. Batter will be stiff; do not overbeat.
  6. Portion into golf-ball-size dough balls and evenly space on baking sheets. Bake 11-12 minutes or until edges are set and middles no longer look raw. Remove from heat and let cookies rest on baking sheet for several minutes before transferring to wire rack to cool completely.
Although I've been able to bake for local opportunities and do non-care-package-friendly baked goods, 90% of my baking is still for military care packages as part of my volunteer work with Soldiers Angels to support deployed military troops. 
Whenever you see a cookie post, 99% of the time, it's for those care packages. Like this one. I like to send cookies with oatmeal in it in the (probably mistaken) belief that they're somewhat healthier. Oats, right? And I use the old-fashioned kind as more whole and less processed than their instant oats cousins. Just ignore the butter, sugar and flour that also goes into the cookies.

This one is slightly different from the norm in that they're chocolate oatmeal cookies. Not my usual fare but it sounded intriguing enough to try it. Whenever you make oatmeal cookies, I advise portioning into dough balls then chilling them overnight in the refrigerator, not the freezer. Not only does it help "age" the dough to more flavor but it can let the oats soak up a bit more moisture. Then you can freeze or bake.
This dough handled well and the cookies baked up to a decent thickness without spreading too much. Because they're chocolate, they can be more difficult to tell when they're done since you can't go by "golden brown" edges as with non-chocolate cookies. I timed them (sort of) and took them out when the tops looked a little dry and cracked but you can still see some of the chocolate dough as soft. When they cool, they settle into fudgy.
I thought these were good as oatmeal cookies with the zing of chocolate. It wasn't too sweet because chocolate... The texture was chewy like a good oatmeal cookie should be and you can't go wrong with chocolate. Oatmeal cookies aren't traditionally my favorite but care packages are literally not about me so I hope the service members I sent these to enjoyed them.


Tuesday, August 6, 2024

Crumbl Cookies review #77 - Double Fudge Sandwich

Crumbl Cookies review #77: Double Fudge Sandwich - visited July 30, 2024
I'm behind in posting this as the Double Fudge Sandwich was from last week's menu. This was a new-to-me item but I don't know if this is their first time on the national menu. I don't normally get Crumbl's chocolate cookies as they're too rich for me so I don't pay attention to the chocolate cookie offerings.
I'd already tried the Cookies and Cream Cheesecake when it was a tester (didn't care for it) and the Cinnamon Crunch which used to be called Cinnamon Toast Crunch. Which I liked back then but didn't get it again this time as I'm (sad to say) kinda over Crumbl.

Not entirely over it as I do still get a cookie now and then but I've definitely stopped being as faithful as I once was. Case in point, while I've skipped the past couple of weeks, I did get this one, partly out of habit, partly because I had a gift card, lol. 
I've tried a peanut butter tester version of this that was called the Nutter Butter Brownie Sandwich. I haven't seen it hit the regular menu so they might've revamped that tester to be this one. The peanut butter was replaced entirely by chocolate but the concept is essentially the same: two chocolate cookies sandwiching a chocolate filling and drizzled with chocolate. 
If you're a chocoholic, this will please the purist in you. It's a straight shot of chocolate. I could only eat less than a quarter of the cookie as the taste test and bundled up the rest in pieces for the freezer. Still too rich for me. I might've liked it better if the frosting filling was similar to the one on the Dirt Cake or if the cookies were more Oreo-based rather than "brownie" which wasn't really a brownie but more like a rich chocolate cookie.

Sunday, August 4, 2024

Famous Chocolate Chunk Cookies from Maddy Gutierrez

Famous Chocolate Chunk Cookies - made dough July 31, 2024 from Maddy Gutierrez
3 1/2 cups all-purpose flour
1 1/4 teaspoons baking soda
1 1/2 teaspoons baking powder
1 1/2 teaspoons kosher salt
1 1/4 cups unsalted butter
1 1/4 cups (10 ounces) brown sugar
1 cup (8 ounces) granulated sugar
2 large eggs
2 teaspoons vanilla extract
1 1/4 pounds chocolate, chopped into chunks
  1. In a large bowl, whisk together flour, baking soda, baking powder and salt; set aside.
  2. In the bowl of a stand mixer fitted with the paddle attachment, cream together butter, brown sugar and granulated sugar until light and fluffy, 2-3 minutes.
  3. Add eggs and vanilla extract, beat to combine.
  4. Add dry ingredients in three additions, mixing on low speed until just combined. 
  5. Fold in chocolate chunks until evenly disbursed.
  6. Portion dough into golf-ball-size dough balls or larger and flatten slightly. Cover and chill for 24 hours.
  7. When ready to bake, preheat oven to 350 degrees F. Line baking sheets with parchment paper. Evenly space 5-6 dough balls on each bake sheet. Bake 12-15 minutes or until edges are set and middles no longer look raw. Remove from oven and let rest on baking sheet for 5 minutes before transferring to wire rack to cool completely.
August 4 is National Chocolate Chip Cookie Day and I've no doubt the blogosphere will be flooded with recipes for chocolate chip cookies today. Before I go sheeple and do the same, I want to call out a small business I order chocolate chip cookies from when I need to send a care package to a deployed military service member. Operation Cookies is female- and veteran-owned and, just as important for my purposes, they ship to APO, FPO and DPO overseas addresses. I've never actually tried the cookies themselves but they get good reviews online and I've had one service member I sent the cookies to tell me they were delicious and enjoyed by her and her unit. That's good enough for me. Yes, I can bake cookies and send them more cheaply myself but sometimes it's not about the cost but what I believe in supporting. And I will always try to support a female-owned small business and a veteran-owned small business whenever I can. Operation Cookies also donates part of their proceeds to nonprofits that support veterans like the Wounded Warrior Project and the Gary Sinise Foundation. So my dollars go even further whenever I buy from them. I'm not affiliated with them and they don't even know my blog exists and that I'm talking them up. But please give them a look and place an order if you're so inclined and able or spread the word about them to those who might be interested in supporting them.

Okay, back to these cookies and this recipe. I'm always a sucker for trying out new recipes for chocolate chip cookies. I stopped comparing one recipe to another because 99% of the time, they're good, no matter what the ingredients are or how you make them. 
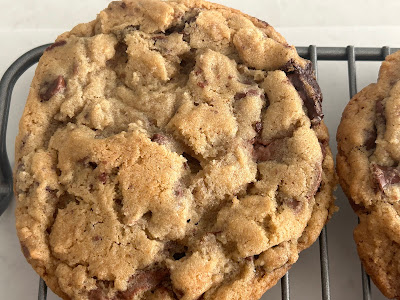
I will say the same about this recipe. It's good. Crisp edges, chewy middles, that perfect brown sugar caramelization flavor comes through. What makes a chocolate chip cookie for me is the type of chocolate I use. Milk chocolate is my favorite but most people I know seem to prefer semisweet. You can do a mix of both in this recipe or stick to one or the other. It's all personal preference. I do recommend following the directions to let the dough "age" in the refrigerator for 24 hours to develop the flavors further.
I portion the dough into dough balls, cover them and chill them for at least a day but no more than 2 days. If I don't need to bake them then, I freeze the dough balls after. Then I bake directly from frozen dough. Baking from frozen takes a little longer so I rarely time the cookies. I bake just until the cookies are the golden brown color at the edges that I like and the middle doesn't look raw anymore. Let them cool completely or just to barely lukewarm and you'll have the perfect texture.

Friday, August 2, 2024

7-Layer Bar Cookies from Salt & Baker

7-Layer Bar Cookies - made dough July 4, 2024 from Salt & Baker
1/2 cup unsalted butter, room temperature
3/4 cup brown sugar, packed
1/8 cup granulated sugar
1 large egg
1 teaspoon vanilla extract
1/2 tablespoon light corn syrup
1 1/3 cups all-purpose flour
1 cup graham cracker crumbs
1 teaspoon cornstarch
3/4 teaspoon baking soda
1/4 teaspoon baking powder
1/2 teaspoon salt
1/2 cup shredded sweetened coconut
1/2 cup semisweet chocolate chips
1/2 cup butterscotch chips
1/2 cup walnuts, chopped (I used almonds)
  1. In the bowl of a stand mixer fitted with the paddle attachment, cream together butter, granulated sugar and brown sugar until well combined and creamy, 2-3 minutes.
  2. Add egg, vanilla extract and corn syrup, beating until combined.
  3. In a separate bowl, whisk together flour, graham cracker crumbs, cornstarch, baking soda, baking powder and salt.
  4. Add dry ingredients to butter mixture in 2 additions, mixing on low speed after each addition, until just combined.
  5. Add coconut, chocolate chips, butterscotch chips and nuts, mixing on low speed until evenly disbursed.
  6. Portion dough into golf-ball size dough balls, cover and chill for several hours or overnight.
  7. When ready to bake, preheat oven to 350 degrees F. Line baking sheets with parchment paper and evenly space dough balls. 
  8. Bake 10-12 minutes or until edges are set and middles no longer look raw or shiny. Let rest on baking sheet for several minutes before transferring to wire rack to cool completely.
I'm fond of 7-layer bars. Normally I'm a purist and prefer only a few flavor ingredients in my baked goods but I like the combination of graham cracker crumbs, coconut, chocolate chips and even nuts blanketed in a sweet layer over the base crust.

So I was willing to try whether the 7-layer bar cookie in actual cookie form would work. Okay, and because I had coconut, butterscotch chips and chocolate chips to use up. I even set aside my bias against nuts in cookies to include them here. But I used almonds instead of walnuts as I don't like the bitterness of walnuts. I had to draw the line somewhere and walnuts are a bridge too far.

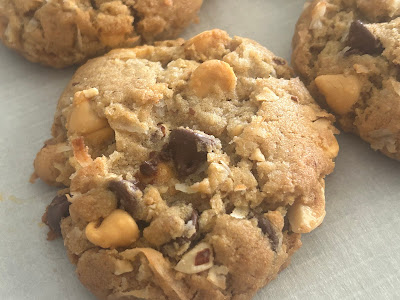
I don't know that I would consider this one of my favorite cookies but it was pretty good if you like the 7-layer cookie combination. All the ingredients worked to make an almost faithful rendition of the bar cookie. I say almost because one thing I preferred in bar cookie form versus round cookie form is the prevalence of the graham cracker crust. In the cookie form, the graham crackers are mixed in the dough. It imparts the flavor but not the same texture as in the bar cookie base.

This is still a good cookie - the dough handled well, the cookie didn't spread much and it's packed full of 7-layer cookie flavor. I'm glad I tried it and it makes a nice change but the original 7-layer bar cookie still reigns for me.