Thursday, July 4, 2024

Bakery Review: Pastelaria Adega, San Jose, CA

Bakery Review: Pastelaria Adega, San Jose, CA - visited June 23, 2023
My friend Paulo, who's of Portuguese descent, recommended I try Pastelaria Adega after I told him I had tried the pastel de nata from Holy Nata. Pastelaria Adega is a Portuguese bakery in the South Bay and since I happened to be in the area (not really but it was less than 10 miles from my hotel), of course I was going to try it.
I arrived shortly after they opened at 9:30 am on a Sunday morning. There was already a line outside the door. The bakery was larger than Holy Nata so a line outside the door meant there were almost 20 people ahead of me in line when I got there. But the line moved reasonably quickly and it only took about 15-20 minutes before it was my turn.

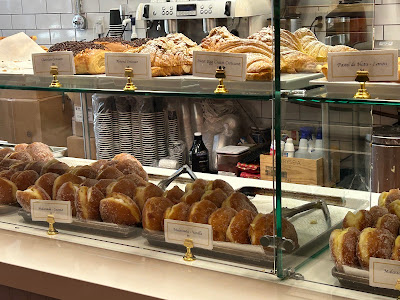
Unlike Holy Nata, Pastelaria Adega offers more than pasteis de nata. Besides the flaky pastries of American and French bakeries like croissants, they also had a large selection of malasadas, a yeast-leavened doughnut that's a Portuguese specialty from the Azores. You could get an unfilled malasada or choose from a variety of different fillings. 

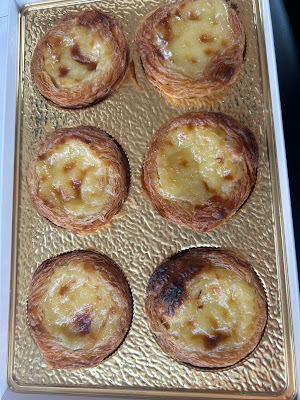
You can get any number of pasteis de nata but they do come in nice boxed packaging when you order 6. Which is what I did. I was going to meet friends for brunch after my bakery visit so I bought a 6-pack for sharing. I also bought a cinnamon and apple-filled malasada to try.
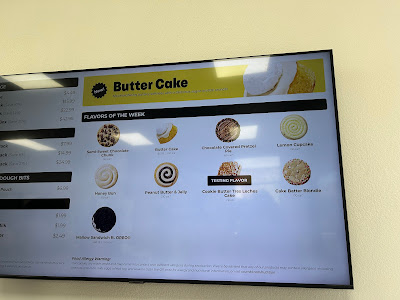
As you can see from the sign above, the pastel de nata was $4 each, a bit more expensive than the $2.50 from Holy Nata. They also offered different fillings but I elected to stick with the original.

First, let's rightly pay homage to the pastel de nata from Pastelaria Adega. Because these are pretty damn close to the ones I ate (and ate) in Portugal. The pastry shell is flaky and crisp, even when at room temperature and even the next day, and is super buttery. If you eat them warm, have a wipe on hand or the ability to wash your hands. The custard was creamy and looked more like the Portugal pastel de nata (Holy Nata's was darker). It also held its shape after you bite into it. But it was still creamy and definitely delicious. Yes, it's more expensive but some things are worth it. This is one of them.


I shared them with my friends at brunch and they enjoyed them as well. One had just returned from a trip to Portugal with her family and was excited to discover there was a local option for her to get pasteis de nata as she and her family had enjoyed them as well. What's not to love?? 


Second, I had the cinnamon & apple filled malasada. This one was a bit disappointing. The dough of the doughnut itself was fine. It has a more chewy texture but wasn't tough. It's not as light as like a Krispy Kreme doughnut, which I was fine with as I prefer more texture in my yeasted doughnuts. So that part was good. Where I was disappointed was in the filling. I had hoped for more apple pieces but the filling was literally mush. Like applesauce mush with very few apple pieces. The apple had either cooked down to mush or there were very few apple pieces to start with. In hindsight, I should've gone with either an unfilled malasada or a filling like dulce de leche or lemon where I expect it to be custard-y and mushy.

But on a high note, the pastel de nata held up well, even the next day. The pastry shell was still flaky and not tough or chewy. The filling also held its shape and didn't run out of the shell when I bit into it. So good. Pastelaria Adega is now a must-stop on my next trip to the Bay Area.

Tuesday, July 2, 2024

Bakery Review: Holy Nata, San Francisco, CA

Bakery Review: Holy Nata in San Francisco, CA - visited June 21, 2024
I spent a few days in the SF Bay Area last month to see friends and, as always, I like to go back to both favorite haunts and new places to try. In this case, I saw an ad for Holy Nata pop up on my Instagram feed. I had never heard of Holy Nata but, thanks to a business trip to Portugal a couple of years ago, I was fabulously well-acquainted with Portuguese custard tarts. They are fantastic. And remember I say that as someone who's not big into custard-y desserts. I'm spoiled that I first tried them in Portugal, including at Pasteis de Belem in Lisbon, where legend says they make pasteis de nata from the original recipe.
Since I don't live in Portugal and where I currently live does not offer pastel de nata, I thought I'd have to do without until I made it back to Portugal. Ah, but wait. Enter that IG ad for Holy Nata. It's located in downtown San Francisco and since SF was one of my stops to see former coworkers/current friends, it was an easy no-brainer to incorporate a trip to Holy Nata into my plans.
The yelp reviews warn that Holy Nata sells out quickly and it's best to reserve your pasteis de nata online ahead of time. Since I only had a small window when I was going to be in San Francisco, I dutifully pre-ordered online for the Friday I was going to be there.
The shop itself is a little hole in the wall on Trinity Place, which is more of an alley rather than a street. The couple of pictures I managed to take inside was just a shot from just within the door, if that gives you an idea of how small it was. I showed up at the appointed time but they didn't have my preorder listed. I showed my confirmation text but it turns out I had made the reservation for the following Friday, not the Friday I was there. D'oh! Fortunately, the counter person very kindly assured me she had enough pasteis de nata to cover my order right there. Whew.
You get the option to have them sprinkle cinnamon over the tops. They packaged my order of 8 into 2 boxes of 4. Each box of 4 is $10 so an individual pastel de nata is $2.50.You can get a box of 4, 6 or 24 or any multiple thereof. No matter how few or how many you get, they're freaking worth it. I bought 4 to give away and 4 for my (oinker) self. When I got back to my (former) office and shared with one of my coworkers, I tried one from my own stash while it was still warm. OMG. Flaky pastry and creamy custard - what could go wrong other than my expanding waistline? When warm, the pastry shell was flaky and buttery while the custard filling was a bit oozy and definitely creamy.  
The "downside" and with 20/20 hindsight, they're still good the same day even when they've cooled off but the next day (even *I* could not eat 4 pasteis de nata in one day), the pastry shell is a bit tough and chewy to eat. It's lost the flake. The custard was still creamy and the overall taste was still good but I recommend only getting as many as you can reasonably eat the same day you buy them. They're not quite the same as the pastel de nata I consumed in Portugal but they're still damn good. If you're ever in downtown San Francisco, stop by and taste for yourself. Just note that they're only open Tuesday - Friday with varying hours and it's probably better to go earlier in the day rather than later to make sure they have pasteis on hand, if you don't pre-order and get the correct date *cough*.

Sunday, June 30, 2024

Soft and Thick Snickerdoodles from Baking is a Science

Soft and Thick Snickerdoodles - made dough May 14, 2024 from Baking is a Science 
3/4 cup granulated sugar
1/2 cup (1 stick) butter, room temperature
1 large egg
1/2 teaspoon vanilla extract
1 3/4 cups all-purpose flour
1/2 teaspoon cream of tartar
1/4 teaspoon baking soda
1/2 teaspoon baking powder
1/4 teaspoon salt
1 teaspoon cinnamon

Cinnamon sugar coating
1 tablespoon granulated sugar
3 teaspoons cinnamon
  1. In a small bowl, stir together 1 tablespoon granulated sugar and 3 teaspoons cinnamon for the cinnamon sugar coating; cover and set aside.
  2. In the bowl of a stand mixer fitted with the paddle attachment, cream together butter and granulated sugar. Add egg and vanilla, mix to combine.
  3. In a separate bowl, whisk together flour, baking powder, baking soda, cream of tartar and salt.
  4. Gradually add the dry ingredients to the butter-sugar mixture, mixing on low speed until just combined.
  5. Portion into golf-ball size dough balls, cover and chill for at least 2 hours or overnight. When ready to bake, remove from refrigerator for 10 minutes before rolling in cinnamon sugar mixture. 
  6. Preheat oven to 350 degrees F. Line baking sheets with parchment paper. Evenly space coated dough balls on prepared sheets. Bake cookies for 12-14 minutes or until edges are set and middles no longer look raw. Remove from oven and let rest on baking sheets for 3-5 minutes before transferring to wire rack to cool completely.
My favorite recipe for snickerdoodles was the one from Sally's Baking Addiction. It was always reliably nice and thick plus had delicious flavor. Until I moved the last couple of times and I just couldn't seem to get that thickness I used to get. The flavor was still good but my snickerdoodles kept coming up flat. I blamed the higher altitude where I lived and that period of time where I swear butter makers were adding more water to their butter and all my cookies were coming out flat.
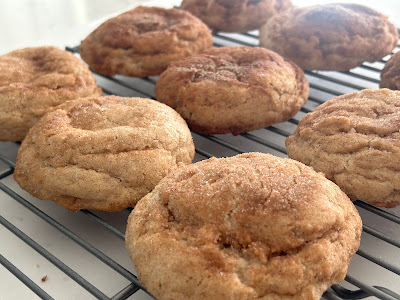
So now I have a new favorite recipe that turned out just as thick as Sally's used to. One recipe only makes 9 snickerdoodles but what a 9 they were. Half the cookies look darker than the other half. They're not burned. I just had more cinnamon in the rolling mixture in the first batch than I did in the second one.

Regardless of the color of the coating, these cookies were amazing. That thick buttery, cinnamon-y texture and flavor were there.

And look at that texture. Perfection. I have a new favorite snickerdoodle recipe and this is it.

Thursday, June 27, 2024

Crumbl Cookies review #74: Cookie Butter Tres Leches Cake (tester) and Butter Cake

Crumbl Cookies review #74: Cookie Butter Tres Leches cake (tester) visited June 24, 2024 and Butter Cake, visited June 26, 2024

I think Crumbl is changing its testing format. It used to be a tester would be released (almost) every Wednesday at all of its test stores. They went through a period of not having testers at all and now, recently, it appears a tester would only come to a limited number of test stores and it would be available all week.  At least that's what I've found lately with the Cookies and Cream Cheesecake tester and the Nanaimo Bar Cookie tester.
They don't seem to do a tester every week either but that could also be because I haven't always paid attention every week. Fortunately I paid attention this week and even more fortunately, my store seems to be one of the limited number of test stores who continue to have test products available.

I say fortunately because y'all know my love of the Tres Leches Cake Crumbl had awhile back. It appeared to be successful enough for Crumbl to test a taste variation of it in the form of a Cookie Butter Tres Leches. You also know my love of cookie butter.
Cookie Butter Tres Leches Cake

So I was already predisposed to like this cake and I did. I won't say it was as good as the original as I think I prefer the original with its cinnamon overtones in the topping. But still, cookie butter.... Cookie butter isn't a particularly strong flavor when blended into baked goods but this had enough flavoring to be a cookie butter tres leches cake. My store does the tres leches really well. This was neither too soggy or too dry. It was delicious. I wouldn't be sorry if/when they have the original tres leches again but this one is a good substitute in the meantime. At my store, this had a $1.49 upcharge so the total was $5.98 plus tax.
I also have to admit, contrary to what I posted about the cinnamon square and how I go to Crumbl for cookies, not cakes I have to eat with a fork or spoon, I was wrong. Crumbl has done well with these little cakes so far and I was so wrong from my original opinion that I've actually been going to Crumbl more for their cakes than their cookies lately.

Butter Cake
Which brings us to the Butter Cake, which, besides the Cookie Butter Tres Leches tester, was the only thing I wanted from this week's menu. I've already tried a non-chocolate version of the Pretzel Pie, the Lemon Cupcake and the Honey Bun. I had zero interest in the peanut butter and jelly (I don't like jelly) or the semisweet (I prefer milk chocolate).


But the butter cake was intriguing. I'm already a fan of Crumbl's Kentucky Butter Cake cookie and I like butter cakes in general anyway. This one had a $0.99 upcharge so it was $5.48 at my store plus tax.
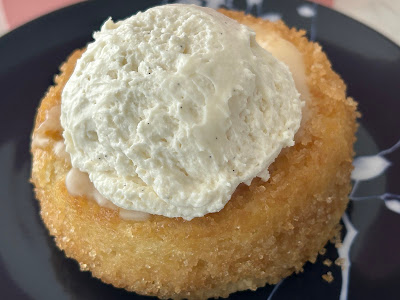
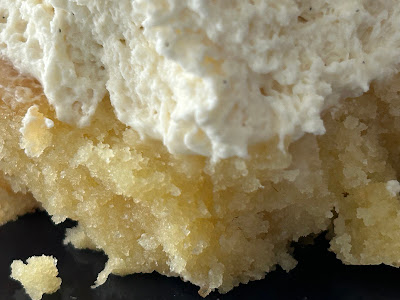
Okay, wow, to cut to the chase, I loved this Butter Cake. Loved. As in, I could easily forego Crumbl cookies from now on and live on a caloric high (literally) with their cakes. Especially this one. It was freaking delicious and is one of the reasons I'm publishing this post now while there's still time for people to get this by Saturday. If you're on the fence about this one, jump off, run, don't walk, to your nearest Crumbl. It was freaking amazing.
I loved 3 things about this cake and liked the 4th. First, the cake itself was absolutely delicious in both buttery goodness and perfect, slightly dense, moist cake texture. Second, the sugar crystals around the outside provided the best texture contrast with the crunch and added sweetness to the cake. Third, the butter glaze was perfect, adding a nice buttery flavor to enhance the cake. The vanilla bean whipped cream was more of a like than a love because you know my bias against whipped cream. But even that was still good as it was reminiscent of the vanilla bean mousse in the skillet cookie. If they had used the mousse from that cookie instead of the whipped cream, my like would shoot to love.

But, regardless of the whipped cream, I still loved this cookie overall. So much so that I may get another one this week and do another double workout in case I eat it all again instead of virtuously storing in the freezer for another time. We'll see.

Wednesday, June 26, 2024

Cinnamon Vanilla White Chocolate Oatmeal Cookies from Great Taste Buds

1 cup butter, room temperature
3/4 cup granulated sugar
3/4 cup brown sugar
2 large eggs
2 1/2 teaspoons vanilla
2 cups old-fashioned oats
1 1/2 cups + 1 tablespoon all-purpose flour
1 teaspoon baking soda
1 teaspoon salt
1 teaspoon cinnamon
12 ounces white chocolate chips
  1. In the bowl of a stand mixer fitted with the paddle attachment, beat butter for 2-3 minutes, until light and creamy. Add granulated sugar and beat to combine. Add brown sugar and beat to combine. Scrape down bottom and sides of bowl to keep mixture even textured.
  2. Add eggs and vanilla, mixing to combine. Add oats and beat to combine.
  3. Add flour, baking soda, salt and cinnamon, mixing on low speed until just combined. Fold in chocolate chips.
  4. Portion dough into golf-ball size dough balls and flatten slightly. Cover and chill for several hours or overnight.
  5. When ready to bake, preheat oven to 350 degrees F. Line baking sheets with parchment paper and evenly space dough balls. Bake 12-14 minutes or until edges are set and middles no longer look raw. Remove from heat and let rest on baking sheets for several minutes before transferring to wire rack to cool completely.
Back to cookies for military care packages. I've been sending care packages all this time but mostly recipes I've already made before there was no need to post them again. This is a new one I've had on my pinterest board for awhile and meant to try. 
I like to send oatmeal cookies since they're usually pretty sturdy and mail well. During summer, I don't typically send anything with white chocolate since white chocolate has a lower melting temperature and, on their way to hot desert climates, they will melt. But when baked into cookies, I just try to keep them inside the cookie and not on top, so they don't arrive too messy.

These were pretty good, nice and chewy with slightly crisp edges. They are a trifle sweet, especially with the white chocolate. The cinnamon flavor wasn't very strong so if you like cinnamon, increase the cinnamon in the dough by another half to full teaspoon.

Monday, June 24, 2024

Cold Oven Pound Cake from Food Gal

Cold Oven Pound Cake - made June 13, 2024 from Food Gal (original recipe from Cheryl Day's Treasury of Southern Baking by Cheryl Day)
3 1/2 cups (438 grams) unbleached all-purpose flour
1 teaspoon baking powder
1 teaspoon fine sea salt
1 1/2 cups whole milk
2 teaspoons vanilla extract
3 sticks (1 1/2 cups) unsalted butter, room temperature
3 cups (600 grams) granulated sugar
6 large eggs, room temperature
confectioners' sugar for dusting, optional
  1. Butter a 10-inch Bundt pan and lightly dust with flour, shaking out the excess.
  2. In a large bowl, whisk together the flour, baking powder and salt; set aside.
  3. In a small bowl, whisk together milk and vanilla.
  4. In the bowl of a stand mixer fitted with the paddle attachment, cream the butter on medium-high speed until light and fluffy, about 3 minutes. Reduce speed to low and gradually add the sugar. Increase the speed to medium-high and continue beating for 2-3 minutes, until the mixture is very light and fluffy,
  5. Reduce speed to low and add the eggs, one at a time, beating well after each addition. Scrape down the sides and bottom of bowl as needed to keep mixture even textured.
  6. Alternately, add dry ingredients and milk mixture, mixing on low speed after each addition until fully incorporated.
  7. Pour batter into prepared pan and spread evenly with a spatula. Place the pan on the middle rack of the cold oven and set oven to 325 degrees.
  8. Bake for 60-70 minutes or until the cake is golden on top and a toothpick inserted in the thickest part of the cake comes out clean. Let cake cool in the pan on a wire rack for 20 minutes then invert onto another rack. Turn right side up and let cool completely.
  9. Dust cooled cake generously with confectioners' sugar, if desired.
If you see me making more cakes and frosted cookies or any other baked goods that don't ship well, you know that means I'm getting out more and bringing desserts to local gatherings. In this case, I was giving financial literacy sessions and teaching local women in my area about investing in the stock market, retirement planning, estate planning and budgeting. For this particular occasion, one of the attendees offered to host at her house so one of the desserts I made was this pound cake.
I love me a good pound and I was intrigued by this one because you start it in a cold oven (hence the name), meaning no need to preheat. You make the batter, pour it into the bundt pan, put it in the oven then turn the oven on. Unlike lighter cakes with leavening agents, pound cakes don't need that initial heat to activate anything since any air in the batter comes from beating the butter and sugar together and not from baking powder or baking soda.
I have to say, this turned out amazingly delicious. I did use Kerrygold European butter for that extra buttery flavor and that worked well. The texture was that perfect dense pound cake texture and I love the simplicity of this cake. 
If I had to quibble about anything, I did find the crust a little too crusty. That developed from the longer baking time, especially starting from a cold oven. But still, it's not a dealbreaker and this was a delicious cake, perfect for hot summer weather. 

I was asked for the recipe by a couple of the participants who also enjoyed the cake and you can't ask for a more sincere compliment than that.