Wednesday, February 22, 2017

Garlic Butter Smashed Sweet Potatoes

Garlic Butter Smashed Sweet Potatoes - made January 20, 2017 modified from Cafe Delites
I have yet to meet a sweet potato that I don't love. I can eat it plain boiled or baked and be perfectly fine. Once in awhile, I take a walk on the wild side and "do stuff" to the plain sweet potato so that it isn't so plain.
It helps when you buy a large bag from Costco and get all crazy. Fortunately, it's hard to ruin sweet potatoes. Even more fortunately, this recipe makes them better. This was just enough savory to complement the sweet potato perfectly. I made one minor mistake because I didn't read the directions carefully enough beforehand (oops) and sprinkled the Parmesan cheese on top the first time I put them in the oven. So the sprinkles got a bit burnt.
Fortunately, the potatoes survived me and my cooking, er, skills and were perfectly fine. It's best to cut the potato rounds a bit thick so they don't fall apart in boiling so easily and there's more sweet potato to enjoy with each serving.
4 medium or 3 large sweet potatoes
3 tablespoons melted butter
1 teaspoon garlic powder
1 tablespoon chopped parsley
salt and pepper to taste
2 tablespoons Parmesan cheese
  1. Cut sweet potatoes into thick discs, skins on. Place in large pot of salted water. Bring to boil, covered for 20-25 minutes or until just fork-tender. Drain.
  2. Preheat oven to broil, high heat setting. Line a baking sheet with parchment paper and lightly spray with nonstick cooking spray.
  3. Arrange sweet potatoes in single layer and lightly press with fork.
  4. Mix butter, garlic powder and parsley. Brush each sweet potato generously with mixture until evenly divided among the pieces. Sprinkle with salt and pepper. 
  5. Broil until they are golden and crispy, about 15 minutes. Remove from oven, sprinkle tops with parmesan cheese and return to the oven until the cheese is melted.


Sunday, February 19, 2017

Apple Crumb Coffee Cake

Apple Crumb Coffee Cake - made January 20, 2017 from NeighborFood
So...I kinda messed up on this recipe (and the pictures didn't turn out that well either). Fortunately, it survived me so you may want to keep reading. Otherwise, you're going to miss a really fabulous apple coffee cake.
I put together the crumb mixture, peeled and sliced the apples, and made the cake batter just fine. Had my 9 x 13 baking pan all lined with foil, sprayed with nonstick cooking spray, the oven was preheated, everything was good to go. Except when I started spreading half the batter for the bottom layer of the cake and there was hardly enough to cover 3/4 of the pan. Seriously, it looked like I was making a really big rectangular pancake. Never mind that the other half of the batter was supposed to cover all of the apples and a part of the crumb layer. Eek.
So I got the brilliant-to-me idea of using a smaller pan. In hindsight, I should've gone with a 10 x 10 pan as it was closer in size to the 9 x 13 I was supposed to use. But no, don't be silly; that would've made too much sense. Instead, I went with a 9 x 9 pan. The first half of the batter spread nicely and covered the bottom of the pan like it was supposed to at a height I would estimate would be great for the cake once it was baked.
The larger cake with the apples but you can't really see them
Except....I still had the apples to layer, then part of the crumb topping then the rest of the cake batter then the rest of the crumb topping. If you guessed I would have run out of room before I could layer all that, you guessed better than I did. I layered the apple slices, I crumbled the crumb topping on top and hit the top of the pan. And that was before baking. I knew the cake would rise so it would end up even higher.
Yeah, that's when I belatedly remembered how crumb cake was really all about the crumb, not the cake. As in, I had so much crumb topping that had I stuck to the 9 x 13 pan, things would have been fine. Fortunately, I knew enough not to insist on cramming everything in that 9 x 9 pan. Instead, I went with just the bottom cake layer, the apple layer and a generous amount of crumb topping on top. The extra batter and crumb topping I split between different ramekins.
Despite my blunder, this was an excellent crumb coffee cake. The crumb topping was probably one of the best I've ever made. It mixes together easily and is easy to squeeze into big lumps so you get gorgeous, crunchy-sweet topping on top of your baked cake. When making a crumb cake, you don't want crumb dust. No, you want big pieces of streusel that crisp up during baking provides a sweet crunch to go with the cake. Just bake it in a big enough pan.
Crumb
3 cups flour
1 cup brown sugar
1/2 cup granulated sugar
1 teaspoon salt
2 teaspoons cinnamon
1/2 teaspoon nutmeg
1 cup (2 sticks) butter, melted
1 teaspoon vanilla
2 large or 3 small tart apples, peeled and chopped (I used Granny Smiths)

Cake
8 tablespoons butter
1 cup granulated sugar
2 large eggs
1 teaspoon vanilla
1 cup sour cream
2 cups flour
1/2 teaspoon baking soda
1/2 teaspoon salt
1 teaspoon baking powder

Glaze
1 cup powdered sugar
1-2 tablespoons apple cider
1-2 tablespoons milk
pinch salt
  1. Preheat oven to 350 degrees. Line a 9 x 13-inc baking pan with foil and lightly spray with nonstick cooking spray.
  2. Crumb: In a mixing bowl, whisk together 3 cups flour, brown sugar, granulated sugar, salt, cinnamon and nutmeg. Add the melted butter and vanilla extract and stir until the mixture is evenly moist. Set aside.
  3. Batter: In a large bowl, cream together the butter and sugar until light and fluffy. Add the eggs, one at a time, beating well after each addition. Beat in the vanilla and sour cream. 
  4. In another bowl, mix together the flour, baking soda, salt and baking powder. Add to the butter mixture, stirring just until combined. Do not overmix.
  5. Spread half the batter into a thin layer at the bottom of the pan. Line the apple slices evenly over the batter. Top with about 1 cup of the crumble mixture, Spread the remaining batter over the top followed by the rest of the crumble. Squeeze some of the crumble into large chunks before topping the cake.
  6. Bake for 35-40 minutes or until a tester inserted in the center comes out clean. If top is getting too brown, lightly cover with foil for the last 10 minutes.
  7. While the coffee cake bakes, whisk together the powdered sugar, apple cider, milk and salt. Drizzle over warm cake and serve.

Thursday, February 16, 2017

Sweet Cornbread

Sweet Cornbread - made January 18, 2017 from High Heels and Grills
Cornbread always brings to mind Marie Callendar's, the restaurant chain known for its pies. I know it for both pies and cornbread. They always served the square of cornbread warm with butter melting on top and it seemed more like a cake than a quick bread. Which meant I liked it, of course.
I haven't gone to Marie Callendar's very much since my undergrad days, way, way back in the day. But I still like me some good cornbread. I don't like it enough to keep trying out different recipes for it though, mostly because the ones I've tried in the past have invariably been dense and sometimes dry with a gritty, crumbly texture. There's only so much dry cornbread warm, melting butter can save.
Fortunately, this wasn't like that at all. I made it with white cornmeal so it might not shriek (yellow) cornbread in the pictures and could try to pass itself off as vanilla cake. But nope, it's cornbread and pretty good cornbread at that. It lives up to its name as being "sweet cornbread" but that made it tasty to my sweet tooth. I also liked the texture which leaned more towards cakey rather than crumbly but still retained the slight grittiness of cornbread.
As always, you can't go wrong with serving it warm with melted butter on top. Even at room temperature it's still pretty good but go for the warm; it's worth it.
4 eggs, separated
1 cup milk
1 teaspoon vanilla extract
3/4 cup butter, melted
1 cup cornmeal
2 cups all-purpose flour
1 1/2 cups granulated sugar
1 tablespoon baking powder
1 teaspoon salt
  1. Preheat oven to 350 degrees F. Line a 9 x 13 pan with foil and lightly spray with nonstick cooking spray.
  2. In a medium-size bowl, combine egg yolks, milk, vanilla and melted butter; whisk to combine.
  3. Add the cornmeal, flour, sugar, baking powder and salt. Stir until fully combined but do not over mix.
  4. In a separate bowl, beat the egg whites until stiff peaks form. Gently fold them into the batter.
  5. Pour batter into prepared pan and bake for 25-30 minutes or until a toothpick inserted near the center comes out clean.

Monday, February 13, 2017

Sweet Potato Hash with Sausage and Eggs

Sweet Potato Hash with Sausage and Eggs - made January 17, 2017, modified from Delicious Meets Healthy
This is the kind of "real food" cooking I like to do. It's easy, it doesn't have too many ingredients and it's pretty healthy. With healthy being relative considering if you plugged a search for "chocolate chip cookies" on my blog, the results probably come back with more than 8 pages' worth of posts. And if you're of the camp that the nutrients of the sweet potato outweigh the affect on blood sugar levels, you might even consider it paleo-friendly if you're on the paleo way of eating.

I also consider this recipe pretty flexible in that, although it's meant to be a breakfast dish, it's good for any meal of the day. I modified it slightly from Delicious Meets Healthy, swapping out the original coconut oil for olive oil and adding a couple of the Penzey's spices I had on hand. I swear I'm not affiliated with Penzey's but I like their spices and love the company. I've been so bent on supporting them that I now have a drawerful of spices I need to use; hence my recent mania with cooking, almost more than baking.

The only drawback to this recipe is you really need to watch the baking once the eggs are cracked open on top. I was afraid of the yolks being runny so I think I kept the baking dish (I didn't have a cast iron skillet large enough) in the oven longer than I should have. Consequently, a film had baked over the eggs. While the yolks still looked undercooked, they actually weren't. In fact, they were as firm as if they'd been hardboiled, even if they didn't look it at first glance. Otherwise, I really enjoyed this dish - simple, hearty and (relatively) healthy.


1 pound bulk sausage
1 medium onion, chopped
2 medium-sized sweet potatoes, chopped
olive oil
salt and pepper to taste
Rosemary, to taste
Roasted garlic, to taste, optional
  1. Preheat over to 425 degrees F.
  2. Brown onions and sausage in a cast iron skillet. Transfer to a plate.
  3. Reduce heat to medium high, add 1 tablespoon olive oil and sweet potatoes. Stir occasionally until tender, about 10-15 minutes. Cover skillet with a lid while cooking.
  4. Once sweet potatoes are tender, add sausage and onions to the cast iron skillet. and stir together.
  5. Crack four eggs over sweet potato hash. Place cast iron skillet in oven and cook 10-15 minutes until eggs are set.

Friday, February 10, 2017

Skillet Snickerdoodle for One (or Two)

Skillet Snickerdoodle for One - made January 17, 2017 from Well Floured
Do you have portion control issues? Do you ignore my suggestion to make cookie dough ahead of time, put it in the freezer then bake off ONE cookie when you want one instead of baking (and eating) the whole batch? No joke, I've had friends give me the side-eye when I suggest the one cookie thing. "Who eats just one cookie?" they demand. Like I'm some kind of weirdo.
My ramekin runneth over - oops
Okay, fine. How about making one cookie then? Like this one for a skillet snickerdoodle. Granted, it's larger than your average cookie but maybe that'll make up for its single-ness.

You can tell a couple of obvious things from the picture right off. First, I didn't make this in a skillet. Because I didn't have one small enough. So I baked it in a ramekin. Which, second, turned out to be too small. I didn't think so at the time when I put the dough into the ramekin as it fit just right. I was shown the error of my ways halfway through baking when the dough puffed up and began spilling over the sides. Oopsie.
So if you don't have a 6-inch cast iron skillet either (I only had an 8-inch) and go the ramekin route, play it safe and divide the dough into two ramekins. I know, that's two cookies but that's better than losing some of the cookie to the bottom of the oven floor like I did. Which was a shame because this turned out to be a pretty good cookie. The edges were crisp and light, very airy. The middle was nicely chewy. It was a bit sweet though but a scoop of vanilla ice cream can temper that right quick. Wait a few minutes after you take the cookie out of the oven. If you put the ice cream on when the cookie is too hot, it melts too fast and you end up with melted goop over your cookie instead of actual ice cream. I like to give it 3-5 minutes then put the ice cream on top. The cookie is still warm and the ice cream remains cold in the time it takes you to eat the cookie.
3 tablespoons butter, room temperature
3 tablespoons sugar
1 egg yolk
1/2 teaspoon vanilla
1/3 cup flour
1/4 teaspoon baking soda
1/4 teaspoon cinnamon
1/4 teaspoon cream of tartar
1/8 teaspoon salt

Topping
1 teaspoon sugar mixed with 1/4 teaspoon cinnamon
  1. Preheat oven to 350 degrees
  2. Cream together butter and sugar until light colored. Beat in egg yolk and vanilla.
  3. Combine flour, baking soda, cinnamon, cream of tartar and salt. Add to the butter-sugar mixture and beat until just combined.
  4. Press dough into a 6-inch cast iron skillet and top with cinnamon-sugar mixture.
  5. Bake for 14-16 minutes or until edges are set and middle no longer looks raw. Serve warm with ice cream.

Tuesday, February 7, 2017

Gingerdoodles

Gingerdoodles - made dough January 17, 2017 from Kristine's Kitchen
Remember earlier when I said I wasn't much into the traditional flavors of Christmas, like gingerbread and such? But I did try a ginger molasses cookie recipe for the holidays. And, being on a one-track sense of purpose of using my fabulous spices from Penzey's (I swear I'm not affiliated with the company, I just like them and their spices), I decided to try another one even though it was past the holiday baking season.
 I compromised though and went with this "gingerdoodle", billed as a cross between a ginger cookie and a snickerdoodle. And I think that's a pretty apt description. The molasses keeps it from being a snickerdoodle but the cream of tartar, texture and rolling in cinnamon sugar before baking also beats back the traditional ginger molasses cookie. Instead, it's a pretty good blend between the two.

I prefer this over the traditional ginger molasses cookie, mostly because the molasses wasn't so overwhelming and I have a fondness for snickerdoodles. If you can't choose between one or the other, give this one a try as a way to have your cake cookie and eat it too.
2 1/2 cups all-purpose flour
1 teaspoon baking soda
1/2 teaspoon baking powder
1/2 teaspoon salt
1 teaspoon cream of tartar
1 teaspoon cinnamon
1/2 teaspoon ginger
1/4 teaspoon nutmeg
1/8 teaspoon cloves
1/2 cup (1 stick) unsalted butter, softened slightly
3/4 cup light brown sugar
1/4 cup granulated sugar
1/4 cup molasses
1 egg
1 teaspoon vanilla

Cinnamon sugar for rolling
3 tablespoons granulated sugar
1 teaspoon cinnamon
  1. In a medium bowl, whisk together flour, baking soda, baking powder, salt, cream of tartar, cinnamon, ginger, nutmeg and cloves.
  2. In the bowl of a stand mixer fitted with the paddle attachment, cream together butter, brown sugar and 1/4 cup granulated sugar. Mix in molasses, egg and vanilla. With the mixer on low speed, mix in the flour mixture until just combined. Do not overmix.
  3. Portion the dough into golf-ball-size dough balls, cover and chill or freeze for an hour or overnight.
  4. When ready to bake, preheat oven to 350 degrees F and line baking sheets with parchment paper.
  5. In a small bowl, stir together the 3 tablespoons granulated sugar and 1 teaspoon cinnamon (feel free to add more cinnamon if desired). Roll chilled or frozen dough balls in cinnamon-sugar, coating completely. Bake cookies for 9-10 minutes, until barely golden and set. Do not overbake. Let cookies cool on pan for 5 minutes then transfer to wire rack to cool completely.

Sunday, February 5, 2017

Soft Toffee Cookies

Soft Toffee Cookies - made dough January 10, 2017, modified from Call Me PMC
First batch - baked until middles were no longer raw
I thought I would like these cookies. Unfortunately I didn't. They weren't bad, per se. Just not my kind of cookie. I didn't think it was even possible that I had a cookie type I didn't like. I mean, who knew? But if you're not me and you do like soft, sweet, cakey, toffee cookies, this might be for you.

Cakey insides
You know I don't like cakey cookies and that was the first strike against this one. I didn't overbake it but took it out just when the middles didn't look like raw dough anymore. You can't eat it warm (strike 2) or the toffee is just sticky and hard to eat. But even at room temperature the edges were cakey and the middle was just kinda goo.
Same dough, second sheet, baked 10 minutes, still raw in the middle 

That was the first batch. So I tried it again when I had to make a goodie bag for a friend I was meeting for lunch and baked off the rest of the dough balls. This time, I actually timed how long I baked these and only went for the recommended 9-10 minutes (it was 10 minutes) before I took the cookies out even though the middles didn't look done. They weren't but when cooled to room temperature, I thought that would work and the cookies wouldn't be cakey because they hadn't baked long enough to get cakey. That worked but it just meant the cookies were really soft. And a bit too sweet (strike 3). Maybe it was because I froze the dough first rather than baking right away so it did need longer to bake than the 9-10 minutes specified in the recipe? Probably.
4 tablespoons butter, room temperature
1/2 cup brown sugar
1 teaspoon vanilla
1 egg
1 cup plus 1 tablespoon all-purpose flour
1/2 teaspoon baking powder
1/8 teaspoon salt
1/3 cup toffee bits
  1. Cream butter and sugar. Add vanilla and egg; mix just to combine.
  2. Add flour, baking powder and salt; mix until just combined.
  3. Fold in toffee bits. Portion into golf-ball-size dough balls and chill or freeze for 30 minutes to an hour (minimum).
  4. Preheat oven to 350 degrees. Line baking sheets with parchment paper and evenly space chilled or frozen dough balls. Bake 9-10 minutes or until edges are set and middles are no longer raw. 

Thursday, February 2, 2017

Salted Dulce de Leche Blondies

Salted Dulce de Leche Blondies - made January 7, 2017, modified from Butter Lust
I had a jar of dulce de leche from Trader Joe's that I bought before the holidays, intending to make sandwich cookies for my holiday baking gifts and sandwich the cookies with dulce de leche. Best laid plans and all that. No, I never made the cookies I'd planned on so that meant I had a jar of dulce de leche still sitting in my pantry, wondering how it was going to be used.
Pinterest once again to the rescue. I searched dulce de leche brownies and most of them were for chocolate brownies that essentially treated the dulce de leche like caramel and swirled it into the batter. Nothing wrong with that and if I'd had a jar of caramel, I might've tried one of those recipes. But I was in the mood for something non-chocolate that wouldn't compete with the dulce de leche flavor like chocolate would.
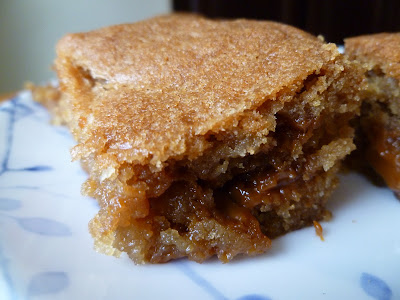
So I found this recipe from Butter Lust (great name). It's basically a blondie with a layer of dulce de leche in the middle. Perfect. I did modify the recipe though. The original one called for 2 teaspoons of coarse sea salt, hence the "salted" in the title. I put a slightly different spin on it by cutting the salt to 1 teaspoon in the batter (I used regular iodized salt) then sprinkling some fleur de sel over the layer of dulce de leche. I figured that would make the salt a little more prominent.
So....if you're still sticking to your New Year's resolution to watch your intake and eat more healthy, you're going to hate me. Because I'm going to advise you to make this recipe NOW. It was amazing and delicious and even more amazing. A simple buttery blondie with brown sugar caramel overtones makes it tasty enough. Add the dulce de leche for some decadence and you have a diet buster worth extra time in the gym. Don't let the pictures fool you - I couldn't get a good enough shot to get their goodness to come across. Try for yourself and see.
Let the blondies cool completely and set (if you can wait that long) or it'll be too mushy. I liked it at room temperature but if you like a more firm texture, try freezing it and eating it half-frozen or well chilled. Superb.
1 cup butter (2 sticks), room temperature
1/2 cup granulated sugar
1 cup light brown sugar, packed
2 teaspoons vanilla
2 eggs, room temperature
1 teaspoon baking soda
1 teaspoon salt
2 1/2 cups all-purpose flour
3/4 cup dulce de leche
1 teaspoon fleur de sel
  1. Preheat oven to 350 degrees F. Line a 9 x 9 baking pan with foil and lightly spray with nonstick cooking spray; set aside.
  2. In the bowl of a stand mixer fitted with the paddle attachment, cream together butter, granulated sugar and brown sugar.
  3. Add vanilla and eggs until just combined.
  4. On low speed, add baking soda, salt and flour, mixing until just combined. Do not overmix.
  5. Press 2/3 of the batter in the bottom of the pan. Bake for 10-12 minutes or until the bottom layer begins to set.
  6. Remove from oven and pour the dulce de leche evenly over bottom layer. Top with spoonfuls of the remaining batter, covering as much of the dulce de leche as possible and return to the oven.
  7. Bake another 20-25 minutes or until a toothpick inserted into the center comes out clean and blondies are golden brown. Cool completely before cutting.

Tuesday, January 31, 2017

Steak and Bean Chili

Steak and Bean Chili - made January 4, 2017 from Penzey's recipe archive
There was a time when I didn't really care for chili. I always thought it would be too spicy for me, there was too much "stuff" in it and it just wasn't my thing. Then I think I was on some "diet" (4-letter word) and it was one of the permissible foods so I tried it and from then on, I don't know why I didn't eat it more often.
I'm not dieting anymore (more or less) but I still like chili. It's a great winter-time meal and relatively healthy. I found this recipe on Penzey's site again because I was trolling for a way to use up the spices I had. This one is a twist on traditional chili in that it uses beef sirloin cubes rather than ground beef. But the hearty aspect remains.

I really liked this version. Although I'm not a fan of green pepper or big chunky onion pieces so I would go easy on those. But otherwise, this made for an excellent dinner.
1 tablespoon vegetable oil
2 pounds beef sirloin, cut into 1-inch cubes
1 large onion, coarsely chopped
1 medium green pepper, chopped
1 15.5-ounce can pinto beans, drained and rinsed
1 15.5-ounce can kidney beans, drained and rinsed
1 15.5-ounce can black beans, drained and rinsed
2 tablespoons regular chili powder
1-3 tablespoons ground cumin
2 28-ounce cans diced tomatoes, undrained
  1. In a large Dutch oven or stockpot, heat the oil over medium-high heat. Add half of the beef and cook, stirring occasionally, until nicely browned. 
  2. Place the browned beef in a bowl and repeat with the rest of the beef. Add the onion and bell pepper to the pot and cook for 2-3 minutes, stirring occasionally. Stir in the beans, chili powder, cumin and diced tomatoes.
  3. Cover and cook over medium heat for 10 minutes. Add the beef and cook, uncovered, until the beef is tender and heated through, about 5-8 minutes or longer if needed. Serve in large bowls with the toppings of your choice.