Saturday, August 6, 2022

White Chocolate Toasted Coconut Cookies from Baking with Blondie

1 cup unsalted butter, cubed and cold
1 cup brown sugar, packed
1/4 cup granulated sugar
2 large eggs, cold
1 teaspoon vanilla
3 1/4 cups all-purpose flour
1 teaspoon cornstarch
1 teaspoon baking soda
1 teaspoon salt
2 cups white chocolate chips
1 cup toasted coconut
  1. Preheat oven to 410 degrees F. Line baking sheets with parchment paper.
  2. In the bowl of a stand mixer fitted with the paddle attachment, cream butter for 1 minute until smooth and creamy. Add brown sugar and granulated sugar, mixing on high speed until well combined, 3 minutes.
  3. Add eggs, one at a time, and vanilla, mixing well after each addition.
  4. Add flour, cornstarch, baking soda and salt in two additions, mixing until just combined after each addition. Reserve a handful of white chocolate chips before adding the rest to the dough. Add toasted coconut and mix on low speed.
  5. Portion dough into 8 equal-sized dough balls. Evenly space four dough balls per baking sheet. Bake cookies, one sheet at a time, for 9-10 minutes. Remove from oven and immediately press reserved white chocolate chips over the tops of the cookies. Let cookies rest on baking sheet for 5 minutes before transferring to wire rack to cool completely.
If anyone's keeping track, this is the 4th recipe I've tried from Baking with Blondie's list of big cookie recipes. And, like the others, this was also delicious. In fact, this comes a close second, or even a near tie with her Biscoff White Chocolate Chip cookies. 
I can't even tell you why this one stands out since the base recipe is the same as the others. Perhaps it's the toasted coconut that gives it texture but, almost surprisingly, I really liked the white chocolate in it. And I'm not a white chocolate fan. But it worked extremely well in this cookie.

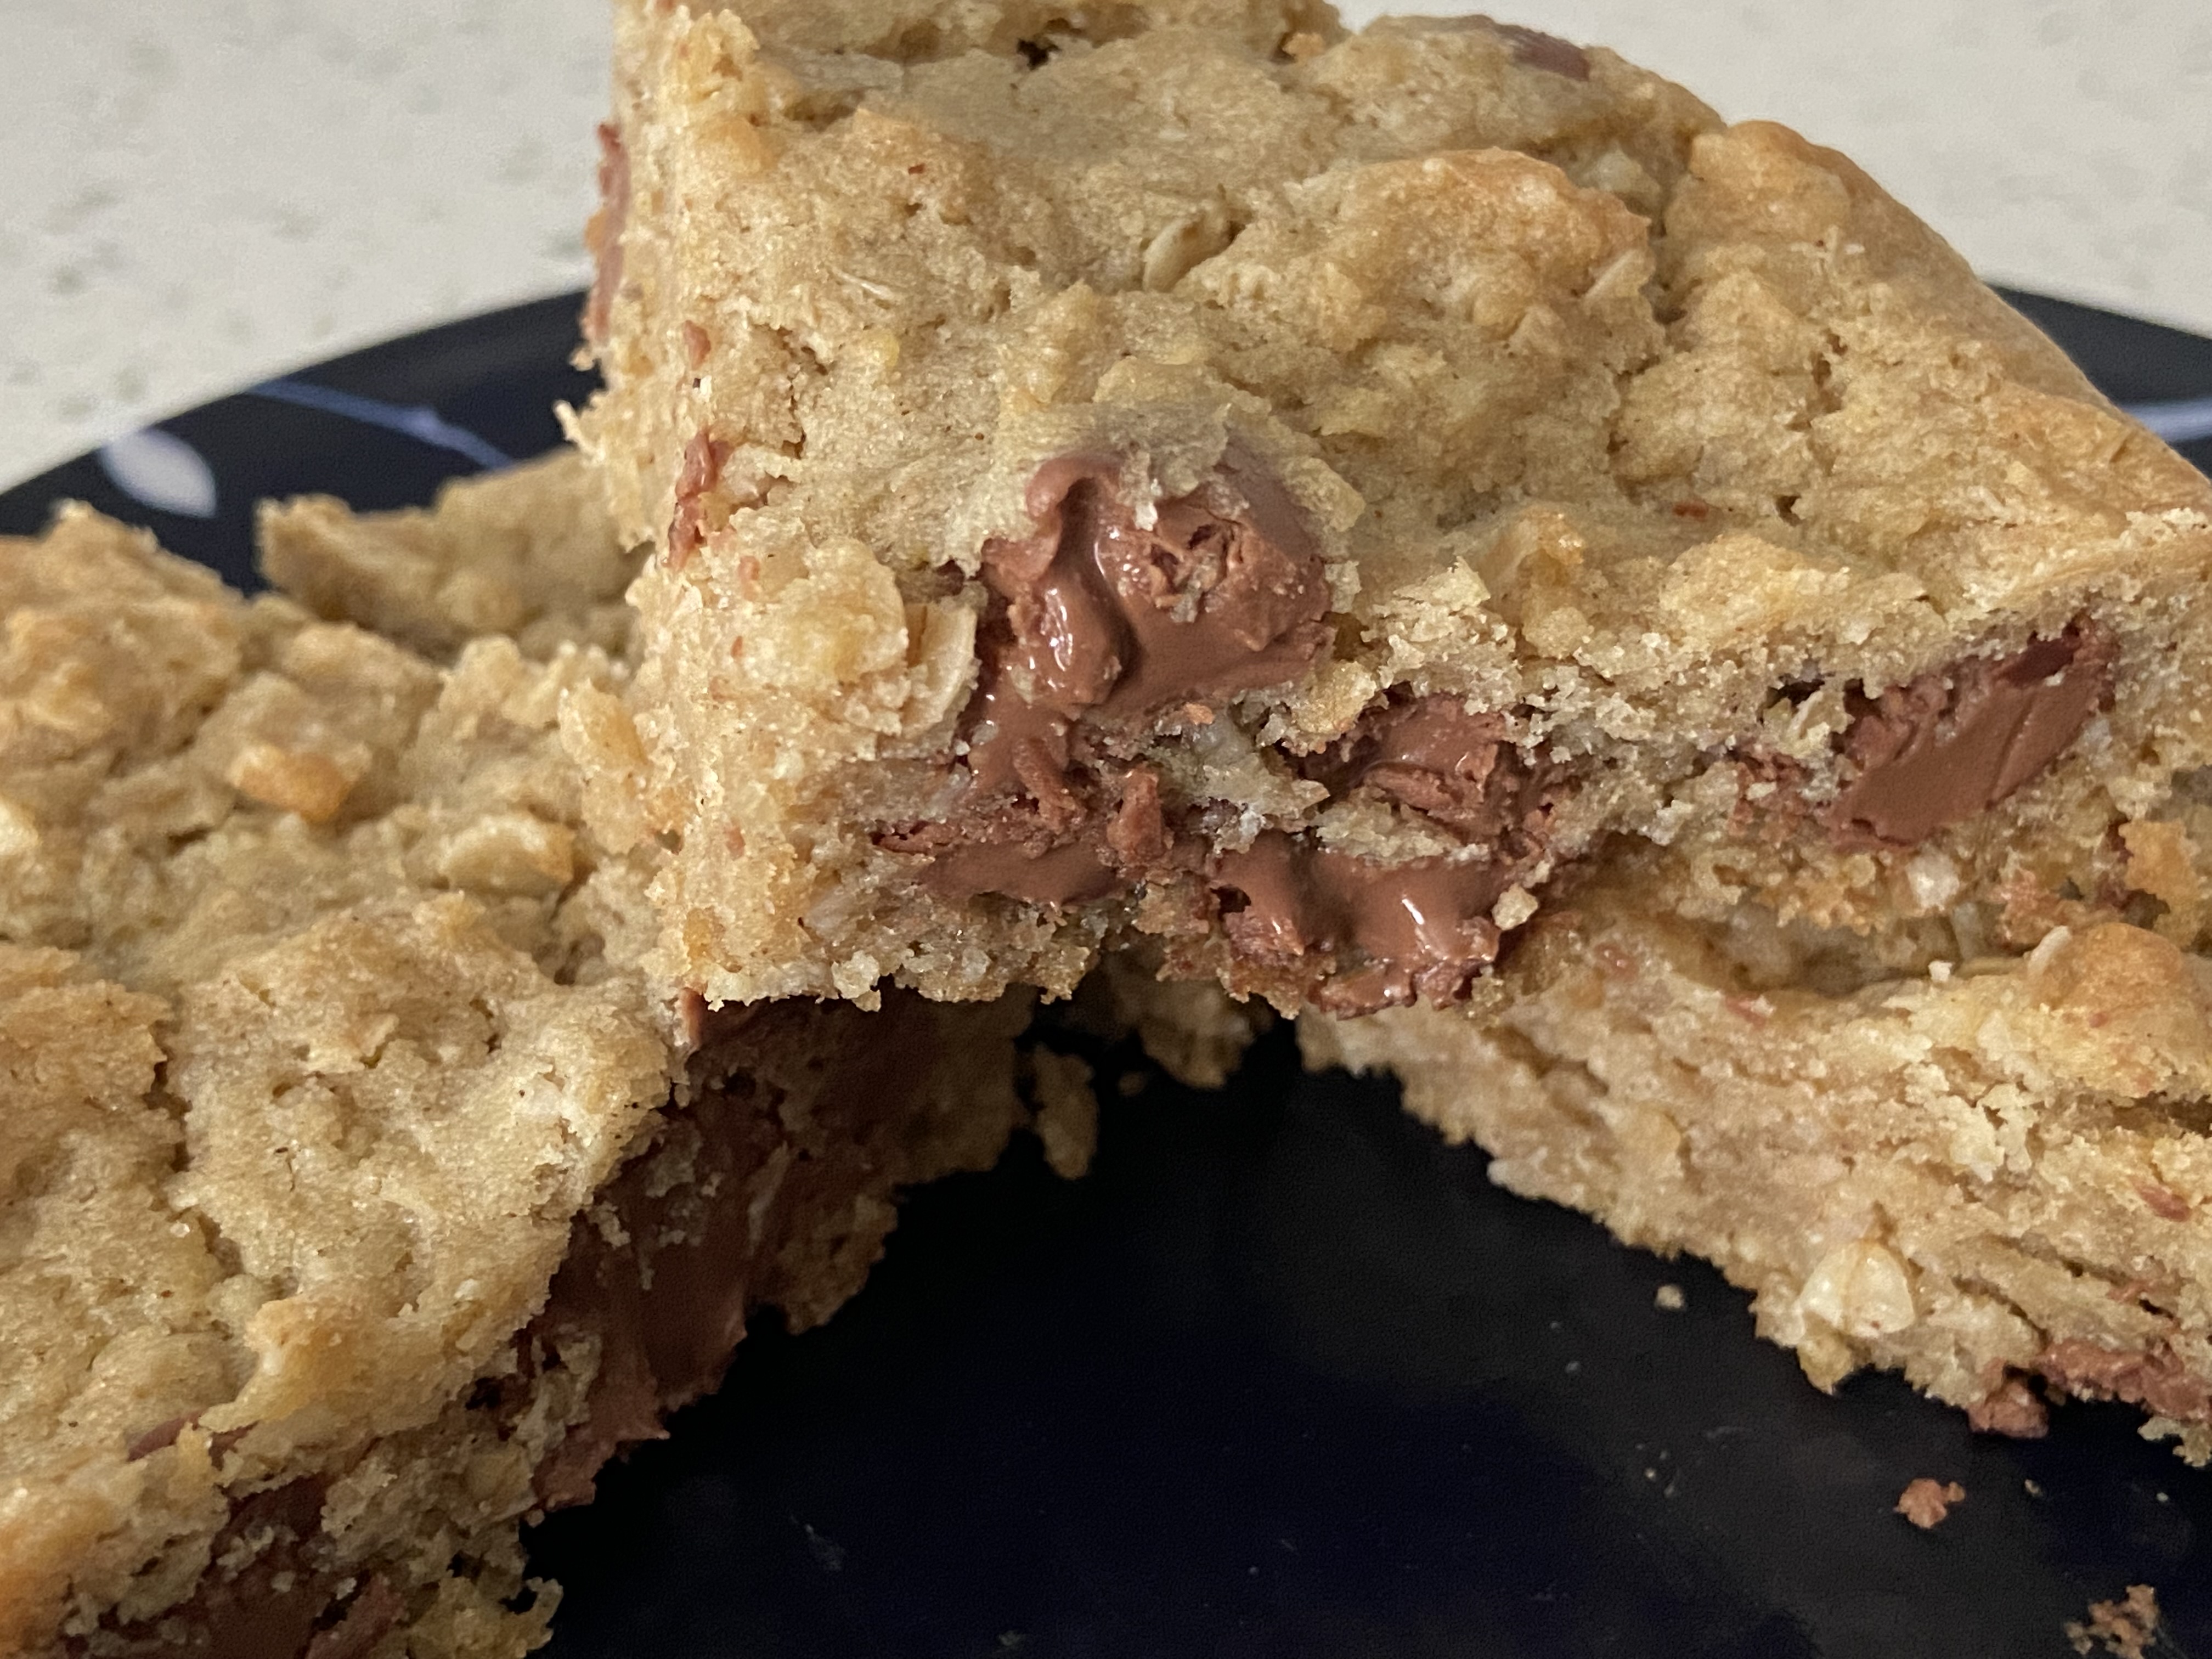
The (large) tester cookie

Inside the tester cookie

The inside of the tester cookie looks a little raw in the picture above as I broke it apart when it was still a little warm. But the picture below is when it was completely cool and you can see it's got the perfect (to me) texture. I loved this cookie.


Thursday, August 4, 2022

Crumbl Cookies review #26: Oatmeal Chocolate Chip and Maple Glaze

Crumbl Cookies review #26: Oatmeal Chocolate Chip & Maple Glaze, July 23, 2022


I only bought the Oatmeal Chocolate Chip this week as that's all I really wanted to try but someone brought my sister a 4-pack so I split the Maple Glaze with my niece and gave her and her boyfriend the other cookies (Oreo and Chocolate Mallow Cupcake).
Oatmeal Chocolate Chip
I probably could've skipped this week. I like Oatmeal Chocolate Chip but it didn't strike me as a special flavor and is one I could make myself. But apparently that Crumbl habit is hard to break. I was supposed to be on a Crumbl break, remember? Yeah, that's not working out.
The main reason I got it was not only to try a different Crumbl cookie I hadn't had before but also because they use milk chocolate chips. Among Crumbl consumers, there's quite the heated debate about milk chocolate vs semisweet. Like suit-up-for-battle worthy online debates between keyboard warriors (sorry, but *eyeroll*). They're cookies and chocolate chips. Eat what you enjoy and let others do the same. Don't buy what you don't like. Buy what you do. Okay, off my soapbox. In any case, milk chocolate is what led me to buy this cookie. A purchase in support of milk chocolate usage is worth more than furious typing between online strangers.
I did enjoy this cookie. It's not quite as oatmeal-ish as a regular oatmeal cookie. It was more like their regular milk chocolate chip with some oatmeal and a little cinnamon thrown in. It was good. Not sure I need to get it again now that I've tried it but I enjoyed it.
Maple Glaze
I didn't enjoy the Maple Glaze as much. I'm not a big maple fan in the first place, although I don't mind some good Vermont maple syrup on my pancakes. But it wasn't the maple that bothered me in this cookie since it was just a glaze drizzle.
No, it was more all the brown sugar on top. I'm not one who shies away from sugar, as years of blogging about baked goods will prove, but I didn't love the brown sugar in its purest form all over the top of the cookie. That made it too sweet. You can imagine I don’t say that too often. This goes in the glad I tried it, wouldn't get it again category.

Monday, August 1, 2022

White Chocolate Chip Biscoff Cookies from Baking with Blondie

1 cup (2 sticks) unsalted butter, cold and cubed
1/2 cup biscoff spread
1 cup brown sugar, packed
1/4 cup granulated sugar
1 teaspoon vanilla
2 eggs, cold
3 1/2 cups all-purpose flour (can also substitute half cake flour)
10 whole Biscoff cookies, crushed to a powder in a food processor or with a rolling pin
1 teaspoon cornstarch
1 teaspoon baking soda
1 teaspoon salt
1 1/2 cups white chocolate chips
6 biscoff cookies, crumbled for garnish
  1. Preheat oven to 410 degrees F. Line baking sheets with parchment paper.
  2. In the bowl of a stand mixer fitted with the paddle attachment, cream the butter for 1 minute, until light and fluffy. Add biscoff spread, brown sugar and granulated sugar, mixing at high speed until well combined, 2-3 minutes.
  3. Add vanilla and eggs, one at a time, mixing well after each addition.
  4. Add the flour, Biscoff cookie power, cornstarch, baking soda and salt, mixing on low speed until just combined. Do not overmix.
  5. Reserve a handful of the white chocolate chips and fold remaining chips into dough. Portion dough into 8 equally-sized large dough balls. Place 4 dough balls on each baking sheet and press Biscoff cookie crumbles on top of each cookie.
  6. Bake for 9-10 minutes; remove from oven and immediately press reserved white chocolate chips on top. Let rest on baking sheets for 5 minutes then transfer to wire rack to cool completely.
I'm getting a little obsessed with the recipes for big cookies on Baking with Blondie's blog. The base recipe seems to be the same or close enough for most of them with a few variations depending on the flavor. Which means they're all turning out reliably, consistently delicious.
This one was no exception. If you're a cookie butter lover, turn on your oven and break out your mixer. These are freaking delicious. If you like big, soft, chewy cookies, that is. If you like your cookies thin, flat and crispy, sorry, these won't be to your taste. But if you like your cookie texture somewhere between cookie dough-like and soft cakey-chewy cookie, loosen that waistband and dig in.
What I love about her recipes is the cookie dough always handles beautifully, not too soft or sticky and not dry or crumbly, despite the hefty amount of dry ingredients. I made 3 baseball-sized behemoth cookies first then portioned the dough into normal-people and care package-sized cookies. 
I sent 2 of the big cookies in a care package to a coworker friend and her husband on the East Coast and kept the third big cookie as my taste test cookie. Like a Crumbl cookie, I did cut it into fourths and ate a fourth for the taste test (the other 3/4 went into the freezer to be doled out on my running workout days).  That's how I could swear blind this is one of the best cookie butter cookies I've eaten. The white chocolate complements it perfectly, the cookie butter flavor comes through and the garnish of cookie butter cookies add a great crunch. This jumps straight to my holiday baking list. Yes, they're that good.


Friday, July 29, 2022

Gemma's Best-Ever Brownies from Bigger Bolder Baking

Gemma's Best-Ever Brownies - made July 23, 2022, modified from Bigger Bolder Baking
1 cup (2 sticks) unsalted butter, melted
2 tablespoons canola oil
1 cup plus 2 tablespoons brown sugar, packed
1 cup plus 2 tablespoons granulated sugar
4 large eggs
4 teaspoons vanilla extract
1 teaspoon salt
1 cup all-purpose flour
1 cup unsweetened cocoa powder
1 1/2 cups chocolate chunks
  1. Preheat oven to 350 degrees F. Line 9 x 9-inch baking pan with foil and lightly spray with nonstick cooking spray.
  2. In a large bowl, combine melted butter, oil, brown sugar and granulated sugar. Add eggs, vanilla and salt, whisking until combined.
  3. Sift in flour and cocoa powder, mixing until just combined. Do not overmix. Fold in half the chocolate chunks.
  4. Pour batter into prepared pan and smooth top. Generously top with remaining chocolate chunks. Bake 35 - 40 minutes (mine baked just over 50 minutes) or until toothpick inserted near the center comes out with moist crumbs, not raw batter. Let cool completely.
I must say, I'm starting to enjoy trying out all these new brownie recipes that primarily use cocoa powder rather than unsweetened chocolate as the chocolate base. I'm still hoarding my remaining unsweetened chocolate as I'm unlikely able to order the high quality stuff online until the summer months and triple digits temps have passed. So no replenishment possibilities for at least a good 3-4 more months. Eeek.
In the meantime, I'm finding really good substitute recipes to use, including this one from Bigger Bolder Baking. Her original recipe called for baking in a 7 x 11 pan which I don't have. Normally, when you substitute pans, you simply multiply the dimensions (7 x 11 = 77) and find something close like an 8 x 8 pan = 64 or a 9 x 9 = 81. In the case of this recipe, I went with the 9 x 9 pan and it baked the brownies to a perfect thickness.

I liked this recipe. The brownies came out soft and fudgy but not mushy. I didn't underbake too much this time although they did bake a good 50 minutes and change in my oven. The key to baking brownies "just right" (which means slightly underbaked and not dry) is to take them out when a toothpick inserted in a corner comes out clean but one inserted in the middle comes out with a few moist crumbs.
1 cup of unsweetened cocoa powder is a lot so make sure you're using a good quality cocoa. I still have some of the cocoa powder from Chef Shop which used to be the Pernigotti cocoa I always used. It's a dark rich cocoa powder which can be a little overwhelming if you use the full cup measure. I cut it with half the cocoa powder from Costco which isn't as dark and rich but is certified fair trade so I combine the two to get to a perfectly rich but not overwhelming or cloying dark chocolate flavor. It worked great in these brownies.

Thursday, July 28, 2022

Crumbl Cookies review #25: Chocolate Toffee Cake, Peanut Butter Munch, Strawberry Pop Tart, Double Fudge Brownie, Lemon Cupcake

Crumbl Cookies review #25: Chocolate Toffee Cake, Peanut Butter Munch, Strawberry Pop Tart, Double Fudge Brownie, Lemon Cupcake - visited July 16. 2022
I said in my last Crumbl review that I was going to skip Crumbl for awhile. And I had every intention of doing so but my mom, knowing how much I like Crumbl, said her birthday gift to me would be Crumbl cookies. Okay. Who am I to say no? Thanks, Mom.
At least I did let almost two weeks lapse though. Meaning I got cookies on a Monday the week before and on Saturday the following week. Which is the longest period you can go without skipping a week since Crumbl is closed on Sundays. I wasn't interested in all of the week's flavors but I asked my niece which ones she and her boyfriend wanted. They asked for the Chocolate Toffee, Peanut Butter "mystery cookie" (it was the Muddy Buddy the day I went to my local store) and Strawberry Pop Tart. I only wanted the Lemon Cupcake but I also got the Double Fudge Brownie. To round out the 6-pack, I got an extra lemon as I figured either my mom or my niece would want that one.
 
Chocolate Toffee Cake ft Heath
Although I did drop off 4 of the 6 cookies with my niece, I did get a taste of the Chocolate Toffee Cake ft Heath (all in the name of blog research of course). I liked the cookie base of this one in terms of flavor and you can't go wrong with toffee bits. I didn't care for the whipped cream icing and would've preferred either a straight buttercream or a ganache. I wouldn't get this one again because of the whipped cream. You'll also notice from the picture that the toffee bits topping was a little wonky, like they decided to only top half the cookie, lol. I don't sweat the small stuff like that though and didn't ask them for more toppings. The employees at my local Crumbl store are always pleasant and friendly and I care more about that than how loaded my cookie toppings are (or are not).

Peanut Butter Munch ft Muddy Buddies
I can't tell you how the peanut butter cookie was since I didn't try it but here's what it looked like inside and out.

Strawberry Pop Tart
I didn't try the Strawberry Pop Tart either. There seems to be inconsistency across the different Crumbls how much strawberry filling is inside. You can see the one I got didn't have much. My niece's boyfriend said it didn't really taste like strawberry pop tart since it didn't have a lot of strawberry. Both he and my niece thought it was good but "basic".
you can barely see the filling

Double Fudge Brownie
I did keep the Double Fudge Brownie for myself although by the time I tried a piece, it had already cooled. The outer edge of the cookie was fragile and broke off when I picked up the cookie. It was good although it had a slightly dry mouthfeel. Towards the middle of the cookie was fudgy perfection though. I tried just enough to confirm it was a nice chocolatey cookie. Not sure I'd get it again but it was good.


Lemon Cupcake
I did enjoy the Lemon Cupcake. I love lemon cookies and I love cakey sugar cookies. This delivered on both fronts. Mine was nicely tart and lemony. I didn't need all that frosting but I loved the cookie.


Tuesday, July 26, 2022

Ultimate Chocolate Cookies from Baking with Blondie

Ultimate Chocolate Cookies - made dough July 12, 2022 from Baking with Blondie 
1 cup (2 sticks) unsalted butter, cold and cubed
1 cup brown sugar
1/4 cup granulated sugar
2 large eggs, cold
1 tablespoon vanilla 
3 1/4 cups all-purpose flour
1/2 cup cocoa powder
1 teaspoon cornstarch
1 teaspoon baking soda
1 teaspoon salt
1 cup semisweet chocolate chips
1 cup milk chocolate chips
1 cup mini chocolate chips
  1. Preheat oven to 410 degrees F (not on a convection setting). Line 2 baking pans with parchment paper.
  2. In the bowl of a stand mixer fitted with the paddle attachment, cream butter for 1 minute until light and fluffy. Add brown sugar and granulated sugar; cream together for 3 minutes on high speed. Scrape down the sides and bottom of bowl to keep mixture even textured.
  3. Add vanilla and eggs, one at a time, mixing well after each addition.
  4. Add flour, cocoa, cornstarch, baking soda and salt, mixing on lowest setting until just combined. Do not overmix.
  5. Reserve a handful of each type of chips then fold in the rest into the cookie dough.
  6. Portion dough evenly into 8 large dough balls. Hand press the reserved chips over the dough balls and evenly space 4 cookie dough balls onto each sheet.
  7. Bake for 9-10 minutes then remove from oven and let rest on baking sheets for 1 minute. Transfer to wire cooling rack to cool completely.
Where are my chocoholics? Break out your baking sheets because you're going to want to make these cookies right now. And unlike 99% of the cookie recipes I post, I'm going to give you the good news that you don't even have to chill or freeze these first to get a chubby cookie. Yes, they'll still bake nice and thick.
I made this cookie dough in hot (>100 degrees) weather and the dough still handled beautifully. Not too soft or sticky but just right. Of course you do have to start with butter cold from the refrigerator but even better because you don't have to wait for the butter to soften to room temperature either.
They may not look "that thick" in these pictures but that's just the angle of the photos. Trust me. Or don't trust me but scroll all the way to the last picture of this post to get the full view of the inside and the thickness. And that cookie was the test cookie I baked as soon as I made the dough, without chilling it.

I only baked off one test cookie when I first made the dough. I portioned out the rest and froze those to bake later when I was making up care packages for Soldiers Angels.  I followed the original recipe directions to only make 8 cookie dough balls. Because you want these big.

In fact, each cookie was so big that I only ate half of the test cookie after baking and cooling. Never fear though, I went back for the other half the next day. It was so good. Perfectly chocolate with that thick-cookie texture I love. 
A few cautionary notes: do bake these at 410 degrees. Yes, that's high for cookies but it's how to get the outside to set and have a crust while the inside remains soft and fudgy. The downside is your chocolate chip tips will burn a bit. Either tuck them, tip side in, into the dough or else don't do what I did and stick the chips on top before baking. Wait until after they come out of the oven then swarm those suckers with chips all over their domed tops.
Second cautionary note is you might be tempted to leave them in longer than 10 minutes, thinking the cookies couldn't possibly have baked long enough. I was afraid of that too. But see the fissures in the cookie around the edges (in the picture above)? That's done enough. 
Besides. when the cookies cool completely (and please let them cool to get the fudgy texture), they'll set and give you the best texture. The last picture says a thousand words.