Tuesday, December 10, 2019

Beef Teriyaki Noodles

Beef Teriyaki Noodles - made November 25, 2019, modified from Chef Savvy
I got the original recipe from Chef Savvy's blog but there's a note on the page that asks for the recipe not to be published. That's always a little surprising as I think recipes should be shared (and due credit given, of course). But I respect the request and she has every right to make it. So I made some changes. I could probably have just made her recipe as is but since I couldn't post it here, I thought I might as well change it up and do my own thing. So I'm not sure how her original recipe would've tasted but I've linked to it in the post title so feel free to check it out.

This is another easy dish to make. You just have to prep the individual elements then they come together in a simple dish very quickly. I didn't have green onions and I couldn't find the jar of sesame seeds I know I have somewhere so mine looks a little plain. But, fortunately, I have very plain taste buds so beef, udon noodles and a tasty sauce is all I need to be happy with my cooking efforts.
I rarely get the noodles to sauce ratio right so this ended up with a little more sauce than noodles but that's preferable to a dry dish of too many noodles and not enough sauce. This reminded me of beef with oyster sauce and, to be honest, in a blind taste test, I probably couldn't have distinguished between the two. But the sauce was creamy and had flavor plus I love udon noodles so it worked for me. This isn't spicy at all but if you want a little heat, feel free to sprinkle with some crushed red pepper flakes.
1 pound sirloin steak, cut into strips
1/4 cup cornstarch
1 pound udon noodles
2 tablespoons oil
3 cloves garlic, minced
2 teaspoons ground ginger
1/2 cup soy sauce
1/3 cup mirin
1/3 cup dark brown sugar
1 teaspoon sesame oil
2 teaspoons fish sauce
1 teaspoon cornstarch
1 tablespoon water
green onions and sesame seeds for garnish
  1. Toss together beef and cornstarch; let sit, covered, for 15 minutes.
  2. Thaw udon noodles and soak in hot water for 10 minutes.
  3. In a separate bowl, combine soy sauce, mirin, brown sugar, sesame oil and fish sauce; set aside.
  4. Heat oil in large skillet. Stir in garlic and cook until lightly browned. Add beef and quick fry until browned on both sides, 2-3 minutes; do not overcook. Add ginger and stir to combine.
  5. Add the soy sauce mixture and bring to a simmer, 2-3 minutes.
  6. In a small bowl, combine cornstarch and water to make a slurry. Slowly add to the simmer mixture and whisk to combine. Cook for 2-3 minutes until sauce has thickened. Add udon noodles and toss to combine. Cook, stirring, until udon noodles is desired consistency. Serve hot with green onions and sesame seeds.

Sunday, December 8, 2019

Maida Heatter's Brownies

Brownies - made November 19, 2019, modified from Happiness is Baking by Maida Heatter
You'll probably see me posting more brownie recipes in the coming months. Now that I'm sending care packages to deployed service members and because I don't have a food sealer (yet) I'm falling back on brownies to put in the care packages since they ship well and have a longer shelf life.
I'm also (again) trying to use the baking books I have. This one from Maida Heatter isn't how I normally make brownies. Her recipe calls for beating the eggs and sugar for 15 minutes - eeek. I never beat the batter that long after the eggs are added as that's what forms the meringue-like crust on top of brownies. I don't like crusty brownies so it was strikingly hard to follow the recipe directions and have the mixer on for so long.
But I confess, I only held out for 10 minutes then I couldn't stand it any long and stopped it there. I cheated the mixing process by 5 minutes. Not sure what difference it made, if any. The brownies came out okay, if a bit thinner than I like my brownies. And that's even after I made them in a 9 x 13 pan instead of a jelly roll pan. For the add-ins, I chopped up the last of my Halloween candy which were Hershey's cookies ' creme bars. These were okay. Can't say I loved them. They make a good, standard brownie but I think I'd prefer some of my other recipes for thicker, richer, more fudgy brownies. Like Ultimate Fudge Brownies, Essence of Chocolate Squares or Forever Brownies.
5 ounces unsweetened chocolate
6 ounces (1 1/2 sticks) unsalted butter
1 tablespoon instant espresso or coffee powder
4 large eggs
1/2 teaspoon salt
2 cups granulated sugar
1 teaspoon vanilla extract
1/4 teaspoon almond extract (I used vanilla extract)
1 cup sifted all-purpose flour
10 ounces walnut halves or pieces, optional
  1. Preheat oven to 450 degrees F. Line a 9 x 13" baking pan with foil and lightly spray with nonstick cooking spray.
  2. Melt the chocolate and butter in the top half of a double boiler set over hot water, whisking until smooth, melted and combined. Add instant coffee or espresso powder and whisk until melted and smooth. Remove from heat and set aside.
  3. In the bowl of a stand mixer, beat the eggs and salt until slightly fluffy. Gradually add the sugar and beat at medium high speed for 15 minutes, until the mixture forms a ribbon when the beater is raised. Add the vanilla and almond extract to the melted chocolate mixture.
  4. On low speed, add the chocolate mixture to the egg mixture, beating only until just combined.
  5. On low speed, add the flour and beat until just combined. Fold in the nuts, handling the mixture as little as possible.
  6. Pour into prepared pan and spread smooth. Place in oven and immediately reduce heat to 400 degrees. Bake for 21 to 22 minutes. Test with a toothpick; it should come out with a few moist crumbs. Do not overbake.

Saturday, December 7, 2019

Oven Baked Korean Fried Chicken

Oven Baked Korean Fried Chicken - made November 14, 2019 from Girl in the Little Red Kitchen
I was so enamoured of my first attempt at Korean Fried Chicken that I had to make it again. Only this time I wanted to avoid the mess of deep frying and try out this oven-baked version.
This one didn't turn out quite as well but I think that was more user error than anything to do with the actual recipe. Ideally, this recipe would work best with chicken wings. Except when I was at Costco, the chicken wings seemed way more expensive than they should've been. The chicken drumsticks were cheaper so my thrifty little soul went with that.
I dutifully went through all the breading instructions: coat in flour, dip in egg, roll in bread crumbs, dip in flour then egg again, dredge in panko crumbs. It was a bit messy but not the same mess if I had been deep frying.

And once you put them in the oven, you can forget about them until they're done. Which makes oven-"fried" an appealing alternative. Except the breading was heavier than the deep fried version and I have to admit, it wasn't as light and crunchy as the first KFC I made. So there are trade offs.

Because the drumsticks were so much bigger than chicken wings and drummettes and because I didn't make any alterations to the sauce recipe, I ended up with too much chicken and not enough sauce.
What sauce there was though was pretty good. Probably would've been a bit better with deep fried chicken but that would've defeated the purpose of oven-fried. So if you don't want the mess of deep frying, this is a good option. Not sure I would bill them as that much healthier than deep fried though, given all the breading. I'm going to have to try an air fryer version and see which works best.
2 lbs chicken wings and drummettes (I used drumsticks)
3 cups flour
3 cups plain bread crumbs
4 cups panko crumbs
4 large eggs
2 tablespoons soy sauce
salt and pepper to taste
5 tablespoons vegetable oil

Sauce
1 tablespoon fresh ginger, minced
2 garlic cloves, minced
1/3 cup gochujang (Korean chili paste)
1/4 cup honey
2 tablespoons soy sauce
2 tablespoons rice wine vinegar
1 teaspoon sesame oil
sesame seeds for garnish
  1. Preheat oven to 450 degrees F. Line a rimmed baking sheet with foil and place a wire rack on top.
  2. Place flour, eggs, bread crumbs and panko in separate shallow bowls. Season chicken pieces with salt and pepper. Whisk eggs with 4 tablespoons soy sauce and 2 tablespoons water. Mix the panko with the oil.
  3. Thoroughly dry the chicken with paper towels. Coat each piece with flour then dip in egg wash then bread crumbs. Dip the chicken back in flour, again in egg wash then in panko. Transfer the coated chicken to the wire rack.
  4. Once all the chicken is fully breaded, bake at 450 degrees for 15 minutes. The chicken should be golden brown at this point. Reduce the temperature to 375 degrees and continue to cook for another 20-30 minutes or until cooked all the way through. Remove from oven.
  5. Meanwhile, make the sauce: in a small saucepan over medium heat, combine ginger, garlic, gochujang, honey, soy sauce, rice wine vinegar and sesame oil. Bring to a simmer, reduce heat to low and cook for 5 minutes.
  6. Remove from heat and pour over the chicken. Toss to coat completely. Garnish with sesame seeds if desired.

Thursday, December 5, 2019

Chocolate Whoppers

Chocolate Whoppers - made dough November 19, 2019 from Happiness is Baking by Maida Heatter
Whenever I make chocolate cookies, I wish I was a better food photographer. No matter what I do, I can't make the pictures of the cookies come out as well as they taste. I've even had someone insult how a past chocolate cookie looked in a picture I posted a few years ago. Sigh.
This cookie is very rich. And you know I have a high tolerance for chocolate richness so if *I* say they're rich, trust me, they're rich. But that's not a bad thing when it comes to chocolate anything, particularly chocolate cookies. But I do advise making these a little small. Or be like me and take an hour to eat a cookie, pausing for sips of water in between. Chocoholics, rejoice, this is your cookie.
The only baking caution is to time these and take them out at 15-17 minutes, no more. No, they won't look "done" and the middles will look raw. Never mind. Take them out anyway and let them cool completely. The chocolate will set and you'll get that fudgy middle. They're just fragile though so I wouldn't suggest mailing these in a care package.
2 ounces unsweetened chocolate
6 ounces semisweet chocolate
3 ounces (3/4 stick or 6 tablespoons) unsalted butter
1/4 cup sifted unbleached all-purpose flour
1/4 teaspoon baking powder
1/2 teaspoon salt
2 large eggs
3/4 cup granulated sugar
2 teaspoons instant espresso or coffee powder
2 teaspoons vanilla extract
6 ounces (1 cup) semisweet chocolate morsels
4 ounces (generous 1 cup) walnuts, chopped or broken into large pieces (I left them out)
4 ounces (generous 1 cup) toasted pecans, chopped or broken into large pieces (I left them out)
  1. Place the unsweetened chocolate, semisweet chocolate and butter in the top half of a double boiler set over hot water on moderate heat. Cook, covered, for a few minutes. Then stir occasionally until melted and smooth. Remove the top of the double boiler and set aside, uncovered, to cool slightly.
  2. Sift together the flour, baking powder and salt; set aside.
  3. In the bowl of an electric mixer, beat the eggs, sugar, coffee or espresso and vanilla at high speed for 1-2 minutes.
  4. Beat in the melted chocolate and butter on low speed just to mix. Add the sifted dry ingredients and beat on low speed until just combined. Stir in the chocolate morsels, walnuts and pecans.
  5. Using a 1/3 cup measuring cup, portion out the dough into mounds. Cover, chill or freeze for several hours or overnight.
  6. When ready to bake, preheat oven to 350 degrees F. Line baking sheets with parchment paper.
  7. Evenly space chilled or frozen dough balls on prepared baking sheets. Bake for 15-17 minutes, no longer. Let set on baking sheets for several minutes before removing to wire cooling racks to cool completely.

Tuesday, December 3, 2019

Oatmeal Spice Muffins

Oatmeal Spice Muffins - made November 18, 2019 from Five Heart Home
I baked these muffins due to a conversation I had with my sister.
Her: I'm going to bake muffins for my office mates because they helped me move.
Me (pause, remembering she burned slice and bake cookies when we were kids): Do you know how?
Her: No.
Me: Do you want me to bake them?
Her: Oh, would you?

Okay, even she admitted that was a little passive aggressive. Not to mention predictably easy to get me to bake. Not just because I like to bake but because my sister can cook but she can't bake. She just can't. So, you're welcome, helpful office mates.

I usually don't make muffins but she wanted something "healthy" and we all know muffins pretend to be a healthy alternative to cupcakes. Pretense gets kicked up a notch when you make oatmeal muffins.
These actually turned out pretty well. I wouldn't consider them super healthy but they did have a nice crumb and texture. And they weren't too sweet. You can kick up the sweetness a notch by sprinkling coarse sugar generously over the tops before baking but otherwise, this makes a good breakfast muffin. I only made a half recipe and used paper liners larger than the standard cupcake size so I only got 8 muffins out of the half recipe.

2 cups rolled oats, not quick-cooking oats
2 cups buttermilk
2 cups all-purpose flour
2 teaspoons baking powder
1 teaspoon baking soda
1 teaspoon salt
2 teaspoons cinnamon
1 teaspoon nutmeg
1 cup packed brown sugar
2 eggs
1 cup (2 sticks) unsalted butter, melted and cooled
1 teaspoon pure vanilla extract

  1. In a large bowl, stir together oats and buttermilk. Let sit at room temperature for 30 - 60 minutes.
  2. Preheat oven to 400 degrees F and line 24 muffin cups with paper liners. 
  3. In a medium bowl, whisk flour, baking powder, baking soda, salt, cinnamon and nutmeg together; set aside.
  4. Once oats have finished soaking, stir in brown sugar and eggs into mixture. Mix in melted butter and vanilla. Blend in flour mixture.
  5. Evenly divide batter between prepared muffin cups. Bake for 20-25 minutes or until tops of muffins are golden brown and toothpick inserted in centers comes out clean. Cool muffins in pans for a few minutes before turning out onto a cooling rack to cool completely.

Sunday, December 1, 2019

Pancit Lug-Lug aka Pancit Palabok

Pancit Lug-Lug - made November 12, 2019 from Kawaling Pinoy
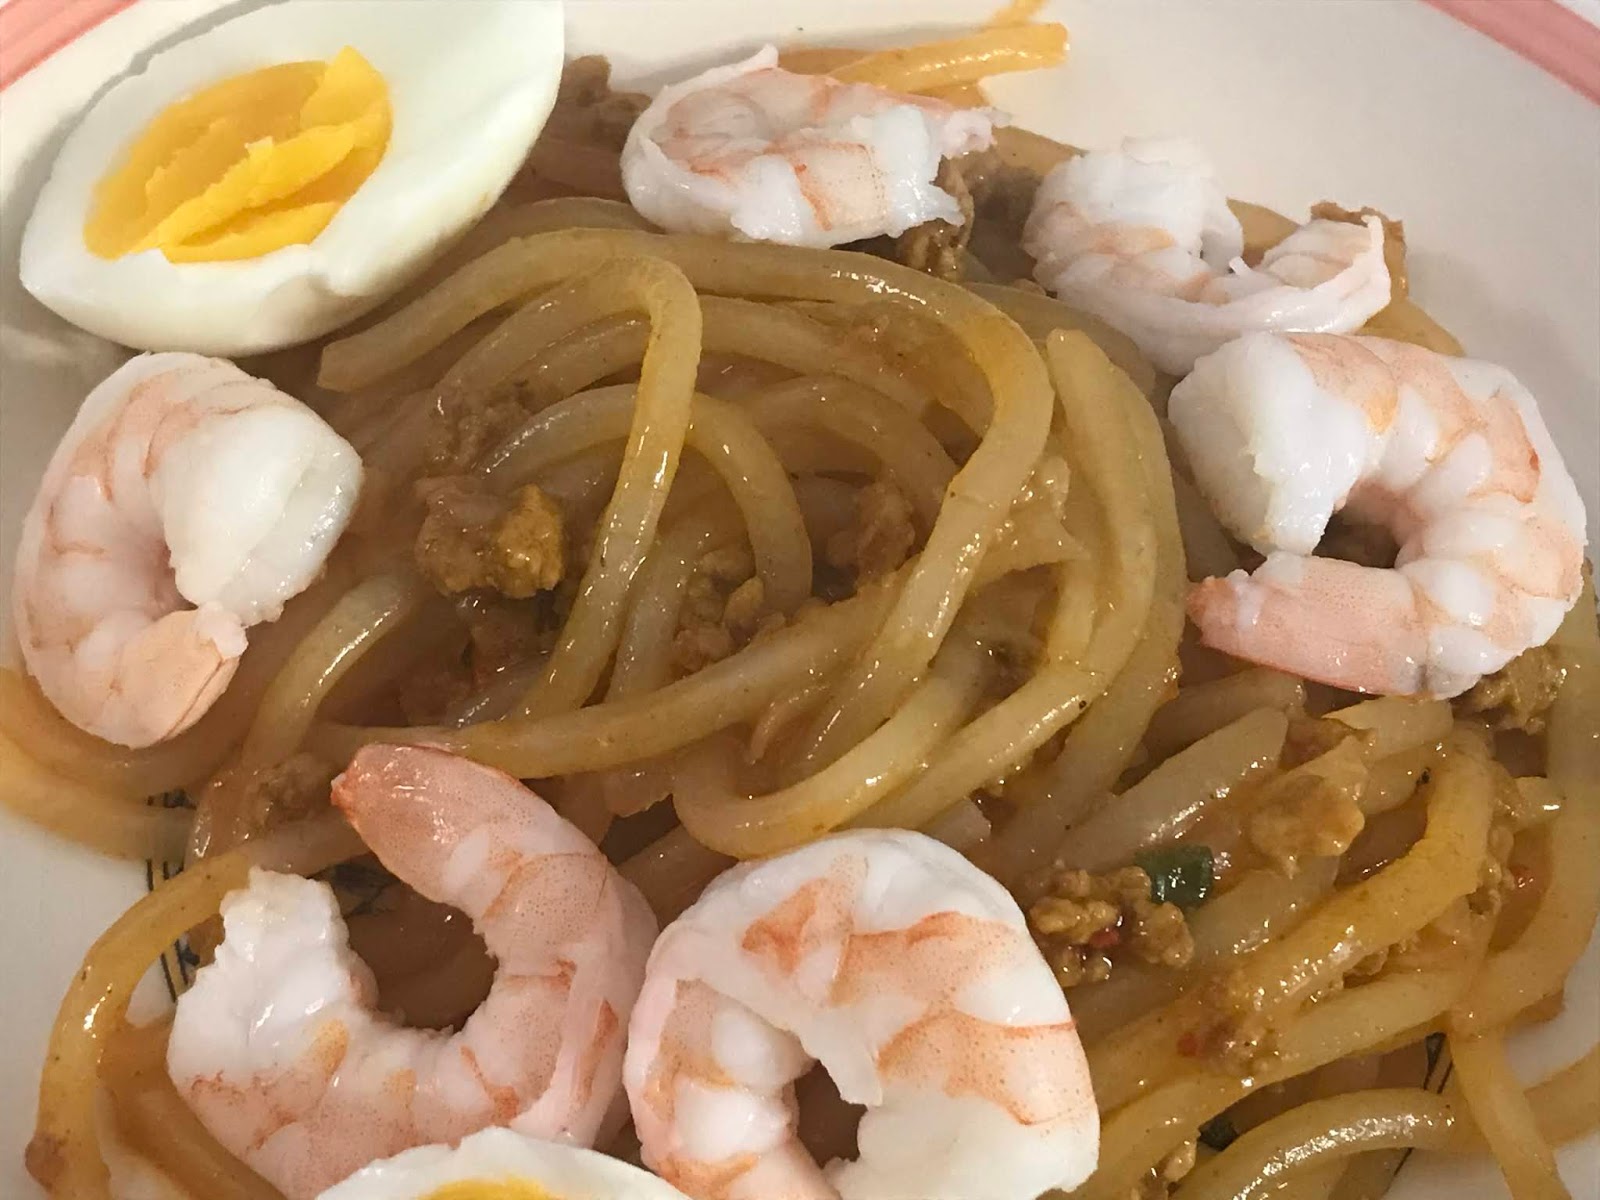
I ended up making this dish twice, not because I particularly loved it and had to make it again but because I didn't feel I made it right the first time. I didn't have atchuete powder the first time so I used anatto seeds. I thought they would melt in hot water but they didn't. They dissolved only very slightly, just enough to impart the slight color that represents the trademark color of pancit lug-lug or palabok.

Then I made a couple of other mistakes as well: I thought the sauce was too soupy so instead of using flour as a thickener, I went with cornstarch, making a slurry of a generous amount of cornstarch (probably at least 1/3 cup) and the existing sauce. But that eventually made it too thick. To compound my comedy of errors, I used the whole package of noodles and it turns out that was too much for the sauce that this recipe made.

Undeterred, I tried again. This time, my mom gave me a packet of atchuete powder to use plus I went easy on the cornstarch this time. Initially I thought I went the other way round in that I didn't have enough noodles and the sauce was still too soupy. But actually, once I took the pot off the burner and combined all the leftover noodles I had and let the sauce "set", it thickened up satisfactorily.

Flavor-wise, I thought this was a little bland. Which I don't mind but not sure how authentic a palabok this was. I'd probably increase the fish sauce slightly and would add a more generous amount of shrimp. But this did have ease of preparation going for it so there's that. Just do a better job than I did on getting that noodles to sauce ratio correct.
4 1/2 cups water
1/4 pound large shrimp, peeled and deveined
1 tablespoon canola oil
1 small onion, peeled and chopped
2 cloves garlic, peeled and minced
1 lb ground pork
1 tablespoon fish sauce
1 tablespoon atchuete powder
1 cube shrimp or pork bouillon
1/4 cup flour
salt to taste
16 ounces thick cornstarch noodles
1 cup crushed pork rinds
2 hard boiled eggs, peeled and sliced
toasted garlic bits
green onions, chopped
calamansi, cut into wedges
  1. In a saucepan over medium heat, bring 4 cups of water to a boil. Using a fine-mesh sieve, plunge shrimp into the hot water and cook for about 1-2 minutes. Remove and allow to cool. Slice lengthwise in halves. Reserve liquid.
  2. In a pot over medium heat, heat oil. Add onion and garlic and cook until softened.
  3. Add ground pork. Cook, breaking apart with the back of a wooden spoon, until lightly browned. Drain excess fat except for about 1 tablespoon.
  4. Add fish sauce and cook for 1-2 minutes. Add atchuete powder and stir until ground pork is evenly colored.
  5. Add reserved liquid and bring to a boil. Lower heat, cover and simmer for 6-10 minutes or until meat is tender and cooked through. Add bouillon and stir until dissolved.
  6. In a small bowl, combine remaining 1/2 cup water and flour. Stir until well blended and smooth with no lumps.
  7. Add to the pot, whisking vigorously to prevent lumps. Continue to cook for 3-5 minutes or until sauce is thickened. Season with salt to taste.
  8. Meanwhile, in a large pot over medium heat, bring about 4 quarts of water to a boil. Add noodles and cook according to package directions until tender but firm. Drain.
  9. In a large bowl, combine cooked noodles, sauce and 1/2 cup of the crushed pork rings. Gently toss to evenly distribute. Garnish with green onions and sliced hard boiled eggs. Serve with calamansi.


Friday, November 29, 2019

Chocolate Pound Cake

Chocolate Pound Cake - made November 11, 2019 from Chef in Training
I didn't make the glaze for this as I was sending it in a care package for a deployed military service member and I didn't know how well the glaze would hold up since I didn't know if it was going to a cold climate or a warm one. Plus, depending on the final destination, it can take up to 2 weeks for a package to arrive and I didn't want the moistness of the glaze to get moldy. I don't have a food sealer (yet) so I played it safe by keeping this unglazed.

This was a great chocolate pound cake. It had a good, slightly dense texture so it would travel well and the flavor was great: not too chocolaty, not too sweet.
If I make it again for myself, I'd try it with the glaze but even "plain", this is a pretty good cake. I made the taste test as an individual cupcake-sized cake but for shipping, I made the rest of the batter into loaf cakes. They ship better and the larger size keeps it moist. Smaller sizes will dry out more easily.

1 1/2 cups butter, softened
3 cups sugar
1 1/2 teaspoons vanilla
5 eggs
1 cup buttermilk
2 1/4 cups flour
1/2 cup cocoa powder
1 teaspoon salt
1/2 teaspoon baking powder
1/2 cup chocolate chips

Chocolate Frosting
2 cups powdered sugar
4 tablespoons cocoa
2 tablespoons melted butter
1/4 to 1/3 cup evaporated milk
  1. Preheat oven to 325 degrees F.
  2. In a large mixing bowl, cream together butter, sugar and vanilla for 5 minutes. Add eggs, one at a time, beating after each addition.
  3. In a separate medium bowl, combine flour, cocoa, salt and baking powder. Add alternately with buttermilk to creamed mixture, beating until just combined. Fold in chocolate chips.
  4. Pour into 3 greased and flour loaf pans, 8" x 4" x 2.5".
  5. Bake for 45-50 minutes or until toothpick inserted near center comes out with a few moist crumbs or clean.
  6. Frosting: Combine powdered sugar and cocoa in medium mixing bowl. Add butter and milk; mix well. Spread over pound cakes.

Wednesday, November 27, 2019

Bakery Style Double Chocolate Cookies

Bakery Style Double Chocolate Cookies - made dough November 8, 2019 from The Food Charlatan
I made these cookies to use up some plain chocolate candy bars I had left after Halloween. They substituted nicely for chocolate chips and were a good way to use up leftover chocolate. At least it kept them from being eaten by me, myself and I.
I also used these cookies to put in a 2nd and 3rd care package I sent to deployed soldiers as part of the Angel Baker team from Soldiers Angels. Normally these wouldn't be good in a care package since they're soft and therefore fragile but I took care to wrap 2 cookies back to back in plastic wrap, put in ziploc bags and lodged them firmly in the mailing box, well cushioned. Hopefully they'll arrive intact and relatively still moist and fudgy.

These baked with a slightly crisp outer shell once they'd cooled completely and the inside was moist, fudgy and chewy. Good chocolate flavor as I used both Valrhona bittersweet chocolate and cocoa powder. I'll keep saying it over and over - the quality of your finished baked goods are entirely dependent on the quality of your ingredients. Use the best you can afford; it'll be worth it at the end.

1 cup unsalted butter, softened
1/2 cup granulated sugar
1 cup dark brown sugar, packed
4 ounces bittersweet chocolate, melted and cooled
2 large eggs
4 teaspoons vanilla
2 cups flour, spooned and leveled
1 cup cocoa powder, spooned and leveled, sifted if lumpy
1 teaspoon baking soda
3/4 teaspoon salt
2 cups chocolate chips
  1. In the bowl of a stand mixer fitted with the paddle attachment, beat butter until light and fluffy, about 2 minutes. Add both sugars and beat 1 more minute, scraping bottom and sides of the bowl.
  2. Add cooled, melted bittersweet chocolate and beat until incorporated. 
  3. Add eggs and vanilla; mix until combined.
  4. Whisk together flour, cocoa powder, baking soda and salt. Add to mixing bowl and mix until just incorporated. Do not overmix. Fold in chocolate chips. Cover bowl and chill dough for 30 minutes or until dough is cool enough to form into dough balls.
  5. Portion into golf-ball-size dough balls, cover and chill or freeze for several hours or overnight.
  6. When ready to bake, preheat oven to 350 degrees F. Line baking sheets with parchment paper. Evenly space dough balls on prepared sheet. Bake 10-11 minutes; do not overbake. Cool on baking sheets for 5 minutes before removing to wire racks to cool completely.