Thursday, September 5, 2019

Filipino Spaghetti

Filipino Spaghetti - made September 1, 2019 from The Unlikely Baker
I'm leapfrogging this post ahead of the other dishes I made earlier as I've gotten a couple of requests for the recipe after I posted a picture on Instagram. Apparently, I'm not the only one who likes Filipino spaghetti :). If you've never had Filipino spaghetti, here are the hallmarks to look for: it's typically made not only with ground beef or ground pork but it also includes slices of hot dog. Yup, hot dogs. It's also sweeter than its Italian spaghetti counterpart and that comes with both the inclusion of banana sauce and, in the case of this recipe, granulated sugar. That might sound weird but trust me, that's what makes it Filipino spaghetti in the first place.

Some recipes call banana sauce "banana ketchup". For the longest time, I didn't even want to try making Filipino spaghetti because I didn't want to buy banana ketchup. I literally thought it was a mixture of mashed bananas and ketchup. I don't like ketchup so ewwww. But banana ketchup is not ketchup at all. It really is banana sauce but with a touch of red food dye to make it look like ketchup. Don't ask me why unless it's made just for Filipino spaghetti and red is the color of spaghetti.
Whatever the reason, you're going to want to buy banana sauce/banana ketchup for true Filipino spaghetti. I got mine from an Asian grocery store and bought the Jufran brand, which is local to the Philippines. You can also get it from amazon if you don't have an Asian grocery store nearby but be warned that amazon is more expensive. Three 12-ounce bottles were $13.11 if you have prime but one 12-ounce bottle at the Filipino grocery store I went to sells it for $1.29. Yup, quite a price difference.

Beyond that, this is a pretty straightforward recipe to put together. Brown the hot dog slices first, set aside, then, like every other recipe for Filipino food that I've seen my mom make when I was growing up, you brown the garlic first then add the onions and stir until they're softened. Then proceed with the rest of the recipe.

I was pleasantly surprised this turned out so well. Meaning, it really did taste like Filipino spaghetti! It was just sweet enough but not too sweet and had the distinct taste of Filipino spaghetti. You'll know what I mean when you try it and compare it to more traditional spaghetti sauces. And it was so easy to make I feel emboldened enough to make it for my relatives when we gather for our upcoming family reunion. The kids will like the hot dogs, which, when I was a kid, was the whole point of Filipino spaghetti.


1 tablespoon canola oil
1/2 pound hot dogs, sliced into 1/2" thick pieces
1 medium onion, chopped
2 cloves garlic, minced
1 1/2 pounds lean ground beef
15 ounces tomato sauce
2 ounces tomato paste
4 ounces banana sauce
2 tablespoons heavy cream
1/8 cup granulated sugar
1 pound spaghetti, cooked al dente
sharp cheddar cheese, grated
  1. Using a large saucepan over medium heat, fry hot fogs in oil until lightly brown around the edges. Remove from pan,
  2. Using the same pan, saute garlic and onion until translucent and fragrant. Stir in ground beef and cook until the beef is browned, 5-6 minutes.
  3. Add the hot dogs, tomato sauce, tomato paste, banana sauce, heavy cream and sugar. Season with salt and pepper. Stir to combine. Cover and simmer for 15 minutes.
  4. Serve meat sauce on top of cooked spaghetti. Sprinkle with a generous helping of cheddar cheese, if desired. Serve warm.

Tuesday, September 3, 2019

Lemon Coconut White Chocolate Blondies

Lemon Coconut White Chocolate Blondies - made August 24, 2019 from Extreme Brownies by Connie Weis
Now that I've moved all my baking books to another state, stored them for 6 months in a garage and unpacked them, I thought I should start using them again. Hoping to do more of that in the coming months so stay tuned. And ignore that I suspended my diet and made these for my cheat day.
I'm mixed about this blondie. It was "good" but there was a lot going on here. Perhaps too much so for my simple taste buds. I love coconut. I love lemon. And while I don't love white chocolate in the same way, most of it was in the batter itself and it didn't have a strong flavor. It was mostly there to lend to the "fudginess" of the blondie. Meaning it added to the density and moisture of the texture which I did like.
But if I were to make this again, I would keep the white chocolate melted into the batter to get the texture and leave off adding it as chips or chunks to the blondie. I don't think it needed it.
I'm also not convinced the coconut and lemon worked as well together in this recipe. At least not to me. The lemon is in the frosting while the coconut is mostly in the blondie itself. If you like the combination, you'll like this blondie. For my plebian taste buds, the lemon overwhelmed the blondie but the coconut tried to hold its own and the fight wasn't very fun. I ended up scraping off most of the lemon frosting to eat just the blondie. Which misses the point of the "extreme" brownie.
Next time, I would leave off the lemon frosting and the white chocolate chunks and make this as a coconut blondie with vanilla frosting.

Blondie Batter
1 7-ounce bag shredded sweetened coconut
1 1/2 sticks (6 ounces) unsalted butter, cut into tablespoons
6 ounces premium white baking chocolate
4 large eggs
2 cups (14 ounces) sugar
1 teaspoon salt
2 teaspoons pure vanilla extract
2 1/2 cups (11.5 ounces) all-purpose flour
1/2 teaspoon baking powder
1/2 cup (3 ounces) premium white chocolate chips

Lemon Frosting
10 tablespoons (5 ounces) unsalted butter
1 large egg yolk (optional)
2 2/3 cups (10.7 ounces) confectioners' sugar
1/4 cup (2 ounces) heavy whipping cream
1 teaspoon pure lemon extract
1/8 teaspoon salt
zest of 1 large lemon
2 tablespoons fresh lemon juice

Garnish
2 to 3 tablespoons white chocolate Callebaut Crispearls
  1. Toast the coconut: preheat oven to 350 degrees F. Spread the coconut evenly onto a half-sheet baking pan. Bake for 5 minutes then stir with a wooden spoon, bringing in the coconut from the corners into the middle and vice versa. Bake for an additional 4 minutes, repeat, turning the coconut then continue to bake in 2-minute intervals until coconut is uniformly light golden brown. Transfer to a cooling rack and let cool to room temperature. Maintain the oven at 350 degrees F.
  2. Make the blondies: line a 9 x 13-inch baking pan with foil and lightly spray with nonstick cooking spray.
  3. In the top half of a double boiler set over hot water, melt the butter and white chocolate, whisking together until completely melted and combined. Remove from heat and set aside.
  4. Using a large whisk, lightly beat the eggs in a large mixing bowl. Whisk in the sugar and salt until just incorporated. Briefly whisk the melted chocolate mixture then gradually whisk into the egg mixture until just combined. Briefly whisk in the vanilla.
  5. In a separate bowl, whisk together the flour and baking powder. Sift over the batter and stir together until just combined. Sprinkle the toasted coconut and white chocolate chips over the batter; fold in until just combined. 
  6. Pour batter into prepared pan and smooth the top with a small offset spatula. Bake for 30 minutes or until a toothpick inserted near the center comes out clean or with a few moist crumbs and top is golden. Transfer the pan to a cooling rack and let cool to room temperature.
  7. Lemon frosting: In a mixing bowl, beat the butter and egg, if using, until soft and creamy. Add the confectioners' sugar, beating on low until incorporated then on high until well combined. 
  8. Using a microplane zester, zest the lemon directly into the bowl then add lemon juice. Beat on high until well combined and creamy.
  9. Frost over cooled blondie, smoothing top with small offset spatula. Garnish with white chocolate crispearls. Refrigerate until frosting has set then cut into even squares.

Sunday, September 1, 2019

Mechado (Filipino Beef Stew)

Mechado - made August 26, 2019 from Serve with Rice
I still had some beef chuck roast from the Costco pack I used to make Beef Tapa so I used it to try this Mechado recipe. Mechado is another name for Filipino beef stew. As with many dishes, there are a variety of different mechado recipes to choose from. I went with this one for its relative simplicity.
10 minutes before it's finished, add the bell peppers and fish sauce
Which meant the only vegetable I had to add was a red bell pepper. I'm not fond of bell peppers and although the recipe called for two, I only used one. No sense in wasting more than I have to and I'm not particularly fond of bell peppers anyway. I could probably have left it out altogether but I was actually trying for some authenticity so decided to compromise on one for the flavor.
I was pleasantly surprised that this turned out, more that the beef got tender like it was supposed to if you cooked it long enough. I don't always have very good luck with beef and its texture. This one worked. It used the same "trick" my mom uses when she cooks Filipino beef dishes: keep adding water to the base sauce and let it boil/simmer/cook until the meat is tender. Add water as needed to keep the sauce from drying out before the beef is the consistency you want.
As for flavor, I didn't love the bell pepper addition to the flavor of the dish itself but that's my personal preference. Otherwise, this was a good "beef stew".
2-3 pounds beef chuck roast, chopped into chunks
salt + pepper + garlic powder to taste
1/4 cup soy sauce
1/4 cup lemon juice
8 ounces tomato sauce
1 large onion, chopped
2 bay leaves
1-3 cups water
2 large red bell peppers, sliced
1 tablespoon fish sauce
  1. Season the beef with salt, pepper and garlic powder to taste. Mix in the tomato sauce, soy sauce and lemon juice. Coat the beef well, cover and marinate for at least 1 hour.
  2. Heat oil in a dutch oven on high heat. Drain off excess marinade from the beef; reserve. Fry the beef over high heat until lightly seared on all sides. Remove to a plate or large bowl.
  3. Lower the heat to medium high and drain all but 1 tablespoon of oil. Saute the onion until fragrant and slightly soft, about 3-4 minutes. Add the beef back and toss with the onions.
  4. Pour in the remaining marinade. Add enough water to cover 3/4 of the beef. Add the bay leaves. Bring to a oil. Lower to medium high heat and let simmer until beef is tender, about 45 minutes.
  5. In the last 10 minutes of boiling, add the red bell pepper and fish sauce. Bring to a simmer again and continue cooking through. Once the meat is tender and the peppers are cooked, turn off heat. Serve warm with rice.

Thursday, August 29, 2019

Mamon (Filipino sponge cake)

Mamon - made August 18, 2019 from Recipe ni Juan (English translation: Juan's Recipes)
My first attempt at mamon
I can only suppress my baking tendencies for so long and once I'd dropped 8 pounds, I gave myself the green light to try another baking recipe. In keeping with the Filipino cooking I've been doing, I now turn to Filipino baking.
This is what the Goldilocks Bakery mamon looks like
Mamon is a childhood favorite. I grew up mostly in the US but whenever one of my relatives visited, they always brought a bag full of mamon from Goldilocks Bakery, a popular bakery chain in the Philippines. To call mamon a sponge cake would be both accurate and inaccurate. It has the texture and fluffiness of a sponge cake. But it tastes much better than your average sponge cake, homemade or not. The closest comparison I can come to is those Sara Lee pound cakes you buy in the freezer section at the grocery store. As much as I do my own baking and have for years, I also have a soft spot for those Sara Lee pound cakes, as much from nostalgia as from the soft, fluffy texture of the cakes.The same with mamon.
I used paper liners as I didn't have mamon cake molds


Times have changed and Goldilocks bakeries are now in the United States as well as other Filipino bakeries who sell mamon. I decided to try making my own. It's made like a basic sponge cake. The yolks go into the main batter and the whites are beaten to medium peaks then folded into the batter. That, and a little bit of leavening, help create the fluffy texture.

One thing to be aware of with making this recipe. You'll see some of the tops are browned and others aren't. When they were done per the toothpick test, they were still a bit of a sickly pale color. Goldilocks mamon were evenly browned on top. I didn't want to bake them longer for fear they'd dry out so I did a quick, 1-minute broil in the oven before I took them out. A few of them browned faster than I expected so I took them out before the others browned on top as I didn't want the rest to get too dark or burn on top.

This was good in terms of taste and it had the fluffiness of a good sponge cake but alas, it isn't quite a Goldilocks copycat. The texture wasn't quite the same. It's similar to my quest for a banana cake like the one from Icing on the Cake. I can get close to the flavor but the texture remains a holy grail. Goldilocks mamon has a tighter crumb but with a soft, fluffy, cakey texture. This was soft, fluffy, cakey but the crumb had more holes in it and wasn't quite like Goldilocks. I'm glad I tried it though and, while I don't have the same penchant for mamon like I do with Icing on the Cake's banana cake, I could see trying out more mamon recipes to get closer to the Goldilocks version.

1/4 cup salted butter, melted, plus more for brushing molds and cakes
1 cup cake flour
1/2 teaspoon baking powder
1/3 cup and 1/2 cup sugar
6 eggs, separated
1/4 cup water
1/4 teaspoon cream of tartar
  1. Preheat oven to 325 degrees F.
  2. Generously brush paper molds with melted butter; set aside.
  3. Sift cake flour, baking powder and 1/3 cup sugar together into a bowl; set aside. 
  4. Combine egg yolks, water and melted butter in the bowl of a stand mixer fitted with the paddle attachment. Mix at low speed until well combined. With the mixer running, slowly add the dry ingredients and mix until combined. Scrape down the sides and bottom of the bowl.
  5. In a separate bowl, combine egg whites and cream of tartar. Beat with the whisk attachment of the stand mixer. Beat at high speed until egg whites double in volume. With the mixer running, slowly and steadily add 1/2 cup sugar. Continue beating until medium peaks form. Medium peaks hold their shape but the tip of the peak curls back onto itself when the whisk is lifted.
  6. Gently and quickly fold in the egg yolk mixture into the egg whites. Divide the batter evenly among the molds.
  7. Bake for 15 to 18 minutes or until a toothpick inserted into the center comes out clean. Place the molds on a cooling rack for 10 minutes. Remove from the molds and let cool completely on a wire rack.

Monday, August 26, 2019

Pork Tocino (Sweet Cured Pork - Filipino dish)

Pork Tocino (Sweet Cured Pork - Filipino dish) - made August 16, 2019 from Panlasang Pinoy
My absolute favorite Filipino breakfast is tocilog. You already know the -ilog part of the meal from my previous post on Beef Tapa. The "toc" part is short for tocino, a sweet cured pork dish, traditional in Filipino cuisine. I love tocino. Just love it.
My mom used to make it when I was a kid and I always loved the sweet flavor of the pork and the crisp yet tender yet chewy texture of same. It's often colored red from annatto powder or achuete as I've known it from my mom's kitchen. I didn't have any so I used red food coloring instead. It might be off-putting to use red food coloring in something that isn't red velvet and pork to boot so if you don't want to, you can exclude it but then you won't get authentic looking tocino. The red color is a trademark of tocino.
You'll notice the brown sugar and the pineapple juice ensures this isn't exactly low carb. I love tocino so much, I don't care so much about that :). This is supposed to "cure" in the refrigerator for 2-3 days. I made it on a Friday afternoon and cooked the first few slices on Sunday morning so it marinated/cured for probably 36 hours rather than 2 full days.
It looked like tocino in terms of color and how it browned and caramelized thanks to the sugar in the marinade. However, it didn't quite have the same sticky sweet flavor of tocino. It's possible I should've let it marinate an extra day so I'm going to try again tomorrow. I also used pork loin which typically has less fat so there wasn't as much fat to crisp up which is part of the appeal of tocino. In fact, in some Filipino restaurants, they serve tocino with too much fat. This one had too little. I also kept tasting the salty more than the sweet. I think next time I would cut back on the full tablespoon of salt. Still, this was pretty good. The pork was tender and had good flavor. It just needs more coating or sauce from the way I made it.
1/2 kilo pork shoulder, sliced into 1/4" thick slices
1/2 cup brown sugar
1/2 teaspoon red food coloring or annatto powder
2 tablespoons soy sauce
2 cloves garlic, minced
1/8 cup pineapple juice, optional (I used it)
1 tablespoon salt
  1. Combine brown sugar, food coloring, soy sauce, garlic, pineapple juice and salt in a mixing bowl.
  2. Put the sliced pork in the bowl and rub the mixture liberally on all sides of the pork.
  3. Place pork and mixture in a ziploc bag and refrigerate for 2 to 3 days.
  4. After curing the pork, fry in 2-4 tablespoons of oil until cooked through and edges are crisp. Do not overcook.
  5. Serve with fried egg and garlic fried rice.

Thursday, August 22, 2019

Snickerdoodles for Shyla's Wedding

Snickerdoodles for Shyla's Wedding - made July 27, 2019
I've mentioned earlier that one of my nieces is getting married. I offered to make a cookie dessert bar for the reception and Shyla chose which cookies she wanted me to make: chocolate chip cookies, chocolate chocolate chip cookies, white chocolate macadamia cookies, oatmeal raisin (favorite cookie of Zack, the groom), walnut butter shortbread (although I substitute almonds for the walnuts) and snickerdoodles.
When I visited Shyla and Zack in Denver a few months ago, I tested out a couple of the recipes at the mile-high elevation, in the hotel kitchenette I was going to bake them in. This snickerdoodle recipe held up to the test, although I did end up making my own modifications to the original recipe from The Pinning Mama. I'm a little nervous about making 6 kinds of cookies for over 100 guests, not because of the volume I'm planning on making but because I'm not going to be in my own kitchen with my own equipment or my own ovens. I'm not daunted by making hundreds of cookies or baking them off the day before and day of the wedding. Even if I'm going to do it with only one oven and 2-3 days beforehand to make all the cookie dough and shop for ingredients.

However, I'm also not stupid and one of the reasons I chose this particular snickerdoodle recipe is for its simplicity and because it didn't need cream of tartar. That might sound weird but when you're going to make dozens of cookies and won't be pulling stuff out of your own pantry, the fewer specialized ingredients you need (which, frankly, the non-baking bride and groom aren't going to use after the wedding, haha), the better. Plus, hey, it's still a good snickerdoodle recipe.
When I did the taste test bake in Denver, we learned a couple of important things. First, don't buy the generic, no-name granulated sugar. While it worked fine in the dough itself, using it as the cinnamon-sugar coating for the cookies didn't work at all. The granules were too large to adhere well to the cookies, especially chilled or frozen dough balls. So...no. We're sticking with C&H for the real day. Second, 3 cups of flour is simply too much for the dough at this elevation. I cut it back by 1/4 cup and it worked well. The dough was still easy to work with, the cookies stayed thick and the taste and texture were just fine. I also added 1 teaspoon of cinnamon to the dough itself for extra flavor.

I've been making this particular recipe a few times before the wedding as I want to make sure I get the practice in and unearth any potential pitfalls with the recipe now, not right before the wedding. Plus, as I'm used to making behemoth cookies, I had to make "normal-size" cookies with these to figure out how many cookies each recipe will yield. Much as I want to make big-as-your-head cookies for the wedding, I knew that would only lead to waste. People will be eating other things and when given the choice of 6 cookies, you know some guests will take 1 of each kind (those are my tribe) but not be able to finish them all (not my tribe). So cookies the size that normal people who aren't me are what it's going to be. This recipe yields 15 such normal-sized cookies. You could possibly make them smaller but I wanted to make them thick enough to still have the texture I like in these cookies. So 15 it is.


1 cup butter
1 1/4 cups granulated sugar
1 teaspoon vanilla extract
1 teaspoon vanilla bean paste
1 egg
2 3/4 cups flour
1 1/2 teaspoons baking powder
1/4 teaspoon salt
1 teaspoon cinnamon

Coating
1/4 cup granulated sugar
2 teaspoons cinnamon (or more or less if you prefer)
  1. Cream butter and sugar together until light and fluffy. Add vanilla extract and vanilla bean paste and mix to combine briefly. Add egg and mix until just combined. Do not overbeat.
  2. Whisk together flour, baking powder, salt and cinnamon in a separate bowl. Add to butter-sugar mixture in two additions, mixing on low speed until just combined. Do not overbeat.
  3. Portion dough into thick discs, golf-ball-size or smaller, whichever your preference.
  4. Cover dough balls and chill or freeze for several hours or overnight.
  5. When ready to bake, preheat oven to 350 degrees. Line baking sheets with parchment paper.
  6. Combine 1/4 cup granulated sugar and cinnamon in small bowl. Coat each dough ball completely in the cinnamon-sugar mixture and evenly space on prepared baking sheets. Bake 10-12 minutes, or until edges are set and middles no longer look doughy or raw. Let rest on baking sheets for 2-3 minutes then remove to wire cooling rack to cool completely.

Saturday, August 17, 2019

Beef Tapa (Filipino dish)

Beef Tapa - made August 16, 2019 from Foxy Folksy
I haven't really been baking lately because of the weight loss challenge at work and trying to eat healthier and/or count calories, whatever gets me through the day. I'm having doubts I'll actually win this challenge as some of my coworkers are kicking my ass so far. I'm placing in the top 5 each week (so far) but only the top 3 get any prize so being #4 or #5 isn't going to do me much good, challenge-wise.

But, my competitive nature aside, I can't lose sight of the fact that I am losing weight. I plateau'd for almost the past 2 weeks, no matter how on track my eating was or how much I worked out. You can imagine my utter annoyance with that, especially since I actually was doing well with calorie counting and exercise. That annoyance drove me to switch to low carbing. Low carbing doesn't work for me in the long run but I wasn't talking until death to the scale but just enough to get off this plateau.
Three days in and the plateau broke so I can't be sorry. I don't know how long I'll keep it up but now that I'm down 8 lbs (7.8 more to go), I want to see how far I can last on it. I'm not talking Atkins Phase 1 low carbing as that's too drastic for me and you know I'll gain that weight back the minute I look at a piece of fruit or a noodle. But few enough carbs that I get more full on fat and protein and my calorie count naturally comes in lower. You actually can't overeat a Costco rotisserie chicken. Trust me, I might've tried.
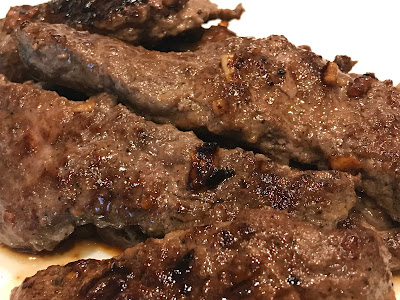
But, since I was trying not to bake sweets and wanted more protein choices, I went searching for some of my favorite Filipino dishes to make. I don't often cook Filipino food. Or at all. But I was in the mood to try and I found this easy recipe for Tapa or beef. It's meant to be part of tapsilog, which is a common Filipino breakfast and is comprised of stir-fried beef (tapa or the "tap" part), garlic fried rice (siningag or the "si" part) and fried egg (itlog is the Tagalog word for egg or the "log" part) - hence tap-si-log. I love tapsilog. I love tocilog even more but that's the next post.
This isn't quite an authentic tapsilog since I left off the garlic fried rice for obvious reasons but I adhered to the tapa and the fried egg. You do have to plan ahead for this recipe but mostly because the meat needs to be marinated overnight. But the marinade itself is really simple to put together. I followed the author's suggestion to whack the beef slices with a meat mallet to tenderize them as I don't trust my beef choosing abilities to get a tender cut of meat or beef frying capabilities to keep it tender. So meat mallet whacking was extra insurance.
I used lemon juice in this recipe but if you have access to calamansi (think of calamansi as small, sweet Filipino lemons), using that instead of the lemon juice probably makes it a little more authentic. This was delicious, btw. Very flavorful with the garlic and the lemon. Don't overcook it or the meat will get tough. Just sear on high heat. It won't be fork tender (at least mine wasn't) but it isn't tough either; rather, it had a good chew like beef should have without overworking your jaws. And the flavor really can't be beat. The only thing that could make this better is to actually eat it like a true tapsilog, with garlic fried rice. Maybe in another 7.8 pounds. But OMG, I can actually cook a Filipino dish.
1/2 pound beef sirloin, sliced thinly
3 tablespoons soy sauce
3 tablespoons lemon juice
1 tablespoon garlic, finely minced
1/8 teaspoon ground pepper
1/2 teaspoon sugar
1/4 teaspoon baking soda, optional
  1. With a meat mallet, pound each slice of meat until flattened to about 1/4" thick.
  2. Place the beef into a bowl and sprinkle with baking soda. Mix until well blended.
  3. Add lemon juice and mix. Add remaining ingredients and stir to coat evenly.
  4. Cover the bowl with plastic wrap and marinate beef in the refrigerator overnight.
  5. Heat a tablespoon of oil in a large pan or skillet. Fry each side of the meat for 3-5 minutes or until browned and the liquid is absorbed. Add more oil as needed. Do not overcook.
  6. Serve hot with fried eggs and garlic fried rice.

Sunday, August 4, 2019

It's National Chocolate Chip Cookie Day

Yes, that's right - August 4 is National Chocolate Chip Cookie Day. If you've followed my blog for any length of time, you know I have a plethora of chocolate chip cookie recipes on here and a number of variations on the classic chocolate chip cookie.

There's the brownie-stuffed chocolate chip cookie (it's what it sounds like - a brownie inside a chocolate chip cookie) that I made for one of my holiday dessert parties which, to this day, I still have my guests telling me it was their favorite from that party.

Then there's its polar opposite of a chocolate chip cookie stuffed inside a brownie: Chocolate Chip Cookie Brownies.

However, for today, let's stick with the classics. I'm often asked, "what's your favorite recipe for chocolate chip cookies?" I don't have ONE favorite. Why limit yourself? But I understand the need for the question. Unlike me, many people don't have the time or inclination to try out dozens of different recipes for chocolate chip cookies. Their loss.

So let me curate my top 5. I have more than 5 but we can keep it simple so as not to overwhelm a normal person who just wants to make a good cookie. My top favorite recipes also fluctuate over time, partly due to the recency bias where I tend to favor what I've made most recently and partly due to changing tastes.

Basic, Great Chocolate Chunk Cookies from Seven Spoons - I like this one so much, it's the chocolate chip cookie recipe I'm making for the cookie dessert bar at my niece's wedding. Plus it has the advantage of being tested at high altitude. It passed.

Levain Bakery Copycat Chocolate Chip Cookies from Smells Like Home - you knew I had to include 1 or 2 Levain Bakery copycats in the top 5, right? Yes, I'm still obsessed with Levain Bakery. And I'm okay with that.

Levain Bakery Copycat Chocolate Chip Cookies from Bustle - slightly different texture, still amazingly good. It's the texture and thickness that wins me over on this one.

Jumbo Chocolate Chip Cookies from Center Cut Cook - go big or go home is all I've got to say. Even at room temperature, this cookie was amazing.

Copycat Panera Chocolate Chip Cookies from The Pinning Mama - this is a (somewhat) oldie but still a goodie. This is the cookie that helped me realize using mini chocolate chips can actually provide more chocolate in a cookie than the regular-sized chips or big chunks of chocolate.

So there you have it. In today's world, with the news being so relentlessly depressing, a National Chocolate Chip Cookie Day might seem frivolous. But I choose to see it as an opportunity to do something kind for your fellow man. Make up a batch of cookies and share with those around you. Cookies may not solve anything but the gesture of sharing them might brighten someone's day. I took a few over next door to meet my new neighbors the other day and also dropped off some at the sales office of the builder I bought my house from. I like to think the gestures were appreciated as much as the cookies. And that's what matters.