Sunday, January 1, 2017

NYC: Bakery Review - Dominique Ansel Bakery

Dominique Ansel Bakery - visited on November 17, 2016

Happy 2017! It's that time of the (new) year where I take a break from baking and I give anyone trying to live up to their new year's resolutions to eat healthy and lose weight a break from any tempting new baking recipes, myself included. I've been saving up the next month's worth of posts to food-chronicle my most recent trip to New York City last November. Because you know I just went there to eat and yes, that's practically all I did while I was there. I met my friend Shawn who was there the first part of the week for work and we spent the last part of the week eating. Just eating.

I love New York....for about 3 days. Then the suburbanite in me starts to feel claustrophobic with the masses of people and tall buildings and honking cars. But for those first 3 days, I don't think there's a better spot on earth if you're a foodie. New York City is my food mecca. I've never eaten anything bad in New York. I spend most, if not all, of my time in Manhattan and I know my local NYC friends would chastise me for not venturing out more broadly. It isn't like I don't want to explore more but it's mostly a logistics issue. I end up having a long list of places I want to go to in Manhattan and by the time I get to even a fraction of my list, the 3 days are up and I'm fleeing the city.

Knowing my timetable, I prioritized the trip. The first priority was to try the original cronut from Dominique Ansel's Bakery in Soho. If you've followed my blog for awhile, you know I "met" Dominique Ansel when he came to talk at my company. I won his baking book and took a selfie with him - that counts as meeting him, even if he more than likely doesn't remember me from the countless other adoring fans he (rightly) has. If you don't follow Dominique Ansel Bakery on Instagram, you're missing out on amazing food porn and a social media look at a man who clearly loves what he does, is amazing at it and loves to share that passion with others. Go to Instagram right now and follow him then come back; I'll wait.

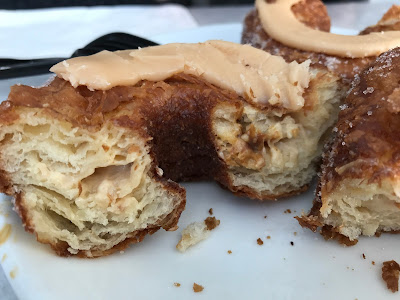
I've tried a knockoff of a cronut from Paris Baguette but I wanted to try the real thing made by the cronut's inventor so that was top of my NY foodie bucket list. To not tempt fate because I'd already heard of the long lines outside of his bakery every morning and the limited number of cronuts available (you'd have to be there at least 1-2 hours before the bakery opens to have a good chance of cronut purchase), I ventured to pre-order. He announces a monthly cronut flavor ahead of time and opens up the cronuts for pre-order for each two-week period.

November's flavor was Maple Pecan with spiced sugar - yum, right? For the time period when we would be there, the pre-ordering opened up on October 31. I confess, I had other stuff going on that day (I know, foodie fail) so I didn't even check the preorder site until that night. Only come to find out the cronuts available for preorder on the Friday-Sunday when we would be in town were already sold out. SOLD OUT. Apparently I had underestimated the cronut craze. Silly me.

Fortunately, we were going to be there on a Thursday-Sunday and there were 4 remaining cronuts available for preorder for Thursday. I don't think my trigger finger ever triggered so fast in securing those last 4 cronuts. They limited preorders to no more than 6 per customer but I figured 4 would be good enough, especially since the website said cronuts are best eaten within 8 hours of purchase. Between Shawn and me, I was confident we could put away 2 cronuts each in an 8-hour period.

Once our cronut preorder was secured, we built the plans for our first full day in New York City around picking them up. Which meant Dominique Ansel's Bakery was our first subway ride and first walk. We were on a cronut mission. I have to say, having heard about lining up 1-2 hours ahead of time to get a non-preordered cronut, I highly recommend going the preorder route if you plan to be in NYC on specific dates and can get your preorder in on time. By the time we got to the bakery, it wasn't crowded and our cronuts were ready for pickup at the 11 am time I had secured. Winning.

It was also winning that I liked November's flavor of maple pecan. The cronut was (not surprisingly) delicious. It really is a perfect blend between croissant and doughnut. Flaky layers, creamy filling, glaze, crunchy sugar coating; all perfection. The only thing that surprised me - and it probably shouldn't have - is I got full on just one. As in, I had no room for the second one in my allotment or for anything else for awhile. That shouldn't have been surprising considering how many calories must be in a cronut but let's be honest, I was disappointed in my consumption capacity. Only another foodie would understand that statement,

Fortunately, we had gotten two of the cronuts packaged up to go while we consumed two onsite in the cute little seating area in the bakery. So we figured we had an 8-hour countdown to consume our second cronuts. And since we were already there and my eyes are always bigger than my stomach, I had also purchased (to go) a DKA or Dominique's Kouign Amann, pronounced "koon ah-man" which is described on his website as "tender, flaky, croissant-like dough with a caramelized crunchy crust." I ate it later in the day and can I tell you those words do not do justice to the real thing? OMG, despite my mission and longing for an original Dominique Ansel cronut, if I had to choose, I would pick the DKA as my favorite.  It was SO GOOD. I've had a kouign amann before, in Paris no less but the DKA was better. The best. Highly recommend.

The DKA
Thus our first bakery excursion in New York City didn't disappoint. If you're ever in Soho, you need to go to Dominique Ansel's Bakery. Are you following him on Instagram yet?


Saturday, December 31, 2016

Penzey's Baked Ham and Cheese

Ham and Cheese Bake - made December 3, 2016 from Penzey's
Good-bye 2016! To be honest, I won't be sorry to see you go. I will end on a savory note before too much time passes as I will be hanging up my oven mitts for the month of January and have a different set of posts coming up for the new year. But first, let's crank this one out. I found this recipe on Penzey's website and with newfound, albeit short-lived, enthusiasm for making "real food" and using some spices I recently purchased from Penzey's, this looked right up on my alley to venture to make. That means it's both easy to make and something my picky palate would eat. I did modify it slightly though by omitting the mushrooms since I don't like them. I also chopped the onion in small pieces so they wouldn't get in the way of my eating. I don't mind onions if they're small enough and go unnoticed when I take a bite. I'm okay with the flavor of onions, it's the slippery texture I'm not wild about. But when you mix them with equally-soft-textured pasta, small bits of cooked onion are fine.
Of course, typical of my cooking efforts, I decided I knew better than the recipe because when I was putting this together, the 1 1/2 cups of pasta I boiled didn't look like it would be enough for the amount of sauce that the recipe made. I also decided that not only was I going to use up the leftover Honeybaked Ham from Thanksgiving but I would also add some turkey sausage kielbasa for extra protein.
The additional protein turned out to be a good idea, the doubling of the amount of pasta - cough - less so. Yup, it came out a bit dry since now there wasn't enough sauce for the amount of pasta I used. Oops. I also discovered baking the casserole dish when you don't have enough sauce makes the top layer of pasta shells a bit, er, chewy. Ah, you have to bake the dish. Now all that "extra" sauce makes sense to prevent the dish from drying out. So that's a whole post worth of singular advice: don't use too much pasta in this recipe.
Other than my usual foibles of cooking, this dish was fine. It could use a little spice (and remember I have bland taste buds so that's saying something) so feel free to use hot links or some other kind of spicy protein. Or add some (Penzey's) pepper.
A serving with a faux Red Lobster biscuit
1 1/2 cups pasta (elbow macaroni or shells)
2 tablespoons butter
8 ounces fresh mushrooms, sliced (optional, I left them out)
1/4 cup chopped onion
1/4 cup flour
1/2 to 1 teaspoon Penzey's pepper, to taste
2 cups chicken stock
1 1/3 cups milk
1 cup shredded cheddar cheese
1/2 teaspoon ground nutmeg
1 tablespoon lemon juice
1 1/2 pounds cooked, cubed ham
1/4 cup shredded Parmesan cheese
  1. Preheat oven to 350 degrees F. Cook the pasta according to package directions and drain. 
  2. While pasta is cooking, melt the butter over medium heat in a large skillet, Add the mushrooms and onion and cook until tender and golden, stirring frequently, about 10 minutes.
  3. Reduce heat to low, sprinkle on the flour and pepper and stir to combine. Gradually add the stock and milk, stirring vigorously as you drizzle it in; simmer until thickened. Add the cheese, nutmeg and lemon juice. Stir until melted and combined, 3-5 minutes. 
  4. Add the pasta and ham; stir to combine. Spoon into a greased casserole dish. Sprinkle with the Parmesan cheese and bake at 350 degrees. uncovered, for 30 minutes, until bubbling and golden.

Friday, December 30, 2016

"My Favorite" Vanilla Cupcakes

"My Favorite" Vanilla Cupcakes - made December 17, 2016, modified from Cookies & Cups
This was the original title of the cupcakes on Cookies & Cups' blog but I had to put them in quotes for myself as I don't know that they're my favorite. Having a favorite is always so subjective. And I honestly don't know if I made these properly or not. I am hit or miss with making cupcakes successfully. And by successfully, I mean with the soft fluffy (but not cake-mix cakey) texture that's part of what denotes (to me) an excellent cupcake.
There are several important factors to making fluffy cupcakes. The amount of flour is critical. When recipes give only volume measurements and not weight measurements, it's hard to get it exactly right since there are different ways of measuring flour. You can sift first then spoon into the measuring cup, resulting in less flour than if you did the dip-and-scoop method. You're not supposed to scoop the flour then pack it down or else you'll end up with too much flour and chances are higher that your cupcakes will be dense.

How much you mix the batter is also critical. Too little and not enough air will be incorporated into the batter. Too much and you beat too many air pockets into the batter which collapse upon baking. Not to mention you risk developing the gluten in the flour and the cupcakes will become tough and chewy. Good in bread, not good in cupcakes.
Baking time is also important. If you bake it too long, your cupcakes will be dry. If you underbake it, your cupcakes will be dense. The latter is often my problem and I think it was that this time too. I swear the toothpick came out clean when I tested the cupcakes but with some cakes and cupcakes, that doesn't mean the baked goods are done. They weren't raw but they probably could've used another minute in the oven for a lighter texture.
For the most part, though, the flavor was really good and the texture was almost as fluffy as I wanted. Make sure you use real vanilla extract. Adding seeds from a vanilla bean or an extra teaspoon of vanilla bean paste wouldn't hurt either. Oh, and this makes 2 dozen cupcakes so if you don't need that many, you can easily halve the recipe for an even dozen.
1 3/4 cups cake flour
1 1/4 cups all-purpose flour
1 3/4 cups sugar
2 1/2 teaspoons baking powder
1 teaspoon salt
1 cup butter, room temperature, cut into small cubes
4 eggs
1 cup milk
2 teaspoons vanilla
1 teaspoon vanilla bean paste, optional but recommended
  1. Preheat oven to 350 degrees F. Line a cupcake pan with cupcake liners.
  2. In the bowl of a stand mixer with the paddle attachment, combine the cake flour, all-purpose flour, sugar, baking powder and salt; mix briefly.
  3. With mixer on low, drop in butter, a few cubes at a time, until butter in all in and mix resembles coarse sand.
  4. Add eggs, one at a time, on low speed, mixing only until just incorporated.
  5. Slowly pour in milk and vanilla. Increase speed to medium and beat for 2 minutes until batter is smooth, scraping down sides of bowl as needed.
  6. Fill liners 2/3 full and bake for 15-20 minutes until centers are set and toothpick comes out clean. Cool completely before frosting. I did a simple vanilla frosting: 4 tablespoons butter beaten until soft and creamy then add powdered sugar and whole milk until you achieve the desired consistency.

Thursday, December 29, 2016

Marble Sheet Cake

Marble Sheet Cake - made December 15, 2016, modified from The Cookies & Cups Cookbook by Shelly Jaronsky
While I was still enamoured of my latest baking book, I tried another recipe from it. I like marble cake okay. I like chocolate, I like vanilla, and I don't mind the two swirled together. I normally don't make marble cake though as it seems like it's a bit of a pain in the ass to have two different batters when one would do just fine. Plus, I've never really had a marble cake that was as good as having a plain vanilla cake or a plain chocolate cake on its own.
Vanilla Cake Batter
But I was in the mood for a "sheet" cake and this uses up some of the milk I had. A typical marble cake has you making the plain vanilla batter first then you separate the batter and add some kind of chocolate to half of it so that you end up with separate chocolate and vanilla batters that you then swirl together. Sometimes the chocolate addition is melted chocolate and sometimes it's cocoa powder. For this recipe, I was glad to see that while it does use cocoa powder, which tends to give a richer chocolate flavor, it also adds hot water to provide more liquid to the batter. That's exactly what you want when you use cocoa. Cocoa tends to dry out batters so when you use it, it's good to have additional liquid to have a more moist cake.
Swirled in the chocolate cake batter

Post-baking, pre-frosting
All in all, this cake was pretty good. I'm still fairly indifferent to marble cakes though. The vanilla cake portion was good, the chocolate cake portion was good. Swirled together, one didn't stand out more than the other in terms of flavor. The cake texture was quite nice though, nice and uh, well, cakey.

This recipe makes too much frosting if you make it in a 9 x 13 pan like I did instead of a sheet pan so you might want to cut the frosting recipe in half if you don't want a thick layer of frosting. What's pictured is about as thick as I like my frosting layer to be.
Cake
1 cup (2 sticks) salted butter, room temperature
1 1/2 cups granulated sugar
2 large eggs
2 teaspoons vanilla extract
1 tablespoon baking powder
1 teaspoon kosher salt
2 1/2 cups all-purpose flour
1 cup whole milk
1/4 cup unsweetened cocoa powder
1/4 cup hot water

Frosting
1/2 cup (1 stick) butter, cubed
1/4 cup unsweetened cocoa powder
1/4 cup plus 2 tablespoons whole milk
2 teaspoons vanilla extract
5 cups powdered sugar
  1. Cake: Preheat the oven to 325 degrees F. Line a 9 x 13 pan with foil and lightly spray with nonstick cooking spray.
  2. In the bowl of a stand mixer fitted with the paddle attachment, mix the butter and granulated sugar on medium speed for 2 minutes. Add the eggs, vanilla and salt and continue mixing on medium speed until smooth, scraping down sides of the bowl as necessary.
  3. Turn the speed to low and add the baking powder and one-third of the flour, followed by half the milk, beating after each addition. Repeat with remaining flour and milk, ending with the final third of flour. Mix until just combined, scraping down the sides of bowl to keep batter even-textured.
  4. Measure out 1 cup of batter and transfer to a medium bowl. Add the cocoa powder and hot water to the 1 cup batter and stir until evenly combined to make chocolate batter.
  5. Spread the vanilla cake batter into the prepared pan. Drop the chocolate batter on top of the vanilla batter by the spoonful and, using a knife, swirl the chocolate into the vanilla. Do not overmix; you want the batters swirled together, not combined.
  6. Bake for 25 minutes or until a toothpick inserted near the center comes out clean or with a few moist crumbs. Transfer the pan to a wire rack to cool slightly.
  7. Frosting: While cake is baking, make frosting. In a large saucepan, combine the butter, cocoa powder, and milk and heat over medium heat until melted and smooth. Remove the pan from the heat and whisk in the vanilla and powdered sugar. Add powdered sugar one cup at a time, mixing until smooth and only adding enough to achieve the desired taste and consistency.

Wednesday, December 28, 2016

Levain Bakery copycat #10 - Bustle

Levain Bakery copycat #10 - made dough December 13, 2016 from Bustle
Wait! Don't go on that New Year's resolution diet yet! I'm blogging out of order and hurrying up to get this post up before everyone's good intentions to eat healthy kick in. Because you'll want one last sugar gasp, right? Something to tide you over before you start eating more vegetables, drinking more water, hauling your post-holiday butt to the gym, and counting your calories. Trust me, this is last-supper worthy.
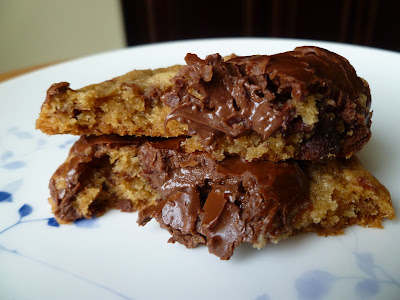
You know I've been obsessed with Levain Bakery cookies. I've now been to the actual Levain Bakery in New York (more to come on that in a future post) and know what the real thing tastes like. But I've also tried so many copycats (you can see I'm now numbering them so I can keep track) that I've decided I'm not actually trying to recreate the actual Levain Bakery cookie. As scrumptious as those are, let's not kid ourselves. I just want to make big, thick, chewy, equally scrumptious cookies. Because the copycats haven't really been coming that close to the real deal of Levain cookies. But for the most part, they've been really, really good.
And I'm happy to tell you that this one, copycat #10, is the best one so far. Seriously. Not necessarily the most authentic to Levain but it doesn't matter because it's that good. There's room in my heart for more than one favorite chocolate chip cookie. My love is boundless and unconditional. In fact, this one may knock off some of my earlier favorites as well. I know, my love is fickle as well as boundless and unconditional. Yours will be too when you make this.
The main thing that's a pain in the butt is, if you want to be authentic to the Levain Bakery process, apparently you should mix this by hand. Erk. I have a mixer for a reason. I don't do hand work. Not just because it doesn't seem as sanitary even though I fanatically scrub/wash my hands clean. But also because I don't like that dough sticking to my fingers and having to be washed off when it could conceivably remain in the bowl and later be made into cookies instead of washing down the drain. I can't scrape my hands clean of dough as well as I can a mixing bowl. #firstworldproblems But I was faithful, at least the first time, and followed the recipe's instructions to get my hands in on the mixing action.
The other kinda pain-in-the-butt is, unlike other recipes that use the entire egg, this one measures the egg by tablespoon. You ever try measuring goopy egg by tablespoon? Pain in those soon-to-be-firm butt cheeks. But soldier on because this cookie is worth not only that first world problem but it's also worth penance time in the gym to burn those cookie calories off. ETA: Forgot to mention, one of the reasons you almost need to mix by hand is the dough seems rather dry at first. The warmth from your hands will help bind it together. You can add up to 1 extra tablespoon of egg if you can't get it to bind, especially after you've add the chips but don't add too much. This isn't a sticky dough.
This is the kind of cookie you definitely don't want to overbake or even fully bake or you won't get the soft, chewy, moist texture you see here. It's like baked cookie dough but better than cookie dough and better than a "normal" chocolate chip cookie. I don't know why I like it so much but you know when my jaded taste buds clap, this is a cookie worth making.
This cookie also breaks my "wait 10 minutes out of the oven" rule. As in, you actually want to cool it almost completely before you eat it. I know, talk about test of willpower. But the wait will be worth it. If you eat it while it's too warm, it'll be too mushy. Optimal texture is at room temperature or, if you're just dying for a nibble, at least lukewarm. Not hot, not warm - control yourself. You'll thank me later even if your waistband doesn't.
1 1/2 tablespoons cornstarch
1/2 cup chopped walnuts, toasted (I left them out)
3/4 cup brown sugar
1/2 cup granulated sugar
1 teaspoon baking powder
1/2 teaspoon baking soda
3/4 teaspoon salt
2 tablespoon eggs (add up to no more than 1 tablespoon if your dough isn't sticky enough)
1/2 tablespoon vanilla extract
1 cup (2 sticks) butter, sliced into cold one-inch pieces
2 3/4 cups + 6 tablespoons all-purpose flour
1 1/2 cups Guittard chocolate chips
  1. In a mixing bowl, combine cornstarch, brown sugar, granulated sugar, baking powder, baking soda, salt and walnuts if using. 
  2. Add eggs, vanilla and butter to the mixture. Knead with your hands to incorporate.
  3. Add flour and chocolate chips to the mixture. Continue mixing together with your hands until it forms a thick dough. 
  4. Portion the dough into 6 to 8 large dough balls. Gently flatten slightly. Cover with plastic wrap and refrigerate for 1 hour.
  5. Preheat oven to 350 degrees F. Line a baking sheet with parchment paper and evenly space chilled dough balls. Bake for 10 to 14 minutes. Transfer to wire rack and let cool.

Saturday, December 24, 2016

Salted Caramel Apple Butter Bars

Salted Caramel Apple Butter Bars - made December 10, 2016 from The Cookies & Cups Cookbook by Shelly Jaronsky
Merry Christmas Eve! Or happy first night of Hanukkah! Or happy whichever holiday you celebrate. Frankly, I can't believe the year is almost over and I only have one more week to be in denial about it. But time and baked goods experiments march on.

If you checked where I got this and the Marbled Hazelnut Chocolate Cookie recipes from, you'll probably have figured out I got a new cookbook for Christmas. You'll also notice, based on the dates when I made each recipe, that I opened my present before Christmas Day. Yeah, I'm weak. Actually, I got it in the mail from a friend and, based on the size and shape, I figure it would be a cookbook and I would probably want to try something from it right away. Turns out I was right on both counts, ha.
Before

After
I have made recipes from Shelly Jaronsky's Cookies & Cups blog before. I think I found previous recipes via pinterest. It's always nice to see a food blogger come out with his or her own cookbook after they've been blogging for awhile. That's a level of dedication and professionalism I don't have since I only do my blog for fun, during my free time outside of work. I know how much work doing this as a hobby is so I can only imagine how doing it full-time as a job is. So it's always great to see a mark of that success in the form of their own cookbook.
Like a kid with a new toy, me with a new baking book means I go through the whole book, marking which recipes I want to make sooner than later and I get started right away. So don't be surprised if I do another one or two recipes from the book then it disappears again for awhile. Because after 3-4 recipes, I will likely have gotten distracted by another book or my pinterest board called me back to try something else. For now, let's go with these bars. I had actually thought I'd made these already from the Cookies & Cups blog but a search of my record says nope. So I rectified that.
I made a couple of minor mistakes with this one. First, baking at 325 degrees only seemed to melt the bottom layer rather than bake it so I cranked up my oven to 350 degrees to get some browning action going on. Which would've been okay if I hadn't taken my eye off the oven for a minute or 6 because next thing you know, the base layer was golden brown all over instead of just at the edges. Oops, my bad.
Pre-baking

Just out of the oven
But I figured that would be okay because the caramel and apples would add some moisture and it's better that the bottom wasn't soggy. So I forged on. My second "mistake" was I couldn't find my little jar of fleur de sel to sprinkle over the caramel layer. You know, the "salted" part of "salted caramel". So I sprinkled it with a tiny bit of table salt instead. I know, that was a little pathetic. It was even more pathetic that (of course) I found the fleur de sel later.
Whatevs, despite my mistakes, these turned out pretty well. Even the golden brown crust that only baked further after the top layer was put on. That helped make the bottom of the bars crisp so they didn't get soggy even with the baked apples and caramels on top of it and provided a nice texture contrast. The top layer of bits of dough layered over the apples and caramel didn't spread as uniformly as I thought they should have. I think it was because I did chill the dough while I worked on the lower layers. If I had kept it at room temperature, I think they would've spread more and looked more like a nice even layer. Look at the pic on the Cookies & Cups blog and you'll see what I mean,
I also got a little fancy and sprinkled the top with cinnamon sugar. I'd like to tell you it was because I was getting creative but that'd be a bald-faced lie. I'd made my favorite snickerdoodle recipe before this to put in holiday gifts and had some cinnamon sugar left over. I didn't want to waste my precious Penzey's Vietnamese Cinnamon so I used it for the top of this caramel apple bar. Which, incidentally, was freaking delicious. A bit rich with all that butter, a bit sweet with the caramel but I loved the combination of butter shortbread crust and top with tart apples and sweet caramel. A winner as a fall dessert.
2 cups (1 pound) salted butter, at room temperature (I used unsalted)
2 cups granulated sugar
1 tablespoon vanilla extract
4 cups all-purpose flour
14 ounces soft caramels, unwrapped (about 55 pieces of Kraft caramel)
1/3 cup heavy cream
1 tablespoon flaked sea salt
2 large Granny Smith apples, peeled and thinly sliced (I used 3 Granny Smiths)
  1. Preheat the oven to 325 degrees F. Line a 9 x 13 baking pan with foil and lightly spray with nonstick cooking spray.
  2. In the bowl of a stand mixer fitted with the paddle attachment, mix the butter and sugar on medium speed for 2 minutes, until light and fluffy.
  3. Add the vanilla and mix until incorporated.
  4. Turn the speed to low and gradually add the flour, mixing until the dough comes together.
  5. Divide the dough in half. Press half into the bottom of the prepared pan. Wrap the other half in plastic and refrigerate until needed.
  6. Bake the base for 15 to 20 minutes, until the edges begin to brown. Transfer the pan to a wire rack to cool slightly but leave the oven on.
  7. In a medium saucepan, combine the caramels and cream; melt over medium-low heat, stirring constantly. Once the caramel is melted and smooth, pour evenly over the top of the baked base.
  8. Sprinkle sea salt evenly onto the caramel and layer the apples over the caramel evenly, overlapping where necessary.
  9. Remove the reserved dough from the refrigerator and crumble it evenly on top of the apples, covering it as much as possible.
  10. Bake for 30 to 35 minutes, until the top is light golden brown and caramel is bubbling. Cool completely before cutting.

Wednesday, December 21, 2016

Marbled Chocolate Hazelnut Cookies

Marbled Chocolate Hazelnut Cookies - made dough December 10, 2016, adapted from The Cookies & Cups Cookbook by Shelly Jaronsky

I could conceivably call these "chocolate chip cookies meet Nutella and have a party" and you'd know exactly what I'm talking about. It's essentially a chocolate chip cookie dough and before you scoop it out, you dollop Nutella over the dough so that you end up with swirls of the good stuff in the chocolate chip cookie as it bakes. This is exactly how I make the Almond Nutella Swirl cookies and you know how much I love those.

I love the concept of these and conceivably, you could do the Nutella dolloping trick with your favorite chocolate chip cookie recipe. Or these cookies are pretty good too so you can also make the recipe as is. Be generous with the Nutella. The best part about this combination is even after the cookies have cooled and the chocolate chips are firm, the Nutella is still wonderfully creamy and gooey in the cookie so it provides an extra richness to the cookie. And that's never a bad thing.

2 cups plus 2 tablespoons all-purpose flour
1 tablespoon cornstarch
1 teaspoon baking soda
1 teaspoon kosher salt
3/4 cup (1 1/2 sticks) salted butter, at room temperature (I used unsalted)
3/4 cup packed light brown sugar (I used dark brown)
1/2 cup granulated sugar
1 large egg
1 large egg yolk
1 tablespoon vanilla extract
1 1/2 cups chocolate chips or chunks
2/3 cup Nutella (or more as desired, I didn't measure)
  1. In a medium bowl, whisk togehter the flour, cornstarch, baking soda and salt; set aside.
  2. In the bowl of a stand mixer fitted with the paddle attachment, beat the butter, brown sugar and granulated sugar on medium speed for 2 minutes until light and fluffy.
  3. Add the whole egg, egg yolk and vanilla; mix on medium speed for 1 minute until combined and smooth, scraping the sides of the bowl as necessary.
  4. Reduce speed to low and add the flour mixture, mixing until evenly incorporated and just combined. Do not overmix. Fold in chocolate chips.
  5. Remove the bowl from the mixer and dollop heaping spoonfuls of Nutella over the cookie dough. Swirl gently; you do not want to incorporate the Nutella into the dough but simply want it swirled in with the Nutella distinct from the cookie dough. 
  6. Scoop into golf-ball size dough balls, dolloping more Nutella on top of the diminishing bowl of cookie dough as desired. Cover and chill or freeze for several hours or overnight.
  7. When ready to bake, preheat oven to 350 degrees F. Line baking sheets with parchment paper and evenly space chilled or frozen dough balls. Bake 9 to 10 minutes or until edges are golden brown. Do not overbake. Cool for several minutes then transfer cookies to wire rack to cool completely.