Tuesday, March 4, 2014

Glazed Lemon Pancakes for Shrove Tuesday

Lemon Pancakes - made March 2, 2014 from Disgustingly Good
It's Shrove Tuesday and this marks the day before Lent, a day and a season observed by many Christian denominations. More importantly as a foodie, it's also known as Pancake Day.  For Lemon Week and Shrove Tuesday, what better combination to denote the day than Lemon Pancakes? I love pancakes and have never had lemon ones but this met my "have to use up my lemons" criteria of using at least 1/4 cup of lemon juice plus zest. Can't waste good zest.
I figured the lemon juice and zest in the pancakes would make this lemony enough but I didn't want the pancakes to compete in flavor with butter or syrup as the traditional pancake toppings. Instead, I made a simple lemon glaze: powdered sugar, lemon zest and just enough freshly squeezed lemon juice to make the glaze the consistency I wanted, slightly thinner than a frosting but thicker than a runny glaze. Since you pour the glaze over warm pancakes, it'll melt a bit so don't be afraid of making it too thick. These weren't the fluffiest pancakes I've ever made but I did like the lemon spin on traditional pancakes. The lemon glaze complements them perfectly to keep up with the lemon theme.

Shrove Tuesday also marks Mardi Gras or Fat Tuesday. Laissez les bon temps roulez!
1 cup all-purpose flour
1/3 cup sugar
1 1/2 teaspoons baking powder
1/2 teaspoon baking soda
1/4 teaspoon sea salt
3/4 cup sour cream
1/3 cup milk
zest of two lemons
1/4 cup fresh lemon juice
3 tablespoons butter, melted
1 egg
1 1/2 teaspoons vanilla extract

Lemon Glaze
1 cup powdered sugar, sifted
zest from 1 lemon
enough lemon juice for the desired consistency (2-3 tablespoons)
  1. Mix together flour, sugar, baking powder, baking soda and salt. 
  2. In another bowl, mix together the rest of the ingredients. Pour wet mixture into dry and stir quickly. The batter will be thick and bubbly.
  3. Use 1/4 cup batter for each pancake and pour onto hot skillet. Cook until golden brown on the bottom then flip. Serve warm with butter and/or maple syrup or lemon glaze (mix 1 cup powdered sugar and enough lemon juice to get the desired consistency).


Monday, March 3, 2014

Lemon Pasta with Ham

Lemon Pasta - made February 17, 2014
My mom's lemon tree is busily churning out more lemons than either she or I can possibly handle. My own lemon tree is getting overloaded but next to my mom's, mine looks anemic. This is a picture of my mom's tree after I harvested two bags of lemons from it. They've been left on the tree so long because we can't keep up that they're turning from yellow to orange. So this is going to be Lemon Week on my blog as I search out more ways to use them than the standard lemon bars.
I knew from past experience that I like lemon in pasta and risotto so I decided to throw together some kind of lemon pasta. A search of a variety of recipes offered some basic commonalities in most recipes: lemon juice, lemon zest, broth, milk and sometimes cheese. I didn't want a heavy sauce and preferred a more pure lemon flavor so I opted to make it without cheese. You can also safely assume I didn't have cheese in my fridge at the time as well.
This was easy to throw together, another key criteria when I cook. The sauce is very thin which is why I recommend angel hair pasta so you don't end up with big noodles and very little sauce. You can use chicken instead of ham but I liked the sweetness of the ham to complement the lemony sauce. I also liked to sprinkle lemon zest over each serving for added lemon flavor. This isn't Cordon Bleu but I liked it for its simplicity and flavor.
1/2 pound angel hair pasta, boiled al dente in salted water
3 cloves garlic, minced
2 tablespoons olive oil
1/2 cup chicken broth
zest from 2 lemons
1/3 cup freshly squeezed lemon juice
1/2 cup whole milk
1/2 lb ham, cut into chunks

  1. Boil pasta to al dente in salted water.
  2. Brown garlic in olive oil. Add chicken broth, zest, lemon juice, and milk. Bring to a boil then add ham and angel hair pasta. Toss to coat lightly with sauce (sauce will be thin).


Sunday, March 2, 2014

Restaurant Review: Joy Luck Palace (dim sum)

Joy Luck Palace - lunch on February 19, 2014
I had never heard of Joy Luck Palace until I read that it was one of the top 5 places to go to for dim sum in the Bay Area. That's a pretty grandiose claim considering the plethora of dim sum places all over a geographic area heavily populated by Asians. A claim that can't go unresearched by yours truly, especially since as soon as I heard it, I started craving dim sum. And since birds of a feather flock together, it wasn't hard for me to rustle up a couple of friends to go test it out for lunch one day.
Surprisingly, Joy Luck only has 3 stars on yelp which seems to be a bit at odds with that Top 5 claim. Did the writer of the original report go on a particularly good day at Joy Luck Palace or were they being overly generous, more so than the 549 reviewers to date on yelp? I consulted with a couple of Chinese friends who are dim sum aficianados and they dismissed the yelp ratings as "that's always for the service, not the food".
Okay, that made me feel better. Sort of. When we arrived, I was surprised to find it wasn't that crowded. We got there during lunch time and usually dim sum places are packed by then. The inside of Joy Luck was pretty spacious, not quite as big as Asian Pearl but still a good size. Plenty of tables, plenty of room for the dim sum carts.
Not that they needed it as it turned out there was some merit to those yelp reviews. I don't expect 4-star service at dim sum places. You sit there, the carts roll on by, you flag the ones you want, they place it on your table, stamp your card and move on. It usually works pretty smoothly. And at first it did. The steam cart came by and we got steamed dumplings and chicken in sticky rice wrapped in banana leaves. So far so good.
Sticky Rice Chicken wrapped in banana leaves
Sticky Rice Chicken
Then another steam cart came along and we got more steamed dumplings including my standbys of har gow (steamed shrimp dumplings) and siu mai (steamed pork dumplings).
Har Gow
Siu Mai
I was looking for the fried cart though, one that would have the fried shrimp balls, baked pork buns, maybe the imitation crab claw and the pork flaky pastry thingies (I never know what they're called but I know it when I see it). My friend Jenny was looking for the shrimp or beef wrapped in flat rice noodles.
But the carts stopped coming and we were left hanging. There were a couple of carts roaming the restaurant but they looked like the exact same carts we'd already availed ourselves of and offered nothing we hadn't already eaten or passed on. Where was the fried stuff?? I started to wonder if they were just faking us out and whether there really was only 1 dim sum cart and they just swapped out who manned it to make it look like there was more than 1 on patrol.
Shrimp wrapped in rice noodles
But we knew the dim sum we were looking for existed because the tables next to us had them. Finally, I picked up the menu on the table and wondered if we had to order it rather than wait for a cart to make an appearance. So that's what we did, once we managed to flag down the right person to take our order. And that took some doing too. There's a confusing hierarchy regarding the personnel at dim sum places. The most formally dressed ones are usually the ones who total up your bill. Similarly dressed but not quite as natty looking can either be the ones you order from or they fill your water glasses. Never try to order from the person pushing the dim sum cart. If what you're looking for isn't on their cart, they get distressed that they can't give you what you want (especially if you don't know how to ask for it in Chinese because you don't know what it's called and "pork flaky pastry thingie" doesn't translate well) and they look around for one of the nattily-dressed people to pass on to the almost-as-nattily-dressed people to take your order.
Baked Pork Bun
But we finally made it through the hierarchy to get to the correct person and our order came out fairly quickly once we finally managed to put it in. Although the deep fried shrimp balls took awhile and I almost thought they'd forgotten it.
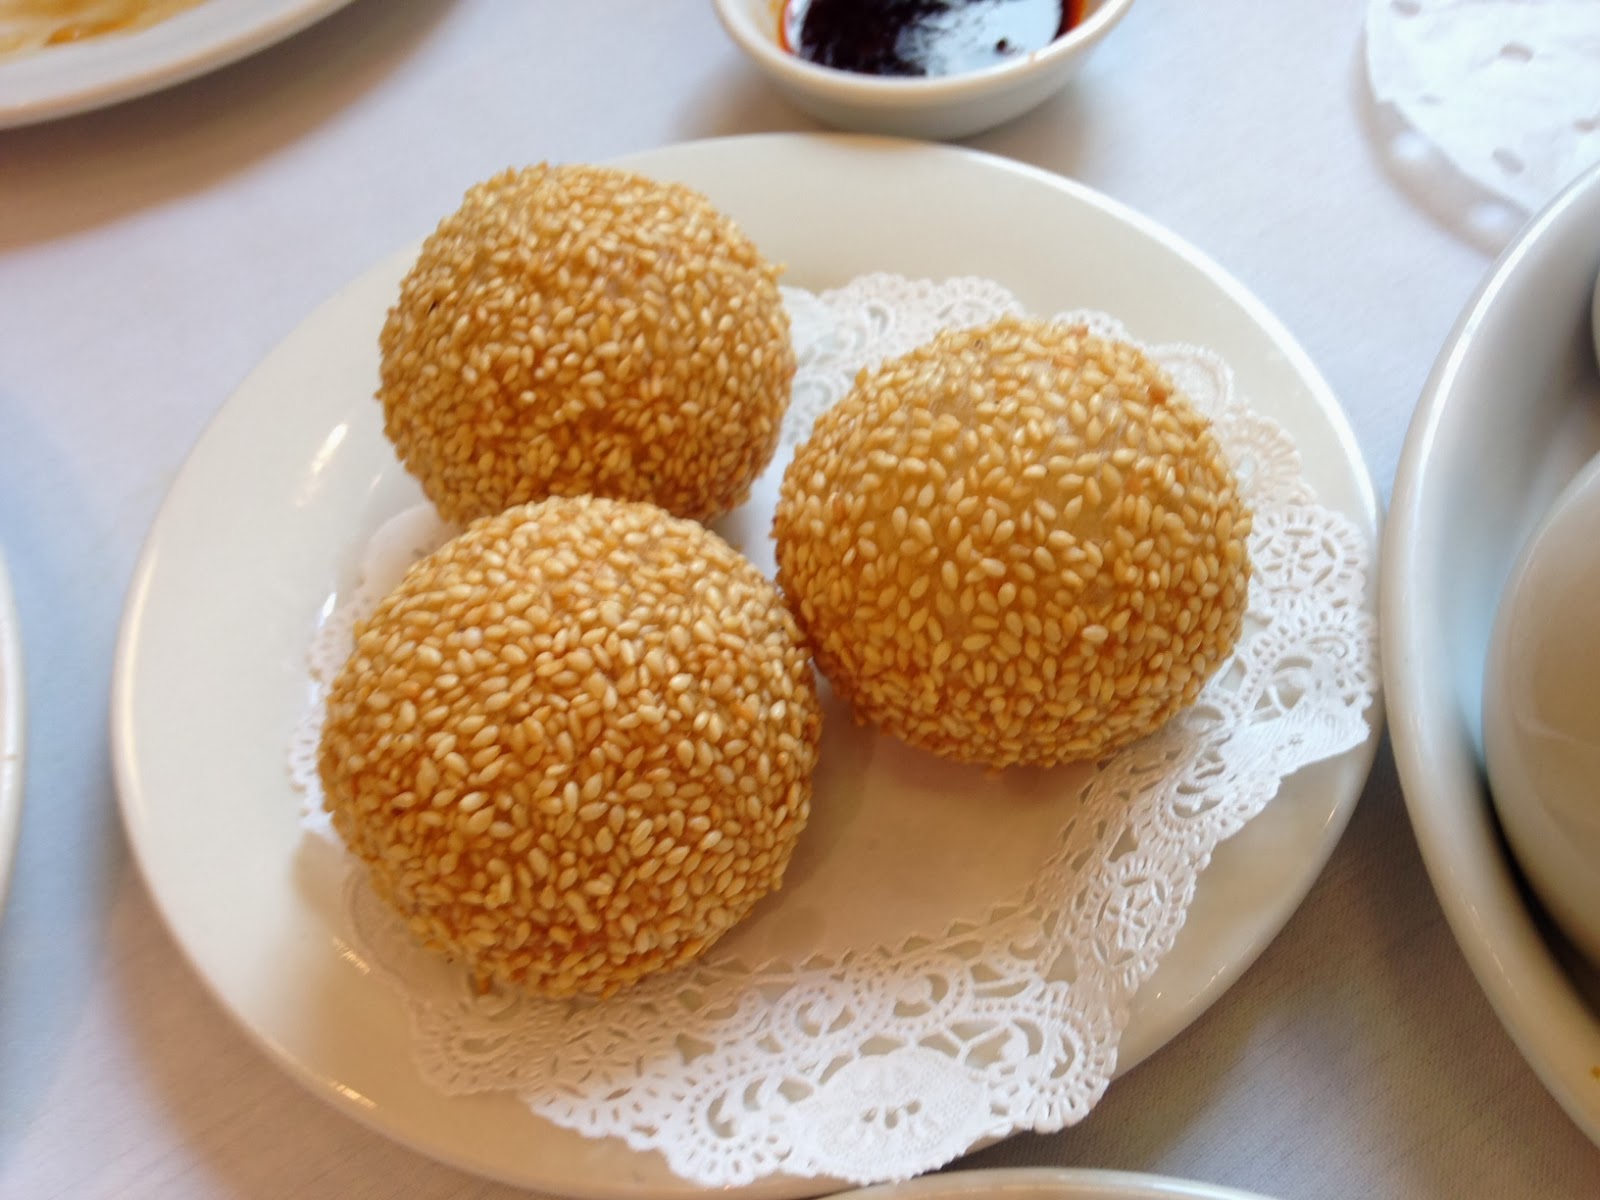
Sesame Balls
The dim sum itself was pretty good although I have to say it wasn't anything out of the ordinary. Perhaps I'm jaded or just fortunate that there are a lot of good dim sum places where I live so something would have to be pretty stupendous to stand out from the crowd. This was good but I can't say it was so fantastically awesome that I can't wait to go back and get indifferent service again. Now I understand the yelp reviews: good dim sum, okay service.
Fried Shrimp Balls

Cinnamon Sugar Apple Cake

Cinnamon Sugar Apple Cake - made February 23, 2014 from Pinch of Yum
I have all sorts of apple cake recipes pinned on my pinterest baking board. Apple is one of the fruit exceptions I bake with. Normally I like my fruit whole and unadorned but apple (and banana) lends itself well to being incorporated into baked goods. Plus it doesn't hurt that you just throw these ingredients together, sprinkle a cinnamon sugar topping over it and let it bake. Nothing could be easier.
The only thing you have to be careful about when baking with apples (and most fruits) is they'll release a lot of moisture (water) into whatever you're baking. That's usually okay but it also means you don't want to underbake anything by very much, if at all, or you'll end up with something wet rather than moist. Knowing that, I really did try to leave this in the oven a few minutes beyond my normal underbaking comfort zone. I could tell the corners and edges were done because the toothpick went in easily. The toothpick poked in the center came out clean so you'd think it would be done but it also encountered more denseness so I knew it wasn't quite as done as the outer edges of the cake. I turned the oven off and left it in there then made myself leave the kitchen or I knew I'd end up hovering and poking a toothpick at the cake every 30 seconds. I lasted another 5 minutes then I had to take it out or suffer a breakdown that I was overbaking a cake.
As it turns out, I should've kept it in there a couple of minutes more (I knew it!) but it wasn't too bad. Still a bit more moist than it should've been but baked enough to be cakey. I used Granny Smith apples so they offered a slight tart contrast to the sweetness of the cake and the cinnamon sugar topping. Their texture was also soft enough to blend well with the softness of the cake. I'd consider this a good brunch cake or a picnic cake. Due to the moistness though, I would recommend cutting it only at the last minute and keeping it well wrapped until you're serving it. Otherwise the cut edges will dry out quickly once exposed to air.
1½ cups brown sugar
⅓ cup oil
1 egg
1 cup buttermilk
1 teaspoon baking soda
1 teaspoon vanilla
2½ cups flour
1½ cups chopped apples
½ cup sugar
1 teaspoon cinnamon
1 tablespoon butter
  1. Preheat oven to 325.
  2. Mix ingredients in order given (except the last 3 ingredients).
  3. Pour batter into a 9×13 greased pan.
  4. Combine last 3 ingredients to make a topping and sprinkle it evenly over the batter.
  5. Bake for 45 minutes. It’s delicious when served warm!

Saturday, March 1, 2014

Mashed Sweet Potatoes

Mashed Sweet Potatoes - made February 22, 2014 from The Quick Recipe by the editors of Cooks Illustrated
I've been so obsessed with trying out all the recipes I've pinned on pinterest that I've been woefully neglecting my cookbooks. They stand at attention in various bookcases (yes, I have that many), in silent reproach that they gather dust every time I walk by and ignore them in favor of shiny new recipes I find on other foodie blogs. In my more fanciful moments, usually when I'm sleep deprived, I wonder if they plot to fling themselves off the shelves to land at my feet, open to a recipe that might tempt me to pay more attention to them.

Okay, weird moment has passed....

To assuage my self-inflicted guilt ("self, you bought all these at some point and don't use them enough - so.....why did you buy them again?"), I cracked open a few to search out recipes that use sweet potatoes. I had a bag to use up and I wanted to do something more than peel and boil them or bake them. Whenever I'm focusing on a particular ingredient to use, I like to check anything by Cooks Illustrated because they'll generally have it and will talk about what they did to it to make it the best they could come up with.
As they did with mashed sweet potatoes. I always thought you just boil them then mash them and voila, mashed sweet potatoes. My, how naive, the Cooks Illustrated people would think me. They had a 2-page write up on their experiments with butter, milk, cream, boiling, peeling, not peeling, baking, and so on. I trusted they knew what they were talking about and tried out the recipe of their end result. And whaddaya know, they really are all that.

I like sweet potatoes but sometimes the uninspired way I make them leaves them too mushy. I like the taste (although sometimes it does seem a bit watered down when I boil it) but the texture is sometimes a little too goopy or gluey. I figured that's just the way they were and kept on eating. Now I know better. This recipe prepares them to just the perfect consistency, not firm but also not too goopy. The flavor is also more robust as full-on sweet potato although I'm not sure I like the added flavor of butter. Butter is fine - and preferable - on white mashed potatoes but I like my sweet potatoes without it as they're flavorful enough without the added taste and calories of butter. Still, this version is far superior to the normally plain way I make mashed sweet potatoes. The Cooks Illustrated people really have some game.
4 tablespoons unsalted butter, cut into 4 pieces
2 tablespoons heavy cream
1/2 teaspoon salt
1 teaspoon sugar
2 pounds sweet potatoes, about 2 large or 3 medium-small potatoes, peeled, quartered length-wise, and cut cross-wise into 1/4"-thick slices
pinch ground black pepper
  1. Combine the butter, cream, salt, sugar and sweet potatoes in a 3 to 4-quart saucepan. Cover and cook over low heat, stirring occasionally, until the potatoes fall apart when poked with a fork, 35 to 45 minutes.
  2. Off the heat, mash the sweet potatoes in the saucepan with a potato masher or wooden spoon. Stir in the pepper and serve immediately.

Cafe review: Corner Bakery Cafe

Corner Bakery Cafe - lunch on February 15, 2014
My coworker, Queen of Cheap Eats, was the one who first told me about Corner Bakery. At the time, they hadn't yet opened their Mountain View location and when they did, I kept forgetting to go. But I finally made it there a week or so ago because I was in the area for another reason, was driving by and saw them, appropriately enough, at the corner, and decided it was a good time to check it out.
I would consider Corner Bakery Cafe to lean more towards the cafe than the bakery side. It's very much like Panera Bread in that you order at the counter, they bring out your order and you can enjoy cafe casual dining inside. Their menu selection leans towards more protein choices than Panera does as you can get egg scrambles and other breakfast entrees all day except for their oatmeal. I took a picture of their "bakery" display and it was a bit humble in my baking mind in terms of baked goods on offer, hence why I consider them more of a cafe than a bakery. There are bread loaves, bagels, and croissants to represent the bread side and cookies, muffins and bar cookies for the baked goods. At first I thought I should try one of the baked goods but in perusing the offerings, there wasn't anything in the display case that I couldn't easily make myself and nothing stood out as being worthwhile enough to tempt me on the calorie intake so I passed.
Instead, it being a cloudy day at the time, I opted for the chili in the bread bowl, one of my favorite ways to eat chili or soup, calories be damned. Which was a good thing because the Corner Bakery does list the calorie count for the items on their menu, right there, big as life when you order. That always has the tendency to be an appetite killer but at least you can make conscious choices. I took the order to go and they had smart packaging for their to-go orders: the chili was in a separate container keeping hot and the hollowed out bread bowl and top resided in their own plastic home. All I did was pop the bread pieces in my toaster oven to give them a little crunch then pour half the chili into the bowl. Half was all that could fit. Not to worry, I ate the other half once the bread bowl had emptied out.
The chili was pretty good although I have to admit, in a blind taste test, I'm not sure I could taste the difference between the chili from the Corner Bakery and the chili from Wendy's. Don't get me wrong, I like the chili from Wendy's and it's the only thing I'll eat there if/when I eat fast food at all. So this was a good choice. For less than $8 plus tax, this is a tasty (and filling) lunch. In fact, it filled me up so much I skipped dinner as I wasn't hungry later on. Which was just as well because, according to the Corner Bakery's menu, a bread bowl of chili is over a thousand calories (ouch) so it's two meals in one.

Friday, February 28, 2014

Baked French Toast

Baked French Toast - made February 20 and 21, 2014, recipe adapted from Mormon Mavens in the Kitchen
Freshly baked, unadorned
You can call this French Toast or bread pudding. I'm going to call it delicious. Seriously. It's a notch above your run of the mill French toast of bread soaked in a custard mixture and pan fried in butter. It's a step above your average bread pudding baked in a custard mixture because of the brown sugar topping and the vanilla glaze.
Newly glazed
It's actually more of a bread pudding in terms of taste and preparation. You prep it the night before to let the custard soak into the bread overnight then bake it off the next morning. I did pare it down a bit from the original recipe simply because I didn't need that much plus I only had a 1-lb loaf of bread to use instead of the 1 1/2 lbs called for in the original recipe. But, as is usually the case with bread pudding, I like how easy it was to put together and it's ideal if you're serving it for a brunch or just want a breakfast treat for your family.
The advantage this has over French Toast is you don't have to fry it up at the last minute or try to time it for when everyone is at the breakfast table. This is actually better when it's served just barely lukewarm. If you serve it too hot from the oven, the texture will be gooey and not in a good way.
Of course, how much you like this depends on the bread you use. I always, always use challah for bread pudding because it has the perfect denseness plus I like the flavor of the egg bread. You can use any other dense bread but skip the Wonder Bread because that's pretty mushy even without custard added to it and it'll just be soggy goo if you try it in bread pudding. It wasn't spelled out in the original recipe but I also added a vanilla glaze. Depending on how much glaze you want, start with 1 1/2 - 2 cups of powdered sugar, add just enough whole milk and a teaspoon (at least) of vanilla extract to get the desired consistency and spread it over the bread pudding when it's lukewarm. I enjoyed this so much that let's just say I worked out while it was cooling, had a piece then worked out again. And it was worth every drop of sweat.
1 pound dense bread like challah or sourdough (I used challah)
6 eggs
1 1/2 cups whole milk
3/88 cup heavy cream
1/2 cup sugar
1 1/2 tablespoons vanilla

Topping
1/2 cup all-purpose flour
1/2 cup packed brown sugar
1 tsp. cinnamon
1/4 tsp. salt
1 stick cold butter, cut into pieces (4 ounces)
  1. Grease a 9x13 pan with butter.  Tear bread into bite-size chunks and place evenly in the pan.
  2. Mix together the eggs, milk, cream, sugar, and vanilla.  Pour evenly over bread.  Cover tightly and store in the fridge for several hours (I put mine in overnight....it was about 12 hours).
  3. In a medium bowl mix together the flour, brown sugar, cinnamon, and salt.  Cut in the butter with a pastry blender until it all looks nice and crumbly (like small pebbles, according to P-Dub).  Place in a ziploc bag and put in fridge.
  4. When ready to bake, take pan and bag out of fridge.  Remove wrap and evenly sprinkle the crumb mixture over the top.  Bake for 1 hour at 350 degrees (or 45 minutes if you like it more soft and pudding-like).