Friday, July 30, 2010

Heath Bits Peanut Butter Cookies

Heath Bits Peanut Butter Cookies - made July 25, 2010

One of my online fitness buddies, Tanya, posted this recipe and coincidentally I found it on the back of the Heath Bits package I had in my baking drawer that I needed to use up. Tanya is a self-admitted peanut butter and chocolate fiend and has been posting a lot of food porn in her journal lately. I, a self-admitted baking addict, seize on any opportunity to try new recipes recommended by people who can appreciate sweets, desserts and good baking.

In case you've never seen toffee bits before, here's what's generally available at the grocery store. There are two kinds - one that's milk chocolate toffee bits and are essentially Heath Bars chopped into pieces (pictured below). The other is just toffee bits without the milk chocolate. The latter is harder to find, at least in my local grocery stores. I've been able to find them when I visit my sister in Southern California so I admit to stocking up on them in the infrequent times I go down for a visit.

This recipe made for a good dough to work with, meaning it wasn't too soft or sticky. I portioned the cookie dough into dough balls using my ice cream scoop which has gotten more use with cookie dough than with actual ice cream, placed them in a plastic lid that was originally supposed to be a cover for a pie pan, and put them in the freezer to firm up before I put them in a ziploc freezer bag marked with their name, oven temp and baking time.


These turned out pretty well. I'm not as into peanut butter as Tanya is so I can't rhapsodize over them but if you like peanut butter, chocolate and toffee, this makes for a nice variation from the usual chocolate chip cookies. I substituted butter for the shortening for better taste and preferred texture - these didn't spread too much and were nice and chewy when properly (under)baked. I baked them off Sunday night to bring into a couple of work meetings on Monday. If you have to go to work on Monday and you have to be in meetings, let there be cookies.


½ cup shortening
¾ cup creamy peanut butter
1 ¼ cups packed light brown sugar
3 tablespoons milk
1 tablespoon vanilla extract
1 egg
1 ½ cups all-purpose flour
¾ teaspoon baking soda
¾ teaspoon salt
1 1/3 cups (8 ounces) Heath Milk Chocolate Toffee Bits, divided

1. Heat oven to 375˚F.
2. Beat shortening, peanut butter, brown sugar, milk and vanilla in large bowl until well blended. Add egg; beat just until blended. Combine flour, baking soda, and salt; gradually bet into peanut butter mixture. Stir in 1 cup toffee bits; reserve remainder for topping.
3. Drop by heaping teaspoons about 2 inches apart onto ungreased cookie sheet; top each with reserved toffee bits. Bake 7 to 8 minutes or until set. Do not overbake. Cool 2 minutes. Remove to wire rack. Cool completely.

About 3 dozen cookies

New Krung Thai - pad thai


Pad Thai - dinner with my friend Cindy on July 23, 2010 at New Krung Thai

One of my favorite Thai restaurants near where I live is New Krung Thai http://www.newkrungthai.com/. Not to be confused with the other Krung Thai further down the same street. I haven't tried that Krung Thai as I keep falling back to the first one I had ever gone to. Almost without fail I get their pad thai (no bean sprouts - I don't see the point of bean sprouts). They're close to my current house (walking distance) and when I call for a takeout order, they already have me programmed into their computer. Eek. When my nieces come for a visit and spend the night, our usual ritual is to get a hefty takeout from Krung Thai and watch chick flicks while we consume our (double) order of pad thai, soup, pad see ew, fried rice and ribs. No, we can't finish it all in one sitting (although we've come close a few times) and yes, they like having the leftovers for breakfast the following day. Since I don't cook, it makes for a perfect solution.

I've experimented by trying pad thai at other Thai restaurants - Amarin Thai, King of Krung Siam and Shana Thai in Mountain View in the recent past but none of them compare to New Krung Thai's pad thai. When I move, I think this is one of the places I'll miss the most. Although that just means I'll have to drive instead of walk to pick up some pad thai.

Sunday, July 25, 2010

Easy Fudgy Loaf Cake


Easy, Fudgy Loaf Cake - made July 23, 2010 from Chocolate by Nick Malgieri

This is one of those recipes I'd been meaning to try for awhile but never seem to get to. I finally got to it because I had some milk I bought for another recipe so I thought I'd leverage ingredients while I could. This was very easy to throw together which is what I did while Ina Garten's Brownies were baking in the oven. I'd already packed my regular size loaf pans so I ended up making this in 2 mini loaf pans and 2 round ramekins. You only see 1 mini loaf in the picture because the other broke when I turned it out of the pan. That was baker error - I upended it out of the pan while it was too warm and it broke apart. Needless to say, that was the taste test loaf.

While it was still warm, this was a great cake - soft texture, not too overwhelmingly chocolatey and just a nice crumb. Once it cooled to room temperature though, it was a little crumbly and I didn't think it was anything special. It didn't slice that neatly and had an almost dry mouthfeel. Not sure I'd make again or if I did, I'd warm it up before eating. Unfortunately I'd only tried it warm and didn't try it at room temp until after I'd given the rest away. Oops.

2 cups cake flour
2 teaspoons baking powder
¼ teaspoon salt
8 tablespoons (1 stick) unsalted butter, softened
½ cup granulated sugar
½ cup light brown sugar
2 ounces unsweetened chocolate, melted and cooled
1 large egg
¾ cup milk
1 teaspoon vanilla extract

One 8 ½ x 4 ½ x 2 ¾ inch loaf pan, buttered and the bottom lined with parchment or wax paper

1. Set a rack in the middle of the oven and preheat to 325˚F.
2. In a small bowl, stir together the flour, baking powder and salt.
3. Use an electric mixer set at medium speed to beat the butter and sugars together until light, about 5 minutes. Beat in the chocolate and continue beating until smooth. Scrape bowl and beater(s) and beat in the egg. Continue beating until creamy and smooth, another minute or two.
4. By hand, using a rubber spatula, stir in half the flour mixture, making sure to scrape the sides of the bowl well. Stir in the milk and vanilla, then the remaining flour mixture.
5. Scrape the batter into the prepared pan and smooth the top. Bake for about an hour, or until well risen and a toothpick inserted into the middle comes out clean. Cool in the pan for 5 minutes, then unmold, remove paper and finish cooling on a rack.

Storage: Keep the cake wrapped in plastic at room temperature for several days. For longer storage, wrap and freeze.

Ina Garten's Brownies


Ina Garten's Brownies - made July 23, 2010 from http://www.foodnetworktv.com/

Someone recommended this recipe as THE best brownies they'd ever made. In baking-speak, to me that's the equivalent of madly waving a red flag at a charging bull. Gets my attention, you know? So I had to try the recipe and see if they'd come up to snuff.

Hmmm. First of all, bear in mind that I've made literally hundreds of different brownie recipes many more hundreds of times. So the bar is quite high for me to put one brownie recipe above all. Second, we all have different tastes and preferences. That's my somewhat gentle lead-in to say I wouldn't quite say these were the best brownies I'd ever made. They were good, no doubt about it. But they don't make my top 5 favorite brownie recipes, mostly due to texture. My favorite kind of brownie is fudgy, rich and dense. These weren't cakey but they did have a light, soft texture, mainly due to creaming the butter and sugar for 5 minutes which incorporates a lot of air into the batter. This recipe also has a relatively large amount of baking powder so that accounts for the lightness as well. I'm also not a big fan of having melted chocolate chips make up the chocolate in the batter. I don't have high-end chocolate chips to use like I do with regular bittersweet bar chocolate that I use for baking. I compromised and use part Nestle chocolate chips and part Guittard chocolate.

I also cut this recipe in half and baked it in an 8 x 8-inch pan. It made for a thicker brownie than The Barefoot Contessa might've intended but nothing wrong with thick brownies. You just have to bake them longer. That said, these were pretty easy to make. I woke up unnaturally early Friday morning and had these baked off and out of the oven before I logged into work by 8 am. Oh, yeah, I also added M&M baking bits on top in lieu of nuts. Some of them sank since the batter wasn't very thick and they gravitated towards the middle. I think these brownies have too soft a texture to take add-ins very well.

1 pound unsalted butter
1 pound plus 12 ounces semisweet chocolate chips
6 ounces unsweetened chocolate
6 extra-large eggs
3 tablespoons instant coffee granules
2 tablespoons pure vanilla extract
2 ¼ cups sugar
1 ¼ cups all-purpose flour
1 tablespoon baking powder
1 teaspoon salt
3 cups chopped walnuts

1. Preheat oven to 350˚F.
2. Butter and flour a 12 x 18 x 1-inch baking sheet
3. Melt together the butter, 1 pound of chocolate chips, and the unsweetened chocolate in a medium bowl over simmering water. Allow to cool slightly. In a large bowl, stir (do not beat) together the eggs, coffee granules, vanilla and sugar. Stir the warm chocolate mixture into the egg mixture and allow to cool to room temperature.
4. In a medium bowl, sift together 1 cup of flour, the baking powder, and salt. Add to the cooled chocolate mixture. Toss the walnuts and 12 ounces of chocolate chips in a medium bowl with ¼ cup of flour, then add them to the chocolate batter. Pour into the baking sheet.
5. Bake for 20 minutes, then rap the baking sheet against the oven shelf to force the air to escape from between the pan and the brownie dough. Bake for about 15 minutes, until a toothpick comes out clean. Do not overbake. Allow to cool thoroughly, refrigerate and cut into 20 large squares.

Friday, July 23, 2010

Patxi's Pizza


When I was an undergrad at Berkeley, one of my favorite pizza places was Zachary's Pizza in Oakland, by the Rockridge BART station. Zach's was always crowded and always good. I think that was one of the first times I'd actually had pizza as a real pizza "pie". Many years out of undergrad later and not getting up to Berkeley or Oakland hardly ever, I was delighted to discover Patxi's (pronounced "pah-cheese") Pizza in Palo Alto thanks to my friend Karen (http://www.patxispizza.com/).

Patxi's is the closest I've come to Zachary's pizza on the peninsula. Their deep-dish Chicago-style pizza has a buttery crust and is laden with cheese. Yeah, don't go there if you're dieting or counting calories. The pies take anywhere from 30-40 minutes to bake so I've discovered the best thing to do is call ahead about 45 minutes before you expect to arrive (and account for having to hunt for parking around Palo Alto's busy University Ave) and order for dine-in. Then it's just a matter of arriving on time and they serve your pizza within a few minutes. If anyone in your party is late, they can also hold the pizza for you in their warmer. The call ahead option is a boon, especially when you're meeting cousins with young kids who probably wouldn't appreciate waiting more than half an hour for pizza :).

Oh, and once again if you're not on a diet and not watching what you eat (although you, I mean, "I", should) and have partners in crime who also like a little dessert, there is also conveniently a gelato place located next door to Patxi's so, despite being full, if you wanted a little something for your sweet tooth, you could also stop there on your way out to your car. I can personally recommend the mocha almond fudge. Just sayin'.....


Seven Layer Bars


Seven Layer Bars - made July 21, 2010 from allrecipes.com (submitted by Patty Tindall)

My friend Hildy mentioned Seven Layer Bars in a facebook post and my Pavlovian response was to hunt up a recipe and bake some, especially since I had all seven ingredients on hand and they were part of the "must use up" list. Seven layer bars are more like seven-ingredient bars. The basic recipe is normally a graham cracker crust "layered" with chocolate chips, butterscotch chips, nuts, coconut and sweetened condensed milk. This is a pretty basic recipe for them and like any tried and true recipe, it turned out well although nothing really spectacular. They're good but, as you've probably guessed by now, I'm super picky about baked goods so I wouldn't call these "great". But for magic cookie bars, they're decent. My favorite Seven Layer Bars would be from Dean & Deluca in St Helena, CA. They cut the pieces big, the graham cracker crust is thick and they really layered on the chips, nuts and coconut.

The only thing I did differently in this recipe is I combined the melted butter and graham cracker crumbs in a bowl rather than melting in the pan. This way I could control the mixing of the crust and I let the mixture sit for a few minutes so the graham cracker crumbs could absorb the butter better. Otherwise, it'd seem more greasy when baked because the butter would separate. I also patted the crust firmly into the bottom of the pan so it stays intact as a crust. For the nuts I used toasted almonds. Can't remember exactly how long I baked these since I didn't time them but I went more by how brown the coconut got rather than the edges. I baked until some of the coconut in the middle was also brown, not just the edges.

½ cup unsalted butter
1 ½ cups graham cracker crumbs
1 cup semisweet chocolate chips
1 cup butterscotch chips
1 cup chopped walnuts
1 14-ounce can sweetened condensed milk
1 1/3 cups shredded coconut

1. Preheat oven to 350˚F.
2. Place butter in 9 x 13-inch pan and melt in oven. Swirl to coat bottom and sides with butter.
3. Spread crumbs evenly over bottom of pan. Layer chocolate chips, butterscotch chips, and nuts over crumbs. Pour condensed milk over nuts. Sprinkle coconut over condensed milk.
4. Bake until edges are golden brown, about 25 minutes. Let cool.

Tuesday, July 20, 2010

Gooey Butter Cake

Gooey Butter Cake - made July 20, 2010 from allrecipes.com (submitted by V. Monte)

I've been dealing with some personal issues recently so I've also been hitting the baking therapy hard for the past few days as a coping mechanism. Sunday I made Kahlua Cake (http://pastrychefbaking.blogspot.com/2010/04/kahlua-cake.html) and Baby Brownies (http://pastrychefbaking.blogspot.com/2010/01/baby-brownies-aka-dulce-de-leche.html). Monday night I made the Triple-Threat Chocolate Chip Cookies. Tonight I made Gooey Butter Cake.

When you think of butter and cream cheese, do you think of Paula Deen? Me too. Which is appropriate as I had only heard of Gooey Butter Cake from my friends from the South. With a title like that and consistent endorsement from several people, I had to try it. Fortunately, it's pretty easy to make. I got this recipe from allrecipes.com but it's almost identical to Paula Deen's recipe on foodnetwork.com.

The base of the crust layer is yellow cake mix. Always sift cake mix before you use it or you'll end up with lumpy batter. I have a big-ass sifter from my culinary school days and it sifts flour, cake mix, you name it very quickly since there's so much surface area to use for sifting right into the bowl.


Once you have the crust mixed up, pat into an even layer in a 9 x 13-inch pan. Note that I always line my pans with foil regardless of whether the recipe calls for it or not. It not only is easier to lift the baked good out of the pan intact to cut properly on a cutting board but it also preserves your pan. I use my baking pans a lot and yet they're still in good shape because I take care of them with the foil method.


Mixing up the filling was pretty easy - I beat the cream cheese first just so the other ingredients would blend better with it when added. The batter was pretty liquid and very smooth.


Pour over the cake mix crust and make sure you get them into the corners as well.


I baked this for just under 45 minutes as the top looked brown. It smelled good pretty much from the get-go. I tried a piece while it was still warm and it's delicious. Bear in mind I don't even like cream cheese that much and this had 8 ounces in it. But I figure the 4 cups of confectioners' sugar killed the usual taste of the cream cheese and made it just nice, sweet and gooey. Those Southerners know how to make good gooey cake.


½ cup butter
1 18.25-ounce package yellow cake mix
3 eggs
1 8-ounce package cream cheese
½ teaspoon almond extract
4 cups confectioners’ sugar

1. Preheat oven to 350˚F. Lightly grease one 9 x 13-inch cake pan.
2. Melt the butter. Stir melted butter along with 1 egg into the cake mix. Press into prepared pan.
3. In a large bowl, mix cream cheese, almond extract, confectioners’ sugar and the remaining 2 eggs. Beat for 3 minutes with an electric mixer set on medium high speed. Spread over top of cake mixture.
4. Bake at 350˚F for 45 to 50 minutes and until browned on top. Allow cake to cool before cutting.


ETA: I had the taste test piece while this was still warm and it was delicious, almost like eating a pudding. I had a second piece today at room temperature and I have to admit, this is a little too sweet for me. I can really taste that yellow cake mix in the base and the pound of confectioners' sugar in the topping. Of course my coworkers just rolled their eyes at me as they swooped down on it so they seemed to like it. But still....if I make this again, I'd search for something a little less cloyingly sweet and more buttery like the basque cake.

Monday, July 19, 2010

Triple Threat Chocolate Chip Cookies

Triple-Threat Chocolate Chip Cookies - made July 19, 2010 from The Pastry Queen

If you don't like chocolate or are indifferent to it, move along, there's nothing to see here. But, if you're like me and think chocolate is the greatest invention of mankind and would inject it directly into your veins if you could, then this is the cookie for you. I think of it almost as baked fudge. It's rich, it's moist, it's just good. But two caveats - first, this isn't for the faint of chocolate heart. This cookie does pack a (chocolate) punch. Second, you must use high quality chocolate. There's a high proportion of chocolate in relation to the other ingredients and if you use inferior chocolate, you'll get an inferior cookie. For the bittersweet chocolate, I used Lindt Excellence 70%.


You should time this recipe as it's sometimes hard to tell when they're done baking. I go mostly by appearance - the cookie is done when it isn't as glossy and fine dry cracks appear slightly. But I say time it because you don't want to overbake it. I bake it for 10 minutes, take them out of the oven and let them sit on the hot cookie sheet a few minutes more to keep baking. Once they're cool and the chocolate sets, they're perfect.

Note that the dough is very soft, almost like a batter, and doesn't really harden. For that reason I don't give this my usual cookie dough treatment of portioning into dough balls and freezing first. It's actually unnecessary because the cookies don't really spread since they have such a high proportion of chocolate relative to butter. Do let it rest for 20 minutes as the directions call for as you don't want the batter to be too liquid before you bake the cookies. Oh, and it goes without saying I left out the nuts and only added milk chocolate chips. This is pure chocolate.


1 cup chopped pecans
1 cup chopped walnuts
6 tablespoons unsalted butter
8 ounces bittersweet chocolate, coarsely chopped
3 ounces unsweetened chocolate, coarsely chopped
3 large eggs
1 cup sugar
1 tablespoon vanilla extract
1/3 cup all-purpose flour
¼ teaspoon baking powder
¼ teaspoon salt
1 ½ cups semisweet or milk chocolate chips

1. Preheat the oven to 350˚F. Arrange the pecans and walnuts on a baking sheet in a single layer and toast for 7 to 9 minutes, until golden brown and aromatic. Cool the nuts completely.
2. Line baking sheets with parchment paper or silicone mats, or grease generously with butter or cooking spray.
3. Melt the butter, bittersweet chocolate and unsweetened chocolate in a small saucepan set over low heat. Stir occasionally, watching carefully to make sure the chocolate does not burn. Remove the pan from the heat to cool.
4. Using a mixer fitted with a paddle attachment, beat the eggs and sugar in a large bowl on medium speed about 3 minutes, until fluffy. Add the vanilla and melted chocolate. Beat on medium speed about 2 minutes, until the dough is thick and glossy. Add the flour, baking powder, and salt to the chocolate mixture, stirring just until incorporated. Let the dough rest for 20 minutes, which makes it easier to scoop.
5. Use a 1 ¾” diameter scoop to drop spoonfuls of dough on the prepared baking sheets, spacing them at least 1 ½” apart. Wet your fingertips lightly with water and gently flatten the cookie dough (no need to press hard; just press out the hump). Bake for 10 to 12 minutes, until the tops begin to crack and look glossy. Cool the cookies for 10 minutes before removing them from the baking sheets.

Friday, July 16, 2010

Rok Bistro

Today for lunch, a few of my fabulous coworkers (the good ones, haha) took me out to lunch for my birthday at Rok Bistro on Murphy St in Sunnyvale http://www.rokbistro.com/

Evelyn, me and Rhuwena

Rhuwena, me and Jenny

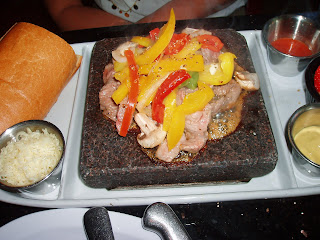
If you've never been there, their claim to fame is, depending on your order, they serve it to you on a volcanic rock heated to 700 degrees so you can cook your entree. Rhuwena and Evelyn got the steak.


They serve it in thick chunks but you're armed with a sharp knife so you can cut it into strips or pieces and cook it more quickly. Be warned though - 700 degrees is nothing to mess with and it'll cook your steak pretty fast and with a lot of splatter. Meaning, best not to go there with dry clean only clothes or if you have an important meeting in the afternoon. Unless you want to go back to work in grease-spattered clothes smelling like cooking meat :). Copious covering with the cloth napkins they provide is highly recommended.


Jenny's order


I got the Chicken Cordon Bleu sandwich (hold the red onions). The chicken was partially cooked and served with the ham on a hot volcanic rock as well so I could finish cooking it. The alfredo sauce and cheese were to the side along with a little cup of fresh fruit. It was the first time I'd tried the sandwich and it was pretty good. I only ate half though to save room for dessert....

My sandwich entree - Chicken Cordon Bleu

Because, let's face it, the real reason to go to Rok Bistro is for the chocolate fondue. During lunchtime, fondue is $9 per person with a 2-person minimum for each type of chocolate fondue. Evelyn is a dark chocolate fan but she was outnumbered by 3 milk chocolate lovers so we ordered my favorite, the milk chocolate hazelnut which is essentially milk, Callebaut milk chocolate and nutella.


The fondue is set on the table which has a flat-top burner in the center and heated atop a pot of water until it's nice, melted, free-flowing chocolate, ready for dipping.


Because you can't have fondue without something to dip into it - their standard platter includes oreo-covered marshmallows, pound cake (Sara Lee), pretzels, rice krispie treats, cream puffs, bananas, pineapple, strawberries and apples. My favorite combination is the banana and chocolate followed by the rice krispie treats, strawberries and pound cake. Never could get into the pineapple dipped in chocolate.

Our server overheard us mentioning my birthday so she surprised us with a scoop of vanilla ice cream sitting atop a volcanic rock - this one frozen so the ice cream didn't melt easily. I thought that was really nice of her! Not to mention she gave each of us a $10 coupon for our next visit. More chocolate fondue! As soon as I workout like a fiend to burn all the calories I consumed....


As always after a fun lunch, thanks, ladies! It was a great start to my birthday weekend!

Chocolate Chip Macadamia Bars with Shortbread Crust


Chocolate Chip Macadamia Bars with Shortbread Crust - made July 15, 2010 from epicurious.com

I have both macadamia nuts and miniature semisweet chocolate chips to use up so this seemed like a good recipe to try since it contained both. I downloaded this from Epicurious.com long ago and have held onto the recipe for months, if not years. I go through periods when I’m hunting for good recipes and just gather them all up. Then they gather dust until I’m inspired to try one of them.

The recipe calls for a food processor to make the crust and I have one but I’ve already packed it in preparation for my move. But it’s not a big deal to manually cut the butter into the sugar and flour – I do it all the time with lemon bars so I’m used to it. Just make sure your butter is chilled and you use two sharp knives or a pastry blender. I confess I’ve never gotten used to a pastry blender as it seems to drill the butter into the flour/sugar rather than actually cutting the butter. It’s all a matter of what you’re used to and I guess I’m old school. Plus, I don’t need another baking gadget like a pastry blender when two knives will do. Just make sure your butter is cold as that makes cutting it into the dry ingredients easier – you don’t want the butter so soft that it actually makes a paste with the flour and sugar. There should be little bits of butter coated with the flour/sugar mixture but not actually blended into it.

I baked the crust for a little longer than 15 minutes, probably closer to 20. My experience says the best part of a shortbread crust is when it’s – well – crusty. If you underbake it, it’ll be too soft and won’t provide enough of a texture contrast to the filling. Don’t overbake it either as you don’t want it too hard and remember it’ll bake some more once the crust is added. I toasted the macadamia nuts first and let them cool before I added them to the filling. Try to add the nuts last and right before you pour it over the crust – they should soften less by spending less time in a liquid batter before it’s baked. As I’ve said ad naseum, I’m not fond of nuts within a baked good although I’m fine with them on top. It’s a texture thing – nuts will steam and soften when baked so they lose the more crisp or hard texture which is what I like about nuts. I’m actually a little more forgiving of macadamia nuts since they don’t soften as much as nuts like walnuts or pecans.

I only had a small smidge of this since by the time it cooled last night, it was late and I don’t like eating right before going to bed. It was pretty good. The shortbread crust had the right “snap” to it and when I ate this, the filling was still just the tiniest bit warm so it was soft. I didn’t overbake it as I had feared since I left it in the oven longer than the prescribed 50 minutes. I recommend actually timing this one (this from me, the infamous “I never time anything” baker) because the crust on the filling forms pretty early on in the baking so sticking a toothpick into it keeps breaking the filling crust while just underneath, everything’s still too gooey to be done. I only had a vague sense of when I put this in the oven so I had to keep checking and could only go by how brown the crust was and what the toothpick test was showing me.

For crust:
1 cup all-purpose flour
¼ cup sugar
½ cup (1 stick) chilled unsalted butter, cut into ½” pieces

For filling:
1 cup sugar
½ cup all-purpose flour
2 large eggs
4 tablespoons (½ stick) unsalted butter, melted, cooled
1 teaspoon vanilla extract
1 cup miniature semisweet chocolate chips
1 cup coarsely chopped macadamia nuts (about 7 ounces)

1. Make crust: Preheat oven to 350˚F. Blend flour and sugar in processor. Add butter; process using on/off turns until mixture resembles coarse meal. Transfer mixture to 8-inch square glass baking dish. Press mixture onto bottom and ¾ inch up sides of dish. Bake until crust is golden brown on edges, about 15 minutes.
2. Meanwhile, prepare the filling: Whisk sugar, flour, eggs, butter and vanilla extract to blend in large bowl. Stir in chocolate chips and nuts.
3. Pour filling into warm crust, smooth surface. Bake until filling is golden brown and tester inserted into center comes out with moist crumbs attached, about 50 minutes. Transfer dish to rack; cool completely. (Can be prepared 1 day ahead. Store in an airtight container at room temperature.) Cut into 16 squares.