I've been baking for so long that I forget it's sometimes not as easy as it looks. I'm only reminded of it when people tell me their mishaps in the kitchen or say that baking is almost impossible for them. In which case I'm always baffled because I think baking is so easy. Then I think about how hard cooking is for me and there are people (who are likely excellent chefs on the hot side) who can't understand that either. So we all have different strengths and talents. I find most people who are good at or enjoy cooking on the hot side aren't as good at baking and vice versa. There are probably some who are equally good at both or enjoy doing both but I haven't met that many.
But still, I don't think baking has to be hard. Yes, it helps to have a certain aptitude for it. If you're the type of cook who likes to throw a dash of this and a pinch of that and don't like to be hampered by a recipe or directions, preferring your taste buds to guide you, then baking might not be for you and you're probably more of an inspired cook than I will ever be. On the other hand, if you like to bake but sometimes feel a bit intimidated by it, here are some simple tips that might help.
1. Read through a recipe first and decide if that's what you really want to make. If you've never baked before, you might want to try making chocolate chip cookies before you take on a chocolate souffle or a seven layer cake. Walk before you run.
2. Make sure you have all your ingredients, including the baking pans and tools you need. No point in making cupcakes if you don't own a muffin tin. In culinary school, our chef instructors had us lay out our ingredients, utensils, pans, etc before we began. This was known as "mise en place" - sounds more uppity in French, doesn't it? But it's helpful to have everything out before you begin. You don't want to get halfway into mixing a recipe only to discover you're out of eggs or don't have anymore baking soda or salt. I've been baking long enough that I don't line everything up since I know exactly what I have in my pantry and refrigerator but if you're starting up, it's a good habit to have until you get more used to baking.
3. As you use an ingredient, put it away. This'll keep you from adding twice the amount of baking powder or salt (or whatever) that a recipe calls for if you get interrupted in the mixing process and you can't remember if you already put some in. If your recipe calls for eggs, set out the exact number of eggs you need and put the egg carton back in the fridge before you begin. Then you also don't have to wonder how many eggs you put in already.
4. Clean as you go. I don't mean wash every measuring cup or teaspoon as you use it but if something spills as you mix, wipe it up. Wash your utensils and mixing bowls as soon as your baking pan goes into the oven. This will make baking seem less like a chore if you're cleaning as you go. Otherwise you're faced with a stack of dirty mixing bowls and such in the sink when what you want to be doing is enjoying your baked goods. If you wash everything right away, all you have left to clean up once you're finished baking is likely the baking pan.
5. Prep your pans first before you even start mixing anything, meaning line the pans with foil or parchment paper and/or coat them with nonstick cooking spray if that's what the recipe calls for. This way once your dough or batter is mixed, you're good to go. Depending on what you're making, you typically want your creation going into the preheated oven as soon as it's fully mixed, especially if you're using chemical leaveners like baking soda or baking powder.
6. Don't forget to preheat your oven! Most recipes will list that as the first step unless you're making something that has to chill before baking. Don't cheat this step because an oven at the right temperature is critical for success. My oven takes 10 minutes before it signals it's at the right temperature I set it for and I hate to waste energy so I usually time it that I turn it on to preheat when I have about 8-10 minutes left of mixing to do.
Shortcuts, aka "how I cheat"
While the baking side is known for being exact to ensure success, as opposed to the hot side, which has far more leeway, I confess I don't always follow the directions to the letter. When you get enough experience, you just know how much you can get away with. For example, many recipes call for ingredients to be at room temperature, especially butter. Since I have a KitchenAid stand mixer, I get around that by beating cold butter until it's soft and creamy. Saves time in case I don't plan ahead enough to take the butter out well enough ahead of time. My niece Lauren said she microwaves the butter for a few seconds at a time until it's soft but I don't like to do that since it's so easy to overheat butter and even a little melting of the butter could change the texture of what you're trying to make.
Many recipes that call for melting butter and chocolate together also call for the mixture to be cooled until tepid before adding other ingredients. Caroline, my college friend, told me she once read that the cooler the chocolate-butter mixture is, the more fudgy the end result of whatever you're making, especially brownies. Well, fudgy's good but do you think I'd listen? Not when I bake after work and only have a limited amount of time at night to get brownies baked, cooled and packaged up to take into work the next day. So I often cheated this one, especially since I also cheated the call for having eggs at room temperature since I would take eggs straight out of the refrigerator and use them (no time to let them come to room temp when I walk in the door after work and get to baking right away). Fortunately for me, at a baking class I once attended at Sur La Table where Alice Medrich (founder of Cocolat in Berkeley and author of several cookbooks) was the chef instructor, she said she added cold-from-the-fridge eggs to the chocolate-butter mixture to bring the temp down and it worked just as well as letting the mixture cool and using room temperature eggs. Rock on, Alice.
Monday, November 23, 2009
Baking tools and gadgets
I'm down in Orange County visiting my sister's for Thanksgiving week. My real bake-fest will take place on Wednesday and Thursday for Thanksgiving desserts and since I can't upload pictures until I get home (forgot my camera USB cord to download onto my computer), I figured now's a good time to talk about my favorite baking tools and gadgets, aka the stuff I can't live without for baking.

My next favorite gadget is the nut grinder I mentioned earlier. No more laborious chopping. Just toast the nuts, let them cool and grind them. Even the good ones are cheap (less than $10) and they last a long time. Whole nuts are cheaper to buy so a nut grinder saves you money. I buy whole pecans from Costco, whole cashews and macadamia nuts from Trader Joe's, and my friend Linda gives me whole almonds - with the nut grinder, it's easy to chop up the nuts if that's what you need.

The third baking tool I find indispensable is a microplane zester . I used to make do with a normal zester but once I tried a microplane zester, I've never gone back. It zests quickly and easily and lets you get the actual peel without the white pith. (When you're zesting lemons or oranges, you just want to get the outer peel, not the white part.) They're a little tricky to clean since they can shred your sponge but just soap them carefully and rinse in warm water. I also dry mine as thoroughly as possible and if the oven is still a little warm from whatever I've baked, I pop it in there to aid in the drying.

Of course there are the usual measuring cups and measuring spoons
 that any good baker needs. As long as they're accurate and hold up well, you can get whichever kind you prefer. I have both plastic and metal sets. I find it handy to have a couple of different sets since I bake so much and use one measuring cup per ingredient. Having multiples saves time so I don't have to wash everything while I'm in the midst of measuring out all the ingredients.
ETA: I can't believe I forgot the most essential baking tool - high heat spatulas ! I have several and use them for everything, mixing, scraping, stirring, etc. Very handy. Invest in a few good ones of varying sizes. I like the narrow ones and the regular size ones. High heat spatulas are essential, not the regular spatula kind. They're more versatile and can use them at high temps (hence "high heat" but you probably already knew that).

First, a KitchenAid stand mixer . Despite the years I've been baking, I didn't buy one for myself until more than 12 years ago. I made do with a handheld mixer but finally broke down and bought myself a 5-quart Kitchen Aid at Costco when I found one at a good price. I LOVE my KitchenAid mixer. It made all the mixing so much easier and faster. I still remember when I first bought it, I baked one cake using the handheld mixer and one cake using the KitchenAid. The one using the KitchenAid turned out lighter and better - the difference was really noticeable. I'll never go without a KitchenAid again. They also last a long, long time. I put mine through frequent use since I bake anywhere from 1-5 times weekly nearly every week and have for years and my white one works just as well as when I first bought it. However, I did get a hankering for a pink one and started wanting one some years ago. But the practical side of me couldn't bring myself to buy a new one because my white one worked perfectly fine. Last Christmas, my old college roommate, Caroline, who's also another baker, surprised me with the pink KitchenAid I'd been wanting. I was floored and touched by her incredible generosity. I gave my white KitchenAid to my mom and have been using the pink one ever since.

My next favorite gadget is the nut grinder
The third baking tool I find indispensable is a microplane zester
Of course there are the usual measuring cups
ETA: I can't believe I forgot the most essential baking tool - high heat spatulas
Friday, November 20, 2009
Butter Pecan Tartlets

I thought I had posted these before but in doublechecking the recipes I would need, I didn't see them so here they are. These are the Butter Pecan Tartlets from Land O Lakes Treasury of Country Recipes. I must say I've gotten a few good recipes from this book that have really stuck with me through the years. Maybe because back in the early days I had such few cookbooks that I was forced to try the recipes I did have instead of being distracted and overwhelmed by a plethora of choices or maybe because they really are just that good.
These make a great dessert party food for a crowd. They're easy to make, look pretty and are easy to eat with little fuss. The butter tart shell dough is easy to work with and the filling couldn't be easier to throw together. Make sure you toast the pecans to bring out their flavor before using. I start with whole pecans and pick through them to get the ones that stayed whole out of the package. Those are the ones I use to top each tart shell. The broken ones go into the nut grinder to be used in the filling itself. These are like mini pecan pies but better because it's mostly real pecans and not that gelatinous filling most pecan pies seem to have (shudder). I double the tart shell recipe for 1 filling recipe. Don't overbake or else the tart shells become hard. And it's okay to substitute vanilla extract for the almond extract. I don't like the taste almond extract brings to a recipe so I always substitute vanilla extract instead.
Tart Shells
½ cup butter, softened
½ cup sugar
1 egg
1 teaspoon almond extract
1 ¾ cup all-purpose flour
Filling
1 cup powdered sugar
½ cup butter
1/3 cup dark corn syrup
1 cup chopped pecans
36 pecan halves
1. Heat oven to 400˚F.
2. In a large mixer bowl, combine all tart shell ingredients. Beat at medium speed, scraping bowl often, until mixture is crumbly (2 to 3 minutes).
3. Press 1 tablespoon mixture in cups of mini muffin pans to form 36 (1 ¾” to 2”) shells. Bake for 7-10 minutes or until very lightly browned. Remove from oven. Reduce oven temp to 350˚F.
4. Meanwhile, in 2-quart saucepan, combine all filling ingredients except chopped pecans and pecan halves. Cook over medium heat, stirring occasionally, until mixture comes to a full boil (4 to 5 minutes).
5. Remove from heat; stir in chopped pecans. Spoon into baked shells. Top each with a pecan half. Bake for 5 minutes. Cool; remove from pans.
Yield: 36 tarts with double tart shell recipe
Banana Butterscotch Cupcakes

This is going to be one of the desserts we're going to serve at Thanksgiving next week. I didn't make them tonight but I wanted to get the recipe up on my blog so I don't have to worry about bringing a hard copy with me down to my sister's. The internet is a wonderful thing - take advantage of it.
My Thanksgiving dessert menu is coming together and I think I've got all the recipes posted here:
Pumpkin Upside Cake with caramelized pecans and cranberries
Butter Pecan Tarts - that'll be our mini "pecan pie"
Chocolate Wafer Sandwich Cookies - for the kids and general cuteness factor
Apple Cobbler with vanilla ice cream
Banana Butterscotch Cupcakes with Brown Sugar Caramel Frosting - in the mini size for easier consumption
Since Thanksgiving comes with so much food and I don't believe in people eating themselves ill, I'm focusing on making bite-size, individual-sized desserts so people can sample a little of each without being committed to devouring a huge serving. If they like something, they can have another piece or serving but they don't have to struggle with finishing the first one because they're already full.
I don't usually make a lot with butterscotch chips but since I've tried the banana and butterscotch combo, I was hooked. I still don't like a lot of butterscotch or by itself as it's too sweet for me but together with banana, it's fantastic. To the point that I don't like chocolate and banana flavors together anymore. I'd rather pair banana with butterscotch. I used regular-sized butterscotch chips for these but I cut them up into thirds, halves and quarters. Yes, each individual chip. It was time consuming so I either do it ahead of time when I have time or I cut really quickly. Why? Well, when you have something as cakey as a cupcake is meant to be, it's got a soft texture. It's a little jarring to eat it with big chunky chips in the way. What's good in the comparatively dense texture of a cookie doesn't play so well in something lighter and cakier. Not to me anyway. They do sell mini butterscotch chips but the only place I've found them is mail order from King Arthur flour and I don't want to take the time or spend the money for it when I could just cut up a bag of Nestle Tollhouse butterscotch chips that I bought on sale for $2 a bag.
This is also a crowd pleaser if you want an alternative to chocolate. I brought these into work twice - the first time as regular size cupcakes and they vanished in the blink of an eye. The second time as mini cupcakes and the only complaint I got about them was they were "too small" as people used that as an excuse to have more than one. These cupcakes don't rise very much so fill the cupcake liners close to full, using up all the batter for only 12 cupcakes. Don't forget to use uber-ripe, nearly blackened skin bananas for the best flavor.
Banana Butterscotch Cupcakes from Cupcakes by Elinor Klivans - first baked 8.22.09
Cupcakes
1 ¼ cups unbleached all-purpose flour
½ teaspoon baking powder
½ teaspoon baking soda
¼ teaspoon salt
6 tablespoons (¾ stick) unsalted butter, at room temperature
1 cup sugar
2 medium bananas, broken into 1-inch pieces
2 large eggs
½ teaspoon vanilla extract
¼ cup buttermilk (any fat content)
1 cup (6 ounces) butterscotch chips
Frosting
¼ cup half-and-half
¾ cup packed light brown sugar
½ cup (1 stick) unsalted butter, at room temperature
1 cup powdered sugar
½ teaspoon vanilla extract
1. Make the cupcakes: Position a rack in the middle of the oven. Preheat the oven to 350 F. Line 12 muffin tin cups with paper cupcake liners.
2. Sift the flour, baking powder, baking soda and salt into a medium bowl and set aside. In a large bowl, using an electric mixer on medium speed, beat the butter and sugar until blended and creamy, about 2 minutes. Stop the mixer and scrape the sides of the bowl as needed during mixing. Add the banana pieces, mixing until they are blended into the mixture; you will still see some small pieces of banana. Add the eggs, one at a time, mixing until each is blended. Add the vanilla and beat for 1 minute. On low speed, add half of the flour mixture, mixing just to incorporate it. Mix in the buttermilk. Mix in the remaining flour mixture until it is incorporated and the batter looks smooth. Stir in the butterscotch chips.
3. Fill each paper liner with a scant 1/3 cup of batter, to about ¼ inch below the top of the liner. Bake until the tops feel firm and a toothpick inserted in the center comes out clean, about 25 minutes. Cool the cupcakes for 10 minutes in the pan on a wire rack.
4. Carefully place the wire rack on top of the cupcakes in their pan. Protecting your hands with pot holders and holding the pan and rack together, invert them to release them onto the wire rack. Turn the cupcakes top side up to cool completely.
5. Meanwhile, make the frosting: In a medium saucepan, heat the half-and-half and brown sugar over low heat, stirring often, until the brown sugar melts. Increase the heat to medium-high, bring to a boil, and boil for 1 minute, stirring often. Pour into a small bowl and refrigerate until cool to the touch, about 45 minutes.
6. In a large bowl, beat the butter and powdered sugar with an electric mixer on low speed until smoothly blended, about 2 minutes. At first the mixture will look crumbly, but then it will form a smooth mass. Add the vanilla and brown sugar mixture and beat on medium speed until smooth and creamy, about 1 minute.
7. Use a small spatula to spread about 1 ½ tablespoons of frosting on top of each cupcake.
The cupcakes can be covered and stored at room temperature for up to 2 days.
Yield: 12 cupcakes
Wednesday, November 18, 2009
Double Chocolate Walnut Fudgies
Before I talk about my backup plan to serve at today's meeting, update on the chocolate chip cookies that I thought were just "okay". People at work loved them.
Jim: "Those cookies. Whoa. Wow."
Tania: "Those cookies were so good."
Mitali: "If you have this cookie dough, I'm happy to take it off your hands." (That Mitali, such a giver.)
So apparently I'm outvoted. However, I'm unswayed by public opinion. I've baked better chocolate chip cookies.
Even though I might not have needed a backup dessert for my meeting, last night I made one anyway. These are called Double Chocolate Walnut Fudgies but if you've read my blog with any regularity, you know none of my brownies will ever meet a walnut. Instead I substituted Heath bar milk chocolate toffee bits. The recipe calls for baking in 2 8-inch pans but I thought that was a bit extreme so I made it in one 9 x 13 pan (if your recipe calls for baking in an 8-inch pan and you want to double it, it's perfectly fine to use a 9 x 13 pan for the doubled recipe). It's supposed to bake for 40 minutes and be super fudgy. I checked it at 35 minutes and the toothpick inserted in the middle came out clean. Uh-oh. Clean is a bad sign. You don't want clean, you want a few moist crumbs clinging to it. Clean typically means overbaked and dry. However, when I took these out and let them cool, they were surprisingly still moist. If I make these again, I would still take them out sooner and see how they come out. I think I'd also bake them in a smaller pan, maybe a 10-inch square baking pan and see if they come out thicker. This is a simple basic brownie so if you want something quick and easy to make, this is a good recipe to try.

Double Chocolate Walnut Fudgies from A Country Baking Treasury by Lisa Yockelson - baked 11.17.09
½ pound (2 sticks) unsalted butter, cut into chunks
6 ounces unsweetened chocolate, chopped
½ cup unsifted cake flour
½ cup unsifted all-purpose flour
½ teaspoon salt
1 cup chopped walnuts
2/3 cup miniature semisweet chocolate chips
3 extra-large eggs plus 2 extra-large egg yolks, at room temperature
2 cups vanilla-scented granulated sugar
2 1/2 teaspoons pure vanilla extract
1 teaspoon chocolate extract
For sprinkling
2/3 cup chopped walnuts
1. Lightly butter and flour two 8-inch square baking pans. Line the bottom of each pan with a square of waxed paper; set aside. Preheat the oven to 350˚F.
2. Melt the butter and chocolate in a heavy saucepan over very low heat; stir well. Set aside to cool.
3. Sift the cake flour, all-purpose flour and salt onto a sheet of waxed paper.
4. Combine the walnuts and chocolate chips in a small bowl and toss with 1 tablespoon of the sifted flour mixture.
5. Beat the eggs and egg yolks in a large mixing bowl. Blend in the granulated sugar and mix well. Blend in the vanilla and chocolate extracts. Stir in the melted chocolate-butter mixture. Stir in the sifted mixture, blending just until the particles of flour have been absorbed. Fold in the chocolate chips and walnuts.
6. Spoon the batter into the prepared pans, dividing evenly between them. Sprinkle the top of eac pan with 1/3 cup chopped walnuts.
7. Bake the fudgies on the middle-level rack of the oven for 40 minutes, until the top is set and shiny and each cake pulls away slightly from the sides of the baking pan.
8. Cool each cake in the pan on a rack until it reaches room temperature, about 2 hours. Invert each cake onto a second cooling rack, peel away the waxed paper, and invert again on to a cutting board.
9. Cut each cake into 9 squares and store them in an airtight tin.
Tuesday, November 17, 2009
"Puffed" Chocolate Chip Cookies

One of my responsibilities at work is to lead my group's recruiting team for new college grad hiring. The team does resume reviews, phone screens, in-person interviews and candidate evaluations. Every Wednesday I have a "resume party" meeting where I gather some of the team to review that week's batch of resumes from graduating students. As a thank you (cough, bribe) for showing up to the resume party, I bake refreshments for the meeting. So Tuesday night is always baking night so I have something to bring to the Wednesday meeting. I asked the folks in my row if they had any baking requests (none of them are on the recruiting team but I like to share with my cube mates anyway) and Quincy, my Ops Finance partner, asked for chocolate chip cookies. Coincidentally I had a batch of chocolate chip cookie dough in the freezer that I had made over the weekend so that request was easy enough to meet.
However, I had some reservations over this recipe. I had made the dough over the weekend and baked a test cookie. The reason I chose this recipe was it promised to be "puffed" or at least not spread thin. It lived up to its promise. Unfortunately, the reason it didn't spread was it used butter-flavored shortening instead of butter. I'm not a believer in shortening. It has its uses but it can never take the place of butter, especially when it comes to taste. I rarely bake with shortening and only did so this time because that's what the recipe called for. So either I'll never make this recipe again or I'll play with it and use butter but alter the rest of the recipe to prevent spreading. I like the thickness/puffiness of the cookie but wasn't crazy about the taste or texture. It's simply "okay". Oh, and because of my prejudice against nuts in cookies, I omitted the pecans and 2 tablespoons of butter altogether. Maybe that would've changed the recipe?
The recipe is from Cookwise by Shirley Corriher which goes into the science of baking and the effect ingredients have to influence the outcome of what you're cooking or baking. There aren't a lot of baking recipes in there since it's mostly a cooking cookbook but she did publish a follow up book called Bakewise that focuses on baking. I've been dying for Bakewise ever since it came out but I had banned myself from buying any new cookbooks since November 2008 because I already had so many (202 in fact), many of which have never been or barely been used. So no new cookbooks for me until I used more of what I had. A couple of weeks ago though, I came across a good deal on Bakewise on eBay so I broke my self-imposed ban and bought it. Unfortunately, the package ended up being stolen after the mailman delivered it last week so I'm still without Bakewise. I'll buy it again eventually but I'm letting the disappointment and angst over the stolen package fade first before I risk it again.
Anyway, back to this chocolate chip cookie recipe - since I'm a little leery of serving it and having it be associated with me (there's that pride and reputation to protect again) when I'm not wild about it so I baked a backup. I just took it out of the oven so it'll have to cool before I can cut it and take pictures. So that'll be tomorrow night's blog post.
Chocolate Chip Cookies - "Puffed" from Cookwise by Shirley Corriher, baked 11.17.09
1 cup coarsely chopped pecans
2 tablespoons butter
1 ½ cups cake flour
¾ teaspoon salt
1 ½ teaspoons baking powder
9 tablespoons butter-flavored shortening
1 cup minus 1 tablespoon brown sugar
1 large egg
1 tablespoon pure vanilla extract
1 cup semisweet chocolate chips
1. Preheat the oven to 350˚F.
2. On a large baking sheet, roast the pecans for 10 to 12 minutes. While the nuts are still hot, stir in 2 tablespoons butter.
3. Turn the oven up to 375˚F.
4. Sift together the flour, salt and baking powder in a medium mixing bowl.
5. Using an electric mixer, cream shortening and sugar in a large bowl until light and fluffy. Add the egg and beat thoroughly. Beat in the vanilla. On low speed, gradually add the dry ingredients until thoroughly combined. Scrape down the sides once with a rubber spatula. Add the pecans and chocolate chips. Beat 5 seconds on low. Use the rubber spatula to finish mixing in well.
6. Spray cookie sheets lightly with nonstick cooking spray. With a tablespoon or small ice cream/food scoop, drop slightly heaped tablespoons of batter about 2 inches apart onto the greased sheets. Bake the cookies for about 12 minutes or until the edges just begin to brown. Remove from the oven and let the cookies cool on the sheet on a cooling rack for 3 minutes, then remove the cookies to a rack to cool completely.
Monday, November 16, 2009
Peanut Butter Brownies

Peanut Butter Brownies - first baked 6.26.09, now baking 11.16.09
I have these brownies in the oven right now. I'd made these once before, hence where the current picture comes from. If you like peanut butter, these are good brownies to make. It's a peanut butter layer on the bottom, then the brownie layer and you sprinkle peanuts on top before baking. Despite my diatribe against nuts in brownies, I'm okay with them when they're layered on top. In culinary school, our chef instructor always told us if you're going to mix the nuts into a batter or dough, you should always toast them first to bring out the flavor. If they're going to be baked on top of something and (theoretically) will be toasted as part of the baking, there's no need to toast them. I ignore that direction because I always toast nuts first before using them, no matter how they're being used. It brings out their flavor and makes them a bit more crunchy. Can't trust that to happen if you put them on top of wet dough or a soft batter. Toast 'em first.
This recipe is from The Good Cookie by Tish Boyle, also another good baking book to have. Most, if not all, of the recipes I've tried from this book have turned out pretty well and it offers more than just the standard cookie or brownie. When you've made as many brownies and cookies as I have over the years, you'll want something a little different from the norm as well.
Peanut butter layer
1 cup creamy peanut butter
1/3 cup granulated sugar
1 large egg
Brownie layer
1 cup granulated sugar
1/3 cup firmly packed light brown sugar
½ cup (1 stick) unsalted butter, cut into tablespoons
2 ounces unsweetened chocolate, coarsely chopped
1 tablespoon light corn syrup
½ cup all-purpose flour
½ teaspoon baking powder
1/8 teaspoon salt
2 large eggs, at room temperature
1 ½ teaspoons vanilla extract
¼ cup unsalted peanuts, chopped
1. Position a rack in the center of the oven and preheat the oven to 325°F. Line an 8-inch square baking pan with aluminum foil so that the foil extends 2 inches beyond two opposite sides of the pan. Lightly butter the bottom and sides of the pan.
Make the peanut butter layer
2. In the bowl of an electric mixer, using the paddle attachment, beat the peanut butter, sugar and egg at medium speed until blended, about 1 minute. Scrape the mixture into the prepared pan and smooth or pat it into an even layer. Set aside.
Make the brownie layer
3. In a medium saucepan, combine the sugars, butter, chocolate and corn syrup. Heat over low heat, stirring constantly, until melted and smooth. Remove the pan from the heat and let cool for 20 minutes, or until tepid.
4. In a small bowl, whisk together the flour, baking powder and salt; set aside.
5. Whisk the eggs one at a time, into the cooled chocolate mixture, mixing well after each addition. Whisk in the vanilla extract. Using a wooden spoon, stir in the flour mixture until blended. Scrape the brownie batter over the peanut butter layer and smooth the top with a rubber spatula. Sprinkle the peanuts evenly over the batter.
6. Bake the brownies for 45 to 52 minutes, or until a toothpick inserted in the center of the brownies comes out with a few moist crumbs clinging to it.
7. Cool the brownies in the pan on a wire rack for 1 hour, then cover the pan with plastic wrap and refrigerate for at least 2 hours until chilled.
8. Using the ends of the foil as handles, lift the brownies out of the pan. Using a sharp knife, cut into 9 squares. Serve chilled.
Store in an airtight container in the refrigerator for up to a week.
Chocolate Chip Fudge Cake
 Chocolate Chip Fudge Cake - baked November 15, 2009
This is what I would call a “picnic cake”. Because you don’t frost it, it’s easy to pack up and take along with you or send in a care package. It’s easy to make in one bowl, you bake it on one pan and you just cut and serve. At first I thought this cake wouldn’t be very chocolaty because it doesn’t have that much baking chocolate but the chocolate chips make up for it. It has a perfect cakey texture which I like in all my cakes – it’s lighter than a pound cake but more dense than a sponge cake. So I consider it “cakey”. If you’re short on time, this is a great cake to throw together. Just watch the baking time – because the batter fills up the pan to make a thick layer, you have to make sure you bake it long enough for the middle to bake but not so long that the corners and ends dry out.
This recipe is also from Fearless Baking by Elinor Klivans. So far, I’m really liking this baking book. I’ve probably made at least a dozen or more recipes from it and only one didn’t turn out (an orange layer cake). But all the others have been so good that I’m thinking that the one failure was more my fault than the book’s because I don’t think I baked the orange cake layers long enough. I may have to try it again just to make sure it wasn’t operator error. The only thing about the book is the directions are somewhat long-winded since she’s aiming for a more novice audience. I tend to skim the directions to get the gist of it then do my own thing. For instance, I don't see the point of melting the unsweetened chocolate in the oven as this recipe calls for. I always melt my chocolate over a double boiler so I can stir it as needed and don't have to bother with popping something in and out of the oven or the microwave. You run less risk of burning the chocolate this way too.
Chocolate Chip Fudge Cake
3 ounces unsweetened chocolate, chopped
1 ¼ cups unbleached all-purpose flour
1 teaspoon baking powder
½ teaspoon baking soda
¼ teaspoon salt
¼ pound (1 stick) soft unsalted butter
1 cup plus 2 tablespoons granulated sugar
2 large eggs
2 teaspoons vanilla extract
1 cup sour cream
½ cup water
1 2/3 cups (10 ounces) semisweet chocolate chips
Powdered sugar for dusting the top of the cake, optional
1. Mix the cake: Position an oven rack in the middle of the oven. Preheat the oven to 175˚F. Butter the bottom and sides of a 9 x 9 x 2-inch square baking pan or an 11 x 7 x 2-inch rectangular baking pan.
2. Put the unsweetened chocolate in a small ovenproof container and place it in the oven to melt. It will take about 12 minutes to melt. As soon as the chocolate melts, remove it from the oven and stir it smooth. Increase the oven temperature to 325˚F. Set the chocolate aside to cool slightly while you mix the cake.
3. Sift the flour, baking powder, baking soda, and salt together onto a piece of wax paper or into a medium bowl and set aside.
4. Put the butter and granulated sugar in a large bowl and beat with an electric mixer on medium speed until the mixture looks smooth and creamy, and the color lightens, about 2 minutes. Move the beaters around in the bowl if using a handheld electric mixer. Stop the mixer and scrape the mixture from the sides of the bowl and any that becomes caught in the beaters as needed throughout the mixing process. Decrease the speed to low and mix in the melted chocolate, mixing just to combine it with the other ingredients. Increase the speed to medium and add the eggs, one at a time, beating for 1 minute after adding each egg. Decrease the speed to low and add the vanilla and sour cream, mixing just until the sour cream is incorporated. Add half of the flour mixture and mix to incorporate the flour. Add the water, mixing to incorporate it. Add the remaining flour mixture, mixing just to incorporate it. Stop the mixer and scrape the sides of the bowl after the last addition of flour. The batter is ready when the final addition of flour is mixed completely into the batter. If any flour is clinging to the sides of the bowl, stir it into the batter. Use a large spoon to stir in the chocolate chips.
5. Use a rubber spatula to scrape all of the batter into the prepared pan, spreading it evenly.
6. Bake and serve the cake: Bake for about 40 minutes, until the top feels firm and a toothpick inserted in the center of the cake comes out slightly sticky but not coated with liquid. If the toothpick penetrates a chocolate chip, test another spot. Cool the cake thoroughly in its pan, about 1 ½ hours. Dust with powdered sugar if desired. Cut into squares to serve. Leave leftover cake in the pan, and cover and store it at room temperature for up to 3 days.
Chocolate Chip Cookie & Fudge Brownie Pie
I’ve had people tell me how much they enjoy reading this blog which is nice to hear as sometimes I feel like I’m just talking to myself (which is okay too as I do that all the time anyway, lol). But if you do end up making a recipe that I’ve posted and made changes that made it better (or worse), I’d love to hear about it via a comment here or an email. Or even if you just tried a recipe and liked it or hated it or had questions, let me know. I’m always trying new recipes and like to experiment so it’s fun to hear of other people’s experiences as well. I’ll always post the recipe as is from wherever I got it from but if I make any changes, I’ll note it in the blog post itself. And don’t worry about hurting my feelings if something turned out terribly or not to your liking. We all have different tastes and I don’t expect everyone to share my taste buds. Otherwise, the world would be overrun in milk chocolate, chocolate chip cookies would only be eaten 10 minutes out of the oven, there’d never be nuts in brownies, fruit would mostly be eaten by itself and not incorporated into anything, jam and jelly might as well go out of existence, and shortening and margarine would be banished forever. In case you can’t tell, I have very strong likes and dislikes about baked goods. In the words of my friend Albie, “I like what I like and I want things the way I want them.” Yeah, that.
Yesterday afternoon, I had another bakefest. I'd already blogged about the Double Fudge Cream Cheese Brownies. The 2nd thing I made was Chocolate Chip Cookie & Fudge Brownie Pie – the title of this recipe pretty much speaks for itself. You start with a chocolate chip cookie layer, partially bake the chocolate cookie crust, take it out and let it cool for 30 minutes so the center will sink and the edges will be slightly raised like a pie. Then you “fill” the top with a brownie layer. This is my kind of pie.
I actually didn’t bake it in a pie pan because I was portioning it out to give away and it’s easier to cut from a square than a round shape so I made it in an 8-inch square baking pan instead of a 9-inch pie pan. I was originally going to make it in a 9-inch square baking pan instead of a pie pan but the batter seemed so little that I thought using a 9-inch pan might make the “crust” a little too thin. Consequently, this turned out to be more of a two-layer confection than any kind of pie. But it also turned out pretty well so you can call it whatever you want. After partially baking the chocolate cookie crust, I barely (and purposely) baked the pie with the brownie topping for the 20 minutes that the recipe called for. So the “topping” turned out pretty soft and fudgy. I think if you bake it longer, it’ll be more firm but that wasn’t the texture I was going for. Since this is two layers, putting it together might seem like it takes a bit longer but it’s not that hard. Make the chocolate chip cookie crust first and while it’s partially baking and cooling, you can make the brownie topping.

Chocolate Chip Cookie & Fudge Brownie Pie - from Fearless Baking by Elinor Klivans, baked 11.15.09
Chocolate Chip Cookie Crust
¾ cup unbleached all-purpose flour
½ teaspoon baking soda
¼ teaspoon salt
5 tablespoons soft unsalted butter
1/3 cup packed light brown sugar
3 tablespoons granulated sugar
1 large egg
½ teaspoon vanilla extract
1 cup (6 ounces) semisweet chocolate chips
Brownie Topping
6 tablespoons (¾ stick) unsalted butter, cut into 8 pieces
3 ounces semisweet chocolate, chopped
1 ounce unsweetened chocolate, chopped
¼ cup unbleached all-purpose flour
¼ teaspoon baking powder
1/8 teaspoon salt
1 large egg
6 tablespoons granulated sugar
1 teaspoon vanilla extract
1. Mix and bake the crust: Position a rack in the middle of the oven. Preheat the oven to 325˚F. Butter a 9-inch pie pan.
2. Sift the flour, baking soda, and salt together onto a piece of wax paper or into a medium bowl and set aside.
3. Put the butter, brown sugar, and granulated sugar in a large bowl and beat with an electric mixer on medium speed for about 1 minute until the mixture looks smooth and creamy. Move the beaters around in the bowl if using a handheld electric mixer. Stop the mixer and scrape the mixture from the sides of the bowl and any that becomes caught in the beaters as needed throughout the mixing process. Mix in the egg and vanilla until they are blended in thoroughly. Decrease the speed to low and add the flour mixture, mixing just until it is incorporated and there is no loose flour. Use a large spoon to stir in the chocolate chips. Use a rubber spatula to scrape all of the dough into the pie pan, spreading it evenly over the bottom of the pan. Bake 15 minutes. Cool 30 minutes. The center will sink slightly.
4. Mix the topping: Put the butter, semisweet and unsweetened chocolate in a heatproof container set over, but not touching, barely simmering water in a saucepan. Stir the mixture often over the hot water until the butter and chocolate are melted and smooth. As soon as the chocolate mixture melts, remove the container from over the water and set it aside to cool slightly for about 5 minutes.
5. Stir the flour, baking powder, and salt together in a small bowl and set aside.
6. Put the egg, granulated sugar, and vanilla in a large bowl and beat with an electric mixer on medium speed for about 1 minute until the mixture thickens and the color lightens slightly. Move the beaters around in the bowl is using a handheld mixer. Decrease the speed to low and mix in the melted chocolate, mixing just to combine it with the other ingredients. Add the flour mixture, mixing just until the flour is incorporated. Use a rubber spatula to scrape all of the batter over the partially cooled chocolate chip cookie layer, spreading it evenly.
7. Bake and serve the pie: Bake for about 20 minutes, until a toothpick inserted in the center of the brownie layer comes out with a few moist crumbs, but not wet batter, clinging to it. Cool the pie thoroughly in the pan.
8. Serve the pie at room temperature. Leftover pie can be covered with plastic wrap and stored at room temperature up to 3 days. Ice cream and warm old-fashioned hot fudge sauce make a good accompaniment.
Sunday, November 15, 2009
Double Fudge Cream Cheese Brownies
This is one of the very first brownie recipes I remember making from scratch that I still bake to this day. I think I probably discovered this recipe in my early college days or thereabouts, around the same time I found the lemon bar recipe and from the same cookbook. I'd said I wasn't a big fan of cream cheese and this recipe has just 3 ounces of it - perfect :). The thing to watch for with this recipe and any other brownie recipe that's baked in a 9 x 13 pan is the baking time. With this size pan, it's so easy to overbake the edges and corners while waiting for the middle to bake. Just keep an eye on it. You'll know it's done when a toothpick inserted in the corner comes out clean and one inserted in the middle comes out with moist crumbs but not raw batter.
I made these again tonight to freeze and use throughout the week - work meetings, social gatherings and possibly to bring down to Southern CA this weekend when my parents and I make the drive down for Thanksgiving week. In fact, this is pretty much going to be brownie baking week since brownies are so versatile and travel well.
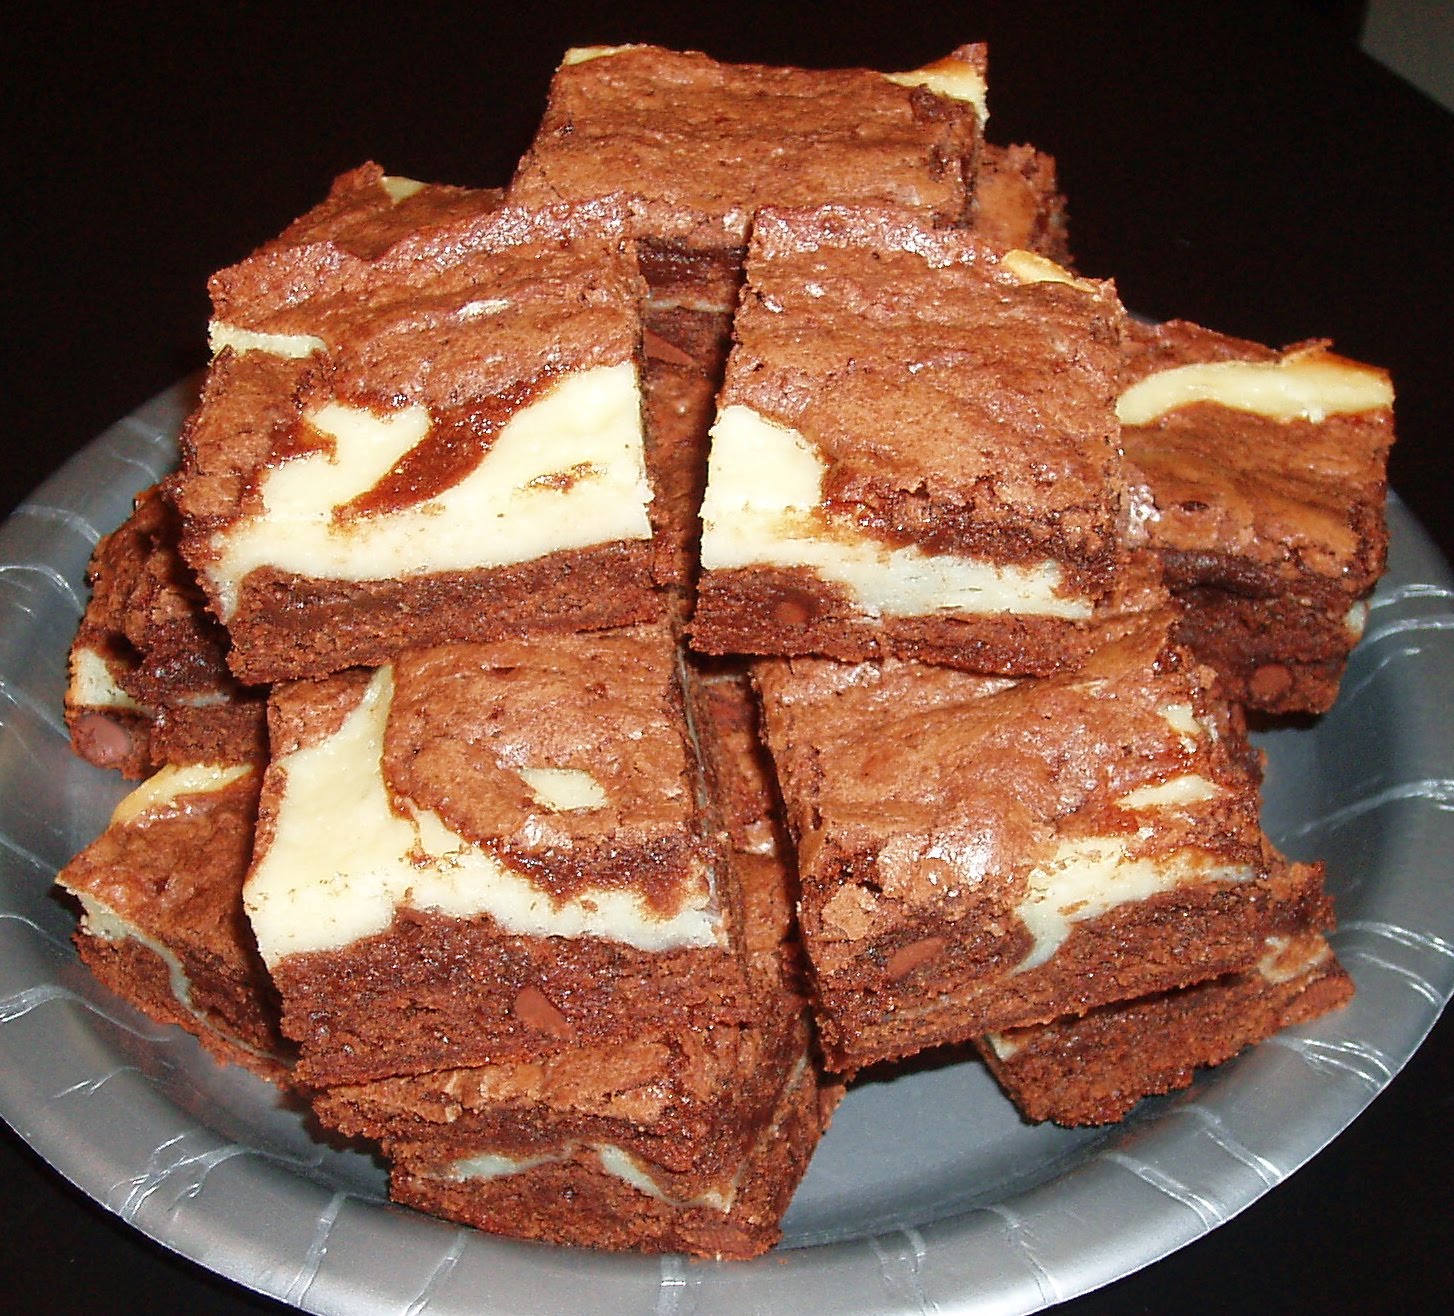 Double Fudge Cream Cheese Brownies from Land O Lakes Treasury of Country Recipes - made 11.15.09
Brownies:
1 cup butter
4 ozs unsweetened chocolate
2 cups sugar
1 1/2 cups all-purpose flour
4 eggs, slightly beaten
1 teaspoon salt
1 teaspoon baking powder
2 teaspoons vanilla extract
1 cup semisweet chocolate chips
Filling
¼ cup sugar
2 tbsp butter, softened
3-oz package cream cheese, softened
1 egg
1 tbsp flour
½ teaspoon vanilla
1. Heat oven to 350˚F.
2. In a 2-quart saucepan, combine 1 cup butter and unsweetened chocolate. Cook over medium heat, stirring occasionally until melted (4-6 minutes). Stir in remaining brownie ingredients except chocolate chips. Fold in chocolate chips. Spread half of batter into greased 9” x 13” baking pan.
3. In small bowl, stir together all filling ingredients. Spread over brownie mixture. Spoon remaining batter over cream cheese (batter will not entirely cover cream cheese mixture). Bake for 30-35 minutes or until brownies begin to pull away from sides of pan.

Subscribe to:
Posts (Atom)