Sunday, March 3, 2013

Salted Caramel Chocolate Chip Cookies

Salted Caramel Chocolate Chip Cookies - made February 23, 2013 from A Lil Country Sugar
I'm always looking for a different twist on the traditional chocolate chip cookie.  This one from A Lil Country Sugar seemed intriguing with the addition of caramel coffee powder (Starbucks) into the dough for a caramel flavor.  Alas, when I felt like making it, I hadn't planned ahead and got the Caramel Via from Starbucks.  I don't drink coffee (or tea) so I hardly ever go to Starbucks unless I'm at an airport and want a bottle of water and a scone.  So I left out the caramel coffee powder and increased the amount of flour by 1/8 cup (modified recipe below).

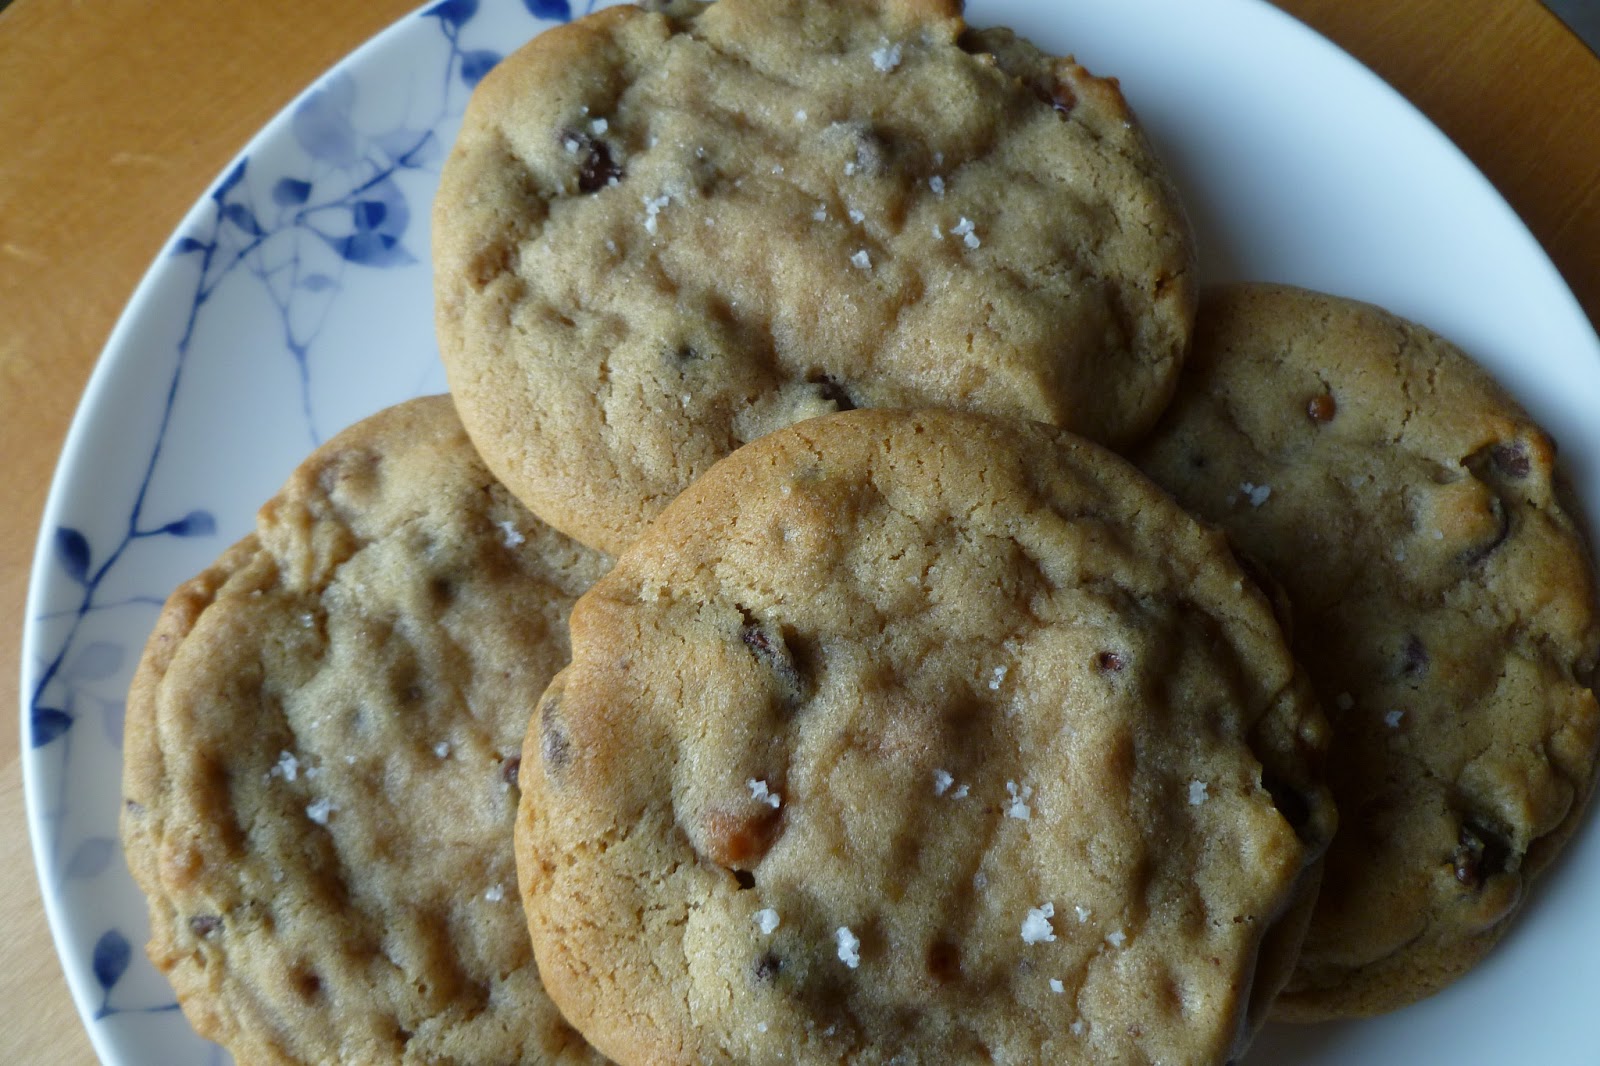
I liked the taste and texture of this cookie.  The key is to underbake it; otherwise it'll just be another typical chocolate chip cookie.  I added caramel bits to make up for the caramel powder and the texture of the cookie was dense enough to bear it which gave it added chewiness.  I'd like to try the way A Lil Sugar had it though as I don't think you can go wrong with caramel flavor.  Plus the sprinkling of fleur de sel on the cookie was pure genius and a nice offset to the sweetness of the cookie.  I normally don't like salty/sweet combinations but it worked in this cookie.

1 cup butter (2 sticks/8 ounces)
3/4 cup sugar
1 cup packed light brown sugar
2 large eggs
1 1/2 tablespoons vanilla extract
1/4 cup caramel sauce (I used Trader Joe's salted caramel)
3 7/8 cups bread flour
1/2 teaspoon salt
1 1/2 teaspoons baking soda
1/2 cup caramel bits
1 1/2 cup chocolate chunks 
Fleur de sel for sprinkling
  1. Preheat oven to 350 degrees F. In a stand mixer, beat the butter and sugars until well combined. Beat in eggs, vanilla, and caramel sauce until well combined.
  2. Place all dry ingredients in a bowl (flour, salt, baking soda) and whisk together. Add slowly to wet ingredients mixing until everything is combined. Mix in chocolate chunks and caramel bits.
  3. Using a large cookie scoop (ice cream scoop will work) place on baking sheets. Using the pointed end of a meat mallet, press cookie down to make the indentations. Lightly sprinkle with fleur de sel before baking. Bake 10 - 12 minutes or until edges are golden brown and middles no longer look raw.  Do not overbake. (You can also form the dough into balls, make the indentations with the meat mallet then freeze the cookies overnight or for several hours before baking.)

Friday, March 1, 2013

7-Up Biscuits

7-Up Biscuits - made February 23, 2013 from Monster Mama
This was one of those weeks where I could barely keep my head above water and I have a few things I've made last week but haven't been able to write up.  So this is going to be brief.  This is an easy  biscuit recipe to make.  What's surprising about it are the ingredients.  I can't taste any of the base ingredients in any significant way but they come together pretty well to make a traditional biscuit.  I made mine craggy-topped because I like the crunch better once they're baked but you can make it smoother by rolling out the dough like Monster Mama did.  As always, serve warm with butter and you can't go wrong.

2 cup Bisquick mix
1/2 cup sour cream
1/2 cup 7-Up (I used Sprite)
1/4 cup melted butter
  1. Preheat oven to 450ยบ
  2. Cut sour cream into your Bisquick mix, then add 7up - it will make a soft dough. Now sprinkle your counter with a little Bisquick mix then add dough and pat it out.
  3. Melt butter and pour it into a 9" square baking pan. Cut your biscuits up and arrange them in pan on top of melted butter.
  4. Bake 12-15 minutes or until golden brown.

Tuesday, February 26, 2013

Orange Soda Cake

Orange Soda Cake - made February 23, 2013, recipe invented by me

I was toying with the idea of making a cake using orange soda since I had a lone can of orange soda left over from when I was having guests.  I used the Kahlua Cake recipe as a base to start from and modified a bit just to try and come up with a recipe that also uses buttermilk.  I added oil too to ensure it would be soft and moist.  I'd like to be able to say this cake turned out to be a successful invention....but I can't.  The batter was silky smooth and seemed promising.  The cake turned orange with the addition of the soda and the flavor was good.  The texture was also moist and cakey.  Problem is it turned out to a little too moist, especially since I glazed it with a glaze of powdered sugar and enough orange soda to make it a runny consistency.  I think some of the glaze seeped into the cake to moisten it further when it didn't really need further moisture.  You can tell from the top of the slice that it was a tad too wet.  Next time I think I would leave out the oil or cut the amount in half.  Ah well, not all inventions can be successes.

(recipe as I made it)

1 box yellow cake mix
1 4-ounce package vanilla instant pudding mix
4 eggs
1/2 cup oil (try using only 1/4 cup or omitting altogether)
1/2 cup buttermilk
1 cup orange soda (I used regular Fanta)
  1. Preheat oven to 350 degrees.  Liberally spray a Bundt cake pa with nonstick cooking spray.
  2. Sift lumps out of the cake mix and pudding mix.  Add eggs, oil, buttermilk and orange soda and beat with the paddle attachment of a stand mixer until batter is smooth (2-3 minutes).
  3. Pour into prepared pan and bake for 50-60 minutes or until a toothpick inserted near the middle comes out with a few moist crumbs or barely clean.

Sunday, February 24, 2013

Peanut Butter Crunch Brownies

Peanut Butter Crunch Brownies - made February 18, 2013, recipes adapted from Katherine Hepburn's Brownies from saveur.com and Crack Brownies from McConkie Menu

I've already made essentially this same brownie as Peanut Butter Cup & Snickers Brownies but by the time I realized it, I had already started making these.  So then I felt free to experiment and modify the recipes.  I think these came out better than the other recipe, partly because I didn't make them as thick as the last one so they were easier to eat.  I was still looking for ways to use the dark chocolate peanut butter I got from amazon so I incorporated it in the topping in addition to the peanut butter.  And I like a lot of crunch in the topping so I was generous with the rice krispies.  

I spent the past week at our company headquarters in Florida so I made these brownies the night before I left to bring to my Florida coworkers. I wrapped up two pieces in an individual "package", boxed them up in a cardboard box to keep them from being crushed in my luggage and got on the plane with what felt like 10 lbs of brownies in my carry-on.  But it was worth the effort as I was able to hand them out to almost everyone I met with on the first day and they were pretty well received.  You always know something's a success when you get thank you emails with subject lines like "OMG", someone who claimed to be in a bad mood that day perked right up when he ate one, and when one coworker liked his so much he offered to buy them off the coworker who got the last pieces.  Score.
Brownie base
16 tablespoons (8 ounces) unsalted butter, plus more for greasing
4 ounces unsweetened chocolate
2 cups sugar
4 eggs, beaten

1 teaspoon vanilla extract
1/2 cup flour

1/2 teaspoon salt
1 heaping cup chopped-up Snickers and peanut butter cups (mix 'em up and be generous)

Topping
1 cup salted peanuts, optional (I left them out)
1 1/2 cups milk or semisweet chocolate chips (I used semisweet)
3/4 cup dark chocolate peanut butter (can substitute creamy peanut butter)
3/4 cup creamy peanut butter
1/2 tablespoon butter
1 1/2 cups rice krispies cereal (you can add more if you want more crunch)
  1. Heat oven to 325°. Line a 9 x 13 pan with foil and lightly spray with nonstick cooking spray.
  2. Melt the butter and the chocolate together in a 2-quart saucepan over low heat, stirring constantly with a wooden spoon. Remove the pan from heat and stir in the sugar.
  3. Add the eggs and vanilla and stir to make a smooth batter. Add the flour, and salt; stir until incorporated.
  4. Pour the batter into the baking pan and spread evenly. Bake until a toothpick inserted into the center comes out clean, 40–45 minutes. 5 minutes before the brownies are done, remove and top with peanuts (if using), Snickers and peanut butter cups.  Finish baking (do not overbake.)
  5. Meanwhile, melt chocolate chips, peanut butter and butter.  Stir in cereal.  Remove brownies from oven and pour chocolate mixture evenly over top.  Let cool to room temperature before cutting and serving.

Friday, February 22, 2013

Chewy Brownies - crunch-ized

Chewy Brownies - made February 16, 2013 from Treats Truck Baking Book by Kim Ima

This brownie is signified by a small world moment I had on my New Orleans trip last month.  In chatting with one of the couples on the tour, one of them, Craig, mentioned that his cousin Kim had a treats truck business (think of a food truck that sells sweets) and had even written a baking book.  It rang a bell in my mind and sure enough, it turns out that I had Kim's Treats Truck cookbook in my baking book arsenal, thanks to one of my friends who had given it to me for a birthday gift.  What a cool coincidence.

I used the Chewy Brownie recipe in Kim's book to make the base for these brownies.  They came out perfectly fudgy and of course, I'm addicted to the nutella crunch topping I like to use on plain brownies.  It just adds that little extra.

3/4 cup butter
3 ounces unsweetened chocolate
2 ounces dark chocolate
1 1/4 cups sugar
2 eggs
1 1/2 teaspoons vanilla extract
3/4 cup flour
1 tablespoon cocoa powder
Nutella Crunch Topping (click on link for recipe)

  1. Preheat oven to 350 degrees.  Line a 9" x 9" pan with foil and lightly spray with nonstick cooking spray.
  2. Melt the butter and chocolates in the top half of a double boiler set over hot water.  Whisk to combine.
  3. Beat the eggs in a bowl and stir in the vanilla.
  4. When the butter and chocolates are melted and whisked smooth, take it off the heat and stir in the sugar, then the eggs and vanilla/  Add the flour and cocoa powder and stir well with a spoon until smooth.
  5. Pour the brownie batter into the prepared pan.
  6. Bake for 30-35 minutes or until a toothpick inserted in the center comes out with a few moist crumbs.  If desired, add the nutella crunch topping several minutes after taking the brownies out of the oven.  Let cool completely before cutting into bars.

Monday, February 18, 2013

Cadbury Mini Eggs Blondies

Cadbury Mini Eggs Blondies - made February 1, 2013 from Chef in Training
I made these awhile back but had a few other things I was trying to get up so this got temporarily delayed.  But since Easter will be looming shortly and stores now carry Easter candy, now's the time to sink your teeth into these.  I love Cadbury mini eggs.  Not to be confused with Cadbury creme eggs or caramel eggs.  These are the milk chocolate mini eggs with the candy shell coating.  Like M&Ms on steroids but much, much better. I usually buy a bag once a year and can make it last me quite while by savoring a couple (or 5) every other day or so.  In recent years though I keep forgetting to buy a bag and when I did, I kept forgetting to eat them.  I actually think these were from last year.  Fortunately the bag was unopened so I figure they were still fresh enough.  Rather than eating them like popcorn, I decided to use them for this blondie recipe.

I don't normally make blondies because a lot of the ones I've tried are a trifle too sweet for me.  But this was a good recipe from Chef in Training.  It's got a nice brown sugar caramel toffee flavor and the Cadbury mini eggs offer a good crunch and chocolate flavor to pair with it.  Don't underbake too much or it'll be too mushy (but don't overbake it either).

2 cups all-purpose flour
1/2 teaspoon baking soda
1/2 teaspoon salt
3/4 cup unsalted butter, melted
1 cup packed brown sugar
1/2 cup white sugar
1 tablespoon vanilla extract
1 egg
1 egg yolk
2 cups milk chocolate mini eggs
  1. In a medium-size mixing bowl sift flower, baking soda and salt together.
  2. Melt butter over medium heat. Once melted add to the bowl of your electric mixer. Cream together with sugars.
  3. Add in vanilla and eggs mix until creamy.
  4. Slowly add in flour mixture until it is incorporated.
  5. Fold in Mini Eggs.
  6. Spread batter into a greased 8×8, 9×9, or 11×7 baking dish. (I made mine in an 8 x 8 pan for thicker bars.)
  7. Bake at 325 for about 40 minutes or until a tooth pick is inserted in the center and comes out clean.
  8. Let the bars cool for 30 minutes before slicing.

Sunday, February 17, 2013

Slow Cooker Pot Roast

Slow Cooker Pot Roast - made February 9, 2012 from Bubble Crumb

Back in early January, in my renewed promise to myself to cook more and eat out less, I went to Costco to buy the main meal ingredients I planned to cook with: pot roast, chicken breasts, pork chops and shrimp.  Throw in my baking staples like butter, eggs, sugar and flour and "somehow" I walked out having spent almost my entire grocery budget for the month with 27 days left in January to go - yikes. Fortunately, I underestimated just how far anything I buy at Costco actually goes.  Case in point, thank goodness for my freezer because I'm still eating what I bought from that early January trip.

What I've done with all of the savory dishes I've posted this year is divided them into individual sizes (real individual sizes, not restaurant portions), placed each serving in small tupperware containers and put them in the freezer.  During the week, I take out a couple a day to thaw out and have one for lunch and one for dinner.  It takes all the work out of cooking during the week and I rotate between the dishes I've made so I don't eat the same thing twice in a day.  This recipe uses up the chuck roast I bought and, 6 weeks after that Costco run, I still have a dozen mini meals in the freezer, half a pack of shrimp, some chicken breasts and half a package of beef left to see me through February.  Whew.

I modified this recipe from Bubble Crumb.  Past experience with crock pot cooking has taught me no matter what I make, the resulting sauce comes out watery.  So I only used 1 can of cream of mushroom soup and half a can of water.  I omitted the mushrooms because I don't like them but the rest of the recipe I kept the same.  Sure enough, it was still thinly soupy but I thickened it with a good spoonful of cornstarch mixed with a little water to make a paste.  If pot roast is your comfort food, this is standard fare and similar to the pot roast I remember my mom making when I was growing up.  What I like about it is I could let it cook in the crock pot until it was literally fork tender and not have to worry about it becoming dry.  And I mean plastic-fork tender. 

1 (10.75 ounce) can condensed cream of mushroom soup
1 (1 ounce) package dry onion soup mix
1/2 can water
basket of baby portabella mushrooms cut in half, optional (I left them out)
2 tablespoons red wine vinegar
2 tabelspoons Worcestershire
5 1/2 pounds pot roast
salt & pepper to taste

Brown and sear meat (you can skip this step if you wish - I did).  Place in slow cooker, combine remaining ingredients and pour over pot roast.  Cook on low for 6 hours or until tender.