Friday, October 8, 2021

Sausage Spinach Quiche

Sausage Spinach Quiche - made September 22, 2021 from Miss in the Kitchen
1 refrigerated pie crust
1 pound sausage, casings removed, sausage crumbled
1 tablespoon olive oil
1/2 cup diced onion
2 teaspoons minced garlic
3 cups chopped baby spinach
3 large eggs
1 1/2 cups milk
1 1/2 cups shredded smoked gouda cheese
  1. Preheat oven to 425 degrees F. Unroll pie crust and press into a pie plate. Prick the bottom and sides of the pie crust with a fork. Bake for 10 minutes then remove from oven and lower temperature to 325 degrees F.
  2. In a large skillet, cook sausage over medium-high heat, breaking up the larger pieces; set aside.
  3. Add olive oil to a medium skill and cook onions and garlic, stirring, for 2 minutes. Add spinach and cook for 5 minutes, stirring frequently.
  4. In a large bowl, whisk together eggs, milk and salt until well combined. Add shredded cheese, sausage and spinach mixture. Stir until well combined.
  5. Pour into pie shell and bake for 50-55 minutes or until center is set. Remove from oven and let rest for 10 minutes before slicing.
I'm not even going to bother with a humble brag - I can cook! At least this time with this recipe. I was trying to use up the rest of the bag of spinach I had on hand, not to mention another pack of sausage links (yes, I bought them from Costco which means I have multiple packs for future cooking endeavors).
This is an inadvertently gluten-free quiche. I say inadvertent because I bought the pie crust ready-made from Trader Joe's and I only saw the gluten-free version in the refrigerator case. The TJ's cashier assured me they have the gluten version but I was checking out by then and didn't want to go hunting for it or have the TJ's employees go to the trouble of finding it for me. So gluten-free it is.
This was so easy to put together and pretty tasty. I generally like quiche anyway so my taste bud-bar is low. The tricky thing with quiche is you definitely don't want to overbake it or the eggy custard will be rubbery. The picture of the slice below might look a little runny but that's partly from the melted cheese (smoked Gouda for the win) and partly because the quiche was still a little warm when I took the picture. So this is the texture I prefer.

Wednesday, October 6, 2021

Bakery Review: Brooklyn Cupcakes

Brooklyn Cupcakes - ordered August 20, 2021 from Goldbelly
Besides doing my own baking, I'm still dedicated to trying out small business bakeries. Since I'm not traveling at the moment and can't visit them in person, the site Goldbelly.com has been a great way to do my virtual bakery travels.

It can be a bit pricey though so I'm always glad when there's a sale. In this case, Goldbelly was offering 20% off at one point and Brooklyn Cupcakes had free shipping. So I tried not to calculate how expensive each jar still was and instead egged myself on with "support small business". That usually does the trick and let's face it, it doesn't take much for me to click on the "order" button. 

Brooklyn Cupcake offers a variety of flavors of basically cake-and-custard in a jar. I'm not a big custard person but thought I'd try it. I went with the Samoa flavor. From their website, it's described as "chocolate cake topped with signature coconut cream cheese frosting layered with coconut custard (Flan) and caramel drizzle topped with toasted coconut."
You can see from the pictures that the 6 jars arrived well-packaged and, even shipped in the warm temps of summer, also arrived fresh and intact. I put them in the refrigerator and had one every day or two. Even after a week in the fridge, each jar was still "fresh" and the cake part wasn't dry.
Surprisingly, it wasn't too sweet either (although remember that my sweet tooth has a high tolerance) and I have to admit, the custard, cake and frosting combination worked really well. Thumbs up for Brooklyn Cupcakes. Now I have my beady eye on trying out some of the other flavors, in case there's another sale.
If you don't want to wait for a sale, you're welcome to use my referral link on Goldbelly. You get $15 off your first order of $50 or more. (Full disclosure, I get $15 off too. I am not affiliated with Goldbelly or Brooklyn Cupcakes.)

Monday, October 4, 2021

Sweetened Condensed Milk Brownies

1 14-ounce can sweetened condensed milk
1/3 cup (76 grams) unsalted butter
2 1/3 cups (400 grams) semisweet chocolate chips
1/4 cup (53 grams) brown sugar
1/4 cup (50 grams) granulated sugar
2 large eggs
1 large egg yolk
1 tablespoon vanilla extract
1/2 cup (60 grams) all-purpose flour
1/4 cup (21 grams) dutch process cocoa powder
1/2 teaspoon salt
  1. Preheat oven to 350 degrees F. Line a 9 x 9-inch baking paper with foil and lightly spray with nonstick cooking spray.
  2. In a medium saucepan over medium heat, melt the sweetened condensed milk and butter together, whisking to combine. Once butter has melted and mixture is smooth, remove from heat and stir in chocolate chips. Continue stirring until chocolate chips have completely melted, whisking to combine. Cool slightly.
  3. In the bowl of a stand mixer fitted with the paddle attachment, beat together brown sugar, sugar, eggs and egg yolk on medium-high speed until lightened in color, about 3 minutes. Beat in the vanilla extract. Stir in the cooled chocolate mixture, mixing to combine.
  4. Add flour, cocoa powder and salt, mixing until just combined. Pour batter into prepared baking pan. Bake 45-50 minutes or until a toothpick inserted near the center comes out with moist crumbs. Cool completely before cutting.
These brownies are dense, rich and fudgy, almost sticky which I blame (or credit) to the sweetened condensed milk. 
If that's the kind of texture you like, almost like a baked fudge rather than a dense brownie, then this is the recipe for you. I tried it as I was sending it in military care packages overseas and figured the sweetened condensed milk as an ingredient would help preserve the brownies for their journey.
It still doesn't unseat my favorite brownie recipe though as it was a bit sweet and a little rich for me. If you like your brownies more chocolaty than sweet, you might try to substitute some of the semisweet chocolate chips for an ounce or two of unsweetened chocolate.

Sunday, October 3, 2021

Snickerdoodle Bars

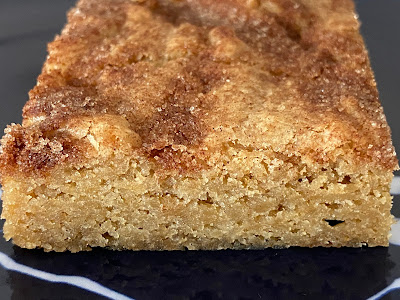
Snickerdoodle Bars - made September 21, 2021 from Who Needs a Cape?
2 2/3 cups all-purpose flour
2 teaspoons baking powder
1 teaspoon salt
2 cups packed brown sugar
1 cup butter, softened
2 eggs, room temperature
1 tablespoon vanilla extract

Topping
2 tablespoons granulated sugar
2 teaspoons ground cinnamon
  1. Preheat oven to 350 degrees F. Line a 9 x 13 baking pan with foil and lightly spray with nonstick cooking spray.
  2. In a medium bowl, whisk together the flour, baking powder and salt; set aside.
  3. In the bowl of a stand mixer fitted with the paddle attachment, beat together butter and brown sugar until well combined and fluffy. Beat in eggs and vanilla until combined. Add the flour mixture, mixing until just combined and no flour streaks remain. Do not overmix. Spread batter evenly in prepared pan.
  4. In a small bowl, stir together granulated sugar and cinnamon until well combined. Sprinkle evenly over top of batter, covering completely. 
  5. Bake for 25-30 minutes or until toothpick inserted near the center comes out clean or with a few moist crumbs. Edges should be golden and center set. Cool completely before cutting.
I'm working my way through my pinterest boards, trying to clear out recipes I pinned so long ago that I could've sworn I'd made them already; they've been on my boards for so long that they've become familiar without my actually trying them.
This was one of them. I like snickerdoodles and often mail them in care packages, especially for Soldiers Angels. Snickerdoodle bars capture a similar flavor but are easier to package and ship and presumably fare better in mailing since they're less prone to drying out.
I deliberately underbaked these by a minute or so, mostly to make sure they were moist and wouldn't dry out in mailing. They had a "fudgy" texture which worked well with the cinnamon sugar flavor. For the purists, this isn't strictly a snickerdoodle as it doesn't have cream of tartar. But they were still good nonetheless and I'm glad I finally made them.


Saturday, October 2, 2021

Butter Coconut Bars

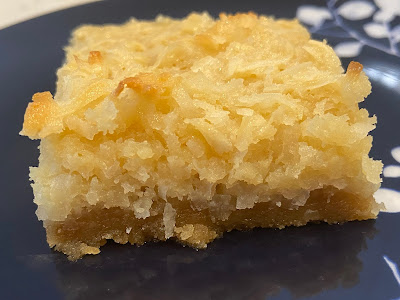
Butter Coconut Bars - made September 18, 2021 from Cookies and Cups
2 cups all-purpose flour
1 cup light brown sugar, packed
1 cup butter, melted

Coconut layer
3 eggs
1 tablespoon vanilla
1 14-ounce can sweetened condensed milk
1/4 cup light brown sugar
1/2 cup all-purpose flour
1/4 cup butter, melted
4 cups sweetened, flaked coconut, divided
  1. Preheat oven to 350 degrees F. Line a 9 x 13" baking pan with foil and lightly spray with nonstick cooking spray.
  2. Crust: In a large bowl, combine flour, sugar and butter. Press evenly into the bottom of the prepared pan. Bake for 15 minutes or until lightly golden. Reduce oven heat to 325 degrees F. Transfer the pan to a wire rack.
  3. Coconut layer: while crust is baking, in a large bowl, whisk together eggs, vanilla, sweetened condensed milk, brown sugar, flour and butter until smooth. 
  4. Stir in 3 cups of the coconut and spread the mixture onto the warm crust. Sprinkle the remaining cup of coconut evenly on top and bake for 25-30 minutes or until edges are lightly golden and the center is set. Cool bars completely before cutting.
At first glance, this had all the hallmarks of what I like in a bar cookie: butter crust, coconut filling. Plus I've had great success with past recipes from Cookies and Cups.
So I was a little surprised that I didn't like these as much as I expected. I followed the recipe exactly, including the baking time of the bottom crust  but I think that's where I went wrong. My oven tends to run on the cool side so I should've baked the crust longer. I think that would've given it a more crisp texture rather than a dense, underbaked one.

The coconut layer wasn't as sweet as I would've expected, considering the sweetened condensed milk. It was still good and nicely chewy but neither the butter flavor or the sweetness of the coconut came through very well.
The other place where I messed up is I didn't read the directions properly. You're supposed to only fold 3 cups of the coconut into the filling then sprinkle the 4th cup over the filling as topping. That would've toasted the coconut garnish and likely provided more flavor and texture contrast. I clarified the ingredients slightly to make it more obvious in case you're like me and tend to skim the directions. "Divided" should be the tip-off that you don't add all 4 cups into the filling layer. Oops.


Thursday, September 30, 2021

Brookies

Brookies - made September 18, 2021 from Buns in My Oven
Brownies
1 cup butter
2 1/4 cups granulated sugar
4 large eggs
1 1/4 cups unsweetened cocoa powder
1 teaspoon salt
1 teaspoon baking powder
1 teaspoon espresso powder, optional
1 tablespoon vanilla extract
1 1/2 cups all-purpose flour
2 cups semisweet chocolate chips

Cookies
1/2 cup butter, melted
1/2 cup brown sugar
1/4 cup granulated sugar
1 large egg
2 teaspoons vanilla extract
1 2/3 cups all-purpose flour
1 teaspoon baking soda
1/2 teaspoon salt
1 cup mini chocolate chips

Brownies
  1. Preheat oven to 350 degrees F. Line a 9 x 13" baking pan with foil and lightly spray with nonstick cooking spray.
  2. In a small saucepan over low heat, melt butter completely. Stir in sugar and continue cooking for 1-2 minutes, stirring constantly. Do not let boil.
  3. Pour melted butter mixture into the bowl of a stand mixer. On low speed, beat in cocoa powder, eggs, salt, baking powder, espresso powder and vanilla extract. Mix until well combined.
  4. Stir in the flour until just combined. Fold in chocolate chips. Spread brownie batter into prepared pan and smooth top; set aside.
Cookies
  1. Combine the melted butter, brown sugar and granulated sugar in a large mixing bowl and stir until well combined. Stir in the egg and vanilla, mixing until just combined.
  2. Add flour, baking soda and salt; stir until just combined. Fold in mini chocolate chips.
  3. Drop spoonfuls of cookie dough over brownie batter. Using a butter knife or small metal spatula, swirl cookie dough and brownie batter together. Do not overswirl.
  4. Bake for 25-30 minutes or until a toothpick inserted near the center comes out with a few moist crumbs. Cool completely before cutting and serving.
Back to the baked goods with this post. My "I don't feel like baking" phase lasted almost 24 hours. Then I was back at it the next day to bake for more care packages for Soldiers Angels.
Brookies are brownies + cookies, usually chocolate chip cookies. At first glance, the swirl looks like it's between chocolate and peanut butter but, in this case, they really are chocolate chip cookie dough swirled with brownie batter.
A good brookie swirl is hard to achieve (for me) because the chocolate chip cookie dough is so much more stiff than brownie batter. I'm as paranoid of overswirling as I am of overbaking so I did neither. This was tricky to bake as the brownie parts took longer to bake than the cookie parts and I was afraid of having dry cookie swirls. Fortunately, that was mostly my paranoia and not reality. You still want to watch the overbaking risk but remember that chocolate sets when cools so don't wait for a completely clean toothpick test before taking these out.

Flavor-wise, these were better than I expected, given the brownies are made from only unsweetened cocoa powder. I have a bias for brownies made with melted chocolate rather than just cocoa powder. The chocolate brownie tended to overwhelm the flavor profile of the chocolate chip cookie part though. That's not necessarily a bad thing but don't expect the brown sugar caramel overtones typical of a chocolate chip cookie. This was more like a fudge brownie with some non-chocolate cookie swirled in. Still good although the chocolate chip cookie part wasn't very buttery.

Wednesday, September 29, 2021

Creamy Pesto Shrimp Pasta

Creamy Pesto Shrimp Pasta - made September 17, 2021, modified from Salt & Lavender
1 pound raw shrimp, peeled and deveined
1/4 cup pesto
2 cloves garlic, minced
1 teaspoon lemon juice + zest of 1/2 lemon
1/4 cup chicken broth or dry white wine
1 cup heavy whipping cream
1 pound uncooked potato gnocchi or pasta (I used mini raviolis - boil them first if not using gnocchi)
1/2 cup freshly grated parmesan cheese
salt and pepper to taste
  1. In a deep skillet over medium heat, whisk together pesto, garlic, lemon juice, lemon zest, chicken broth and cream until combined.
  2. When the sauce starts to gently bubble, stir in gnocchi or pasta. Cover the pan and cook for 5 minutes. Stir and add shrimp. Cover for one minute. Uncover and stir until shrimp is cooked through.
  3. Just before serving, stir in parmesan cheese. Salt and pepper to taste. Stir until cheese is melted. Serve warm.
I've had a craving for gnocchi recently and saw a recipe for pesto gnocchi from Salt & Lavender that I wanted to try. But alas, Trader Joe's was out of gnocchi and I couldn't find it at Winco or Target either. So I substituted these mini raviolis from TJ's, figuring they would be "close enough".
Er, I was wrong. First, I didn't boil them well enough and the little raviolis apparently aren't that tasty when they're hard little bits of processed pasta.
Second, after I fished out the shrimp and added more liquid to the pasta to cook them to better texture, the pasta drank up the liquid like there was a drought going on (there is). So the dish turned out a little dry. Ah yes, this is more typical of how my cooking efforts usually turn out. Sigh. The flavor was good though, thanks to the fresh pesto I made from my basil plants. And next time I will learn a little pasta goes a long way, make more sauce no matter what the recipe says, and boil the pasta properly first. At least I have the Sausage and Tortellini Soup and the Cheeseburger Macaroni Soup to fall back on. 

Monday, September 27, 2021

Crockpot Macaroni Cheeseburger Soup

Crockpot Macaroni Cheeseburger Soup - made September 17. 2021, modified from The Kitchen Magpie 
1 pound lean ground beef
1/2 small white onion, diced
1 1/2 cloves garlic, minced
3 cups strong chicken stock
1 teaspoon basil
1 cup uncooked macaroni 
3/4 cup whole milk
8 ounces cheddar cheese (the original recipe called for Velveeta)
  1. In a large skillet over medium heat, cook ground beef, stirring until mostly browned. Add chopped onion and fry, stirring, until translucent and soft. Add garlic and stir fry another minute.
  2. Transfer mixture to crockpot. Pour chicken stock over beef mixture and add carrots and basil. Cook on low for 6-8 hours.
  3. 30 minutes before serving, add in macaroni. Cook until soft. Whisk in milk and cheddar cheese. Stir until cheese is melted throughout the soup completely. Serve warm.
I was so emboldened by the success of the Sausage Tortellini Soup that I continued with the cooking that day, figuring I would stock up meals for the coming weeks.
I haven't used my crockpot in ages, maybe not since I got my instant pot. But this recipe called for a crockpot so I dusted off mine. The one I have is a mini one, probably the size most people use to boil potpourri or spices. Me, I cook with it. I did have to make a half recipe of this though as a full recipe wouldn't have fit into my little crockpot.
I know, I know, most people buy a large crockpot to let some huge amount of food cook all day to feed a crowd. Nope, not me. I march to the beat of my own mini cooking efforts.
Fortunately, this one turned out quite well too. It's like a homemade soup version of Hamburger Helper cheeseburger macaroni. But less salty and more tasty. I omitted the carrots called for in the original recipe as I didn't have any and I didn't use Velveeta for the same reason. I did have a good amount of shredded cheddar cheese that's been in my freezer for what was getting to be a dodgy amount of time (probably from my last cooking efforts donkey's ages ago) so I used that. The end result probably wasn't as creamy as Velveeta would've been but my taste buds for savory food aren't that discriminating so this worked just fine.