Thursday, June 10, 2021

Giant Red Velvet Cookies

Giant Red Velvet Cookies - made May 7, 2021 from Kar for a Bite 
I love red velvet and I love giant cookies. White chocolate and red velvet are a classic combination, pleasing to the eye and taste buds. At least, these ones were.

The only thing I don't like when baking with white chocolate is how they brown in the oven during baking. It just doesn't look as aesthetically pleasing as when they're still un-browned white chocolate. You can get around this by baking with the white chocolate inside the cookies then, as soon as you take them out of the oven, press more white chocolate chunks on top of the hot cookies, pressing them lightly to adhere on top of the cookies.

As you can tell, I didn't do that for this batch. But regardless of how they looked, these cookies were delicious. You don't have to make them as "giant" cookies but if you make them smaller, be sure to adjust baking time accordingly. I like them large enough that you can really get that fudgy texture and have something to sink your teeth into.


1 cup butter, softened
1 cup brown sugar, packed
1/2 cup granulated sugar
2 large eggs
4 tablespoons red food coloring or 1 tablespoon red gel food coloring
1 tablespoon vanilla extract
2 1/2 cups all-purpose flour
3/4 cup cocoa powder
1 teaspoon baking powder
1/4 teaspoon baking soda
1 teaspoon salt
2 cups white chocolate chips
  1. In the bowl of a stand mixer fitted with the paddle attachment, cream the butter, brown sugar and granulated sugar until combined and fluffy, 1-2 minutes. Add eggs, red food coloring, and vanilla, mixing on low speed until combined.
  2. In a separate bowl, whisk together flour, cocoa powder, baking powder, baking soda and salt. Add in two additions to butter mixture, mixing briefly after each addition until just combined. Fold in white chocolate.
  3. Portion dough into 12 equal parts and shape into thick discs. Cover and refrigerate or freeze for several hours or overnight.
  4. When ready to bake, preheat oven to 350 degrees F. Line baking sheets with parchment paper and evenly space cookie dough discs two inches apart. Bake for 15-17 minutes or until edges are set and middles no longer look raw. Let rest on baking sheets for 5 minutes then transfer to wire rack to cool completely.

Thursday, June 3, 2021

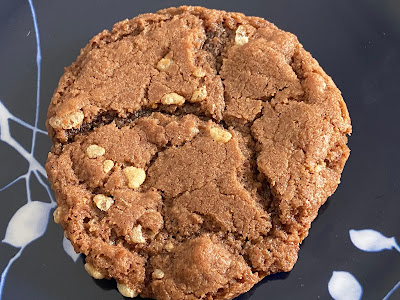
Brown Butter Nutella Crunch Cookies

Brown Butter Nutella Crunch Cookies - made dough May 9, 2021 from Toasty Oasis 
Much as I love Rice Krispie treats, especially the cookie butter version, the most First World problem with them is I never use up the whole box of Rice Krispies to make them. So I'm left with a partial box that isn't enough to make another batch of Rice Krispie treats but are too much to throw away (which I wouldn't do anyway as my Filipino upbringing would abhor wasting even 1 puffed grain of rice). Yet if I don't use them soon enough, they'll go stale.
I don't know why I never thought of using them in cookie recipes sooner or more often. I think I just had a one-track (or two-track) mind that they could only be used in Rice Krispie treats or my Nutella Crunch brownies. I don't eat them as straight cereal; I only bake with them. Enter Nutella Crunch Cookies.
These turned out pretty well because, well, Nutella.... As with all sandwich cookies, err on the side of making these small since you'll be eating two of them as a sandwich cookie. I also took the precaution of flattening them slightly to start their baking from a disc shape rather than a round bake. It helps with more even baking and increases your chances of ending up with a more uniform shape.
True to their title, they do have some crunch, both from the Rice Krispies in the dough but also in the texture of the cookie itself. You still don't want to overbake though. You don't want the texture of a crisp Oreo or the blackened look of one either.

3/4 cup unsalted butter, melted and browned
6 tablespoons granulated sugar
1 cup light brown sugar
1 tablespoon vanilla extract
2 large eggs, cold from refrigerator
1 cup Nutella
2 1/2 cups all-purpose flour 
3/4 teaspoon baking soda
1 1/4 teaspoons salt
1 1/2 cups crispy rice cereal (45 grams)
  1. In a mixing bowl, pour hot melted browned butter over granulated sugar and brown sugar and stir to combine. Whisk in vanilla extract then eggs, one at a time, whisking after each addition. Stir in Nutella, mixing until combined and smooth,
  2. In a separate bowl, whisk flour, baking soda and salt. Add to butter-Nutella mixture in two additions, stirring to combine after each addition. Fold in crispy rice cereal.
  3. If dough is too warm or soft to portion out, cover and chill for 30 minutes. Then portion into golf-ball-size dough balls, cover and chill or freeze for several hours or overnight.
  4. When ready to bake, preheat oven to 350 degrees F. Line baking sheets with parchment paper and evenly space dough balls. Bake for 10-11 minutes or until edges have set and middles no longer look raw. Let rest on cookie sheet for several minutes then remove to wire rack to cool completely. Sandwich with Nutella if desired.

Monday, May 31, 2021

Biscoff White Chocolate Oatmeal Cookies

It's been another little while since I last updated my blog. I could use the same (valid) excuse that I was busy, both with work and because now that I'm fully vaccinated, I've been able to get out more in terms of volunteering. Plus the weather has been nicer albeit all over the place with temps varying by 40-50 degrees in the same week, sometimes in the same day.
But I had also been feeling some ennui, back to feeling like I'm not really doing anything new. Since most of my baking has been concentrated on sending out military care packages for Soldiers Angels, I'm still doing a lot of cookies and brownies and there's a sameness to them, especially since I also tend to same the same basic types of cookies (chocolate chip, snickerdoodles, oatmeal chocolate chip) and brownies (fudge brownies plain or with different mix-ins like chocolate chips, Nutella, Oreos, candy bars).
I did do some baking for local housing-insecure/homeless folks a few times but again the same type of things since they could easily be packed in lunch bags for distribution and consumption. For that latest effort, I made over 100 cookies, brownies and a bundt cake that I sliced and packaged up for inclusion. The bundt cake was only okay (to me) and was what I was supposed to post about next. Since it didn't seem that inspired to me, I couldn't think what to write about it.
So this is my long lead-in to say I'm just going to do the obvious and just blog what I want to blog about. And what I want to blog about are the things I liked and turned out well, not stuff that just turned out okay and not that interesting to me. 
Fortunately, this one turned out well and I rather liked it. That's the norm for any recipe from Sally's Baking Addiction. If you haven't ever tried any of her recipes, this is a great one to start with. It's easy to make and it's delicious, especially if you're a cookie butter fan. The dough is very easy to make and work with. The cookies don't spread much and this is an excellent flavor combination between the cookie butter, the oatmeal and white chocolate.

It also has the added benefit of mailing well because, like most oatmeal cookies, it bakes up sturdy (not fragile) and is easily packaged and shipped. Be sure to check out Sally's blog for more amazing recipes.

3/4 cup all-purpose flour
1/4 teaspoon salt
1/2 teaspoon baking soda
1/2 teaspoon baking powder
1/2 cup unsalted butter, melted and cooled slightly
3/4 cup brown sugar, packed
1 large egg
1/2 cup Biscoff or cookie butter spread
2 teaspoons vanilla extract
2 cups oats
1 1/2 cups white chocolate chips or chunks
  1. In a small bowl, whisk together flour, salt, baking soda and baking powder.
  2. In a separate, larger bowl, stir together melted butter and brown sugar until combined. Whisk in egg until combined. Add cookie butter and vanilla and stir until combined.
  3. Add dry ingredients and mix until just combined. Do not overmix.
  4. Add oats and white chocolate, reserving a handful of white chocolate chips.
  5. Portion dough into golf-ball-size dough balls, cover and chill or freeze for several hours or overnight.
  6. When ready to bake, preheat oven to 350 degrees. Line baking sheets with parchment paper and evenly space dough balls on baking sheets. Bake 11-12 minutes or until edges are set and middles no longer look raw. Do not overbake. Remove from oven, let cookies rest on baking sheets for several minutes then remove to wire racks to cool completely.

Wednesday, May 12, 2021

Cookie Butter-Stuffed Blondies

Cookie Butter-Stuffed Blondies - made on April 30, 2021 from Handle the Heat 
I feel a bit conflicted about this bar cookie. On the face of it, it's everything I like: easy-to-make bar cookie (always good when baking for a crowd, which I was), brown-sugar blondie and hello, cookie butter.
But I don't know if my taste buds were a bit on sugar overload when I made this or what the issue was but I didn't love this as much as I expected. For one thing, it was a bit too thick, even for me, so it might've been better to bake in a 9 x 9 pan instead of an 8 x 8. Plus the cookie butter-sweetened condensed milk filling was a bit too thick and didn't taste as cookie buttery as I would've wanted. Instead it just seemed gelatinous.
Next time, I might just thin the cookie butter by melting it and perhaps adding a few tablespoons of whole milk rather than mixing it with sweetened condensed milk.
2 sticks (1 cup) unsalted butter, melted
1 3/4 cups (350 grams) dark brown sugar
2 large eggs
1 large egg yolk
1 teaspoon vanilla
1/4 teaspoon salt
2 cups (254 grams) all-purpose flour
1 cup cookie butter
2/3 cup sweetened condensed milk
  1. Preheat oven to 350 degrees F. Line an 8 x 8" baking pan with foil and lightly spray with nonstick cooking spray.
  2. In a large bowl combine the hot melted butter and sugar with a rubber spatula. Let cool. Add the eggs, egg yolk, and vanilla and stir until combined. Stir in the salt and flour.
  3. Spread half the batter evenly into the prepared pan. Bake for 15 minutes, or until it just begins to set. Keep oven at 350°F.
  4. In a heatproof container, microwave the cookie butter and condensed milk in 20-second bursts, stirring between bursts, until warmed through and well combined.
  5. Spread the cookie butter mixture over the par-baked blondie layer in one even layer. Use your palms to flatten pieces of the cookie butter mixture to layer over the blondie if needed. Spread the remaining blondie batter over the cookie butter layer until it’s completely covered.
  6. Return to the 350°F oven and bake for another 30 minutes, or until golden brown and set. Let cool completely before chopping into bars with a big sharp knife. Wipe the blade with hot water for cleaner slices.

Monday, May 10, 2021

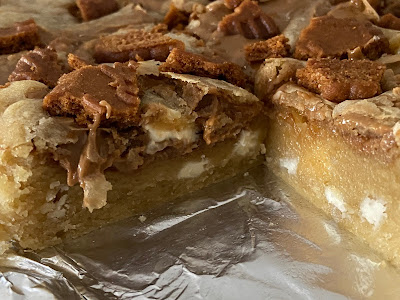
Biscoff Blondies

Biscoff Blondies - made April 30, 2021 from Jane's Patisserie
Hot on the heels of my earlier post regarding stuffed cookie butter cookies, here's a bar version where blondies are baked with cookie butter swirled in and topped with Biscoff cookie pieces. 
So you can already imagine I'm going to tell you this was also incredible. Because it was.

The cookie butter was a bit difficult to swirl in since it's fairly stiff. You can always warm it up slightly for easier swirling but I wouldn't worry too much about it because having large pockets of cookie butter in the blondie isn't a bad thing.

I've become a fan of adding Biscoff cookies to pretty much anything. Unlike my other favorite, the Oreo cookie, Biscoff cookies don't soften in baking and retain the crispness I like so much in these cookies.
I didn't bake this bar cookie as much as I could have as it was difficult to tell when it was actually done via the toothpick test so I could've baked it a little longer for more of a golden brown color.
Still, it was pretty feckin' delicious anyway. The original blogger, Jane's Patisserie, is from Australia (I believe) so the original recipe followed the metric system. I've translated to ounces for the butter but kept everything else in grams so it's best if you have a food scale to measure the ingredients.
200 grams (7 ounces or 14 tablespoons) unsalted butter, melted
125 grams granulated sugar
125 grams brown sugar
3 eggs
1 teaspoon vanilla extract
275 grams all-purpose flour
1 tablespoon cornstarch
200 grams white chocolate chips
250 grams cookie butter
100 grams Biscoff cookies, coarsely chopped
  1. Preheat oven to 350 degrees F. Line a 9 x 9" baking pan with foil and lightly spray with nonstick cooking spray.
  2. In a large bowl, whisk together melted butter, granulated sugar and brown sugar.
  3. Add eggs and vanilla, beating after each addition.
  4. Add flour and cornstarch; mix until just combined.
  5. Fold in white chocolate chips.
  6. Pour into prepared pan and dollop the cookie butter on top. Swirl through batter. Sprinkle chopped Biscoff cookies. 
  7. Bake for 25-30 minutes or until corners are set, middle no longer looks raw and a toothpick inserted near the center comes out with a few moist crumbs.

Saturday, May 8, 2021

White Chocolate Macadamia Coconut Cookies

This is still part of the mass baking day I did the first weekend in May. You'll always see cookie recipes as part of my mass baking days since I could (and do) mix together cookie doughs any time I have a spare 15-20 minutes throughout the week then I keep the cookie doughs in my freezer until I'm ready to bake. 

It's a handy time management trick since I tend to do my mass baking when I have several free hours (which only seems to be on my Friday day off and/or the weekend) and baking a ton of cookies is much easier and takes less time when the cookie doughs are already made up and ready to go.
I love the coconut-macadamia combination and macadamias are almost the only nut I can tolerate inside a cookie since they don't soften like pecans and aren't bitter like walnuts. Plus they taste good.
This is a pretty good cookie. It has brown sugar overtones, the chewiness of coconut, the crunch of macadamia nuts and the sweetness from the white chocolate. All in all, a great combination. 

1 cup butter
3/4 cup brown sugar, packed
3/4 cup granulated sugar
2 teaspoons vanilla extract
2 large eggs
2 1/4 cups all-purpose flour
1 teaspoon baking soda
1 teaspoon salt
2 cups white chocolate chunks
1 1/2 cups macadamia nuts, lightly toasted, cooled and coarsely chopped
1 10-ounce package sweetened flaked coconut
  1. In the bowl of a stand mixer fitted with the paddle attachment, cream together the butter, brown sugar and granulated sugar until combined and no butter lumps remain, 2-3 minutes.
  2. Add vanilla extract and eggs, one at a time, mixing briefly after each addition until just combined.
  3. In a small bowl, whisk together flour, baking soda and salt. Add dry ingredients to butter mixture in two additions, mixing after each addition until just combined. Do not overmix.
  4. Fold in white chocolate, macadamia nuts and coconut. Portion into golf-ball-size dough balls, cover and chill or freeze for several hours or overnight.
  5. When ready to bake, preheat oven to 375 degrees F. Line baking sheets with parchment paper and evenly space dough balls 2 inches apart. Bake 12-14 minutes until edges are golden and middles no longer look raw. Cool on baking sheets for several minutes then transfer to wire rack to cool completely.

Thursday, May 6, 2021

Maple Snickerdoodles

Maple Snickerdoodles - made dough April 17, 2021 from Butternut Bakery 
This is another cookie that was part of my mass baking day. I was a bit concerned when I made this dough as it was pretty soft after it was mixed and I had to chill it in the fridge before I even portioned it into dough balls. Usually when a cookie dough is that soft, it'll spread more, even when baked from frozen dough.

Now these did spread but not as much as I would've expected given the softness of the dough. And I thought I'd balk over these because of the addition of the maple syrup because, remember, I'm a snickerdoodle purist. 

Turns out I was wrong again. These were delicious. The maple flavor is subtle but still ups the  flavor profile a notch. The texture was perfect, crisp at the edges, chewy in the middle.

As always, watch the bake time. You want to bake just until the edges are set and the middle no longer looks raw. Don't wait until the middle is uniformly puffy, that'll always surely be overbaked by then. Bake just until you see some fissures near the center but not completely over the whole cookie. When baked properly, the middles will sink for this look (below).

1 cup unsalted butter
1 cup brown sugar, packed
1/2 cup granulated sugar
scant 1/4 cup maple syrup (I used Trader Joe's maple syrup)
2 teaspoons vanilla extract
2 large eggs
3 cups all-purpose flour
1/2 teaspoon baking soda
2 teaspoons cinnamon
1/4 teaspoon cream of tartar
1 teaspoon salt

Coating
1/4 cup granulated sugar
1 tablespoon cinnamon
  1. Cream together butter, brown sugar and granulated sugar until combined and fluffy, 2-3 minutes. Add maple syrup and vanilla extract and beat until combined. Add eggs, one at a time, beating until just combined after each addition.
  2. In a separate bowl, whisk together flour, baking soda, cinnamon, cream of tartar and salt. Add in two additions to butter mixture, beating until just combined after each addition. If dough is too soft, cover and chill for 30 minutes before portioning into dough balls.
  3. Portion into golf-ball-sized dough balls, cover and chill or freeze for several hours or overnight.
  4. When ready to bake, preheat oven to 350 degrees F. Line baking sheets with parchment paper. 
  5. In a small bowl, combine together 1/4 cup granulated sugar and cinnamon. Roll dough balls in mixture, coating completely. Evenly space on prepared baking sheets. Bake 10-12 minutes or until edges are set and middles no longer look raw. Let rest on baking sheets for several minutes before removing to wire rack to cool completely.