Sunday, March 7, 2021

Fudge Hazelnut Espresso Cookies

Fudge Hazelnut Espresso Cookies - made November 26, 2020 from Grab the Mangos

I don't drink coffee or espresso but I always seem to have a container of espresso powder so I can try recipes like this one. Coffee (or espresso) pairs well with chocolate to bring out the chocolate flavor. Depending how much you add, you can also balance to bring out the coffee flavor. Espresso is stronger in flavor than coffee so this definitely had the espresso flavor profile as much as the chocolate profile.
The dough was easy to work with and the cookies didn't spread too much. As always, I baked them from frozen dough. I modify all of the recipes I try to portion the dough into cookie dough balls, freeze and bake from frozen dough, no matter what the original recipe says. You can skip that step and bake as soon as you make the dough but I can't guarantee how thick or thin your cookies will turn out. 
It's also easier to avoid overbaking cookies if you bake from frozen dough. I like my cookies underbaked so it's an easy choice for me to make. 
1 cup semisweet chocolate chips
3/4 cup butter
2 teaspoons espresso powder
3/4 cup brown sugar
1/2 cup granulated sugar
2 eggs
1 teaspoon vanilla
2 cups all-purpose flour
1 teaspoon baking powder
1/2 teaspoon salt
1 cup chocolate chips
  1. In the top half of a double boiler set over hot water, melt butter and chocolate chips, whisking until melted, smooth and combined. Add the espresso powder and stir to dissolve.
  2. In a large mixing bowl, combine the melted butter-chocolate mixture with the brown sugar and granulated sugar. Add eggs, one at a time, beating briefly after each addition to combine. Add vanilla.
  3. In a separate bowl, whisk together the flour, baking powder and salt. Add to chocolate mixture in two additions, mixing briefly after each addition until just combined. Fold in chocolate chips.
  4. Portion into dough balls, cover and chill or freeze for several hours or overnight.
  5. When ready to bake, preheat oven to 350 degrees F. Line baking sheets with parchment paper and evenly space dough balls. Bake for 10-12 minutes or until edges are set and middles no longer look raw or shiny.

Friday, March 5, 2021

Pumpkin Buttermilk Pound Cake

Pumpkin Buttermilk Pound Cake - made November 20, 2020 from Seasonal and Holiday Recipe Exchange

I'm still catching up on recipes I made a few months ago and, as you can tell, it was still pumpkin season. Unlike the cookies and brownies I bake for Soldiers Angels care packages, this cake was for my nieces' birthday. I haven't seen either in awhile (thanks again, Covid) but I mailed them both a baked goods care package as part of their gift.

The original recipe included a glaze but since I was mailing this out, I didn't glaze it so it would be less messy to pack and ship. 
This was a good, straightforward, bundt cake. Moist. flavorful, good texture and it held up well for mailing. That's all I asked from it.

1 cup unsalted butter, softened
2 1/4 cups all-purpose flour
2 teaspoons baking powder
1 teaspoon baking soda
2 teaspoons cinnamon
3/4 teaspoon nutmeg
3/4 teaspoon ginger
1/4 teaspoon cloves
1/2 teaspoon salt
1 1/4 cups canned pumpkin
1/2 teaspoon vanilla
3/4 cup buttermilk
1 1/4 cups granulated sugar
3 large eggs

  1. Preheat oven to 350 degrees F. Thoroughly spray a bundt pan with non-stick baking spray. Set aside.
  2. Whisk together flour, baking powder, baking soda, cinnamon, nutmeg, ginger, cloves, and salt in a bowl. Whisk together pumpkin, buttermilk and vanilla in another bowl.
  3. Beat butter and granulated sugar in large bowl of electric mixer at medium-high speed until pale and fluffy (3 to 5 minutes), then add eggs and beat another minute.  Reduce speed to low and add flour and pumpkin mixtures alternately in batches, beginning and ending with flour mixture and mixing until batter is just smooth.
  4. Spoon batter into pan and bake until a wooden toothpick or skewer inserted in center of cake comes out clean (40 to 50 minutes). Cool cake in pan on a rack 15 minutes, then invert rack over cake and reinvert cake onto rack.  Cool completely, transfer to platter, then drizzle with glaze.

Cinnamon Buttermilk Glaze
1/3 cup buttermilk
1/4 cup granulated sugar
2 tablespoons butter
2 teaspoons cornstarch
1/8 teaspoon baking soda
1/4 teaspoon cinnamon 
  1. Combine all ingredients in a small saucepan over medium heat; bring to a boil. Cook 1 minute or until thick, stirring constantly; remove from heat. Drizzle cake with glaze.

Sunday, February 28, 2021

Wunderkeks - "wunderful" cookies

Wunderkeks - bought February 3, 2021

Inside Out Chocolate Chip Cookie

One of the things I miss most during the past year of quarantines and shut downs is traveling. Whether I stayed local, within the country or flew internationally, I loved exploring new places and, of course, trying out new places to eat, especially bakeries.
I haven't been able to do that (thanks, Covid) but even worse than my first-world problem is the impact to small businesses and the decrease in their in-store foot traffic plus fewer orders as people have lost their jobs and can't afford their goods or services anymore. Small businesses have also had to let go of their employees because business is down and people who've lost jobs can't patronize those businesses either; the downward spiral goes on.
So, since I've been fortunate enough to get a job during this pandemic, I devote part of my earnings to supporting those small businesses. I don't really need "stuff" but I can always eat consumables, especially cookies. I make a point of searching out the ones I can order from online, trying them out and whenever I can, spreading the word so other people can discover them too.
Thus I discovered Wunderkeks, a bakery located in Austin, TX. It was the pictures of their cookies on their website that drew me in. Click on the post title, go to their website and you'll see what I mean.
I ordered the Greatest Hits variety pack which comes with 3 flavors of 4 cookies each so it's an even dozen. The cookies are individually wrapped as you see above and come in a sturdy decorative box. Kudos on the packaging as well as the two-day shipping; I literally got the cookies 2 days after I ordered them online.

Chocolate Chip Cookie
The cookies arrive with a card instructing the recipient to warm the cookies in the oven for 2-3 minutes before eating. Not the microwave, but the oven. Trust me, do what they say. 
Inside the Chocolate Chip Cookie

Inside Out Chocolate Chip Cookie
These cookies were amazing. Remember, I'm a cookie snob. Years of baking my own cookies, eating them warm out of the oven and being finicky about my baked goods have turned me into said cookie snob. These cookies pass the snob test.
Inside Out Chocolate Chip Cookie

Inside the Inside Out Chocolate Chip Cookie
My favorite was the Inside Out Chocolate Chip Cookie which is a dark chocolate cookie with white chocolate. I don't normally like white chocolate that much but it was perfect in this cookie. The regular chocolate chip comes in a close second. The flavor and the texture were perfect.
The Everything Cookie - just out of the oven

The Everything Cookie
My least favorite was the Everything Cookie, mostly because I don't like nuts. The Everything cookie has nuts, chocolate chips and coconut then it's rolled in cinnamon sugar like a snickerdoodle. I would've preferred fewer nuts and more coconut. It was still good though and people who do like nuts in their cookies will enjoy this one.
Inside the Everything Cookie
A dozen cookies are $29.95 plus $9.95 shipping but they seem to regularly offer discount codes. I got this initial order with a 20% discount code and I put in another order to send to a friend for her birthday with a free shipping code for a dozen cookies. A check of their website today offers free shipping for 2 dozen+ cookies, no code required. But even without a discount code, if it's within your budget, these are worth full price. And you'll be supporting a small business. 
The Everything Cookie


Saturday, February 27, 2021

Chewy Pumpkin White Chocolate Cookies

Chewy Pumpkin White Chocolate Cookies - made November 15, 2020 from We Three Shanes

Quick write up as I'm not sure anyone reads these anyway and you just want to get to the recipe, right?
Most pumpkin cookies are cakey. These are chewy. I much prefer chewy cookies over cakey ones so I liked these.
If you don't like a bunch of spices in your cookies, this one doesn't have too many but if you're really not into spices, omit the cloves and nutmeg but substitute with more cinnamon. I love cinnamon so that would be an easy choice for me,


2 cups all-purpose flour
12 tablespoons (1 1/2 sticks) unsalted butter
1/3 cup pumpkin puree
1 1/2 teaspoons vanilla
1 cup brown sugar, packed
1/2 cup granulated sugar
1 teaspoon baking soda
1/2 teaspoon cinnamon
1/2 teaspoon salt
1/8 teaspoon cloves
1/8 teaspoon nutmeg
1 cup white chocolate chips
  1. Cream together butter, brown sugar, granulated sugar and vanilla. Mix in pumpkin puree until combined. 
  2. Whisk together dry ingredients in a separate bowl. Add to butter-sugar mixture in two additions, mixing briefly after each addition until just combined. Fold in white chocolate chips.
  3. Portion into dough balls, cover and chill or freeze for several hours or overnight.
  4. When ready to bake, preheat oven to 350 degrees F. Line baking sheets with parchment paper and evenly space dough balls. Bake 8-10 minutes or until edges are set and middles no longer look raw or shiny. Do not overbake.

Saturday, February 20, 2021

Thick Chocolate Chip Cookies from Kitchen Fun with My 3 Sons

Thick Chocolate Chip Cookies - made October 31, 2020 from Kitchen Fun with My 3 Sons

Although I said last year that I would stop trying out new recipes for chocolate chip cookies because I had found THE ONE, it turns out I lied. It also turns out that, for me, it's not actually about finding THE best recipe because, let's face it, there are plenty of great recipes for chocolate chip cookies out there. Rather, it's about (taste) testing them all and enjoying the journey rather than trying to reach the destination. 
So, even though I probably couldn't distinguish from the plethora of recipes I've made in a blind taste test, it doesn't matter as apparently I just like (taste) testing them all. Not looking for the winner but rounding up all the contestants is my jam. 
Chocolate chip cookies are what I bake most often for military care packages. I don't put nuts in my cookies so they're safe for deployed service members with nut allergies and I figure it's about as ubiquitous a "taste of home" as you can get so it's a safe bet someone will like them. Plus they pack and ship well, vacuum sealed.
This was supposed to be like Levain Bakery cookies but I don't make the cookies as big when I'm planning to ship them. I get more cookies out of a batch by making them smaller and I want to pack the box(es) full so the cookies can be shared with more service members. 
Hence these are smaller than the original blogger intended. Still tasted good though.

2 1/3 cups all-purpose flour
2 teaspoons baking powder
1/2 teaspoon baking soda
1 teaspoon salt
10 tablespoons unsalted butter
2/3 cup brown sugar, packed
1/3 cup granulated sugar
1 egg
2 teaspoons vanilla extract
12-ounce bag of chocolate chips
  1. In a medium mixing bowl, whisk together the flour, baking powder, baking soda and salt; set aside.
  2. In the mixing bowl of a stand mixer fitted with the paddle attachment, cream the butter, brown sugar and granulated sugar on medium speed until light and fluffy, 3-4 minutes. Add egg and vanilla; beat until combined.
  3. Add the flour mixture in two additions and beat at low speed until just combined. Stir in chocolate chips.
  4. Portion dough into balls, cover and chill or freeze for several hours or overnight.
  5. When ready to bake, preheat oven to 400 degrees F. Line baking sheets with parchment paper and evenly space dough balls. Bake cookies for 15-18 minutes for large cookies, 10-12 minutes for smaller cookies or until golden brown at the edges and middles no longer look raw or shiny. Cool on baking sheets for 5 minutes then remove to wire cooling rack to cool completely.

Thursday, February 18, 2021

M&M Cookies from Lil Luna

M&M Cookies - made October 2, 2020 from Lil Luna

As you can tell from the "monster" M&Ms in these cookies. I made these for October care packages. I made them early to allow for shipping time overseas to give them enough time to arrive for Halloween.
This is one of those recipes I could've sworn I've made before from Lil Luna but I couldn't find it on my blog so I made them now or, er, back in October. I always like the look of M&M cookies because it's so easy to make them seasonally relevant by switching out which M&Ms you use. But typically I'm not a big fan of the taste as they always strike me as too sweet. Not so much the cookie itself but because of the M&Ms. 
Regardless of my personal feelings though, these were a good cookie with crispy edges and chewy middles. One pro-tip: reserve some of the M&Ms and gently poke them strategically on top of the cookies immediately after you take them out of the oven. The colors will stay vibrant and not bleed over the cookie and you can "decorate" the cookies with judicious placement of the M&Ms.

1 cup granulated sugar
1 cup brown sugar
1/2 cup butter, softened
1/2 cup vegetable oil
2 eggs
1 teaspoon vanilla
1 teaspoon baking powder
1 teaspoon salt
1 teaspoon baking soda
3 cups all-purpose flour
M&M, plain
  1. Cream together granulated sugar, brown sugar, butter and oil.
  2. Add eggs and vanilla; beat until fluffy.
  3. In a separate bowl, combine baking powder, salt, baking soda and flour. Add to butter mixture in 2 additions, beating until just combined. Fold in M&Ms.
  4. Portion into dough balls and chill or freeze for several hours or overnight.
  5. Preheat oven to 350 degrees F. Line baking sheets with parchment paper and evenly space cookie dough balls. Bake 8-10 minutes or until edges are golden brown and middles are no longer raw or shiny. Remove from oven, let cool on baking sheets for 5 minutes then transfer to wire racks to finish cooling completely.


Monday, February 15, 2021

Starbucks Copycat Espresso Brownies

Starbucks Copycat Espresso Brownies - made January 17, 2021 from Little Spice Jar

I'm not going in order to blog what I've made. Some were from months ago, some from just a few weeks. I decided to keep things simple and just put up what I have and not worry about going in chronological order until I'm caught up.
Another brownie which went into military care packages. I've gotten feedback how popular coffee and caffeine is with our deployed troops so, in addition to sending instant coffee packets and k-pods, I decided to try out this recipe for Starbucks Copycat Espresso Brownies. I don't know how true the copycat version is to the real thing since I don't drink coffee and have never had a Starbucks espresso brownie. But I can tell you this was definitely coffee-flavored and a good choice for people who like that fudgy chocolate and coffee combination.
10 tablespoons butter, cut into tablespoons
6 ounces bittersweet chocolate, chopped
1 1/4 cups granulated sugar
1/4 cup espresso powder
3 large eggs
3 tablespoons cocoa powder
2/3 cup all-purpose flour
1 cup chocolate chips, optional
  1. Preheat oven to 350 degrees F. Line an 8" square baking pan with foil and lightly spray with nonstick cooking spray.
  2. In the top half of a double boiler set over hot water, melt butter and bittersweet chocolate, whisking until smooth and completely melted. Remove from heat. Stir in granulated sugar and espresso powder until combined. Add eggs, one at a time, beating until incorporated.
  3. In a separate bowl, whisk together the cocoa powder and flour. Add to butter-chocolate mixture and mix until just combined. Do not overmix. Fold in chocolate chips, if using.
  4. Pour batter into prepared pan and smooth top. Bake for 30-35 minutes or until a toothpick inserted near the center comes out with moist crumbs, not raw batter. Cool completely.

Saturday, February 13, 2021

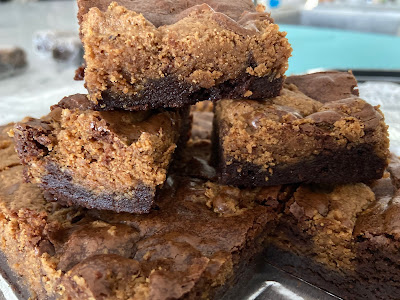
Almond Butter Swirl Brownies

Almond Butter Swirl Brownies - made August 2, 2020, modified from Vintage Kitchen Notes
If you want something different from the traditional peanut butter chocolate combination, try this brownie recipe that uses almond butter as the swirl-in.
Almond butter has a thicker consistency than peanut butter but the oil separates out more easily, especially if your jar of almond butter has been sitting for awhile. Make sure you whisk it to incorporate the almond oil back in if it's separated before measuring out and using.

Almond butter provides a more gritty texture than smooth peanut butter but the almond bits or "grit" are smaller than chunky peanut butter. This makes a fudgy brownie; the almond butter swirl breaks up a bit of the richness of the fudgy chocolate part of the brownie. I liked this one for the texture, the thickness with which the brownie baked into and the durability for mailing. Thumbs up.


Brownies
3/4 cup (4.5 ounces) semisweet chocolate, coarsely chopped
3/4 cup (12 tablespoons) unsalted butter
3/4 cup granulated sugar
3/4 cup dark brown sugar
3 eggs
2 teaspoons vanilla extract
1 cup (140 grams) all-purpose flour
1 1/2 tablespoons unsweetened cocoa powder

Almond Butter Swirl
2/3 cup almond butter
5 tablespoons (40 grams) powdered sugar
1/2 teaspoon vanilla
3 tablespoons heavy cream
  1. Preheat oven to 350 degrees F. Line a 9 x 9-inch baking pan with foil and lightly spray with nonstick cooking spray.
  2. Brownies: Melt the chocolate and butter in the top half of a double boiler set over hot water, whisking until melted, smooth and combined. Cool slightly.
  3. Mix in granulated sugar and brown sugar. Add eggs, vanilla extract and cocoa powder, mixing until combined. Add flour in two additions, mixing after each addition until just combined. Do not overmix. Spread batter evenly into prepared pan.
  4. Almond Butter Swirl: in a medium bowl, mix together almond butter, powdered sugar, vanilla and heavy cream until smooth. If mixture is too thick, warm for 20 seconds in the microwave and stir.
  5. Drop spoonfuls on top of the brownie base and swirl lightly with a knife. Do not overmix or blend.
  6. Bake for 25-30 minutes or until a toothpick inserted in the center comes out with a few moist crumbs. Do not overbake. Cool completely before cutting and serving.