Saturday, December 21, 2013

Kahlua Fudge

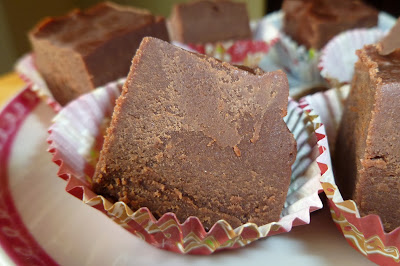
Kahlua Fudge - made December 14, 2013, recipe adapted from La Phemme Phoodie
I don't want to jinx myself but it's possible that I might have, just maybe, broken my fudge curse. You know the one where I can't make homemade fudge from scratch to save my life without it turning out dry, crumbly and grainy, or, if I use marshmallow creme, that it isn't so sweet that even my sweet tooth trembles in trepidation.
Jez's fudge recipe helped by not failing on me. Then this recipe for Kahlua Fudge from La Phemme Phoodie gave my fudge ego a nice little boost by coming out creamy and actually tasting like it had kahlua in it.  But in a good way. I changed up a couple of things to stack the fudge odds in my favor.  First, I let it boil for only a scant 5 minutes. I think the other times I've made fudge and let it boil for the full amount of time in the recipe, it's always come out a little too firm.  This time I didn't overboil it and while a bit soft at room temperature, newly chilled, it was just right. Even soft at room temperature was still a good creamy consistency. Second, this time I used mini chocolate chips for the semisweet chips.  That helped them melt faster and made for a smoother texture without me madly stirring it trying to get the chips to melt and having the fudge set too soon. The milk chocolate chips were still the regular size so they took longer to melt but still melted okay without too much effort.
Once I spread this in the pan and smoothed the top, I layered plastic wrap directly over the top so it wouldn't form a skin and let it cool. For once I left out the nuts even though I prefer my fudge with toasted almonds. But I wanted to see what it would taste like simply flavored with Kahlua. Although I don't drink, I don't have any issues with liqueurs like Kahlua or Grand Marnier or Godiva chocolate liqueuer (c'mon, it's Godiva. And chocolate) for flavoring. The Kahlua paired nicely with the chocolate and I like the creamy consistency.  At last, I finally made fudge how it should be.
1 1/3 cups granulated sugar
1 7-ounce jar marshmallow creme
2/3 cup evaporated milk
1/4 cup salted butter
1/3 cup Kahlua
1/4 teaspoon salt
2 cups semisweet chocolate pieces
1 cup milk chocolate pieces
1 teaspoon vanilla
  1. Line an 8" square pan with foil.
  2. In a 3 1/2-quart saucepan, combine sugar, marshmallow creme, milk, butter, Kahlua and salt. Bring to a rapid boil, stirring constantly for 5 minutes. Remove from heat; add all chocolate. Stir until melted. Add vanilla. Turn into prepared pan and smooth top.
  3. Cool on wire rack for 30 minutes and then refrigerate until firm. Cut into small squares and serve.

Thursday, December 19, 2013

My first foray into Penzey's

Penzey's - visited December 14, 2013
Do you have a Penzey's in your area? I had only heard about them recently from friends who loved to go there. Then I discovered there's a local one not too near me but within driving distance. I always meant to go but since it's farther away, I never made it. I'd fallen out of the habit of shopping just to shop so I couldn't justify driving there just to see the place. When one of my coworkers discovered I had never been but she knew how much I love to bake, her first reaction was "you've got to go to Penzey's!" And to help me see the light of what I was missing, she was kind enough to give me a gift card to Penzey's. It isn't like I needed an incentive to go but it did give me purpose and justification to make the drive over (thanks, Michelle!).
Which I did and it was fun. Penzey's is a spice shop but that seems like such a modest oversimplification to describe the store. Every conceivable spice lines their shelves, neatly arranged in some flavor palette that probably makes sense to most cooks. Spices, extracts and "powder" products commonly used in baking like cinnamon, nutmeg, pumpkin pie spice, apple pie spice, cloves, dried lemon peel, cocoa, and vanilla extract are neatly displayed in an area meant to emulate a kitchen. Spices for barbecues like jerk rub are in one section, other seasoning spices line up next to them.  If you're an avid cook, Penzey's is akin to FAO Schwarz for kids. I can see chefs and gourmands alike spending hours at Penzey's much like I geek out at the library or Williams Sonoma. I know so little about cooking that I can't even do justice to a description of Penzey's so if you have one near you, I'd say it's definitely worth a field trip.

I did appreciate all the baking spices though and stocked up on my favorite Vietnamese cinnamon as well as unsweetened Dutch process cocoa powder and lemon extract. Their prices were pretty reasonable, especially since I don't believe in buying spices in large containers. Spices are at their most flavorful when they're fresh and by the time you go through a bottle, it'll have lost some of its initial punch. It's better to buy spices in small containers and replenish them as needed. Says the person who has geriatric garlic powder in the spice drawer..... But hey, at least my cinnamon is used up and purchased fresh regularly.  Nothing but the best for my snickerdoodles.
Oh and if you're still shopping for Christmas gifts, if you have any cooks on your gift list and/or anyone who's gluten-free, dairy-free, vegan or has other dietary requirements and the usual food baskets won't do, spices are a great gift. Anyone who cooks at home can always use them and you can have fun picking which ones you think they'd like best.

Wednesday, December 18, 2013

A Different Kind of Lemon Doodles

Lemon Doodles - made December 14, 2013 from Chef in Training
Add this to the "I have a lot of lemons and more on the way to use up" list of recipes I was experimenting with since my initial lemon harvest (I plucked 4 more off my lemon tree this past weekend).  I had made a cookie called Lemon Doodles before but it was different from this one. This was more like a lemon sugar cookie or a lemon version of a snickerdoodle but with lemon zest instead of cinnamon to go with the sugar for the coating.  But what really pulled me towards this recipe is you use browned butter.  I've declared my love for browned butter many times already.  But browned butter paired with fresh lemon zest?  We might be talking a whole 'nother level of deliciousness.
And we would be talking sense because this made for a good flavor combination.  The lemon does tend to take over the flavor profile of the cookie but a discerning palate can still taste the browned butter. If you're the type to snitch cookie dough, you might have to pace yourself not to eat it all before any of it is baked. I don't eat cookie dough but this was one of those doughs where I could just stick my nose in the mixing bowl, inhale, and be happy.
The edges are crunchy and the middles are chewy. It really is like a lemon snickerdoodle but without the cinnamon. And as with snickerdoodles, don't overbake these.  They don't spread much so they'll stay puffy but to get that chewy texture, they need to be slightly underbaked.  I deviated from the directions and baked them at a lower temperature but for longer than the 7 minutes specified in the recipe.  At 7 minutes, the cookies were raw little dough balls just barely beginning to brown and still at the "I'm melting" stage rather than baked.
The main reason I didn't bake them at such a high temperature as the original directions said is I know 425 degrees is too hot in my oven and the cookies would likely burn on the outside while still remaining raw inside, especially with the sugar coating which is what aids in faster browning. Feel free to experiment what works best in your oven but keep an eye on these if you're going to play around with oven temps.
1 cup butter
1 cup granulated sugar
zest of 2 lemons
1/2 cup dark brown sugar, firmly packed
3 cups all-purpose flour
1 teaspoon baking soda
1/2 teaspoon salt
3 eggs
1 teaspoon vanilla extract

Coating
1/2 cup granulated sugar
zest of 3 lemons
  1. To make coating for cookie dough: Mash zest and sugar together with a fork to create lemon sugar.
  2. To make cookies: Start by browning butter. Melt 1 1/2 sticks of butter in a skillet over medium heat, stir continually until butter starts to foam and is light golden brown. Immediately remove from heat and add remaining 1/2 stick of butter to pan and set aside to cool.
  3. Line baking sheets with parchment paper and preheat oven to 425 degrees. (I baked mine at 375 degrees.)
  4. In the bowl of a stand mixer, combine sugar and lemon zest and mix on low speed until well combined.
  5. Add brown sugar, flour, baking soda, and salt. Mix dry ingredients together on lowest speed just until combined.
  6. Add cooled butter, eggs, and vanilla and mix again just until combined.
  7. Scoop out two tablespoons of dough and form into a ball. Roll balls in lemon sugar mixture to coat and place on cookie sheet. Flatten the cookie dough balls slightly by using the back of a measuring cup.
  8. Bake for about 7 minutes and let cool (I baked mine for 10-12 minutes). They are best slightly underdone. When they come out of the oven, the middle should fall in just a little and the cookie should crackle as it settles.

Tuesday, December 17, 2013

Peanut Butter Brookies

Peanut Butter Brookies - made December 13, 2013 from Shugary Sweets
When you have a lot of baked holiday gifts to give away, 9 x 13 cakes and brownies are a lifesaver, both because they're easy to make and because they can go a long way in a lot of gifts. I needed exactly that so it was a good time to test out Peanut Butter Brookies. "Brookies" are a combination of "brownie" and "cookie" in case you haven't come across that nomenclature before. "Crownies" are the cookie/brownie cutesy word combo.  Regardless of what you call it, the aim is to make the best of both worlds.
Chocolate and peanut butter are always a good flavor combination and usually how I like to eat anything with peanut butter: partnered with chocolate. I didn't have peanut butter chips in my pantry (about the only thing not in there) but I did have the last of the mini peanut butter cups from Halloween to clear out so that's what I used instead.  Plus they look cuter. Yes, I'm a girl and I like cuteness, even in baked goods.
In reading the recipe, I was fine with the brownie layer as it seemed like a standard brownie. I was a little more skeptical about the peanut butter layer because I have a prejudice against shortening but I know that's also a common ingredient in peanut butter cookies. So I went with it. Sometimes suspending skepticism is a good thing because these turned out deliciously. It actually worked to have the shortening in the peanut butter layer because that's what helped give it a little crisp-ness (not crispy but elements of a crisp texture) in part of the peanut butter layer. The brownie layer was wonderfully fudgy and the peanut butter layer offered both a flavor and texture complement that enhanced both layers. All in all, a good offering for the peanut butter chocolate lovers on your gift list.
Brownie layer
1 cup granulated sugar
3/4 cup all-purpose flour
3 large eggs
1/2 cup unsalted butter, melted
2 cups semi-sweet chocolate morsels

Peanut butter cookie layer
1/2 cup butter flavored Crisco
2 tablespoons unsalted butter, softened
2 tablespoons milk
1 tablespoon vanilla extract
1/4 cup granulated sugar
1 cup light brown sugar
3/4 cup creamy peanut butter
1 large egg
1 3/4 cups all-purpose flour
1 teaspoon salt
2 teaspoons baking powder
1 cup peanut butter morsels
8oz bag Reese's mini peanut butter cups
  1. For the brownie layer, melt chocolate chips with 1/2 cup butter for 1 1/2 minutes in microwave safe glass bowl. Stir until smooth. Add sugar, flour and eggs and combine completely.
  2. Pour into a 13x9 baking dish lined with parchment paper.
  3. For the cookie dough, beat shortening with 2 tablespoons butter. Beat in milk, vanilla, sugars, peanut butter and egg. Add flour, salt and baking powder. Fold in peanut butter morsels and Reese's mini PB cups.
  4. Drop cookie dough onto brownie batter layer. Smooth evenly.
  5. Bake in a 375 degree oven for 35-40 minutes. Remove and cool completely. Refrigerate and cut into bars.

Monday, December 16, 2013

Bakery Review: Smith Island Baking Company

Smith Island Baking Company - December 13, 2013
I meant to get this post up earlier but ironically, I've been so busy with baking over the weekend that I haven't had time to write up much of what I'm doing. Although I also didn't get this cake until last Friday so I couldn't have written it up before then anyway :).
Are you still shopping for Christmas gifts?  The thought of going to the mall making you break out in hives yet you still need to solve your gift conundrum?  Don't know what to get for someone who has everything and doesn't want more "stuff"? Need to send a gift to far-away friends and/or relatives but shudder at the thought of lining up at the post office to mail something? In those situations, I always give food, notably food gifts I can order online and have shipped directly to my recipients.
Enter the Smith Island Baking Company. I saw an article online that listed the top 10 food gifts to give and their coconut cake was one of them. Coconut? My ears, ears and taste buds all stood to attention. I always send my former college roommate, Caroline, a foodie gift for Christmas and her birthday.  She's better than I am in sourcing online places to order from but this time I felt this would be an inspired gift. I had never heard of the Smith Island Baking Company but after going to their website and reading about their story (I highly recommend anyone interested in small businesses to go check it out), I had to try it, not only as a gift for Caroline but yup, I had to get one for me too.
Perfectly packaged for shipping and arriving intact
In a pure moment of serendipidity, for the first time, I also heard of Foodydirect.  They're a local company based in Menlo Park, CA and while I was "out shopping" on Cyber Monday, I discovered Foodydirect and, more importantly, their $10 off coupon for first-time customers.  And most relevant of all, the Smith Island Baking Company was one of their foodie partners I could order from. A match made in culinary heaven.  Foodydirect is currently running a promotion and you can get $15 off your first purchase if you use this referral link (Note: I'm not associated with Foodydirect or the Smith Island Baking Company - I just like to eat....)
Not too much frosting - yay
I placed the order for Caroline to arrive the first week of December but scheduled mine to arrive last Friday. I knew I wouldn't - and shouldn't - eat the whole cake by myself so I scheduled it to arrive when I was making up all my baked goods holiday gifts so I could include slices of the cake with my gifts. Some may call it cheating but I call it still fitting into my clothes by Christmas. I believe in sharing the calories.
The "normal" size piece which actually turned out to be a lot of cake
As you can tell from the pictures above, the cake came very well packaged. The outer box was wedged in amidst dry ice packs inside a styrofoam shipping container, it sat on a cardboard circle, the coconut-dusted frosted sides were wrapped with cardboard all around it and the whole thing was encased in sealed plastic. Not a shred of coconut was allowed to move. Their website says the cakes are frozen as soon as they're assembled then shipped UPS 2nd Day Air when ordered to ensure freshness on arrival. I must admit to their truth in advertising as when the cake arrived on my doorstep, it was still pretty cold and firm to slice. It's actually best to slice it when it's still in that state because with this many layers, it's easy to get more misshapen if you cut it when it's completely thawed.
The Smith Island Baking Company bakes each of those thin layers you see above individually.  So it isn't like they bake one tall round cake and slice it into layers using the dental floss method. They bake every single layer separately then assemble it with frosting and coconut. That kind of effort and attention to detail is almost mind-boggling even to a baker like me but I must say, it was worth every bit of work because this cake was amazing. I loved the taste, the softness of the texture, the mouthfeel, and the chewiness of the coconut. There isn't too much frosting which is usually my issue with cakes; it didn't need a lot because there were so many layers than a very thin frosting layer between each cake layer was perfect. The only drawback - and yes, I know this is a First World problem - is with this many layers, it's hard to slice a thin slice without crumbling or smushing the cake.  Yet if you cut a "normal" slice, there are also so many layers that it actually makes for a lot of cake.  My eyes were bigger than my stomach (although, er, my stomach is feeling like it's catching up quite nicely) and I cut a "normal" piece.  It took me all afternoon over 4 sittings to finish it. It was delicious but even I have a sugar stopping point. I ended up slicing the cake and giving the rest away so I could share the deliciousness with family and friends. I'm so glad I discovered this bakery and am giving myself 6 months before I plunge back in and order their original yellow cake with fudge frosting. Just to see what that's like of course.

Sunday, December 15, 2013

Red Velvet Cheesecake Brownies revisited

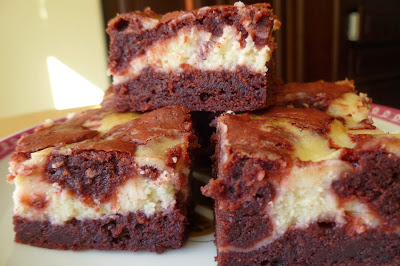
Red Velvet Cheesecake Brownies - made December 14, 2013 from Sweet Pea's Kitchen
I've pretty much been baking almost nonstop all weekend. I think I took a break for showers, church, an emergency run to Costco for more eggs and a little sleep. Although I'm somewhat loopy from lack of sleep so it really was just a little sleep.  But I got all the baking done for gifts I gave away to folks at church this morning and now, at the end of a long afternoon and evening of baking, I have 3 care packages of baked goods to mail out as well as baked gifts for my coworkers tomorrow, a friend I'm meeting for lunch (plus one extra goodie bag for her to take to a mutual friend back at their office) and another friend I'm meeting for dinner.
As part of some of the baked gifts, I made these Red Velvet Cheesecake Brownies. I've had this on my pinterest board for awhile and I thought I was testing out a new recipe but it appears I made these just over a year ago and simply forgot. Easy to do when I bake so much. But I'm glad to have resurfaced them again as these turned out pretty well.  I only had a sliver half the size of my pinky but it was enough to confirm they're good.  And I don't even like cheesecake.  But the brownies were a perfect foil for the cheesecake portion and they're suitably Christmas-y in all their red velvet glory.  The search function on blogger hasn't been working the last couple of days and I don't know when it'll be fixed so I'll save you the trouble of searching for it - just click on the post title link and it'll take you to the recipe.  Enjoy.
And in case you're wondering what I've been up to, besides these brownies, here's what I've made in the last 48 hours:
Lemon Chip Cookies
Lemon Doodles
Sour Cream Fudge Cake (recipe to follow in a future post)
Lemon Bars
Peanut Butter Brookies
Browned Butter Crinkles (recipe to follow in a future post)
Kahlua Fudge

I made enough of the above to give to 23 people and package them up in Christmas splendor in all the treat bags and boxes I bought on sale after Christmas last year. And clean up my kitchen back to a presentable state. Eek, no wonder I'm tired. But in a good way. I didn't take a picture of everything because I'm too tired. And my camera doesn't have a wide angle lens, haha.

Saturday, December 14, 2013

Restaurant Review: Kotetsu Ramen

Kotetsu Ramen - lunch on December 5, 2013
Is it cold where you live?  We generally have mild weather but we've been experiencing a cold snap lately. And there's something about chilly weather that puts hot soup or, in this case, hot ramen, at the top of my comfort food list.
When my coworker and I went to Thaibodia for lunch last month, we noticed a line of people waiting outside of Kotetsu which is located in the same strip mall.  Naturally, when you see a bunch of people waiting to get into a restaurant, you figure there's something there worth eating. We agreed we needed to check it out so the next time we both had an available lunch hour, we headed to Kotetsu. Since we didn't have the luxury of time to wait to be seated, we deliberately went early and were fortunate to get a table right away as the restaurant wasn't full yet.
Sea Salt based Kotetsu Ramen
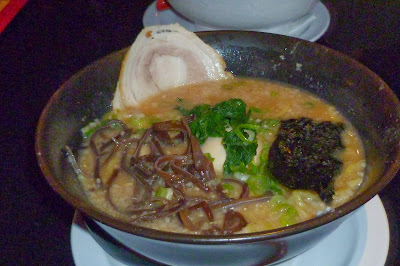
We each got the standard Kotetsu ramen since this was our first visit and we "had" to get the restaurant's namesake order. They offer ramen in two types of broth: sea salt based and soy sauce based. I went with the soy sauce base and my coworker ordered the sea salt base. Although it's hard to tell from the pictures, each bowl of ramen comes with a whole, soft-boiled egg along with the noodles, a few slices of meat (typically chicken or turkey), and some greenery that, being me, I usually set aside.  For the egg, the white is fully cooked and the yolk is still soft and a little runny but continues cooking in the hot broth.
Soy Sauce based Kotetsu Ramen
What made this a good bowl of ramen were the noodles.  They were the perfect texture with a nice chewiness. When you think "ramen", generally those cheap Top Ramen packs come to mind but that would be an insult to Kotetsu.  Their ramen was satisfying chewy, not too hard but not mushy soft either. My soy-sauce based broth was also good.  But have you ever noticed that the first few sips of broth are the best? By the time I forked up the last bit of noodles and the broth was getting low in the bowl, it had become a little too salty for me. But for less than $10, this was a decent place for lunch.  I do advise getting there before noon though.  By the time we left, the tables were all full and there were at least a dozen people milling around outside waiting to be seated.

Friday, December 13, 2013

Sweet and Sour Chicken from Mel's Kitchen Cafe

Sweet and Sour Chicken - made December 7, 2013 from Mel's Kitchen Cafe
I'm deep in the throes of the holidays and baking.  We're also incredibly busy at work so I have to fit everything in after my day job.  Normally at this time of year, because of the time crunch, I virtually live on takeout or eating out with friends out of both sociability and sheer survival.

But I did manage to fit in making this quick and easy sweet and sour chicken recipe from Mel's Kitchen Cafe.  It's very similar to one I've made in the past in terms of ingredients and preparation so it was no surprise that it also tasted the same. I like both versions. Served over brown rice, it's perfect for the times I'm too busy to do more than throw something in the microwave for lunch or dinner and eat on the run. (Um, that would be every day between Thanksgiving and Christmas.)
Chicken
3-4 boneless, skinless chicken breasts
Salt and pepper
1 cup cornstarch
2 large eggs, beaten
1/4 cup canola oil

Sauce
3/4 cup granulated sugar
4 tablespoons ketchup
1/2 cup apple cider vinegar
1 tablespoon soy sauce
1 teaspoon garlic salt
  1. Preheat the oven to 325 degrees F.
  2. Heat the oil in a large skillet over medium heat. While the oil is heating, cut the chicken breasts into 1-inch pieces. Season with salt and pepper. Place the cornstarch in a gallon-sized ziploc bag. Put the chicken into the bag with the cornstarch and seal, tossing to coat the chicken. Whisk the eggs together in a shallow pie plate. Dip the cornstarch-coated chicken pieces in the egg and place them carefully in a single layer in the hot skillet. Cook for 1-2 minutes and then flip each piece over to cook on the other side until nicely golden but not all the way cooked through. Place in a single layer in a baking dish and repeat with the remaining chicken pieces.
  3. Mix the sauce ingredients together in a medium bowl and pour over the chicken in the baking dish. Bake for one hour, turning the chicken once or twice while cooking to coat evenly with sauce. Serve over hot, steamed rice.

Thursday, December 12, 2013

Almond Nutella Fudge

Almond Nutella Fudge - made December 7, 2013, recipe adapted from Jez
Remember my epic fudge fail? I told myself I would try that recipe again and make it right but it's been two years and the trauma hasn't faded so I never did give it another shot. Truth be told, I don't think I've even made any kind of fudge since then. Not sure if I was really that traumatized or just risk averse and wanted to make other things  that had a higher chance of success.
But I got this recipe from one of the ladies on my online fitness board who's also a baker so I was willing to give making fudge from scratch another chance. I modified her original recipe which called for peanut butter and instead substituted in the same amount of nutella. I also added whole toasted almonds for additional flavor and texture.

Thankfully, my fudge curse may have been broken as I thought this turned out really well. There was a hold-my-breath moment when it seemed like the fudge was going to be dry and not creamy once it had lost its initial gloss after I melted and beat in the chocolate chips and nutella but the moment passed and I could exhale. The fudge was a trifle more firm than creamy but it wasn't dry or crumbly. I think the firmness might've been due to the nutella substitution as it was also cold in my kitchen when I was making this (I'm notoriously cheap about not turning on my heater until I'm practically blue from frostbite) so the fudge mixture cooled more quickly than I anticipated before I was able to get the chips fully melted and the nutella incorporated. Despite the marshmallow creme, this wasn't too sweet. You can't really taste the nutella either though so I think it was more to add creaminess than flavor to the fudge. I will have to try the peanut butter version shortly and see how the flavor turns out.  Plus I need more fudge for my holiday gifts as I took this batch of fudge into work today and it's all gone. Jez says this freezes well so it's a good do-ahead recipe; it's definitely a keeper.
1 7-ounce jar marshmallow creme
1 1/2 cups granulated sugar
2/3 cup evaporated milk
1/4 cup butter
1/4 teaspoon salt
1 cup milk chocolate chips
1 cup semisweet chocolate chips
1 cup nutella
1 teaspoon vanilla extract
1 cup whole almonds, toasted, optional
  1. Line an 8 x 8 baking pan with foil and set aside.
  2. In a large saucepan over medium heat, combine marshmallow creme, sugar, evaporated milk, butter and salt. Bring to a full boil, and cook for 5 minutes, stirring constantly.
  3. Remove from heat and pour in the chocolate chips and nutella. Stir until the chocolate is melted, the nutella is combined and the mixture is smooth. Stir in the vanilla. Add toasted almonds if desired. Pour into prepared pan and smooth. Chill in refrigerator for 2 hours or until firm.


Wednesday, December 11, 2013

Restaurant Review: Steins Beer Garden

Steins Beer Garden - dinner on December 3, 2013
I don't drink so it might seem odd that I'd go to a restaurant called a beer garden but I was meeting my friends Todd and Jenny for dinner and that was one of the choices Todd suggested. I had never been there before but I looked up the menu, saw "burger" as one of the choices and wanted to try it.  This would be Chocolate Chip Cookie Todd for anyone keeping track of the friends I bake for, not to be confused with Oatmeal Chocolate Chip Cookie Rick or one I haven't talked much about, Lemon Bar Bryan. I don't actually call my friends by these names, at least not to their faces, just for my blog so you know who I'm talking about and what I'm baking when I meet them.
Inside Steins
Anyway, Steins Beer Garden. It's one of many restaurants around Castro St in Mountain View, also home to Xanh, one of my go-to places for good food.  Steins is rather large with both indoor and outdoor seating. It was a cold night when we went so we opted for indoor seating. The restaurant offers pretty straightforward food: mostly burgers, sandwiches, salads and a few meat, chicken and fish entrees. I opted for the burger with my usual stripped-down modifications: hold the aioli, tomato and onions.  The lettuce is fine.  Add the cheese. It was served on a brioche bun and was delicious.  A bit juicy/greasy but honestly, that's what makes a burger good, right?  As for the brioche bun that the burger came on, well, while my brain knows it adds that many more calories, my taste buds don't care. It might actually even be a better burger than the one I've had at Birk's. Birk's burger is good too but different.  Steins' burger wasn't as "spread out" as Birk's and was more compact but thicker. Todd and Jenny also approved of their orders, the salad and the Herb Marinated Grilled Flank Steak sandwich respectively.
My burger (and yes, I took the pickles off)
Todd's salad
Jenny's flank steak sandwich
And of course we ordered dessert.  Their dessert menu isn't posted online so I suspect they change it up to reflect the seasons.  Jenny ordered the pumpkin cheesecake and I got the fried apple pies with vanilla ice cream (remember fall is the best time to order anything with apples since they're in season then). I forgot the official name of the cake Todd ordered (I really must remember to write these things down at the time if I want to blog about it later) but it was a multi-layer vanilla cake filled with hazelnut filling, covered with chocolate frosting and garnished with hazelnuts. I think it had Prince or Regent in the title. That was good too when I tried a bite but I stayed loyal to my fried apple pies.  If you're ever nostalgic about those flaky apple pies from McDonalds, this is the upscale version of them.  Served warm and dusted with cinnamon sugar, paired with vanilla ice cream....yum. There were only two little pies but since the burger was pretty filling, I can't complain about the serving size since it was just right.
Fried Apple Pies a la mode
Multi-layer Hazelnut Cake
Pumpkin Cheesecake
Even beyond the food, this is a perfect happy hour place. Aside from the fact that they have a plethora of beer selections (none of which I looked at since I don't drink), it's got a very open floor plan and gives off a cozy vibe.  Todd is the king of happy hours and I instantly thought it was his kind of place. He agreed.
Todd's beer