Tuesday, October 12, 2010
"Walnut" Butter Shortbread
So…..remember my regular harping about not liking to use nuts in baked goods? Well, forget about that for this post because in this recipe, nuts are a critical component that make it tasty. The original recipe calls for walnuts (hence the title) but my aversion to walnuts remain. Apparently I can’t change all my leopard-like spots at once. Not to knock walnuts but they’re too bitter for my taste. Pecans rule for this shortbread cookie. Toast the pecans first to bring out their flavor. The trick to toasting nuts? You have to rely on your sense of smell. You can time them but the best way to tell if the nuts are properly toasted is if they smell really good. That might seem frustratingly vague but try toasting nuts a few times and you’ll know what I mean. If you don’t toast them long enough, they’ll smell good but not really fragrant. If you have to stick your nose all the way into the pan to get the smell, then the nuts aren’t toasted enough. If you overtoast them, they’ll look and smell burnt. Depending on your oven, and if you want to be cautious, try toasting them for 7-10 minutes and keep checking if they should be toasted longer. But ultimately, follow your nose. Once the nuts are toasted, let them cool completely before you even start making the shortbread dough. If they’re even the slightest bit warm when you use them, they can melt your dough and you don’t want that. Plus it’s easier to chop them finely when they’re completely cool. I use my nut grinder to chop them up in less than 30 seconds. If you haven’t already, invest in a nut grinder. They’re less than $10 and will save you a lot of time.
These are the easiest shortbread cookies to make – the recipe is from the CIA (Culinary Institute of America) so it makes a lot but you can easily halve the recipe. The directions are pretty succinct but easy enough to follow. And you will need a food scale to measure the ingredients. My recipes from CIA are almost always based on weight, not volume since that's the most accurate measure. What I like about this recipe is the dough handles really well, i.e. it isn’t too sticky. Shape them into round or square logs, wrap them in wax paper and freeze them. When you’re ready to bake them, let the dough thaw slightly. If you cut the cookie logs while they’re too frozen, the dough will crumble. If you let it thaw too much, the dough may be soft and the log will start to lose its shape as you cut it. One trick I learned in culinary school is to keep turning the log as you make each slice so you can “re-shape” it back into the log instead of having one side flatten as you keep cutting.
The toasted pecans bring out a wonderful flavor to complement the buttery richness of the shortbread. Don’t underbake these (one of the few times you’ll see me write that) as the key to good shortbread is the “snap” of the cookie and you’ll only get that if you bake them long enough. I bake mine until the tops look a little dry and the underside is slightly golden brown. When they’re cool, they’re crisp without being hard. You can make these cookies plain and they make for tasty little tea cookies. However, this time around, I sandwiched these with a little dulce de leche. My parents just got back from South America and per my request (“PLEASE, Mom, all I want is dulce de leche”), they brought me back a couple of cans from Buenos Aires. I love dulce de leche. It goes really well with these cookies in terms of flavor and texture contrast. The only thing I would caution is you should put these together as a sandwich cookie at the very last minute before serving. Otherwise the filling (whether it’s dulce de leche or not) will soften the shortbread cookies over a few hours and you’ll lose the crispness and texture contrast. They’ll still taste good even if they’re not crisp but if you like the cookies crisp, wait until the last minute.
As the holidays approach, if you want some time-saving tips, make the dough ahead of time and wrap in wax paper before putting in the freezer, bake it the day you’re planning to serve it, put in airtight containers after they cool (Ziploc bags work really well) then sandwich them with the filling right before serving. This is also a good recipe to make with kids if you want a family activity since the dough is easy to put together, you just slice the cookie logs (no messing with flouring a cutting board, rolling out dough and cutting out cookies), and the kids can spread the filling and sandwich the cookies together.
Oh, and in case you’re not planning to go to South America any time soon, dulce de leche is available in the States. I’ve gotten the pricey jars at Williams Sonoma ($10 a jar - eek) but have been told they’re also available at Cost Plus World Market and I imagine they’re cheaper there. When my mom found that out, she wanted to know why I wanted her to bring dulce de leche back from South America when I could get it here. “But Mom, you were going to be in South America anyway….” Besides, I’d rather have dulce de leche than a t-shirt or a mug :).
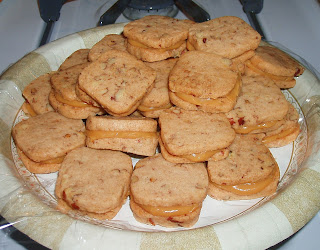
1 lb soft butter
8 ozs brown sugar
1 lb, 4 ozs all-purpose flour
3 ozs cornstarch
1 teaspoon salt
2 teaspoons cinnamon
2 teaspoons vanilla
8 ozs walnuts, chopped
1. Cream butter and sugar. Sift dry ingredients together and add to the above. Add walnuts and vanilla to the batter; mix just until combined.
2. Shape dough into bricks. Refrigerate until firm. Slice ¼” thick, lay on paper.
3. Bake at 350˚F for ~15-18 minutes.
Sunday, October 3, 2010
Butterscotch Flip
7 tablespoons unsalted butter
1/3 cup bittersweet chocolate chips
2 large eggs
½ cup granulated sugar
½ teaspoon pure vanilla extract
1/3 cup unbleached flour
Pinch of salt
¼ cup semisweet chocolate chips
Top layer
4 tablespoons (½ stick) unsalted butter
1 large egg
¾ cup packed light brown sugar
¼ teaspoon pure vanilla extract
½ cup unbleached flour
Pinch of salt
½ teaspoon baking powder
¼ cup butterscotch chips
1. Grease a 9-inch x 9-inch baking pan with butter. Dust with flour and tap out the excess. Preheat the oven to 350˚F.
2. To make the bottom brownie, melt the butter and bittersweet chocolate chips together in a small saucepan over low heat, stirring frequently. Remove from the heat and set aside to cool.
3. Cream the eggs, granulated sugar and vanilla together until smooth. Add the cooled chocolate mixture and continue mixing until well blended.
4. Measure the flour and salt and sift together directly into the batter. Mix gentle until well combined and no trade of the dry ingredients remains. Stir in the semisweet chocolate chips by hand, if desired. Spread the batter evenly in the prepared baking pan and set aside.
5. To make the top layer, melt the butter in a small pan or in the microwave. Beat the egg, brown sugar and vanilla together until light and fluffy. Add the melted butter and continue beating until well combined.
6. Measure the flour, salt and baking powder and then sift directly into the batter. Mix gently until well combined and no trace of the dry ingredients remains. Stir in the butterscotch chips by hand. With a spatula, spread the batter over the bottom layer in the prepared baking pan and smooth to the edges.
7. Bake for 32 minutes or until a toothpick inserted in the center comes out clean or with only crumbs, not batter, on it. The top should be a golden butterscotch color.
8. Remove from the oven and let cool on a rack for 1 hour. Cut just before serving.
Makes 12 to 16 bars
Saturday, October 2, 2010
Oatmeal Caramel Bars
Oatmeal Caramel Bars - made September 26, 2010 from Cookies by Better Homes & Garden
2 ½ cups all-purpose flour
2 cups packed brown sugar
2 eggs
2 teaspoons vanilla
1 teaspoon baking soda
3 cups quick-cooking rolled oats
1 6-ounce package (1 cup) semisweet chocolate pieces
½ cup chopped walnuts or pecans
24 vanilla caramels (7 ounces)
2 tablespoons milk
1. In a large mixing bowl beat the butter with an electric mixer on medium to high speed about 30 seconds or until softened. Add about 1 cup of the flour to the butter. Then add the brown sugar, eggs, vanilla and baking soda. Beat till thoroughly combined, scraping sides of bowl occasionally. Beat in the remaining flour. Stir in the rolled oats.
2. For crust, press two-thirds (about 3 1/3 cups) of the oat mixture into the bottom of an ungreased 15 x 10 x 1-inch baking pan. Sprinkle with the chocolate pieces and nuts.
3. In a medium saucepan combine the caramels and milk. Cook and stir over low heat till the caramels are melted. Drizzle the caramel mixture over the chocolate and nuts. Drop the remaining oat mixture by rounded teaspoons on top of the caramel layer.
4. Bake in a 350˚F oven about 25 minutes or till top is lightly browned. Cool in pan on a wire rack. Cut into bars. Makes 60.
Banana Cake with Chocolate Frosting
2 cups all-purpose flour
1 teaspoon baking soda
1 teaspoon baking powder
¼ teaspoon salt
¾ cup (1 ½ sticks) butter, softened
1 ½ cups sugar
3 eggs, lightly beaten
½ cup buttermilk
1 ½ cups mashed ripe bananas
Chocolate Frosting
½ cup (1 stick) butter
1/3 cup cocoa
1/3 cup evaporated milk or half-and-half
4 cups sifted confectioners’ sugar
1 teaspoon vanilla extract
1. To make the cake, heat the oven to 350˚F. Grease and flour two 9-inch round cake pans. Combine the flour, baking soda, baking powder and salt in a medium bowl, and stir with a fork to combine well.
2. In a large bowl, combine the butter and sugar, and beat well, about 2 minutes. Add the eggs, one by one, and then the vanilla. Beat well for 2 to 3 minutes more, scraping down the bowl occasionally, until you have a smooth batter.
3. Using a large spoon or spatula, stir in half the flour just until it disappears into the batter. Stir in the buttermilk, and then the remaining flour, the same way. Quickly and gently fold in the mashed bananas, and then divide the batter between the 2 cake pans.
4. Bake at 350˚F for 25 to 30 minutes, until the cakes are golden brown, spring back when touched lightly in the center, and begin to pull away from the sides of the pans.
5. Cool for 10 minutes in the pans on wire racks or folded kitchen towels. Then turn out onto wire racks or plates to cool completely, top side up.
6. To make the frosting, in a medium saucepan, combine the butter, cocoa, and evaporated milk. Place over medium heat and bring to a gentle boil. Cook, stirring often, for about 5 minutes, until the cocoa dissolves into a dark, shiny essence. Remove from the heat and stir in the confectioners’ sugar and vanilla. Beat with a mixer at low speed until you have a smooth, thick frosting.
7. To complete the cake, place one layer, top side down, on a cake plate or serving plate, and spread about 1 cup of frosting evenly over the top. Cover with the second layer, placed top side up. Spread the frosting evenly, first over the sides and then covering the top of the cake.
Sunday, September 26, 2010
Brickle Bars
2 squares (2 ounces) unsweetened chocolate
1 cup sugar
2 eggs
1 teaspoon vanilla
¾ cup all-purpose flour
¾ cup almond brickle pieces
½ cup miniature semisweet chocolate pieces
1. In a medium saucepan melt the butter and chocolate over low heat, stirring frequently. Remove from heat. Add the sugar, eggs and vanilla. Using a wooden spoon, lightly beat just till combined (don’t overbeat or brownies will rise too high, then fall). Stir in the flour.
2. Spread batter into a greased 8 x 8 x 2-inch baking pan. Sprinkle with almond brickle pieces and chocolate pieces. Bake in a 350˚F oven for 30 minutes. Cool in pan on a wire rack. Cut into bars. Makes 16.
Thursday, September 23, 2010
Pearl Mae Oakley's Coconut Cake
3 cups all-purpose flour
2 teaspoons baking powder
½ teaspoon salt
1 teaspoon vanilla extract
1 cup milk
1 cup (2 sticks) butter, softened
2 cups sugar
4 eggs
Coconut Icing
2 cups sugar (or 1 cup if you are using sweetened shredded coconut)
1 cup milk
Butter the size of an egg (¼ cup)
About 3 cups grated fresh coconut or sweetened shredded coconut
1. To make the cake, heat oven to 350˚F. Grease and flour two 9-inch round cake pans and set aside. In a medium bowl, combine the flour, baking powder, and salt and use a fork to mix them together well. Stir the vanilla into the milk.
2. In a large bowl, beat the softened butter with a mixer at high speed until creamy. Add the sugar gradually, stopping to scrape down the bowl, and continue beating until the mixture is evenly combined. Add the eggs, one by one, beating well each time, until the mixture is thick and smooth.
3. Add about one third of the flour mixture to the batter and beat well with the mixer at medium speed. Then add about half the milk to the batter, beating well. Continue beating as you add another third of the flour mixture, the remaining milk, and then the remaining flour mixture. Beat well until very thick and smooth.
4. Quickly scrape the batter into the prepared cake pans, dividing it evenly, and place them in the oven. Bake at 350˚F for 25 to 30 minutes, until the cakes are golden, spring back when touched lightly in the center and begin to pull away from the sides of the pans.
5. Remove from the oven, and cool the layers in the pans on wire racks or folded kitchen towels for 10 minutes. Then turn out the cake onto wire racks or plates, top side up, and cool completely.
6. To make the icing, combine the sugar, milk and butter in a medium saucepan, and cook over medium heat, stirring now and then, until the sugar dissolves and everything melts into a smooth, velvety icing, 3 to 4 minutes. Stir in the grated coconut and set aside.
7. To complete the cake, place one layer, top side down, on a serving plate, and spoon about half the icing over the cake. Place the second layer over the first, top side up, and spoon the remaining icing over its surface. Work slowly, allowing the icing to soak into the cake a bit. Continue spooning icing over the cake, allowing it to run down the sides as it will. Let stand for about 1 hour before cutting.
Wednesday, September 22, 2010
Caramel Witches
½ cup plus 1 tablespoon bittersweet chocolate chips
3 large eggs
1 cup plus 1 tablespoon granulated sugar
1 teaspoon pure vanilla extract
½ cup coarsely chopped pecans (optional)
½ cup unbleached flour
Pinch of salt
30 caramel squares
2 tablespoons lukewarm water
1. Grease a 9-inch x 9-inch baking pan with butter. Dust with flour and tap out the excess. Preheat the oven to 350˚F.
2. Melt the butter and chocolate in a small saucepan over low heat, stirring frequently. Remove from the heat and let cool to room temperature.
3. Meanwhile, beat the eggs, sugar and vanilla until smooth. Add the cooled chocolate mixture and mix until well combined. If desired, stir in chopped pecans by hand.
4. Measure the flour and salt and then sift together directly into the chocolate mixture. Mix until well combined and no trace of the dry ingredients remains.
5. Pour half of the batter evenly in the prepared baking pan; it will be about ¼” high. Set the pan aisde.
6. Unwrap the caramels and put them in a microwaveable bowl with the water. Microwave on medium power and check every 60 seconds or until the caramels have melted into a thick liquid. Remove the bowl from the microwave and let cool for 5 minutes. Whisk the caramel with a fork to get a consistent texture. Pour the caramel over the batter in the pan. Don’t go all the way to the edges and don’t worry about covering every spot. Place the pan in the refrigerator for 20 minutes, allowing the caramel to set.
7. Remove the pan from the refrigerator and spread the remaining half of the batter evenly over the caramel using a spatula. Let the pan sit for 15 minutes to come to room temperature before putting it in the oven.
8. Bake for 35 minutes or until the brownies begin to pull away from the sides of the pan.
9. Remove from the oven and cool on a rack for 1 hour. Right before serving, I suggest cutting 18 pieces since they are rich and satisfying!
Makes 12 to 18 brownies
Saturday, September 18, 2010
Fat Witch Brownies
Fat Witch Brownies - made September 15, 2010 from Fat Witch Brownies by Patricia Helding
THESE are the brownies I initially wanted to make from the Fat Witch recipe book. These are the original Fat Witch brownies. I did an emergency run to Costco after work so I could get chocolate chips (and butter, sugar and eggs) so I'd be prepared for the plethora of new brownie recipes I plan to try from this book. What I found surprising with this recipe is the relatively small amount of chocolate used in proportion to the butter and the fact that the chocolate component comes from chocolate chips. I'm used to my better brownie recipes having an almost equal ratio of butter to chocolate and the chocolate is typically high-end baking chocolate, not chips. I didn't have high-end chips (Costco doesn't carry them) and didn't have time to pop over to Williams Sonoma or Sur La Table so I stuck with good old Nestle Tollhouse chocolate chips in the massive bag from Costco.
Let me say this recipe is true to the Fat Witch brownies I've tried from Fat Witch bakery. The texture is fudgy and dense as a good brownie should be and the richness comes from all that butter. I hovered over the oven during the last few minutes as I didn't want to overbake these and they came out just right in terms of fudginess. The only thing I would probably play with in future trials is I wasn't wild about the flaking of the top crust. According to Shirley Corriher of Bakewise and Cookwise fame, that "meringue-like" flaking comes from beating the eggs and if you want to minimize it, you have to minimize the beating of the eggs once they're added to the batter. This recipe calls for beating the eggs from the first step and you keep beating the mixture as you add more ingredients. I'll have to figure out how to get around that. Some people like that flaking on top. I don't particularly care for it. Regardless, it doesn't detract from the deliciousness and richness of the brownie.
Oh, one other note - the recipe calls for baking in a 9 x 9" pan. I used an 8 x 8" pan instead to make thicker brownies.
14 tablespoons (1 ¾ sticks) unsalted butter
½ cup plus 2 tablespoons bittersweet chocolate chips
1 ¼ cups granulated sugar
4 large eggs
1 teaspoon pure vanilla extract
½ cup plus 2 tablespoons unbleached flour
Pinch of salt
1. Grease a 9-inch x 9-inch baking pan with butter. Dust with flour and tap out the excess. Preheat the oven to 350˚F.
2. Melt the butter and chocolate in a small saucepan over low heat, stirring frequently. Set aside to cool.
3. Cream the sugar, eggs, and vanilla together. Add the cooled chocolate mixture and mix until well blended.
4. Measure flour and salt and then sift together directly into the chocolate mixture. Mix the batter gently until well combined and no trace of the dry ingredients remains.
5. At this point, if desired, stir in any extras like walnuts.
6. Spread the batter evenly in the prepared baking pan and bake 33 minutes or until a toothpick inserted in center comes out clean or with only crumbs, not batter, on it.
7. Remove from the oven and cool on a rack for 1 hour. Cut just before serving.
Makes 12 to 16 brownies
Cakey Brownies
4 ounces unsweetened chocolate
1 cup granulated sugar
2 large eggs
2 teaspoons pure vanilla extract
¼ cup whole milk at room temperature
1 cup unbleached flour
½ teaspoon baking powder
Pinch of salt
1. Grease a 9-inch x 9-inch baking pan with butter. Dust with flour and tap out the excess. Preheat the oven to 350˚F.
2. Melt the butter and chocolate in a small saucepan over low heat, stirring frequently. Set aside to cool.
3. Cream the sugar and eggs together. Add the vanilla and milk and mix well. Add the cooled chocolate mixture and mix until well blended.
4. Measure the flour, baking powder and salt and then sift together directly into the chocolate mixture. Mix the batter gently until well combined and no trace of the dry ingredients remains.
5. Spread the batter evenly in the prepared baking pan and bake for 20 minutes or until a toothpick inserted in center comes out clean or with only crumbs, not batter, on it.
6. Remove from the oven and cool on a rack for 1 hour. Cut just before serving.
Makes 12 to 16 brownies
Tuesday, September 14, 2010
Gigi's Fabulous Caramel Cake
I almost didn't want to make this blog post because this recipe turned into a half-failure and I hate when that happens. But failure and confession is good for the soul and I decided I needed to 'fess up. Not everything I make turns out but I learn from it for next time and that's all I can ask. For one thing, the cake itself lives up to its name and it really is fabulous. If you want a good vanilla cake, make this cake. Only don't make it with this frosting because that's the failure part. I'm not quite sure what I did wrong or whether it's the recipe or really me. I followed the instructions almost to the letter. The almost part is I substituted whole milk for the evaporated milk. I also only used half the frosting recipe since I was making this as a 9 x 13 cake and not as two round layer cakes. But I still don't think that accounted for the colossal failure that was my caramel frosting.
Here's the picture from the recipe book on what the finished cake and frosting are supposed to look like:
Lovely, isn't it?
Er, here's what mine turned out like:
Not quite so lovely, right??!? The frosting was thick and difficult to spread, even when warm, even after I added more milk. It was just grainy. I don't know if I overcooked it since it also turned out darker than in the book picture. But the true failure was in the taste test. While the cake itself was delicious, the frosting was like eating brown sugar out of the box. I'm not a big fan of frosting to begin with but, while I have a high sugar tolerance, even *I* do not make a habit of eating straight brown sugar and that's what this tasted like.
It wasn't a total loss as I now have a great vanilla cake recipe to use but next time, I'm going to pair it with a real vanilla frosting. But the main point I wanted to make by posting this is everyone has failures, myself included. I get some emails with people telling me a recipe they tried from my blog didn't turn out like mine - sometimes it's because they inadvertently left out an ingredient (Rhuwena forgetting the sugar in the pumpkin upside down cake), sometimes it's because they did a horrific substitution (margarine instead of butter - wah), or sometimes because they overbaked it. The point is - that's okay. Try and try again until you get it right. That's what I intend to do.
Yellow Cake
3/4 cup (1 1/2 sticks) butter
1 cup milk
2 cups sifted all-purpose flour
2 3/4 teaspoons baking powder
1/2 teaspoon salt
4 eggs
2 cups sugar
1 teaspoon vanilla extract
Gigi's Caramel Icing
One 1-pound box (about 2 2/3 cups) light brown sugar
1/2 cup (1 stick) butter
7 tablespoons evaporated milk
1 teaspoon vanilla extract
1. To make the cake, heat oven to 325˚F. Grease and flour two 9-inch round cake pans. Combine the butter and milk in a small saucepan, and cook over low heat until the butter melts. Stir well and let cool to room temperature.
2. Meanwhile, combine the flour, baking powder, and salt in a medium bowl, and stir with a fork to mix well. In a large bowl, combine the eggs and sugar, and beat well at high speed, scraping down the bowl often, until light yellow, smooth and thick.
3. Stir the flour mixture into the egg mixture, mixing only until the flour disappears. Add the cooled milk mixture and the vanilla, stir well, and divide the batter between the prepared pans.
4. Bake at 325˚F for 25 to 30 minutes, until the cakes are pale golden, spring back when touched lightly in the center, and begin to pull away from the sides of the pans.
5. Cool in the pans for 10 minutes on wire racks or folded kitchen towels. Then turn out the cakes onto wire racks or plates to cool completely, top side up.
6. To make the icing, have the cake layers handy and ready for frosting, so that you can spread the warm frosting quickly once it is ready. In a heavy medium saucepan, combine the brown sugar, butter, evaporated milk, and vanilla. Bring to a boil over medium-high heat. Stir well and then adjust the heat so that the frosting boils and bubbles gently. Cook for 7 minutes. Remove from the heat and let cool for 5 minutes.
7. Beat the warm icing with a wooden spoon until it thickens, 2 to 3 minutes. Place a cake layer, top side down, on a cake stand or serving platter. Quickly spread some icing over the top and cover it with the second cake layer, top side up. Ice the top quickly and then spread the remaining icing over the sides.
8. If the icing becomes too hard to spread, warm gently over low heat, add a spoonful or two of evaporated milk, and then scrape and stir well until the icing softens enough to spread again. Dip a table knife in very hot water to help soften and smooth out the icing once it is spread.