Thursday, March 27, 2014

Chocolate Cake with Chocolate Ganache

Chocolate Cake with Chocolate Ganache - made March 21, 2014 from Averie Cooks
I've been trying to clean up my pinterest boards. By "clean up", I meant deleting pins of recipes I pinned awhile ago and never made, thinking if I haven't made them by now, I never will so why am I still keeping them pinned? Answer: turns out I'm a virtual hoarder. I have one pin board titled "Baking Recipes I Want to Try". Once I do try a particular recipe from that board, I move it to another board called "Pinned Recipes I've Already Made". That's how I keep my organization freak happy. At its peak, the first board had over 300 recipes while the second board now has almost 275. So I've made some progress. But not quite enough, hence my virtual decluttering attempt.
At which I failed miserably. I think I ended up deleting two pins from a board of 300. I kept getting distracted by long-ago pinned recipes and thinking I should make that one or try this one. It was my someday syndrome again. Someday I'm going to make this. Problem was, I had so many recipes on my pin board and kept adding more that I kept losing sight of the ones I had pinned earlier. So I compromised and did the sensible thing. I broke up the want-to-try recipes into categories, specifically cakes, cookies and I left the original board as all other desserts. So I still have almost 300 recipes to try but now I've got them classified more cleanly. My inner hoarder wasn't distressed at any more deletions and my organizer freakishness was swooning.
Now it's so much easier to choose which recipe to bake. Like when I was in the mood for a quick, simple cake recipe, I just went to my Let Me Eat Cake pinboard and selected this one from Averie Cooks. I've had lots of success with Averie's recipes and this one was no exception. If you like the fluffy, cakey texture of box cake mixes but want a chocolate cake that actually has chocolate flavor (inner baking snobbery peeks out), this is the cake recipe for you.
This was a really good chocolate cake. Of course, use a high quality cocoa powder so the chocolate flavor will shine through. You'll see the addition of coffee in the batter but if you're not a coffee lover, never fear, this isn't a coffee chocolate cake. The coffee just enhances the chocolate even further but doesn't contribute to the taste. I'm not a coffee drinker but I don't mind coffee-flavored goods. I could detect a hint of the coffee in the background against the chocolate but it doesn't detract from the cake at all. My only down note is I'm not a big fan of ganache as it's a little too rich for me and not sweet enough in general but that's a taste preference and nothing to do with the recipe. Otherwise, this was a fantastic chocolate cake.
1 large egg
1 cup granulated sugar
6 ounces sour cream
1/4 cup canola or vegetable oil
1 1/2 teaspoons vanilla extract
1/2 cup brewed coffee, room temperature or warm
1/2 cup unsweetened natural cocoa powder
1 cup all-purpose flour
1 teaspoon baking soda
1/2 teaspoon baking powder
1/2 teaspoon salt, optional
  1. Preheat oven to 350° F.  Line a 9-by-9-inch square baking pan with aluminum foil, spray with cooking spray; set aside.
  2. In a large mixing bowl combine egg, sugar, yogurt, oil, vanilla, and whisk until smooth and combined. Add coffee and cocoa powder; whisk vigorously until batter is smooth and free from lumps.
  3. Add the flour, baking soda, baking powder, salt, and whisk vigorously until batter has just combined, about 1 minute. Pour batter, which is a loose and fairly runny batter, into prepared pan and bake for about 25 minutes, or until top has set and a toothpick or cake tester inserted in the center comes out clean.
  4. Allow cake to cool in pan completely, at least 30 minutes, before adding ganache or frosting the cake, or before slicing and serving. Unfrosted cake can be stored in an airtight container at room temperature for up to 5 days, or store frosted cake in the refrigerator for up to 5 days.

Chocolate Ganache 
9 ounces semi-sweet chocolate (about 1 1/2 cups semi-sweet chocolate chips)
3/4 cup cream or half-and-half
1 teaspoon vanilla extract

  1. Place chocolate in a medium microwave-safe bowl and heat on high power for 1 minute to soften chocolate; set aside. 
  2. In a small microwave-safe bowl or measuring cup, heat the cream (I used half-and-half) on high power just until it begins to bubble and show signs of boiling, about 60 to 75 seconds. 
  3. Pour hot cream over chocolate and let it stand about 1 minute. 
  4. Whisk vigorously until chocolate has melted and mixture is smooth and velvety. Add vanilla and stir to combine. Set bowl aside for about 10 minutes, allowing ganache to cool and thicken a bit. 
  5. Whisk mixture briefly before pouring all of it over the cake. Lightly smooth and spread the ganache with a spatula or offset knife. Allow ganache to set up for at room temperature for at least 30 minutes before slicing and serving the cake; or speed this process up by placing pan in the refrigerator or freezer briefly.

Tuesday, March 25, 2014

Banana Dream Cake

Banana Dream Cake - made March 15, 2014, recipe adapted from The Novice Chef
Banana Cake Take 1
Over the past few years I've talked intermittently about my love for the banana cake from Icing on the Cake. I go there every year around my birthday and buy myself a piece as my birthday cake. There's a hiking trail near there that I sometimes go to and, after a long hike, I have no problem justifying a stop at Icing on the Cake to get my favorite cake (good thing they sell it by the piece). Heck, I've even built into my pre-retirement, post-Corporate America plans that I'm going to apply for a baking job there just so I could learn how they make the banana cake.

It should even come as no surprise that I've also tried endless recipes of different banana cakes to find THE recipe for it. There have been a few where I've come close on taste but not on the fluffy texture. Most banana cakes I've made have been too moist or too dense or both. The fluffy has eluded me. So when I saw the picture of this cake from The Novice Chef, hope sprang eternal again as the pictured cake looked close to my Holy Grail of banana cakes. Could this be it? Could this be the one?
Just by looking at the original recipe, here are a few things I knew right off the bat before I even baked it: this would be moist, not just from the amount of liquid ingredients (the milk) but also from the sour cream. It would not taste lemon-y even though there's lemon juice in it. The acidity of the lemon juice is needed to activate the baking soda and add to the leavening of the cake. It would not likely be greasy because the applesauce allows for a lesser amount of butter to be used. I actually thought it might not be banana-y enough because a cup of bananas didn't seem like much for a 3-layer cake. I admit I erred on the side of banana and added a generous cup of it. Beyond that, I followed the recipe to a tee. Final result? This was so close to the cake texture I was looking for. Close. Really close. But not quite. And still not as fluffy as what was pictured on The Novice Chef.

However, it did set my baking wheels turning. With a few tweaks, I felt sure I could come even closer. The first thing I had to accept is: it is NOT the recipe that makes the cake. Or at least not just the recipe ingredients. It's the technique. This was a great recipe to start with but I had to make some adjustments. First, remember that bananas add a lot of moisture to a cake. More moisture means denser cake if you don't compensate with additional baking time. I'm always terrified of overbaking so I underbake more often than not. And that's a big part of my problem.
Banana Cake Take 2
But let's tackle one problem at a time. Because I use very, very overripe bananas, flavor wasn't going to be an issue if I used a little less banana. Instead of a generous cup, I used a scant cup. So not as much moisture going in. Second, to achieve a fluffy texture, the batter has to have more air beaten into it. I don't like to overmix batter because that'll develop the gluten from the flour and make the texture tough. So the time to beat more air into the batter is before you add the flour. It's also before you add the eggs. If you overbeat batter with eggs in it, you inadvertently can make a meringue texture from the foaminess of the eggs and get a crust on top. So the time to beat air into the batter is when you're creaming the butter and the sugar together. Most recipes say to beat until "light and fluffy" but that leaves so much room for interpretation and I often interpret that incorrectly. This time I beat it a little longer than I normally do. I normally only beat for a minute, this time I beat for 3 minutes.

Finally, my biggest weakness - baking time. I know what my problem is but I don't know what my problem is. And with this cake, it was actually hard to tell when it was done because the toothpick does come out "clean" so you'd think it was done. But while it wasn't too underbaked the first time, I knew I could've baked it a little longer and that would've been a huge factor in getting the fluffy texture I've been obsessing over looking for. The second time around, I factored in not just whether the toothpick came out clean but also how easily it went in. A denser cake will provide more resistance while a more baked cake will let the toothpick go in more easily. It's hard to describe unless you have a comparison at the same time but I've Monday morning quarterbacked a lot of underbaked cakes so my baking instincts can usually tell me when something needs to stay in the oven a little longer. I just usually second guess myself and ignore those instincts but this time I muffled my baking insecurities and just let the cake layers bake. And bake.
Result of the second cake? Still close but still no cigar. Sigh. I thought I was on the right track but I don't think my changes made a discernible difference in the fluffiness. And, one of my guinea pigs coworkers confessed she liked the first cake better than the second cake. Argh. But, no experiment is wasted. Now my baking wheels keep on churning on the next things to test. I think I need a recipe that uses cake flour (lighter texture) as well as baking powder (more leavening). So the search continues and my pre-retirement plans to work at Icing on the Cake still remain on my bucket list.
1 scant cup mashed overripe bananas (2-3 bananas)
2 teaspoons lemon juice
3 cups all-purpose flour
1 1/2 teaspoons baking soda
1/4 teaspoon salt
3/4 cup unsalted butter
2 1/8 cups granulated sugar
3 eggs
2 teaspoons vanilla extract
1 cup milk
1/2 cup sour cream
4 ounces applesauce

Frosting
3/4 cup unsalted butter, softened
1 1/2 packages (12 ounces) cream cheese, softened
5 3/4 cups confectioners' sugar
2 teaspoons vanilla extract
Cinnamon, for sprinkling
  1. Preheat oven to 275 degrees F. Spray 3 round 8" round baking pans with nonstick cooking spray and line with parchment rounds.
  2. In a medium bowl, mix flour, baking soda and salt; set aside.
  3. In a large bowl, cream butter and sugar together until light and fluffy. Beat in the eggs, one at a time, then stir in vanilla, sour cream and applesauce. Beat in the flour mixture alternately with the milk. Stir in banana mixture.
  4. Divide batter (about 2 1/2 cups batter in each pan) into prepared pans. Bake for 40-50 minutes, or until a toothpick inserted into the center of the cake comes out clean. Remove pans from oven and immediately place in freezer for 45 minutes. This keeps the cake moist by immediately stopping the baking so the cake does not continue to bake when you remove it from the oven. Note: I skipped the freezer step because I didn't have room in my freezer; instead, I ran a spatula around the sides of the cake and overturned them onto plates lined with wax paper as soon as I took them out of the oven to stop the baking from the heat of the pans.
  5. For the frosting: In a large bowl, cream butter and cream cheese until smooth. Beat in vanilla.
  6. Add confectioners' sugar and beat on low speed until combined, then on high until frosting is smooth.
  7. Assemble the three layers with a thick layer of frosting in between each layer. Then apply a thin crumb coat on the top and sides. Place in the refrigerator to harden the crumb coat for 10 minutes. Then apply a thick, even layer around the outside of the cake. Sprinkle on a little cinnamon on top and store in the refrigerator until ready to serve.

Sunday, March 23, 2014

Restaurant Review: Kahoo (ramen)

Kahoo - dinner on March 10, 2014, 3.5 stars on yelp, 1108 reviews
I met my friend Cindy, the one I'd given the Texas Fudge Cookies to, for dinner a couple of weeks ago at a new-to-us ramen place, Kahoo. Kahoo has several locations so I guess they're a mini "chain" in our area. We'd already tried Ramen Halu the last time we'd met for dinner; Cindy was in the mood for ramen again and suggested Kahoo. The one we went to has a bit of a weird location. It's in a strip mall just off the freeway, which is fine, but it's rather tucked away in that strip mall so if you don't know where to look, they might be hard to find. The inside was also smaller than I expected. It's L-shaped with the short part of the "L" being the entrance way and the long part being where most of the tables and the counter seating are.
Yelp reviews warned about long wait times when the place is crowded but fortunately Cindy and I met early enough, just after 6 pm on a Monday, to be able to get seated right away. Kahoo filled up before we left but we got there before things got too busy. The music is a bit loud or I'm just old but it was nothing too eardrum-splitting.
Chicken Karaage
We split an appetizer of Chicken Karaage which is another name for breaded, fried, boneless chicken (hello, yummy). You can dip the chicken in a sauce but I'm not a sauce person so I liked it as is just fine. I've had Chicken Karaage before at another ramen place but it was way too salty. This one was not. It was perfectly seasoned, not greasy and the chicken was just right, not too thin, not too thick.
As for the ramen, we both ordered the Shoyu Ramen; it was the standard ramen with a soy-based broth. There's a salt-based broth but I opted for the soy sauce. There wasn't much cha-su pork in the ramen but what there was of it was delicious. I also liked the broth. Unlike the other ramen places I've tried, the broth remained the same flavor, i.e. it didn't become more and more salty as you consumed it. Points for Kahoo on that one. My only minus is it's definitely a carb-based meal. There was only half of a soft-boiled egg (other places often include a whole one) and only a few bits of pork which I think they could've increased. But the ramen noodles were nicely chewy and, as mentioned, the broth was good. For under $10, I'd go back again for good ramen. (Note: they do offer a low-carb ramen bowl, sans the ramen noodles, which seems counter-intuitive to me but for anyone low-carbing, you still have options at Kahoo.)

Saturday, March 22, 2014

The Cro-Nut

The Cro-Nut - from Paris Baguette, March 13, 2014
Have you heard of the cro-nut? It's a croissant and doughnut combined, hence the name. Legend or, er, wikipedia, has it that it was invented by chef Dominique Ansel in New York City. The croissant part comes from the fact that it's a laminated dough (butter folded into sheets of dough and folded over and over again) and the doughnut contributes not only the round shape but the sugar coating, the filling and the glaze on top. It's actually pretty genius when you think about it; this is the kind of food modification I can deal with.
I'm actually behind on the cronut craze because it was invented last year and I'm only trying it out just now. In my defense, I'm not crazy enough about either croissants or doughnuts to go out of my way for them, even when they're combined, so it would have to be literally in front of me in order for me to try it. And by lucky happenstance, it was exactly that, in front of me, when I was at Paris Baguette last week. I was actually at a food court next door getting takeout for my dinner and stopped off at Paris Baguette to see if there was anything I wanted for dessert. Lo and behold, there sat a tray of cronuts. So I bought one for $3.75. Not exactly cheap if you think of it as a doughnut (Stan's Donuts are 85 cents each) but in line with croissant prices.
Overall, I thought it was pretty good. When I took the first bite, I classified it mostly as a croissant because of the flaky texture. And I'll be honest. I didn't see what the fuss was about. Yeah, it was good but a "craze"? Hmm, that's pretty grandiose. I should also mention though that I'd had this after my takeout dinner so I was rather full and one bite was all I managed of the cronut that night. I returned to it the next day when I was more hungry and gained a greater appreciation for it. Once I wasn't stuffed full of orange chicken from the night before, I could appreciate the doughnut half of the cronut. The filling was a light citrus pastry cream/glaze, probably the exact same as the glaze on top. The sugared coating combined with the flakiness really did make it a perfect hybrid of a croissant and a doughnut. If you like either or both of those, the cronut is worth experiencing.

Friday, March 21, 2014

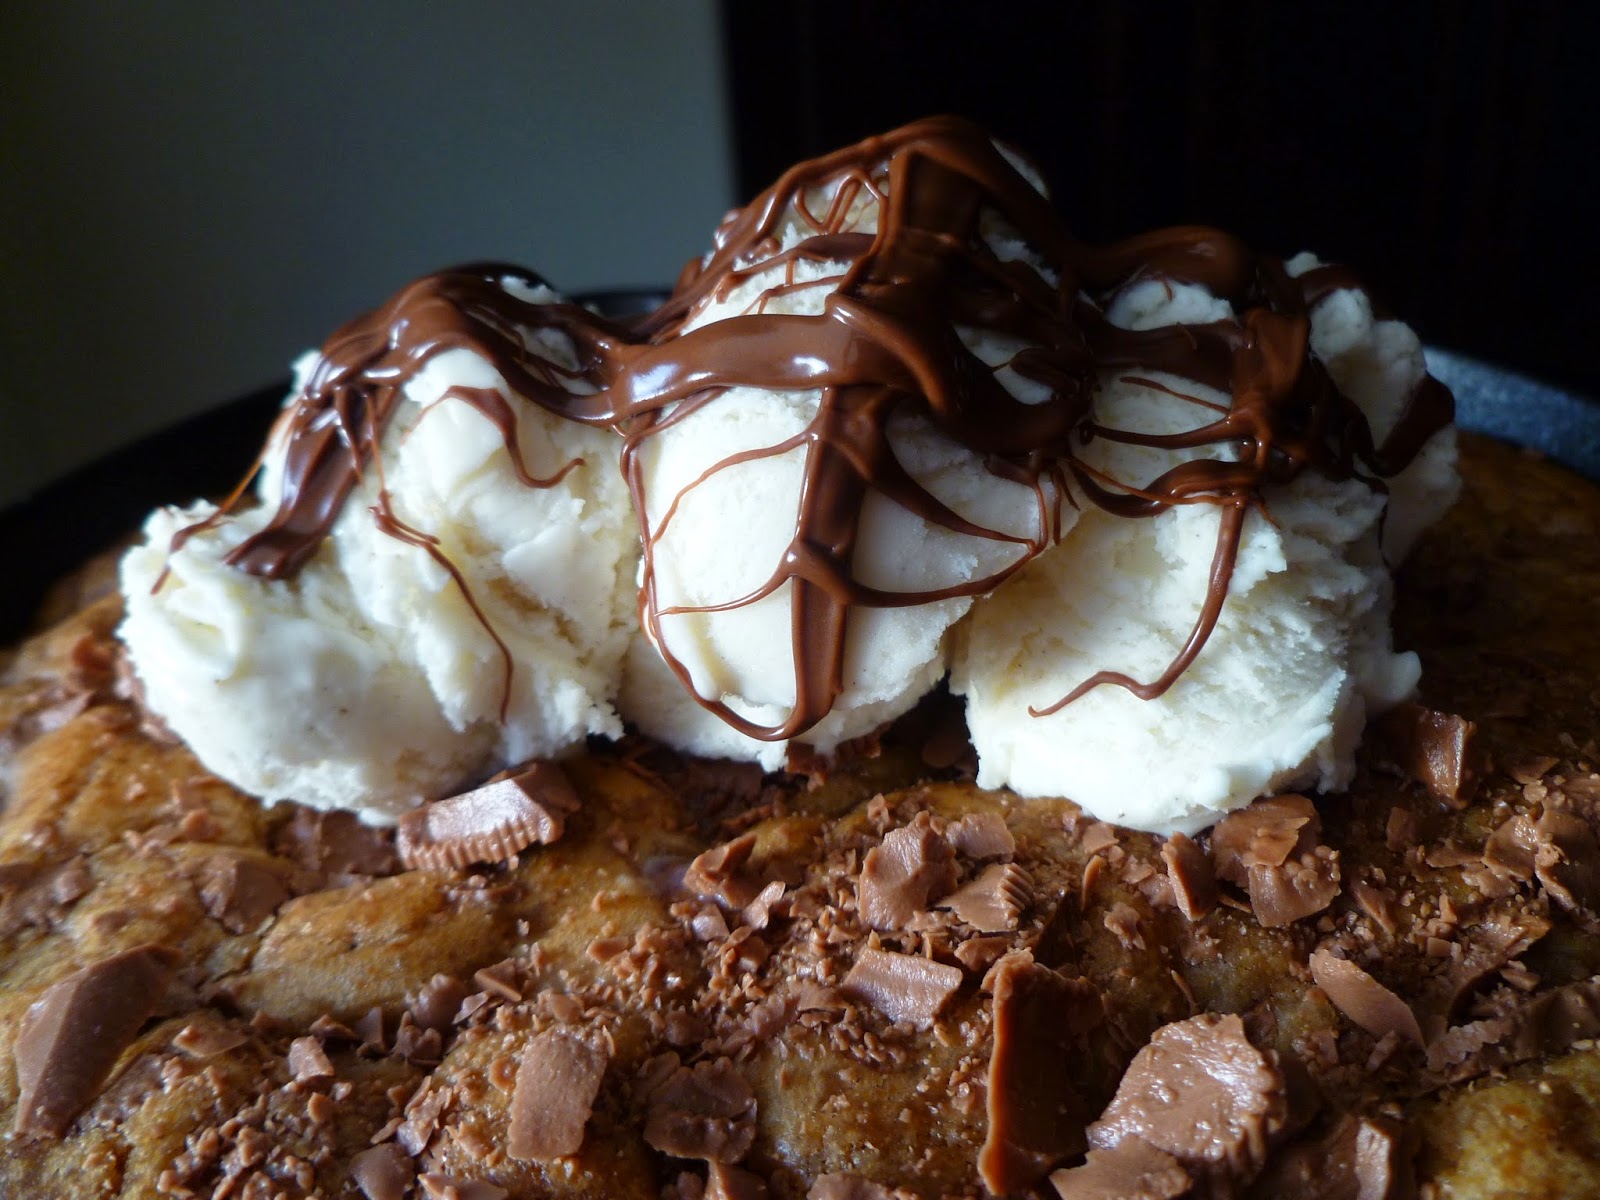
Deep Dish Brown Butter Chocolate Chunk Pizookie

Deep Dish Brown Butter Chocolate Chunk Pizookie - made March 14, 2014, recipe modified from Damn Delicious
You ever have one of those weeks when, by the time you've made it to the end, you're so wrung out that all your good intentions of eating healthy to nourish your body, working out for mental well being, and going into zen mode to refresh your spirit gets drowned out by the call of "screw this, I want a warm chocolate chip cookie with ice cream. Now." Right? Welcome to last Friday.
Only it was such a week that I upped the ante. A normal chocolate chip cookie just wasn't going to cut it. In fact, even chocolate chips weren't going to do. This called for chocolate chunks. I had a slab of milk chocolate my parents had brought back from a trip (yup, I'd much rather have that as a "souvenir" than a t-shirt or a mug, thanks) which I chopped into generous-sized chunks. I wasn't messing around. And I not only raised the stakes to go with a chocolate chunk pizookie but I made it a deep dish brown butter chocolate chunk pizookie. In a size and of a thickness guaranteed to push me beyond comfortable ecstasy straight to semi-consciousness. For the first few bites anyway. As they say on Sesame Street, this is a sometime food.
Normally, pizookies are individual sized and I'd bake them off in small ramekins. This time I went for broke and spread all of the dough into my 8-inch cast iron skillet. Which turned out to yield a pizookie large enough to feed me and 18 of my closest friends. I added the scoops of ice cream and drizzles of warm nutella on top for picture taking purposes but since my 18 closest friends didn't happen to be around when I took this out of the oven, I ended up only taking a few bites.
Which were actually pretty satisfying enough. My only mistake was, because the cookie turned out to be so thick, I didn't bake it long enough. Which I didn't discover until I'd already put the ice cream on top and took a few bites. The outer edges were fine; they were perfect as a matter of fact, warm and sumptuous. But the inner circle and the middle were too gooey, especially when warm.
Nothing left to do except scrape the ice cream off to eat separately and put the skillet back in the oven. I baked it off a little longer but after the second baking, my emotional eating crisis had passed or been stuffed into submission with those first few bites so I left the skillet pizookie for the next day.
Which actually turned out to be even better. By then it had cooled to room temperature, the texture wasn't mushy or gooey, more like "fudgy". And the brown butter flavor was more prominent. Much as I like warm cookies topped with ice cream, I have to admit, this was better at room temperature without the ice cream. I think it was because, in the skillet, the pizookie was too thick so the cookie was mushy/gooey when warm. If I had baked less of it in smaller ramekins like I usually do, it would've baked more evenly and thoroughly all around so it wouldn't have been as mushy. And in small amounts, a little gooey isn't a bad thing.
I had a hard time getting a clear picture of the inside, both due to the lighting at that time of day/almost evening when I made this but also from the deepness of the pan. But you can see a hint of the mushiness below. Regardless, this was a good cookie recipe. I'd advocate baking it in smaller portions; then you can enjoy it warm or room temperature, your choice. I took the cooled cookie, broke it into smaller chunks and placed them in a ziploc bag in my freezer. Next time I'm having an emotional eating crisis, I know what to reach for.
1 7/8 cups all-purpose flour
1/2 teaspoon baking soda
1/2 teaspoon salt
14 tablespoons unsalted butter
1/3 cup sugar
1/2 cup dark brown sugar, packed
2 teaspoons vanilla extract
1 large egg
1 large egg yolk
1 cup chocolate chunks
Vanilla ice cream
  1. Preheat oven to 375 degrees F. Lightly coat an 8-inch cast iron skillet with nonstick cooking spray.
  2. In a large bowl, combine flour, baking soda and salt; set aside.
  3. Melt butter in a medium saucepan over medium heat. Cook, whisking constantly, until the foam subsides and the butter begins to turn a golden brown, about 3 minutes. Remove from heat and let cool slightly.
  4. Whisk in sugars and vanilla until well combined. Whisk in egg and egg yolk until well combined. Add flour mixture, beating just until incorporated. Gently fold in chocolate chunks.
  5. Pour mixture into skillet. Place into oven and bake until edges are golden brown but center is still moist, about 20-25 minutes (check at 15 minutes).
  6. Serve lukewarm, topped with ice cream.

Thursday, March 20, 2014

Lemon Pudding Cake

Lemon Pudding Cake - made March 8, 2014 from One Bowl Baking by Yvonne Ruperti
The best way to describe a lemon pudding cake is to think of it like an upside-down lemon bar. The lemon curd or pudding is the bottom layer and what normally would be the shortbread crust on a lemon bar is instead a soft lemon cake on top of the pudding layer. All from one batter. I can't tell you what science makes this phenomenon work (I probably could but I'm too lazy pressed for time to look it up), just that it does. But you have to follow the recipe exactly, beating the eggs in enough in the order given. I did and it really did work.
However, unlike a lemon bar, this is not a bar cookie that cuts into neat little slices. Because the pudding is the bottom layer, this is really more like a spoon dessert. That is, it's literally best eaten with a spoon as it's very hard and messy to eat pudding with your fingers. I like the lemony flavor of this but I can't say I was in love with the cake in general. This is probably because I don't generally like custard-type desserts except for creme brulee and certain pot de cremes but this didn't clear my hurdle to go into the exception pile. It was okay but I wouldn't call it fantastic unless you like anything lemon.
3/4 cup granulated sugar
4 large eggs, room temperature
2/3 cup fresh lemon juice from about 4 lemons
1 cup whole milk, room temperature
6 tablespoons unsalted butter, melted
1 tablespoon lemon zest from 1 lemon
pinch salt
1/3 cup cake flour
3/4 teaspoon baking powder
confectioners' sugar, for dusting
  1. Place an oven rack in upper-middle position.  Preheat oven to 375 degrees F. Line an 8" square baking dish with foil and lightly spray with nonstick cooking spray or brush with melted butter. Place the dish in a rimmed sheet pan.
  2. In a large bowl, whisk the sugar with one egg until the mixture is very light, about one minute.
  3. Whisk in the second egg for 30 seconds.
  4. Whisk in the third and fourth eggs for 15 seconds each.
  5. Gently whisk in lemon juice, milk, butter, lemon zest and salt.
  6. Sift the cake flour and the baking powder over the mixture, then gently whisk until combined.
  7. Immediately pour into the pan and set in the oven. Fill the sheet pan with about 1/2-inch of water.
  8. Bake until the pudding is just set, about 20 to 25 minutes.
  9. Carefully remove the baking dish from the water bath and let it cool on a wire rack until just warm. Dust with confectioners' sugar and serve warm, room temperature or chilled.


Wednesday, March 19, 2014

Bakery Review: Sift Cupcake and Dessert Bar

Sift Cupcake and Dessert Bar - visited March 3, 2014
Prepare for a post with lots of pictures. Because this is it. After my niece Lauren and I filled up on dim sum, we headed out of Chinatown and made our way down (and up) California to go to Sift Cupcake & Dessert Bar. I'd first heard of Sift by watching Cupcake Wars. A big reason I watch Cupcake Wars is to find out about local small business cupcakeries - more places to try out. Whenever I hear of any in my area, it goes on my list of places to visit someday. For Sift, this was the day.

Last summer, I did the same thing with Frost. Frost Cupcake Factory actually won their episode of Cupcake Wars but if you recall my review of their cupcakes, I was rather disappointed as the textures on most of the cupcakes I bought were dry and their flavors weren't very spectacular in terms of taste. So my expectations for Sift were a lot lower because Sift got knocked out in one of the qualifying rounds and, unlike Frost, couldn't boast being Cupcake War winners.

But before I get to the cupcakes, let's talk about Sift's cute little bakery because it really was a cute little bakery. Sift is located in lower Pacific Heights; Lauren and I were so busy talking when we were walking there that we actually passed it because we were on the other side of the street. We had to double back to find it.


The bakery storefront itself isn't very big but for a cupcakery, it's still a decent size, similar to Sprinkles and Kara's Cupcakes. It's very cheery and filled with pastel colors. One look at their display cases and I was predisposed to like them anyway. They also were smart in their display and storage space by having shelves house their cupcake boxes (above). The cupcake boxes have cute sayings on them and double as decorations until they're needed.

Sift has a selection of not just cupcakes but also "soda pop" (not to be confused with the likes of Diet Coke and their ilk because they didn't have any but actual old-fashioned soda pop) as well as layer cakes, macarons, Krispy cakes (amped up Rice Krispie treats), and whoopie pies. I have a one-track mind and I came for cupcakes so cupcakes are what we bought.
When faced with such mouthwatering choices, it's always hard to narrow down my selections. I highly recommend you check out Sift's flavor menu so you can appreciate my First World struggle. In the end, I bought a Samoa Cupcake and Lauren chose a carrot cupcake. We also bought a red velvet and a chocolate one for Lauren to bring back for Shyla.
Red Velvet and All for the Cookie cupcakes

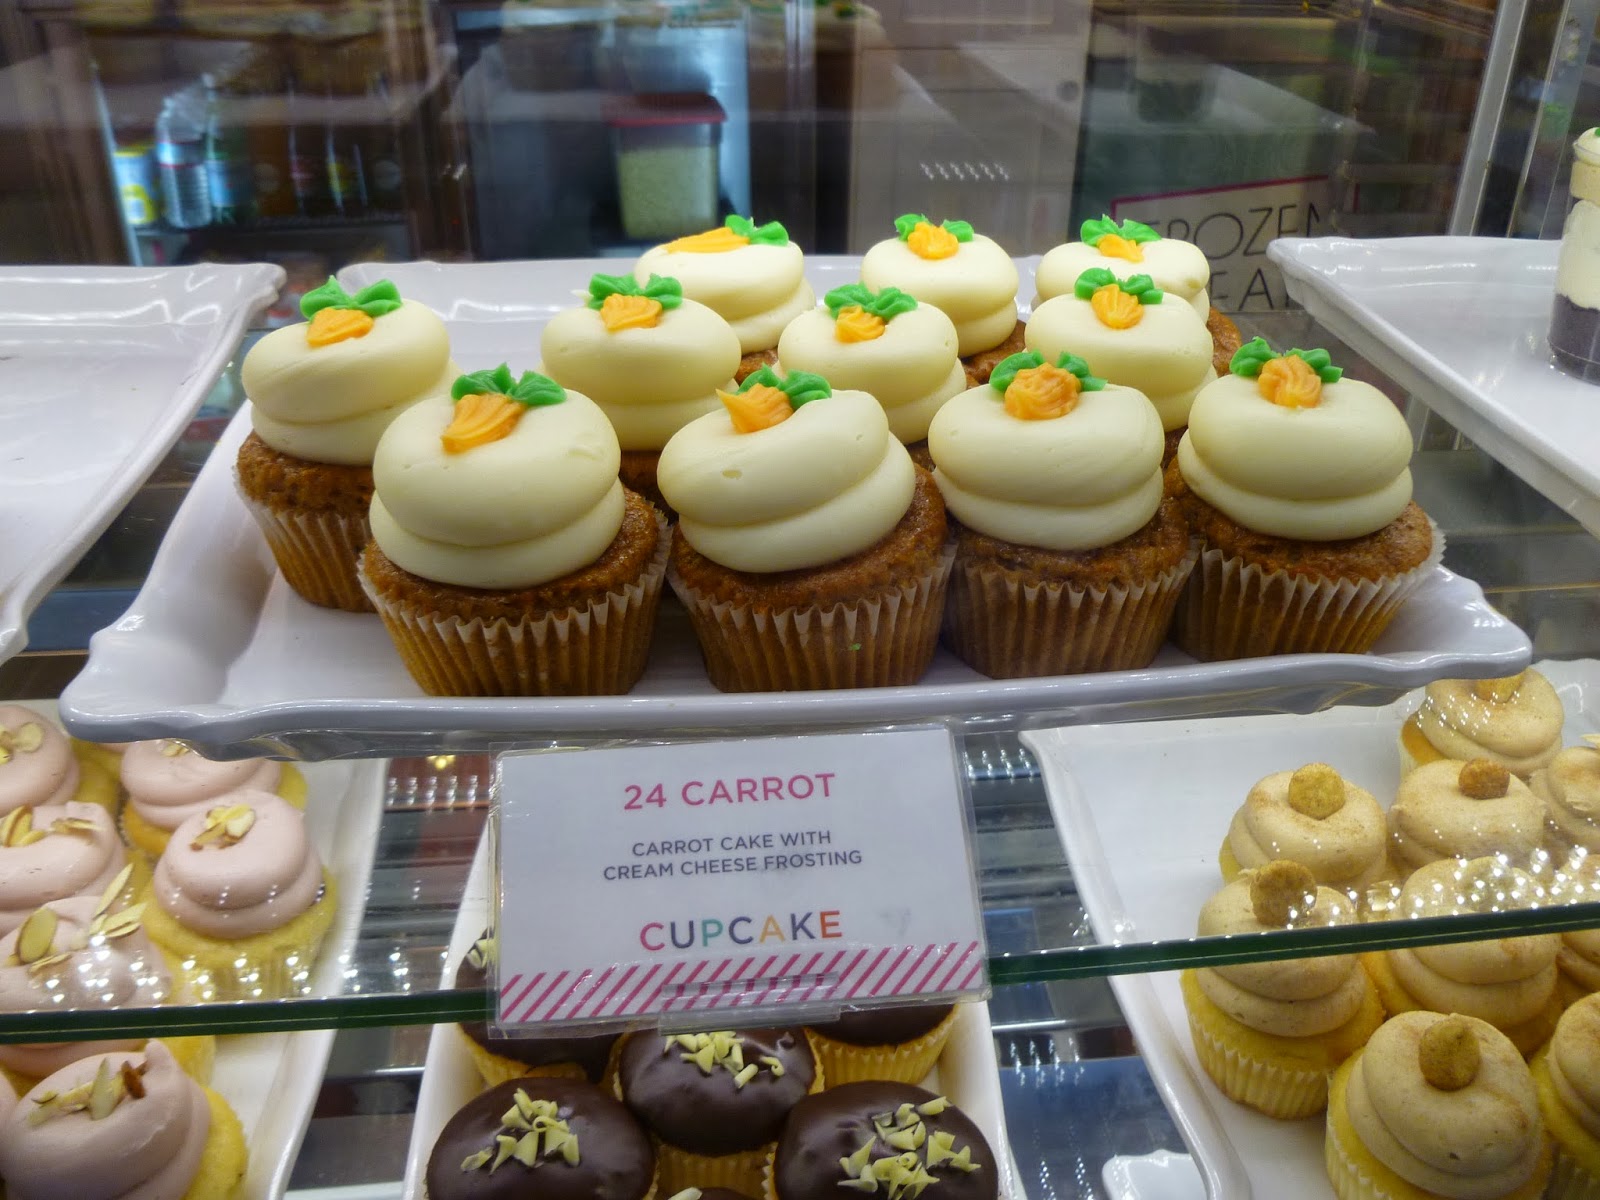
The carrot cupcake was topped with the traditional cream cheese frosting and decorated with an icing decoration of a carrot. It was my favorite way carrot cake (or cupcake) should be made: with just carrots. The flavor card on the bakery counter that describes each flavor even points out there are no nuts or raisins in their carrot cupcake. Points for Sift. It was also a really good cupcake, cakey, fluffy and moist but not greasy.


The Samoa cupcake was a coconut cake filled with chocolate ganache and topped with vanilla frosting garnished with toasted coconut and ganache drizzle. If that sounded good to you, it's because it was. I loved this cupcake. Let me repeat that: I loved this cupcake. Moist, fluffy, perfect coconut flavor. And here's the shocking thing: I also loved the frosting. If you know me at all, you know I always say I'm not a frosting person, I only like a little frosting to go with my cake and I never profess love for frosting. This is the only cupcakery I've been to where I not only like the frosting but I ate it all. Yup, you read that right. I love Sprinkles red velvet cupcake and I prefer their frosting over most places but I don't ever eat all of the frosting on a Sprinkles cupcake. Not so with Sift's Samoa cupcake. Loved it. The toasted coconut on top was the perfect complement in texture and flavor with the frosting too.

I even liked the ganache filling although if I had to give one piece of feedback to Sift, I'd recommend they switch out the chocolate ganache for a caramel filling instead. The chocolate is already represented in the drizzle on top but I was missing the caramel component of a traditional Samoa. Still, this was a darn good cupcake, chocolate ganache filling included, so I have no complaints. Actually, let me rephrase that: I enjoyed this cupcake so much that I did something else I never do. I bought another one. Buying another cupcake isn't so unusual but typically I would get a different flavor to try. But I liked the Samoa so much that I had to have another one. Not right that moment of course but I bought it for later. And just to really push the outer limits of my waistband, I also chose one of the chocolate cupcakes to try out another time.
Carrot Cupcake on the left, Samoa on the right
I bought the "Sky is Falling" cupcake which was a chocolate cupcake filled with white chocolate mousse and topped with a chocolate buttercream. But I was really greedy for the Samoa again. I had the second one the next day and it was just as good as the first one, even a "day old" and I ate all the frosting again. You've no idea how mind-boggling that is to me.
I didn't get to the Sky is Falling cupcake until the following day - in the interests of moderation, one high-calorie treat a day is all I normally allow myself. This one was more typical of other cupcakes I've had elsewhere. I don't know whether it's because it was two days old by then or it just wasn't as good as the Samoa to hook me in but on this one, I ate the cupcake but left a lot of the frosting. It was good but just not as good as the Samoa. Sorry I don't have a picture other than the bakery case. For once, I forgot to take one before I ate it.
All in all, I thought Sift's cupcakes were delicious and I enjoyed them much more than the ones from Frost. I'll have to hunt up their Cupcake Wars episode again and see where they went wrong in the competition but they win in my cupcake book.