Tuesday, December 27, 2022

Caramel Crunch-Chocolate Chunklet Cookies by Dorie Greenspan

Caramel Crunch-Chocolate Chunklet Cookies - made December 20, 2022 from Baking with Dorie by Dorie Greenspan
2 sticks (8 ounces) unsalted butter, cut into chunks
1/2 cup (100 grams) granulated sugar
1/2 cup (60 grams) confectioners' sugar
1/2 teaspoon fine sea salt
1 teaspoon pure vanilla extract
2 cups (272 grams) all-purpose flour
3 ounces dark or milk chocolate, chopped into small chunks (I recommend mini chocolate chips)
1/2 cup (60 grams) walnuts, coarsely chopped, toasted, optional (substitute more chocolate chunks if not using)
  1. In the bowl of a stand mixer fitted with the paddle attachment, beat together butter, granulated sugar, confectioners' sugar and salt until light and creamy, 1-2 minutes. Beat in vanilla.
  2. On low speed, mix in flour, beating until just combined. Add in chocolate and nuts, if using.
  3. Turn dough onto clean workspace and knead to bring it together. Divide dough in half and roll into 6-inch logs, slightly less than 2 inches in diameter. Wrap both logs and refrigerate for at least two hours.
  4. When ready to bake, preheat oven to 350 degrees F and butter two 12-cavity muffin tins. Cut each log into 1/2-inch thick rounds and place each round in a muffin cavity. Bake 20-22 minutes or until tops are golden brown at the edges and tops are softly set. Let cool for 3 minutes then remove gently with small spatula.
I thought these would be like caramelized brown-sugar chocolate chip cookies but they were more like chocolate chip shortbread. Really good chocolate chip shortbread. I advise doing as Dorie Greenspan suggests and baking these in muffin tins. That's what allows for the browning and caramelization of the cookies and gives them flavor and a little crunch.
For once, I don't advocate underbaking. The above shows what the bottom of the cookie should look like. It won't really spread in the muffin cavity but the darker muffin tin browned the bottoms of the cookies nicely. If you don't bake them long enough, you will only get a pale, anemic version of the cookie. It tastes better when it's baked to the golden brown color on the bottoms.
I omitted the nuts in this (of course) but increased the amount of mini chocolate chips. The dough was firm enough that I only chilled it in the refrigerator and didn't freeze it. That made slicing easier before baking. I really liked these and they look dainty and pretty. Cut them thickly as they're not meant to be thin snappy cookies but, when properly browned on the bottom, you'll still get a nice crunch but also some chewiness.

Monday, December 26, 2022

Stamped (Brownie) Cookies #26 from Apt 2B Baking Co

Stamped Brownie Cookies #26 - made dough December 22, 2022 from Apt 2B Baking Co
3 cups (384 grams) all-purpose flour
1/2 cup (50 grams) dutch-process cocoa powder
1/2 cup (50 grams) black cocoa powder
1 teaspoon kosher salt
1/2 teaspoon baking powder
1/4 teaspoon cinnamon, optional 
1 cup unsalted butter, softened
1 1/2 cups (330 grams) light brown sugar
2 large eggs
1 teaspoon vanilla extract

Glaze
1 cup confectioners sugar
3 tablespoons cream
1/2 teaspoon vanilla bean paste
1 teaspoon peppermint or vanilla extract (I used vanilla)
pinch salt
  1. In a medium bowl, whisk together flour, both cocoas, baking powder and salt.
  2. In the bowl of a stand mixer fitted with the paddle attachment, cream together butter and brown sugar until light and fluffy. Add eggs, one at a time, mixing after each addition until combined. Add vanilla and mix to combine.
  3. Add dry ingredients and mix on low speed until combined, scraping down sides and bottom of bowl to keep mixture even textured.
  4. Turn dough onto piece of plastic wrap and form into thick disc. Wrap tightly and refrigerate for at least 1 hour and up to 2 days.
  5. Once dough is chilled, roll out between two large sheets of parchment paper to desired thickness (usually 1/4" - 3/8"). Using a mixture of equal parts flour and black cocoa powder, lightly dust top of rolled out dough and cookie stamps to prevent sticking. Cut or stamp out cookies. Arrange in single layers on flat containers, cover and chill or freeze an additional 30-60 minutes or overnight.
  6. When ready to bake, preheat oven to 350 degrees F and line baking sheets with parchment paper. Evenly space cookies on prepared sheets, leaving 1 inch apart. Bake 7-10 minutes, until cookies are just firm to the touch and puffed.
  7. Prepare glaze while cookies are baking: whisk all glaze ingredients in a small bowl. Once cookies have been out of the oven for 5 minutes, brush or dab glaze with a pastry brush to lightly coat cookies.
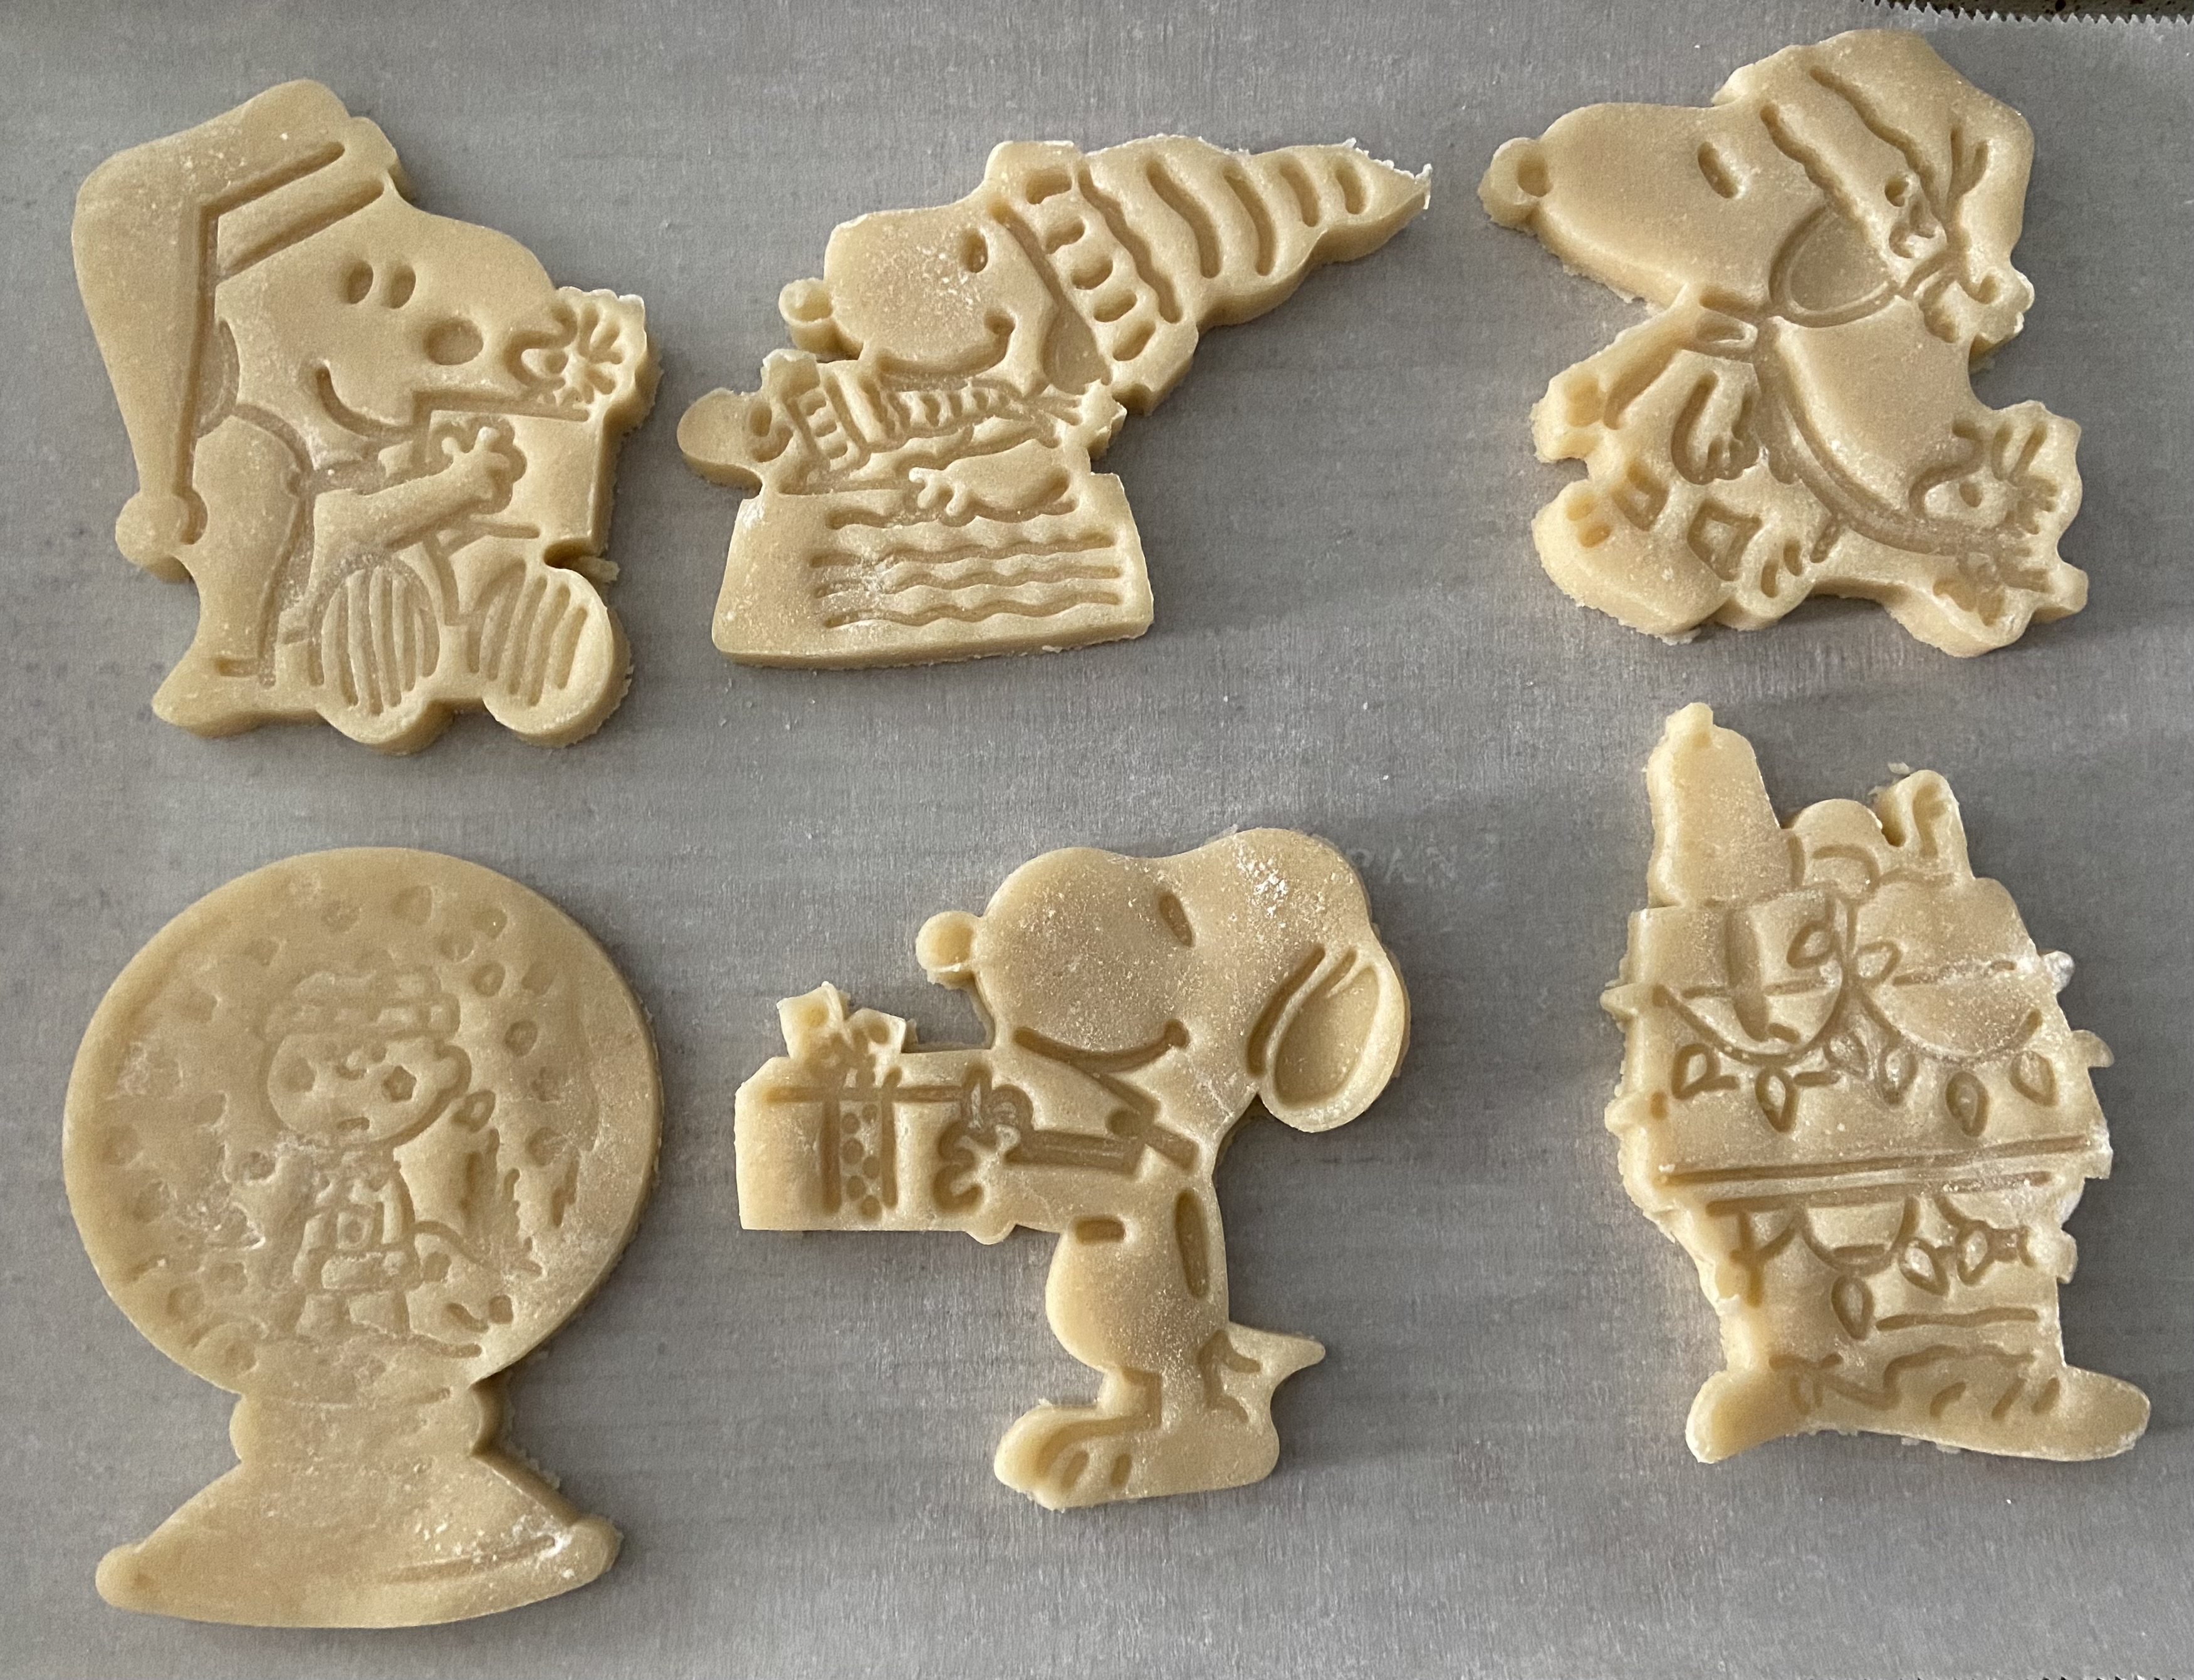
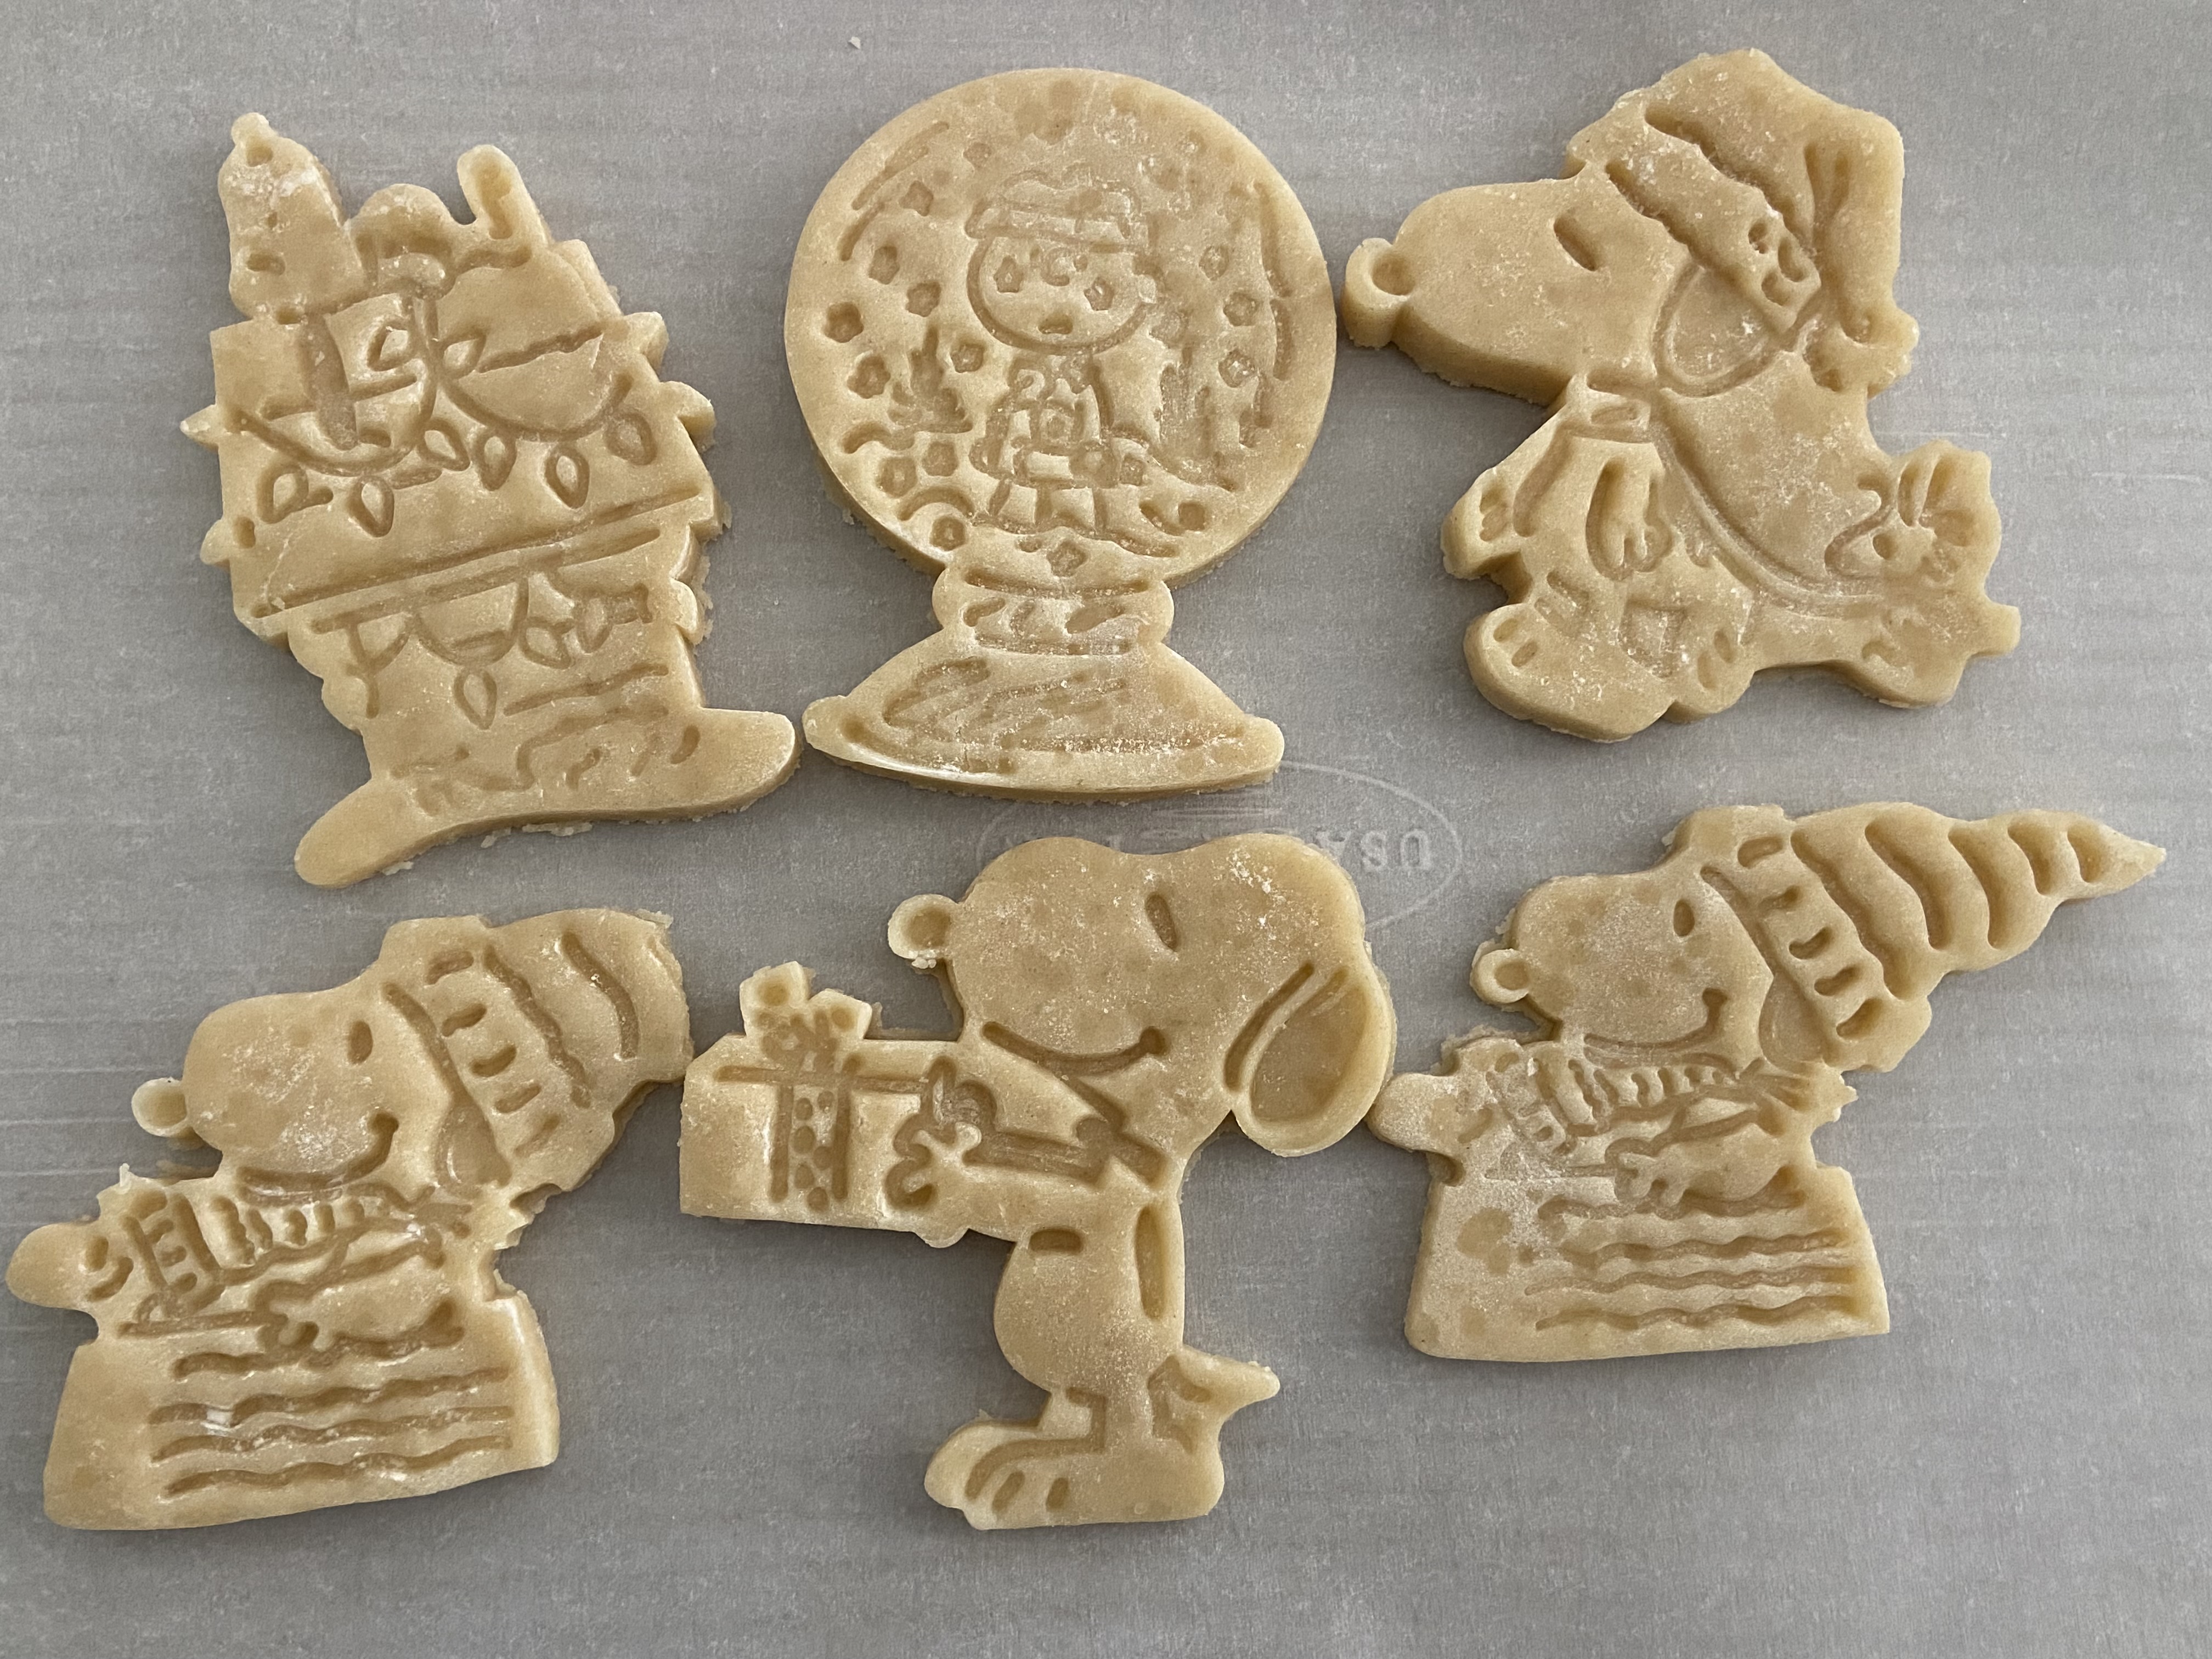
I am thrilled to say I found another stamped cookie recipe that holds impressions really well in baking. Even better, these come out soft, not hard like some of the stamped butter cookie recipes I've tried. And best of all, they're chocolate and taste amazing.

This is not like a snappy-crisp chocolate cookie. Instead, these really do taste like brownies in cookie form.
And look how faithfully they kept the impressions! I haven't tried it with more finely detailed stamps but I think they'll work well with those too. The dough came together easily and was the perfect consistency for stamping, not too dry or crumbly and not sticky and too soft.

Although the original directions say to roll out the dough for stamping and cutting or using an embossed rolling pin, I prefer to make the dough into balls, roll the balls in granulated sugar and press a cookie stamp over each dough ball. Then I cut the stamped cookie with a round cookie cutter to make neat edges. 

It's much easier and faster for me to stamp cookies this way and you don't have to handle the dough too much like you do with rolling and re-rolling the leftover dough.
The original recipe includes a glaze but I only made a tiny amount and only glazed the taste test cookie. Since I was mailing these out for Soldiers Angels' care packages, I didn't want to risk a glaze with cream in it in case it didn't hold up well in mailing, even if the cookies are vacuum sealed.


Sunday, December 25, 2022

White Chocolate Chip Cookie Butter Cookies from 5 Boys Baker

White Chocolate Chip Cookie Butter Cookies - made dough December 1, 2022 from 5 Boys Baker
1 cup (2 sticks) unsalted butter, cut into cubes
1 cup brown sugar
1/2 cup granulated sugar
1 teaspoon vanilla
2 large eggs
1 1/2 cups cake flour
1 1/2 cups all-purpose flour
1 teaspoon cornstarch
3/4 teaspoon baking soda
3/4 teaspoon salt
2 cups white chocolate chips
1 1/2 cups Biscoff cookies, coarsely broken
1 jar Biscoff cookie butter, chilled
  1. Preheat oven to 410 degrees F. Line baking sheets with parchment paper.
  2. In the bowl of a stand mixer fitted with the paddle attachment, cream together butter, brown sugar and granulated sugar until well combined, about 2-3 minutes.
  3. Add vanilla and eggs, one at a time, mixing until combined after each addition.
  4. In a separate bowl, whisk together cake flour, all-purpose four, cornstarch, baking soda and salt. Add to butter mixture in two additions, mixing until just combined after each addition.
  5. Fold in cookie pieces and white chocolate chips.
  6. Portion dough into eight 6-ounce balls. Break each ball in half, press an indent in one half and spoon a generous tablespoon of cookie butter in the indent. Cover with other half and roll into a ball, making sure cookie butter is sealed inside. 
  7. Evenly space dough balls and bake cookies 9 - 11 minutes. Remove from oven and let rest on baking sheets for 15 minutes before removing to wire rack to cool completely.
Merry Christmas! Today I give you this virtual gift of another great recipe I tried out from 5 Boys Baker. This is another cookie butter white chocolate chip cookie recipe but a super delicious one that is all about the cookie butter. It helps that you "stuff" the cookie butter inside which adds to the flavor. It's especially good if you eat this warm (not hot) and the cookie butter is still rather flowy.
It also has chunks of Biscoff cookies in the cookie itself which adds a nice crunch to go with the caramelized flavor of the cookie itself and the sweetness from the white chocolate. The texture is on point as well, especially if you like a traditional chewy-crispness of a good chocolate chip cookie.

If you want the cookie butter to be lava-esque, be generous with the dollop you put in the middle of the cookie dough. Just make sure the edges are sealed and pinched so no cookie butter leaks out during baking.

This one is definitely a keeper and going into my regular care packages.


Saturday, December 24, 2022

Red Velvet Cookies from The Domestic Rebel

1 cup cold unsalted butter, cubed
1 1/2 cups granulated sugar
2 large eggs
1 teaspoon vanilla
2 teaspoons red liquid food coloring
1/4 cup unsweetened cocoa powder
1 teaspoon baking soda
1 teaspoon cornstarch
1/2 teaspoon salt
1 cup cake flour
1 3/4 cups all-purpose flour
2 cups white chocolate chips
1 cup semisweet chocolate chips
  1. In the bowl of a stand mixer fitted with the paddle attachment, cream together the butter and granulated sugar on low speed for 30 seconds. Increase speed to medium and beat for another 30 seconds, scraping paddle and bottom and sides of bowl. Increase speed to high and continue beating another 30 seconds or until mixture is light and fluffy, scraping down sides and bottom of bowl to keep mixture even textured.
  2. Beat in the eggs, one at a time, and vanilla, mixing well after each addition. Beat in the red food coloring on low speed until uniformly incorporated. 
  3. In a separate bowl, whisk together cocoa powder, baking soda, cornstarch, salt, cake flour and all purpose flour. Add to butter mixture in three additions, mixing on low speed until just combined. Stir in white chocolate chips and semisweet chocolate chips.
  4. Refrigerate for 20 minutes. 
  5. Preheat oven to 410 degrees F. Line baking sheets with parchment paper.
  6. Divide dough into 6-ounce portions. Form into thick discs and evenly space on prepared baking sheets, leaving 3 inches between cookies. Keep remaining discs refrigerated and bake one sheet at a time. Bake cookies 8-11 minutes or until edges are set and middles no longer look raw.
  7. Remove from oven and let cookies rest on baking sheet for at least 30 minutes before serving.
If you haven't finished up your holiday baking by now and want a last-minute, quick, easy and tasty cookie, nothing says Christmas better than red velvet cookies. Okay, lots of things say Christmas and I listen to all of them but still, this is a great red velvet cookie to make any time of the year. And if you are done with your holiday baking, save this recipe for Valentine's Day.
I did not make (most of) them as big ad they're supposed to be. Mostly because I was going for quantity to make up more care packages and holiday gifts and, for holiday baking gifts, I tend to go small since I make several varieties and, as my culinary school classmate, Chris, liked to say about large cookies or big slices of cakes, "that's too much commitment".
However, I did make the lone taste test cookie larger than the rest of the cookie dough balls from this batch because when it comes to taste test cookies, I don't have commitment issues. I wanted to see if these would bake up thick.
The answer is yes and no. They didn't bake as thick as the ones shown on Domestic Rebel's blog as I still seem plagued by is-it-the-butter-making-my-cookies-spread issue but they still baked to a decent thickness, thanks to baking directly from frozen dough and mounding the dough ball taller than wider. Whatever works. It worked well in this cookie as this had a soft, chewy texture and good flavor. You'll notice it's a bit plain in that it isn't overloaded with white chocolate chips but that was a conscious decision on my part for the taste test cookie. If you're a white chocolate fan, tuck the chips inside the cookie dough ball and, as soon as they come out of the oven, press white chocolate chunks or chips (chunks are better) gently into the tops of the cookies. This way you get the plethora of white chocolate without them burning during baking if they're exposed on top.


Thursday, December 22, 2022

Stamped Cookies #25 from Your Baking Bestie

Stamped Cookies #25 - made dough November 28, 2022 from Your Baking Bestie
1 cup (226 grams) unsalted butter, cut into tablespoons, room temperature
1 cup (200 grams) granulated sugar
1 1/2 teaspoons vanilla extract
1 egg
2 teaspoons baking powder
1/2 teaspoon salt
3 cups (360 grams) all-purpose flour
  1. In the bowl of a stand mixer fitted with the paddle attachment, cream together butter and granulated sugar until well combined, 2-3 minutes.
  2. Beat in egg and vanilla.
  3. In a separate bowl, whisk together baking powder, salt and flour. Add to wet ingredients in two additions, mixing on low speed after each addition until just combined and no floury streaks remain.
  4. If using an embossed rolling pin, roll out dough between two sheets of parchment paper before chilling. If using cookie stamps, chill dough for 30 minutes before stamping.
  5. For cookie stamps, roll dough into balls and roll in granulated sugar before stamping and cutting. For embossed rolling pin, brush pin lightly with a mixture of equal parts flour and powdered sugar and lightly dust rolled-out cookie dough with same mixture before rolling and cutting.
  6. Lay stamped/embossed and cut out cookies on parchment lined baking sheets, cover and chill or freeze for several hours.
  7. When ready to bake, preheat oven to 350 degrees and evenly space cookies, leaving 2 inches between cookies. Bake for 12-13 minutes. Remove from oven and let rest on baking sheets for several minutes before transferring to wire rack to cool completely.
I love anything Peanuts and Snoopy so I was delighted to find this set of cookie stamps at Williams Sonoma. I was less delighted to discover they're the spring-loaded plastic stamps instead of high-quality resin or wood stamps. I don't have good luck with the spring-loaded plastic stamps. They break too easily and don't hold up well. Depending on the design, if the location of the spring-loaded press handle isn't perfectly centered in the design, you may get uneven impressions, no matter how evenly or firmly you press on the stamp. See the Charlie Brown snowglobe design below; the handle to press down the design is just a bit far off from the top right of the design so it doesn't imprint as well. 
But I will compromise for all things Snoopy so I (over)paid for the stamp set so I could make these cute little cookies. I tried this recipe from Baking Bestie. The plus side is they taste good and aren't as hard/crisp as other stamped butter cookies. The down side is they don't hold the impression as clearly. 
They do better on a stamped design that wasn't so detailed as you can see from the other stamps I used below. Still, these were pretty tasty. The edges are crisp, the middles are chewy and the fresh butter flavor comes through (don’t overbake or they’ll be hard). You just need to excuse my rookie mistake of not having evenly rolled out dough so parts of some of the cookies came out thinner and baked/browned more quickly than others (Exhibit A: Snoopy above). D’oh! (Get it? Dough? D’oh? What?? I’m tired from all the holiday baking and make bad jokes, lol.)


Tuesday, December 20, 2022

Homemade Oreos

Homemade Oreos - made dough December 14, 2022 from Buzz Feed
1 cup unsalted butter, softened
1 cup granulated sugar
2 large eggs
2 cups all-purpose flour
1 1/4 cups black cocoa
1/2 teaspoon baking soda

Cream Filling
1/2 cup butter, softened
2 cups powdered sugar
1 teaspoon vanilla
  1. In the bowl of a stand mixer fitted with the paddle attachment, cream together butter and granulated sugar until light and fluffy, 2-3 minutes. Beat in eggs until just combined.
  2. In a separate bowl, whisk together flour, black cocoa and baking soda. Add to butter mixture in 2 additions, mixing on low speed until just combined.
  3. Turn out the dough onto a large piece of parchment paper. Cover with an equal-size parchment paper and roll into 1/4" thickness. Leaving between parchment, chill dough for 1 hour.
  4. Preheat oven to 325 degrees F. Line baking sheets with parchment paper.
  5. Remove dough from fridge and remove top piece of parchment. Cut into circles using cookie cutter. Evenly space on baking sheets, leaving 1/2" space between cookies.
  6. Bake for 12-15 minutes or until edges are set and middle no longer looks raw. Let rest on baking sheets for several minutes then transfer to wire rack to cool completely.
  7. Make the filling: cream together butter, powdered sugar and vanilla until light and fluffy. Use filling to sandwich cookies together.
I had high hopes for these homemade Oreos but they were dashed after baking and tasting a cookie from the first batch. I (perhaps unfairly) had hoped they would keep their impressions after baking. They sort of did but not the smaller details and definitely not for the thicker cookies.
It's hard to make chocolate embossed dough cut cleanly without more flour than I want to use. I tried to temper the risk by combining equal parts flour, powdered sugar and black cocoa powder and brushing the top of the rolled out (and chilled) dough as well as the embossed rolling pin. It embossed well enough for the most part but you do have to imprint only on chilled dough. Otherwise, it's too soft and sticks to every nook and cranny in the rolling pin (yes, personal experience speaking).

Sadly though, the impressions didn't hold very well after baking. They also didn't really have an Oreo flavor. If I had been making soft dark chocolate sandwich cookies that weren't very sweet or rich, these would be great. I wasn't so I put these in the "okay" category.


It does do better with larger impression though and holds decently well. So this dough is better with cookie stamps with larger designs rather than an embossed rolling pin with finer details.