Monday, December 20, 2021

Biscoff Snickerdoodles

Biscoff Snickerdoodles - made dough November 29, 2021 from Moribyan
3 1/4 cups all-purpose flour
1 teaspoon baking soda
1/4 teaspoon baking powder
2 teaspoons cream of tartar
1/4 teaspoon salt
1 1/2 cups granulated sugar
1 cup unsalted butter, softened
2 large eggs
1 teaspoon vanilla extract
1 cup Biscoff spread or Speculoos cookie butter

4 tablespoons granulated sugar
2 teaspoons cinnamon
  1. In a medium bowl, whisk together flour, baking soda, baking powder, cream of tartar and salt; set aside.
  2. In the bowl of a stand mixer fitted with the paddle attachment, cream together butter and sugar until light and fluffy, 2-3 minutes. Add eggs, vanilla extract and cookie butter; beating until fully combined.
  3. Add dry ingredients in two additions, mixing until just combined after each addition; do not overmix.
  4. Portion dough into golf-ball-size balls and flatten slightly. Cover and chill or freeze for several hours or overnight.
  5. When ready to bake, preheat oven to 375 degrees F. Line baking sheets with parchment paper. Remove dough balls from freezer and let thaw while oven preheats.
  6. In a small bowl, combine 4 tablespoons granulated sugar with 2 teaspoons cinnamon. Roll dough balls in mixture until completely coated. Evenly space on baking sheets. Bake 10-12 minutes or until edges have set and middles no longer look raw. Remove from oven and let rest on baking sheets for several minutes. Transfer cookies to wire cooling rack to cool completely.
I've made something similar before but that recipe was called Cookie Butter Snickerdoodles. Cookie butter is also known as Biscoff or Speculoos (Trader Joe's version) so they're actually the same thing.
This recipe is similar to the other one I had made earlier this year and is also pretty good. If you're a snickerdoodle purist, you may not like it as much as the cookie butter does flavor it.
But it has the same components of a snickerdoodle in terms of the chewiness and the cinnamon sugar coating. 
If you like cookie butter more than plain snickerdoodles though, this is a great recipe. The cookie butter flavor isn't that strong as it does have to share your taste buds with the cinnamon and sugar but I like how it baked. It didn't spread too thin, the edges were crisp and the middle was chewy.


Friday, December 17, 2021

Levain-Style Soft Baked Brown Butter Funfetti Cookies

1 cup unsalted butter, melted and browned, then re-chilled to solid form
1/2 cup dark brown sugar, packed
1/3 cup granulated sugar
1 large egg
2 large egg yolks
1 tablespoon vanilla extract
2 cups (250 grams) all-purpose flour
1 1/2 cups (172 grams) cake flour
2 tablespoons cornstarch
1 teaspoon baking powder
1 teaspoon baking soda
1/2 teaspoon salt
2 tablespoons milk
1/2 cup sprinkles
  1. To brown the butter: place butter in medium saucepan over medium high heat. Stir as it melts, foams and begins to brown, 4-6 minutes or until a nutty aroma arises and you can see the browned bits on the bottom. Remove from heat, transfer to a 9-inch round cake pan and place in freezer for 20 minutes or until solid and re-formed.
  2. Scrape solidified brown butter into a mixing bowl and beat with paddle attachment until smooth and creamy.
  3. Add dark brown sugar and granulated sugar; beat until combined.
  4. Add egg, egg yolks and vanilla; mixing until combined.
  5. In a separate bowl, whisk together flour, cake flour, cornstarch, baking powder, baking soda and salt. Add in two additions to butter mixture, beating until just combined after each addition. Add milk and beat until just combined. Do not overbeat.
  6. Fold in sprinkles. Portion dough into 4-ounce balls then pat into thick discs. Cover then chill or freeze for several hours or overnight.
  7. When ready to bake, preheat oven to 375 degrees F. Line baking sheets with parchment paper and evenly space dough discs. Bake 14-16 minutes or middles are just barely set. Remove from oven, let rest on cookie sheet for several minutes then transfer cookies to wire rack to cool completely.
You don't often see baked goods made with sprinkles on my blog. Mostly because I'm not a fan of sprinkles. I like them well enough when used as decorative garnish on top of a frosted cupcake but for the most part, I dodge sprinkles. They add crunch to a cookie and stay crunchy, unlike nuts, in baking. However. I don't like crunch in a chewy cookie. Hence the no-sprinkles-in-my-baking thing.
But, as you can see here, I made an exception for these funfetti cookies, mostly because I was putting together holiday care packages for Soldiers Angels and wanted to do Christmas-themed baked goods in my boxes. And a reminder to myself that *I* wasn't the one eating these and hopefully they would go to military service members who didn't have my bias against sprinkles.
Sprinkles are the easiest way to add a holiday flare to cookies so I can see why they're so popular. They look fun. I didn't make these as big as a Levain cookie since they were going to care packages and smaller cookies are easier to share among the unit.
The cookies themselves were pretty good. I didn't bake them for very long since they were small and didn't need a long bake. The flavor and texture were good except - yes, it's coming - the sprinkles part. I still don't like the crunch that interferes with the soft chewiness of the cookie. So I may make this recipe again and leave out the sprinkles.


Thursday, December 16, 2021

Bakery Review: Caramel Apple Pie from Justice of the Pies

Caramel Apple Pie - ordered October 28, 2021 for November 24, 2021 delivery from Justice of the Pies via Goldbelly
I ordered this caramel apple pie from Justice of the Pies as one of our Thanksgiving desserts. As you can see from the pictures, I ordered it through Goldbelly. Like all the other times I've ordered from Goldbelly in the recent past, they were having a sale. In this case, it was $20 off full price so I was able to get it $49 shipped. 
Cutie pie - get it?
Which might seem expensive for a pie but to support a small business, to support their social justice cause and just for a caramel apple pie, I'll spend the money. Any combination of the three is enough for me to break open my wallet. 
Well packaged, well-insulated

The pie arrived as pictured above, well wrapped, frozen in perishables packaging (insulated, dry ice) with a sleeve of the salted caramel packaged separately. The caramel is meant to be drizzled over the heated pie once it's out of the oven.

The pie also came with these cards, with heating and storage instructions.
And it came with the story of their mission. I encourage you to visit the Justice of the Pies website to read the story. And to hopefully get a pie of your own.

The pie before re-heating and without the caramel sauce

This pie was delicious.. The bottom crust was flaky and the top crust of oatmeal topping with caramel drizzle added the perfect touch of sweetness as well as additional texture to the apple pie filling. Despite the caramel, it actually wasn't too sweet. Or else the oatmeal fooled me into thinking it wasn't.
If I had any critique about the pie, it's that the caramel got a little lost in the oatmeal topping. When I drizzled the caramel over the heated pie, the drizzle was only visible for a few minutes before it absorbed fully from sight into the oat topping.
Which was a bit aesthetically disappointing as nothing I like better than seeing (and eating) that caramel. So mine didn't look like the picture on the postcard that came with the pie. I couldn't taste the caramel very much either as it combined with the apple filling. 
But other than that, this was still mighty good pie.


Sunday, December 12, 2021

Stamped Cookies #15

Stamped Cookies #15 - made dough November 18, 2021 from Hello Little Home
2 2/3 cups all-purpose flour
1 teaspoon baking powder
1/2 teaspoon salt
1 cup unsalted butter, softened
1 cup brown sugar, packed
1 large egg
1 teaspoon vanilla extract

1 cup granulated sugar for stamping (do not mix into the dough)
  1. In a medium bowl, whisk together flour, baking powder and salt; set aside.
  2. In the bowl of a stand mixer fitted with the paddle attachment, cream together butter and brown sugar until well combined and fluffy. Mix in egg and vanilla extract until just combined.
  3. Add flour mixture in two additions, mixing until just combined after each addition.
  4. Divide dough into two and shape each half into a thick disc. Wrap completely in plastic wrap and chill for 2 hours or overnight. Refrigerate cookie stamps as well.
  5. Once dough is chilled, preheat oven to 375 degrees F. Line baking sheets with parchment paper. Place granulated sugar in small bowl.
  6. Roll dough into golf-ball-sized balls then roll each dough in granulated sugar. Dip cookie stamp into sugar then press evenly with dough ball in the center. Repeat with each dough ball. Chill or freeze stamped cookies in one layer, covered in plastic wrap, for at least 10 minutes.
  7. Bake chilled cookies until golden brown on bottom, 9-10 minutes. Let cookies cool on baking sheets for 5 minutes then transfer to wire rack to cool completely.
If you're sick of my stamped cookie posts, sorry, you're going to need to keep on scrolling by as I'm not done yet. Hard to be done when - you guessed it - I bought another cookie mold set from Kitchen Vixen.
It came just as well packaged and as high quality as the first set I bought. This is more appropriate for Halloween and Thanksgiving but I didn't care. It's cute. And technically, it IS still fall anyway.
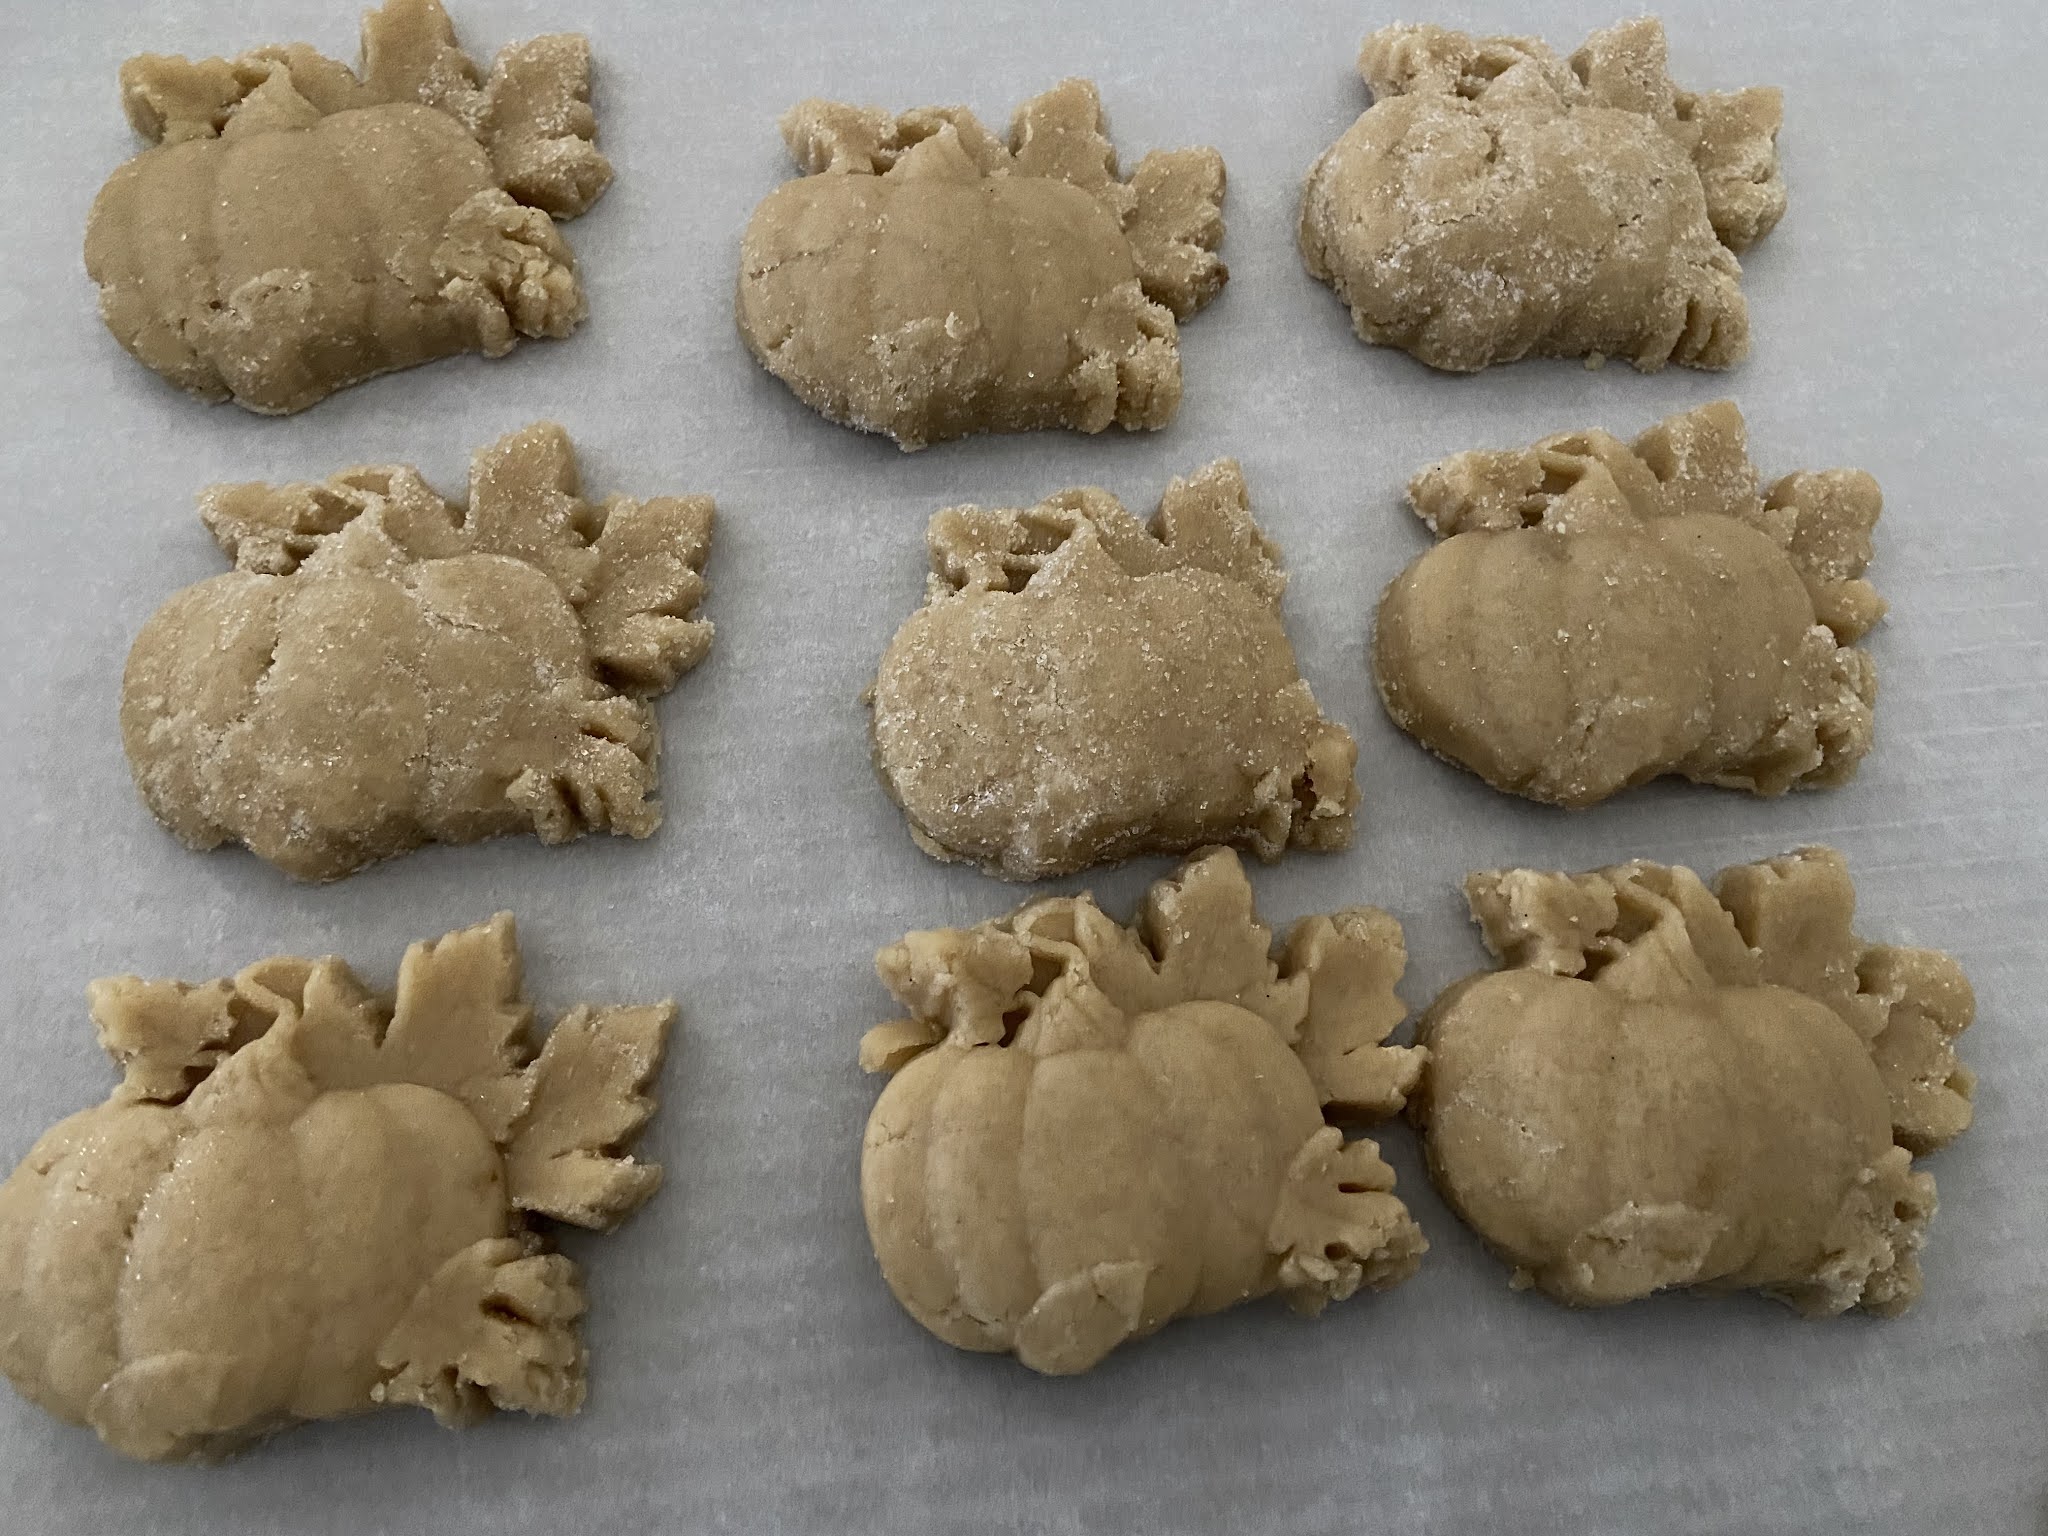
The only bummer though is this recipe for stamped cookies didn't work as well for this cookie mold as the recipe from Masala Herb that went so beautiful with the Eva's Lace set from Kitchen Vixen. This dough was softer to work with and I had a harder time getting it out of the pumpkin mold 
Despite the dough being chilled, it scoffed at my efforts to extract it from the mold intact, especially the leaves surrounding the pumpkin. So after a few valiant attempts, I switched to my Nordic Ware Pretty Pleated cookie stamps. Because they're so pretty! (If you're picturing a manic gleam in my eye, you would be correct.)

The pumpkin ones baked to cracks as you can see so they were not aesthetically pleasing. But, and this is a big but, their saving grace was the cookies were delicious. They had more flavor than even the Masala Herb ones and I loved the texture. Because the pumpkin design made a thicker cookie, this baked to a nice chewiness rather than a crisp texture. I loved it. I might even say that out of the multiple stamped cookie recipes I've tried, this would rank in the top 3 for flavor.

I just wish the dough was a little easier to work with and the impressions kept a little better but this is one of the stamped cookie recipes that work better with larger designs without a lot of intricate detail. In other words, it works well with the Nordic Ware stamps.


Friday, December 10, 2021

Twix Blondies

Twix Blondies - made November 18, 2021, modified from Cookies and Cups 
3/4 cup butter, melted
2 cups brown sugar
3 eggs
2 teaspoons vanilla
2 teaspoons baking powder
1 teaspoon salt
2 1/2 cups all-purpose flour
6 full-size Twix bars (3 packages) coarsely chopped
1 cup semisweet chocolate chips
1/2 cup salted caramel
  1. Preheat oven to 350 degrees F. Line a 9 x 13 baking with foil and lightly spray with nonstick cooking spray.
  2. In the bowl of a stand mixer fitted with the paddle attachment, cream together butter and brown sugar on low speed until combined. Add eggs, vanilla, baking powder and salt; mix until smooth and combined.
  3. Add flour and beat on low speed until just combined.
  4. Fold in Twix pieces and chocolate chips. Spread 2/3 of the batter into an even layer in prepared pan. Dollop caramel and swirl, cover with remaining batter. Bake 25-30 minutes or until edges are set and center is almost set. Cool completely before cutting into bars.
I have mixed feelings about this bar cookie, more because of my expectations rather than the bar cookie or recipe itself. I thought this would be gooey and I even stacked the odds in my favor by swirling caramel into the batter before baking.
It didn't turn out as gooey as I thought it would and I don't think it's because I baked it too long. Overbaking is not a problem I have. Usually underbaking is what leads to my regular baking fails.
The caramel mostly sank to the bottom so that didn't quite work out either and it was more sticky/chewy rather than flowy. I was going for flowy.
Don't get me wrong; this was still a good bar cookie. If you're a Twix fan, it's a great bar cookie. The blondie part is reminiscent of the cookie part of the Twix and the chocolate and caramel make up the rest. Plus actual Twix pieces in it.
It'd probably be more aesthetically pleasing if you press additional chopped up Twix pieces into the top of the blondie as soon as you take it out of the oven. The Twix would melt into the top of the blondie and would be more obvious. I didn't do that as I didn't plan ahead well enough and didn't have any more Twix bars to use but that's something to do for next time.


Wednesday, December 8, 2021

Nutella Brownies - Happy National Brownie Day

Nutella Brownies - made November 18, 2021 from Pies and Tacos 
1/2 cup unsalted butter
1 cup semisweet chocolate chips
1/2 cup granulated sugar
1/4 cup brown sugar
3 eggs
1 1/2 teaspoons vanilla extract
2/3 cup all-purpose flour
2 tablespoons cocoa powder
1/4 teaspoon salt
1 cup semisweet chocolate chips
1 cup Nutella
  1. Preheat oven to 350 degrees F. Line an 8 x 8-inch baking pan with foil and lightly spray with nonstick cooking spray.
  2. In the top half of a double boiler set over hot water, melt butter and 1 cup of semisweet chocolate chips. Whisk until melted and combined. Remove from heat. 
  3. Add granulated sugar and brown sugar; whisk until combined.
  4. Add eggs, one at a time, whisking after each addition until combined. Whisk in vanilla extract.
  5. In a separate bowl, stir together flour, cocoa powder and salt. Add to batter and whisk until incorporated. Beat briefly until mixture is glossy and well combined. Fold in chocolate chips.
  6. Spread half the batter in the prepared pan. Drop dollops of Nutella over batter and smooth into an even layer. Cover with remaining batter and smooth top.
  7. Bake for 25 to 30 minutes or until edges have set and a toothpick inserted diagonally (try to avoid the Nutella layer and get the top layer) comes out with a few moist crumbs. Cool completely before cutting.
Can you stand another brownie recipe? Of course you can because today is National Brownie Day :). Quick, easy, fudgy and just the thing for the Nutella lovers on your gift giving list.
I was a little generous with the Nutella layer so you can clearly see it in the pictures. This isn't the time for careful measurement of exactly what the recipe says. As the meme goes, you measure that isht with your heart. And a heavy Nutella hand.