Sunday, December 12, 2021

Stamped Cookies #15

Stamped Cookies #15 - made dough November 18, 2021 from Hello Little Home
2 2/3 cups all-purpose flour
1 teaspoon baking powder
1/2 teaspoon salt
1 cup unsalted butter, softened
1 cup brown sugar, packed
1 large egg
1 teaspoon vanilla extract

1 cup granulated sugar for stamping (do not mix into the dough)
  1. In a medium bowl, whisk together flour, baking powder and salt; set aside.
  2. In the bowl of a stand mixer fitted with the paddle attachment, cream together butter and brown sugar until well combined and fluffy. Mix in egg and vanilla extract until just combined.
  3. Add flour mixture in two additions, mixing until just combined after each addition.
  4. Divide dough into two and shape each half into a thick disc. Wrap completely in plastic wrap and chill for 2 hours or overnight. Refrigerate cookie stamps as well.
  5. Once dough is chilled, preheat oven to 375 degrees F. Line baking sheets with parchment paper. Place granulated sugar in small bowl.
  6. Roll dough into golf-ball-sized balls then roll each dough in granulated sugar. Dip cookie stamp into sugar then press evenly with dough ball in the center. Repeat with each dough ball. Chill or freeze stamped cookies in one layer, covered in plastic wrap, for at least 10 minutes.
  7. Bake chilled cookies until golden brown on bottom, 9-10 minutes. Let cookies cool on baking sheets for 5 minutes then transfer to wire rack to cool completely.
If you're sick of my stamped cookie posts, sorry, you're going to need to keep on scrolling by as I'm not done yet. Hard to be done when - you guessed it - I bought another cookie mold set from Kitchen Vixen.
It came just as well packaged and as high quality as the first set I bought. This is more appropriate for Halloween and Thanksgiving but I didn't care. It's cute. And technically, it IS still fall anyway.
The only bummer though is this recipe for stamped cookies didn't work as well for this cookie mold as the recipe from Masala Herb that went so beautiful with the Eva's Lace set from Kitchen Vixen. This dough was softer to work with and I had a harder time getting it out of the pumpkin mold 
Despite the dough being chilled, it scoffed at my efforts to extract it from the mold intact, especially the leaves surrounding the pumpkin. So after a few valiant attempts, I switched to my Nordic Ware Pretty Pleated cookie stamps. Because they're so pretty! (If you're picturing a manic gleam in my eye, you would be correct.)

The pumpkin ones baked to cracks as you can see so they were not aesthetically pleasing. But, and this is a big but, their saving grace was the cookies were delicious. They had more flavor than even the Masala Herb ones and I loved the texture. Because the pumpkin design made a thicker cookie, this baked to a nice chewiness rather than a crisp texture. I loved it. I might even say that out of the multiple stamped cookie recipes I've tried, this would rank in the top 3 for flavor.

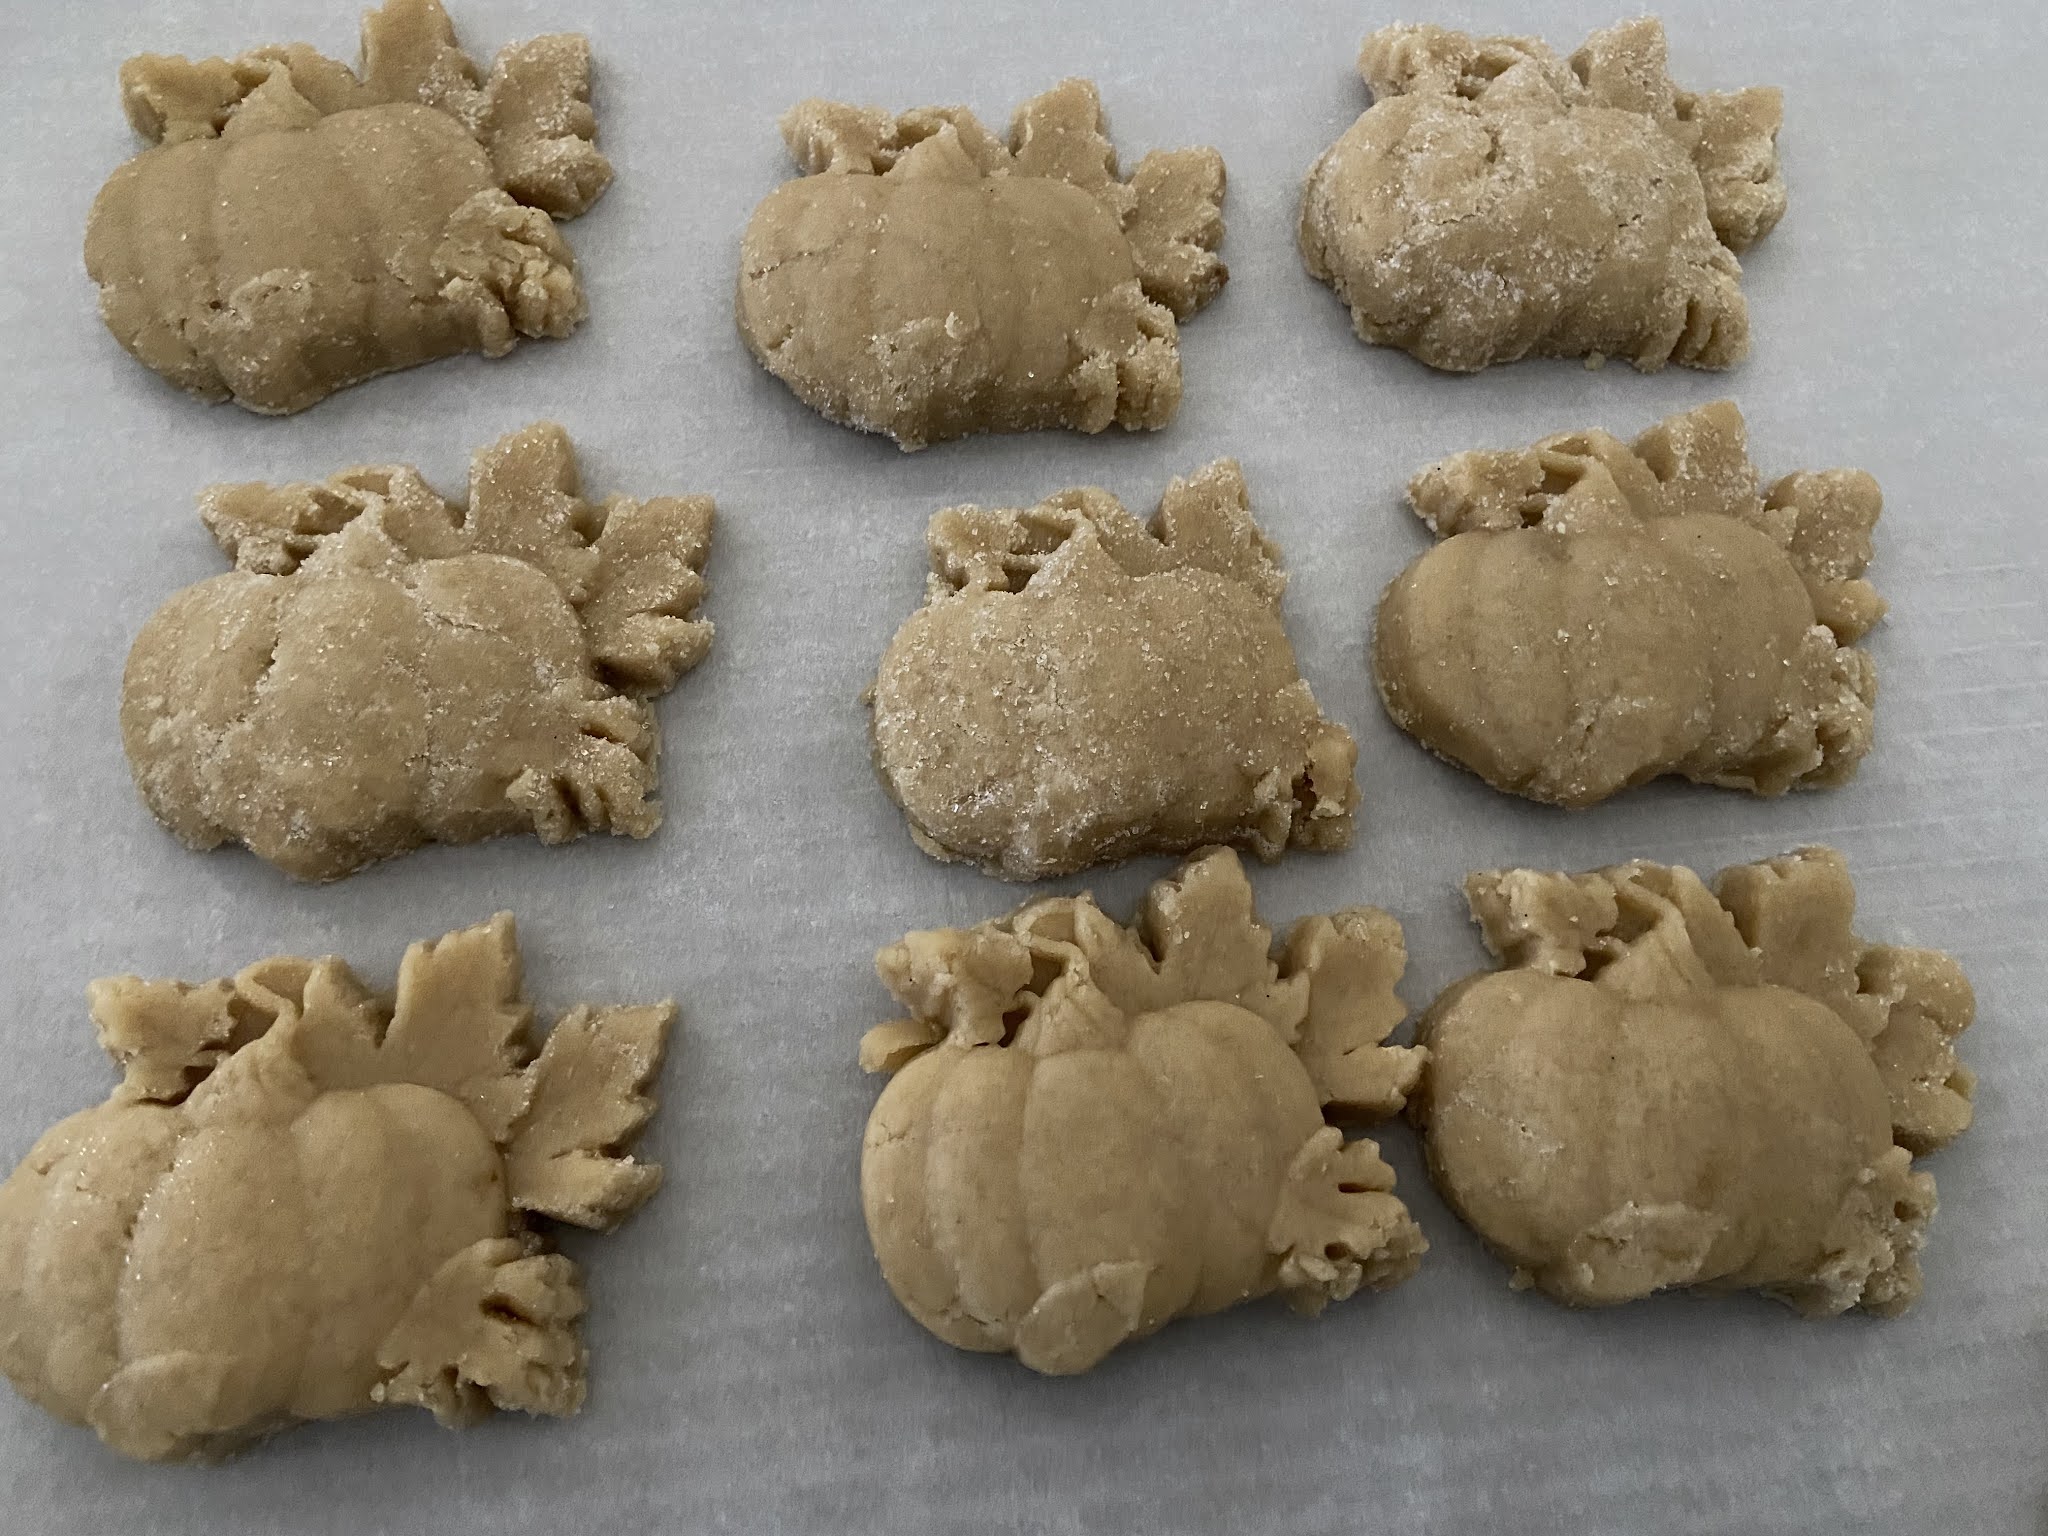
I just wish the dough was a little easier to work with and the impressions kept a little better but this is one of the stamped cookie recipes that work better with larger designs without a lot of intricate detail. In other words, it works well with the Nordic Ware stamps.


Friday, December 10, 2021

Twix Blondies

Twix Blondies - made November 18, 2021, modified from Cookies and Cups 
3/4 cup butter, melted
2 cups brown sugar
3 eggs
2 teaspoons vanilla
2 teaspoons baking powder
1 teaspoon salt
2 1/2 cups all-purpose flour
6 full-size Twix bars (3 packages) coarsely chopped
1 cup semisweet chocolate chips
1/2 cup salted caramel
  1. Preheat oven to 350 degrees F. Line a 9 x 13 baking with foil and lightly spray with nonstick cooking spray.
  2. In the bowl of a stand mixer fitted with the paddle attachment, cream together butter and brown sugar on low speed until combined. Add eggs, vanilla, baking powder and salt; mix until smooth and combined.
  3. Add flour and beat on low speed until just combined.
  4. Fold in Twix pieces and chocolate chips. Spread 2/3 of the batter into an even layer in prepared pan. Dollop caramel and swirl, cover with remaining batter. Bake 25-30 minutes or until edges are set and center is almost set. Cool completely before cutting into bars.
I have mixed feelings about this bar cookie, more because of my expectations rather than the bar cookie or recipe itself. I thought this would be gooey and I even stacked the odds in my favor by swirling caramel into the batter before baking.
It didn't turn out as gooey as I thought it would and I don't think it's because I baked it too long. Overbaking is not a problem I have. Usually underbaking is what leads to my regular baking fails.
The caramel mostly sank to the bottom so that didn't quite work out either and it was more sticky/chewy rather than flowy. I was going for flowy.
Don't get me wrong; this was still a good bar cookie. If you're a Twix fan, it's a great bar cookie. The blondie part is reminiscent of the cookie part of the Twix and the chocolate and caramel make up the rest. Plus actual Twix pieces in it.
It'd probably be more aesthetically pleasing if you press additional chopped up Twix pieces into the top of the blondie as soon as you take it out of the oven. The Twix would melt into the top of the blondie and would be more obvious. I didn't do that as I didn't plan ahead well enough and didn't have any more Twix bars to use but that's something to do for next time.


Wednesday, December 8, 2021

Nutella Brownies - Happy National Brownie Day

Nutella Brownies - made November 18, 2021 from Pies and Tacos 
1/2 cup unsalted butter
1 cup semisweet chocolate chips
1/2 cup granulated sugar
1/4 cup brown sugar
3 eggs
1 1/2 teaspoons vanilla extract
2/3 cup all-purpose flour
2 tablespoons cocoa powder
1/4 teaspoon salt
1 cup semisweet chocolate chips
1 cup Nutella
  1. Preheat oven to 350 degrees F. Line an 8 x 8-inch baking pan with foil and lightly spray with nonstick cooking spray.
  2. In the top half of a double boiler set over hot water, melt butter and 1 cup of semisweet chocolate chips. Whisk until melted and combined. Remove from heat. 
  3. Add granulated sugar and brown sugar; whisk until combined.
  4. Add eggs, one at a time, whisking after each addition until combined. Whisk in vanilla extract.
  5. In a separate bowl, stir together flour, cocoa powder and salt. Add to batter and whisk until incorporated. Beat briefly until mixture is glossy and well combined. Fold in chocolate chips.
  6. Spread half the batter in the prepared pan. Drop dollops of Nutella over batter and smooth into an even layer. Cover with remaining batter and smooth top.
  7. Bake for 25 to 30 minutes or until edges have set and a toothpick inserted diagonally (try to avoid the Nutella layer and get the top layer) comes out with a few moist crumbs. Cool completely before cutting.
Can you stand another brownie recipe? Of course you can because today is National Brownie Day :). Quick, easy, fudgy and just the thing for the Nutella lovers on your gift giving list.
I was a little generous with the Nutella layer so you can clearly see it in the pictures. This isn't the time for careful measurement of exactly what the recipe says. As the meme goes, you measure that isht with your heart. And a heavy Nutella hand.


Monday, December 6, 2021

Stamped Cookies #13 - Ginger Molasses Cookies

Ginger Molasses Cookies (stamped cookies #13) - made dough November 13, 2021, recipe (and stamps) from Nordic Ware 
3 3/4 cups all-purpose flour
1 tablespoon ginger
1 tablespoon cinnamon
2 teaspoon ground cloves
1 1/2 teaspoons salt
1 cup unsalted butter, room temperature
1 cup granulated sugar plus more for rolling dough in
1 large egg
1/2 cup molasses

Orange Cream Cheese Filling
1 (4 ounces) stick butter, softened
8 ounces cream cheese
4 cups powdered sugar
1/2 teaspoon salt
zest of 1 orange
juice of half an orange
  1. In a medium bowl, whisk together flour, ginger, cinnamon, ground cloves and salt; set aside.
  2. In the bowl of a stand mixer fitted with the paddle attachment, cream together butter and sugar on medium speed until light and fluffy, 2-3 minutes. Scrape down the sides of the bowl and add egg. Beat until combined. Add molasses and beat until just combined, scraping down sides and bottom of bowl. Add flour mixture in two additions, beating on low speed until just combined. Cover and refrigerate for at least 2 hours but less than a day.
  3. When ready to bake, preheat oven to 350 degrees F. Line baking sheets with parchment paper. Roll dough into golf-ball-sized balls and roll in sugar before placing on baking sheets. Press dough evenly with stamps. Cut with round cookie cutters if you want even edges. Remove any dough scraps before baking 10-14 minutes. Let cookies cool on baking pan for 5 minutes then transfer to wire rack to cool completely before frosting.
  4. Make filling: cream together butter and cream cheese until fluffy. Gradually add powdered sugar and beat until combined. Mix in salt, orange zest and orange juice until combined. Spread filling over half of the cooled cookies and sandwich with the rest of the cookies.
Another "tis the season" recipe. I'm not overly fond of ginger molasses cookies. I can deal with ginger but mostly in savory recipes. I don't care much for the strong taste of even mild molasses though so I rarely make ginger molasses cookies.
Except during the holidays and when I want to try my new Christmas cookie stamps. How cute are these?? Yes, they're from - of course - Nordic Ware and I freaking love them.
The original recipe called for the cream cheese filling and I've included the recipe for it here but I didn't make it for these cookies. Because I was shipping them in military care packages overseas that have a 2-3 week mailing time, I would never risk a cream cheese filling going unrefrigerated for that long.
Because I was mailing them, I made the cookies pretty thick so they would hold up well in shipping. As you can see from the pictures, this recipe kept the impressions fairly well. Although, as I've learned from my multiple experiments with cookie stamps, this recipe would work better with stamps that don't have a lot of intricate detail. The Nordic Ware ones are perfect as they have just the right amount of detail for this dough to hold the impression clearly.

As for the flavor, I ended up liking it more than I expected (but remember I have low expectations for ginger molasses cookies). They definitely had a bite to them but in a good way (also remember I have bland taste buds). I liked the texture best of all.
You do want to watch the baking time on these as overbaking them will make for hard cookies. Underbaking, if you're using cookie stamps, may lead to the impressions sinking a bit and not being as clear.
But overall, this is a great addition to the holiday cookie lineup.

Saturday, December 4, 2021

Nutella Peanut Butter Cookies

Nutella Peanut Butter Cookies - made dough November 11, 2021 from Simply Bakings
1 cup butter, softened
1 cup granulated sugar
1 cup brown sugar
2/3 cup creamy peanut butter
2 eggs
2 teaspoons vanilla extract
2 2/3 cups all-purpose flour
2 teaspoons baking soda
1 teaspoon salt
heaping 1/2 cup Nutella
  1. In the bowl of a stand mixer fitted with the paddle attachment, cream together butter, granulated sugar and brown sugar until well combined. Beat in peanut butter until combined.
  2. Add eggs and vanilla extract, beat until just combined.
  3. In a separate bowl, whisk together flour, baking soda and salt. Add to butter mixture and beat on low speed until just combined. Do not overmix.
  4. Dollop Nutella over cookie dough and scoop into golf-ball-sized balls, leaving swirls of Nutella in each dough ball. Cover and chill for several hours or overnight.
  5. When ready to bake, preheat oven to 350 degrees F. Line baking sheets with parchment paper. Evenly space dough balls on baking sheets. Bake 10-12 minutes or until edges are set and middles no longer look raw.
It’s National Cookie Day. So this is for all the Nutella and peanut butter lovers out there. Make a simple peanut butter cookie dough, swirl or dollop Nutella into it and bake. If you like a more uniform cookie, swirl the Nutella into the completed dough before portioning into dough balls but don't overmix the Nutella to actually become incorporated into the dough. You want distinct Nutella swirls.

If you're a little more nutso about Nutella *raises hand* then you want the dollop approach. After I finished mixing the dough, I dolloped generous spoonfuls of Nutella over the dough and began scooping into dough balls, only dabbing a bit of dough onto a dough ball to partially cover the Nutella if a too-generous amount of Nutella ended up deforming the dough ball. Otherwise I left the dollops as intact as possible.
Once you scoop out the top layer of dough, dollop the Nutella again over the remaining cookie dough and keep scooping. You get the picture. This was a good basic peanut butter cookie, amped up with the Nutella. If you're more of a purist and don't like mixing flavors, instead of dolloping or swirling Nutella, try it with some peanut butter.


Friday, December 3, 2021

Coconut Cream Cheese Pound Cake

Coconut Cream Cheese Pound Cake - made November 9, 2021 from Call Me PMC 
1 cup butter, room temperature
1/2 cup shortening
3 cups granulated sugar
1 8-ounce package full-fat cream cheese
7 large eggs
3 cups all-purpose flour
1 tablespoon coconut extract
1 teaspoon almond extract
1 cup sweetened, flaked coconut
  1. Preheat oven to 325 degrees F. Generously grease and flour Bundt pan.
  2. In the bowl of a stand mixer fitted with the paddle attachment, cream together butter, shortening and granulated sugar until well combined and fluffy, 2-3 minutes.
  3. Add the cream cheese and beat until well combined and fluffy, 1-2 minutes.
  4. Alternately add eggs, 2 or 3 at a time, with the flour, 1 cup at a time, beginning and ending with the flour and beating until just combined after each addition.
  5. Stir in the extracts. Fold in coconut. Pour into prepared Bundt pan and smooth top into an even layer. Place on a baking sheet and bake for 85-90 minutes or until a toothpick inserted into the thickest part of the cake comes out with a few moist crumbs or clean.
  6. Cool for 5-10 minutes before loosening sides and center with a small rubber spatula and inverting onto a serving plate.
I have mixed feelings about this cake but the downside comes from my baking rather than the recipe itself. If you look at the ingredients, you'll see there's no chemical leavening in it so you would expect it would have the dense texture of a pound cake. And it does.
Even though I did beat the butter, shortening and sugar together a fair amount to incorporate air into it, it still came out as as a thick batter and baked into a dense texture. I expected that.
What I didn't expect is how long it would take to bake. The directions say 85-90 minutes. I left this in the oven for over 100 minutes and during parts of the baking, even increased the temperature to 350 as my oven runs cool. 
I finally took it out after 105 minutes as the toothpick test came out "clean" but you can see in the picture above in the bottom left corner of the cake slice that it was still underdone. The top part of the cake was fine and tasted great. Bottom, inner parts, not so much.


Even if/when baked properly, this is a really heavy cake. In hindsight, I would beat the butter and sguar even more than I did and "cheat" with a little baking powder to lighten up the texture a bit.