Monday, June 12, 2017

Bakery Review: Cutesy Cupcakes

Cutesy Cupcakes - visited May 20, 2017
It’s been awhile since I had a new cupcake bakery to review. Actually, it feels like it’s been awhile since I’ve tried or sought out any new bakeries. I’m still having (more than) my share of sweets but I’ve been rolling my own, so to speak.

But a friend of mine told me about Cutesy Cupcakes. Actually, I think our conversation went something like:
Her: Have you tried that new cupcake place?

Me: WHAT NEW CUPCAKE PLACE???

I think I went there within days of finding out about it. According to their website, Cutesy Cupcakes was a contender on Cupcake Wars a few years ago but they didn’t win. I don’t know which episode they were on but I watch the reruns regularly so I will have to keep an eye out for them.


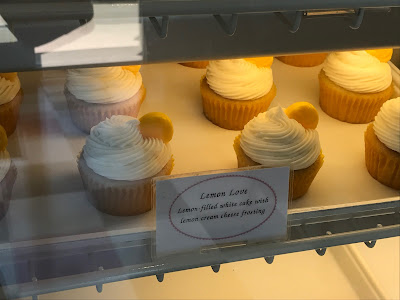
Their location provides both cupcakes and ice cream as well as various drinks and their prices for cupcakes are on a sliding scale. The more you buy, the cheaper the individual cupcakes are. I limited myself to two. At least for this initial visit. Since my Boston sojourn last year, I’ve been sampling vanilla cupcakes more than chocolate whenever I try a new bakery. I’ve discovered that vanilla cupcakes are so simple that it’s a mark of a good bakery to have an excellent vanilla cupcake. There’s no disguise you can make that wouldn’t be apparent in a bad vanilla cupcake. But a good one will stand on the simplicity of its ingredients.

The shop itself was cute. It’s not meant for a big crowd as there weren’t many tables or places to sit but if you wanted to swing by for a cupcake or ice cream with a friend or two, it’s a good option. The ladies behind the counter were very friendly and quite nice, happy to provide service with a smile and a cupcake.
My other flavor choice was a salted caramel chocolate cupcake with caramel buttercream, a drizzle of salted caramel, sea salt sprinkles and a chewy caramel on top. Is that a cupcake that spells my name in glitter or what?

Each cupcake was in its own specialized cupcake to-go container which I thought was clever and pretty packaging. It not only allowed you to transport them safely but the clear plastic clam shell case showcased the cupcakes in individual glory. It was definitely a step above those cardboard cutouts meant to anchor cupcakes in place but then covered them in a box.


The cupcakes themselves were also pretty good. I don’t know if I would necessarily be able to distinguish them from another typical cupcake bakery. That status is reserved for Crumbs Bake Shop, Sprinkles and Sibby’s. Cutesy Cupcakes had more frosting than I care for (I scraped off half of it) but they’re better than I could make. I don’t have a light hand with cupcakes and tend to underbake them so I can’t achieve the soft fluffiness of a Crumbs cupcake, for instance. But Cutesy’s vanilla cupcake was good and attested to pure quality ingredients that could make a vanilla cupcake stands on its own. The salted caramel was good as well even if I scraped off more of the frosting and just went with the cake and caramel candy on top.

Next time I go back, I want to try the red velvet. They were out when I visited and had only put out a new tray just as I was leaving. I can’t eat three cupcakes so I’ll save that for next time.


Saturday, June 10, 2017

Buttermilk Chocolate Cake

Buttermilk Chocolate Cake - made May 7, 2017 from Southern Bite
One of the common themes on my blog for the recipes I try is to use up an ingredient I have before it expires. That’s often a dairy product like milk, buttermilk or sour cream. Sometimes it feels like 90% of the time I post a recipe that uses buttermilk is because I’m trying to use up buttermilk. I’ve heard of the tricks like freezing it and only thawing when you need it but I’ve never done it. I don’t know why. I used to use powdered buttermilk and just rehydrate however much I needed when I had to but that version never seemed as good as fresh buttermilk. But now, I just try to plan ahead and when I do buy buttermilk to use in a recipe, I line up several more recipes to use up the rest.
This is one of those “use up my buttermilk” recipes. Pinterest is a treasure trove of such recipes since you can search for what has the ingredient in the title or the recipe. Pictures say a thousand words and I liked how this looked on the original blog that I got the recipe from so it was an easy decision to try this out.
This is almost like a standard Texas sheet cake recipe that yields an easy-to-make chocolate cake that’s then frosted with an easy-to-make icing. Both of which are delicious and easy to serve to a crowd. I cut the original frosting recipe in half since I don’t like a lot of frosting. You can see from the pictures the thin layer of frosting coating my cake. Yup, that’s about as much frosting as I like. If you’re not me and prefer a thicker layer, make the frosting recipe below as is.
The cake texture on this one was fluffy and soft and the (thin layer of) frosting complemented it perfectly. I gave some of this to my parents and brought the rest into work. The highest accolade from my mom and several of my coworkers? “I like this; it isn’t too sweet.” Almost verbatim from at least 3 different people. Although I laughed when my coworkers said it since they matched my mom’s tone of praise and sincerity, I know what they mean. Chocolate desserts often aren’t “too sweet”; chocolate triggers a different flavor signal than more sugary desserts. Even though you use sugar in chocolate desserts too. Thanks to the Pernigotti cocoa I used in this cake and frosting, the dark rich cocoa offsets any sweetness from the sugar to provide a full-bodied chocolate flavor.
2 cups all-purpose flour
1 teaspoon baking powder
1 teaspoon baking soda
1/2 teaspoon salt
2 cups sugar
1/2 cup (1 stick) unsalted butter
3 tablespoons cocoa powder
1/2 cup vegetable oil
1 cup water
3 eggs
1/2 cup buttermilk
1 teaspoon vanilla extract

Icing
1/2 cup (1 stick) unsalted butter
3 tablespoons cocoa powder
3 3/4 cups confectioners' sugar
1 teaspoon vanilla
6-8 tablespoons buttermilk
  1. Preheat oven to 350 degrees F. Line a 9 x 13" baking pan with foil and lightly spray with nonstick cooking spray.
  2. In a large bowl, whisk together four, baking powder, baking soda, salt and sugar.
  3. In a small saucepan, melt the butter, then stir in the cocoa powder, oil and water. Heat  to a boil and let boil for 1 minute.
  4. Meanwhile, in a small bowl, mix together the eggs, buttermilk and vanilla. 
  5. Pour the heated mixture over the flour mixture and stir. Add the eggs and buttermilk mixture and stir until well combined. 
  6. Pour the batter into the prepared pan and bake for 35 to 45 minutes or until a toothpick inserted near the center comes out clean or with a few moist crumbs. Cool for at least 30 minutes before icing.
  7. Make the icing: Combine the butter and cocoa in a small saucepan. Cook until the butter is melted completely. Take off the heat and stir in the vanilla. Whisk until smooth.
  8. Pour the confectioners' sugar into a large bowl and pour the hot mixture over the sugar. Stir to combine. Add 1 tablespoon of buttermilk at a time until you get the icing to a pourable consistency but not too thin. Pour over the cake and spread to coat.

Thursday, June 8, 2017

Cookie Butter Quick Bread

Cookie Butter Quick Bread  (original title Sweet Biscoff Loaf)- made May 6, 2017 from Biscoff Cookies & Spread Cookbook
After my month of baking mostly just plain brownies, snickerdoodles and every Levain Bakery copycat of chocolate chip cookies that I could find, I wanted to make something completely different. I browsed my (dusty) bookshelves and was reminded that I had this cookbook for Biscoff cookies and spread. When I first bought the book, I tried out several things at once from it. Then, per my usual MO, put it back on the bookshelf, moved on to other recipes and forgot that there were likely still recipes in it that I wanted to try.

I had even earmarked the recipes I wanted to try first with various post-its sticking out of it. This was one of those earmarked recipes. I’m not normally a fan of quick breads. My banana bread is the one I make the most often but mostly because my family asks for it all the – freaking – time. Otherwise, I don’t make them a lot. I don’t have anything in particular against them and they, by definition, are usually easy and quick to make.
But quick breads have commitment issues to me. They’re not like regular bread of the flour, shortening, yeast, salt and water variety but they’re not cakes either of the fluffy texture and frosting camp. Instead they’re something in between. Mostly they’re like muffins in loaf form and I don’t make good muffins. They have their place but they’re not my go-to dessert, know what I mean?

Still, this one used cookie butter and you know I’m a fan of the cookie butter. I baked this in 3 mini loaf pans so I could use one for a taste test and give the other two away as whole loaves. When they first came out of the oven and I tried it the same day I baked it when it had cooled to room temperature, I really liked it. The crust was a little crunchy but not hard and the texture was great, a little fluffy like a good quick bread but only slightly more dense than a cakey cake. All was good. The cookie butter flavor wasn’t that strong but the texture was good and it still tasted delicious.
Then I tried another piece the next day and I didn’t think it was quite so great after all. The top had softened and there was no more pleasing crunch or firm texture like a good muffin top normally has. Instead it was just soft and a little moist. Meh. The inside had also started to get a slightly dry mouthfeel which I don’t like. I know you could refresh the texture by popping it into the microwave for a few seconds but even warm or room temperature, the cookie butter flavor wasn’t very prominent. So….not sure I’d make this again unless I was serving and eating it within a few hours of baking it.
1 1/2 cups all-purpose flour
1 tablespoon baking powder
1 teaspoon salt
1 cup creamy Biscoff or cookie butter
2/3 cup granulated sugar
2 eggs
1 teaspoon vanilla extract
1 cup milk

  1. Preheat oven to 325 degrees F. Spray 9 x 5" loaf pan with nonstick cooking spray.
  2. In a medium bowl, whisk together flour, baking powder and salt; set aside.
  3. In bowl of standing mixer fitted with paddle attachment, beat together biscoff or cookie butter and granulated sugar until well combined. Add eggs, one at a time, then vanilla and milk, mixing until combined.
  4. Add dry ingredients, mixing in gently and beating until just combined. Do not overmix.
  5. Pour batter into prepared pan and bake for 50 minutes or until a toothpick inserted in the center comes out clean or with a few moist crumbs. Serve warm.


Monday, June 5, 2017

Disneyland Snickerdoodles

Disneyland Snickerdoodles - made dough April 29, 2017, adapted from Six Sisters' Stuff via Pop Sugar
I don’t know how many dozens of snickerdoodles I baked for my niece’s fundraiser but the majority of her donors donated $25 (the minimum number to score a goodie bag) and she raised $1400. So you can do the rough math.

Because I was making so many snickerdoodles in April (the fundraising period), I seriously depleted my jar of Vietnamese cinnamon and had to do an emergency run to the brick and mortar Penzey’s store (not that) near me for more cinnamon and cream of tartar. Because you can’t make good snickerdoodles without either. I also had some milk to use up and fortunately this particular recipe needed it so that was handy.

This was a good, typical snickerdoodle recipe. I don’t know that it stood out as one of my favorites and it wasn’t quite as good as the Jumbo Snickerdoodle Cookies I’m now officially in love with but these were still delicious. I also brought a plate to work and received compliments on them so you don’t have to take just my word for it.

I also admit, I deviated from my normal taste test cookie and baked a cookie in my new 3.5” cast iron skillet pan as my taste test. It’s so cute! (insert girly baker moment) One normal-sized cookie dough ball in the little skillet makes for an individual-sized dessert that screams “portion control!” So it was cute and diet-friendly. Or if a cinnamon-sugary cookie can’t be diet-friendly, it at least wasn’t as diet-enemy as other choices might have been. I left off the vanilla ice cream just to make myself feel all virtuous too.

3 1/2 cups all-purpose flour
1/2 teaspoon baking soda
1/2 teaspoon cream of tartar
1 teaspoon cinnamon
1 cup unsalted butter
2 cups granulated sugar
2 large eggs
1/4 cup milk
1 teaspoon vanilla

For rolling:
1/4 cup granulated sugar
1 teaspoon cinnamon
  1. In a large bowl, whisk together flour, baking soda, cream of tartar and cinnamon.
  2. Cream butter and sugar together in the bowl of a stand mixer fitted with the paddle attachment until light and creamy, 2-3 minutes. Add the eggs, milk and vanilla, beating until just combined.
  3. Add dry ingredients and beat until just combined. Do not overmix.
  4. Portion dough into golf-ball-size dough balls, cover and chill or freeze several hours or overnight.
  5. When ready to bake, preheat oven to 375 degrees F. Line baking sheets with parchment paper.
  6. In a small bowl, mix together sugar and cinnamon. Roll dough balls in mixture, coating completely. Evenly space on parchment-lined baking sheets. Bake 7-10 minutes or until edges are set and middles no longer look raw. Do not overbake. Cool for several minutes then transfer cookies to wire rack to cool completely.

Friday, June 2, 2017

"The Best" Carrot Cake

"The Best" Carrot Cake - made April 22, 2017 from Mel's Kitchen Cafe
I’ve mentioned before that I rarely try out new recipes for carrot cake.  Partly because I already have a favorite recipe that suits me just fine and partly because I hate grating carrots. I do it the old-school way with a grater whose plastic outer rim is cracked. Yes, I could buy a new grater. Yes, I could possibly grate the carrots in my food processor. I do neither. Why? I don’t know. 
But I have my suspicions. Maybe because I don’t want it to be easy to make carrot cake because it’s actually rather bad for you. If you think the carrots redeem the cake, think again. The oil cackles and says “nope”. And the cream cheese frosting that accompanies any carrot cake worth its carrots also doesn’t help. Carrot cake is one of the unhealthiest cakes I can make, largely because of the oil. But that same oil is also what makes it so moist and so good. So trying to reconcile the cognitive dissonance in my head means I don’t make carrot cake that often.
So when I do, I want it to be good. Or at least as good as my favorite recipe from Jim Fobel. What caught my eye about this recipe is the original blogger has the same views about carrot cake as I do, namely that it should only contain carrots. Not nuts, not pineapple, not raisins (shudder), not mashed bananas, nuttin’ but carrots. Preach, sister. 
Not only do we have a meeting of the minds about the purist carrot cake but her recipe is amazing. As amazing as my favorite recipe, in fact. This was a really good cake. Fluffy, great taste, great texture. So if you’re going to eat this unhealthy, make it worth the calories and worth the manual grating of those carrots. I did my own riff on a traditional cream cheese frosting by adding some cinnamon to it to make it a cinnamon cream cheese frosting; that also paired really well with this cake. So now I have two favorite recipes for carrot cake.
2 1/2 cups (12.5 ounces) unbleached all-purpose flour
1 1/4 teaspoons baking powder
1 teaspoon baking soda
1 1/4 teaspoons ground cinnamon
1/2 teaspoon ground nutmeg
1/8 teaspoon ground cloves
1/2 teaspoon salt
1 pound medium carrots (6 to 7 large carrots), ends trimmed and peeled
1 1/2 cups (10.5 ounces) granulated sugar
1 1/2 cups (10.5 ounces) packed brown sugar
4 large eggs
1 1/2 cups vegetable oil (canola or other neutral flavor oil)

Cream Cheese Frosting
8 ounces cream cheese, softened
5 tablespoons butter, softened
1 tablespoon sour cream
1/2 teaspoon vanilla extract
1 1/4 cups (4.25 ounces) confectioners' sugar
1 teaspoon cinnamon, optional but recommended
  1. Preheat oven to 350 degrees F. Line a 9 x 13" baking pan with foil and lightly spray with nonstick cooking spray.
  2. In a medium bowl, whisk together the flour, baking powder, baking soda, cinnamon, nutmeg, cloves and salt; set aside.
  3. In a food processor fitted with large or fine shredding disk (or using a box grater and shredding by hand), shred the carrots for about 3 cups total.
  4. In the bowl of a stand mixer fitted with the paddle attachment, beat the granulated sugar, brown sugar, and eggs on medium high speed until thoroughly combined, about 45 seconds.
  5. Reduce the speed to medium and, with mixer running, add oil in a slow, steady stream.
  6. Increase the speed to high and mix until the batter is light in color, about 45 seconds to 1 minute longer.
  7. Stir in the carrots and dry ingredients by hand until just combined; do not overmix.
  8. Pour the batter into the prepared pan and bake until a toothpick inserted near the center comes out clean, about 40 minutes.
  9. Let the cake cool completely before frosting.
  10. Frosting: Mix cream cheese, butter, sour cream and vanilla at medium high speed until well combined, about 30-45 seconds, scraping down the sides of the bowl with a rubber spatula. 
  11. Add the confectioners' sugar and mix until very fluffy, about 1-2 minutes. Frost cooled cake.

Wednesday, May 31, 2017

Bacon, Shrimp and Corn Chowder

Bacon, Shrimp and Corn Chowder - made April 23, 2017 from The Blond Cook
The pictures for this dish aren’t much to write home about. I honestly just could not take a good picture of them. The chowder doesn’t look smooth and creamy because it wasn’t. I don’t know whether it was because I didn’t have an immersion blender or because I didn’t blend the 2 cups of soup well enough in my blender as the backup option but regardless, the flavor was pretty good and I didn’t mind that it wasn’t as smooth and creamy.

I liked this chowder. Cooking it was easy and just my speed on the cooking spectrum. I normally don’t like cooking with bacon since the grease spatter and cleanup are often not worth it to me but bacon is a good addition to this chowder. It provides some crunch and flavor to go with the shrimp and corn.

The corn is what makes the chowder look a little lumpy but don’t skip it as it’s also a good component to the dish, adding both flavor and texture. This is actually a deceptively filling chowder, mostly because of the cream (I won’t kid you on the calories – it’s got cream). The shrimp is the star of the dish but the soup was pretty good too. It’s more of a winter or cold-weather meal but I’m not picky. It was quick and easy to make and tasted good so that was all I needed.

5 slices bacon, cut into small pieces
1 pound medium shrimp, peeled and deveined
1 cup chopped yellow onion
1 tablespoons minced garlic
1 teaspoon paprika
1/2 teaspoon dried thyme
pinch of crushed red pepper
2 1/2 cups corn kernels
3 cups chicken stock (I used Penzey's chicken soup base)
1 cup half and half
salt and pepper, to taste
  1. In a large pot or Dutch oven over medium heat, fry the bacon pieces until crispy. Transfer to a plate lined with paper towels. Drain off fat from pot, leaving 1 tablespoon.
  2. Add shrimp to the pot and cook until pink, about 3 to 4 minutes, stirring frequently. Remove shrimp with a slotted spoon and add to the plate with the bacon. Leave juices in the pot.
  3. Add onions and garlic. Saute for about 3 minutes, or until onions are soft and translucent.
  4. Add paprika, crushed red pepper, thyme, salt and pepper. Cook, stirring frequently, for 2 minutes.
  5. Add corn, chicken stock and half and half. Stir to combine. Bring to a boil. Reduce heat to medium low and simmer for 15 minutes.
  6. Using an immersion blender, blend about half of the soup until creamy. If you don't have an immersion blender, blend 2 cups of soup in a blender and pulse until creamy. Return to the pot and stir well.
  7. Add shrimp and sprinkle each serving with bacon pieces. Garnish with fresh thyme if desired.

Saturday, May 27, 2017

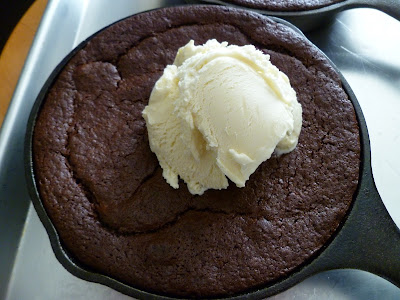
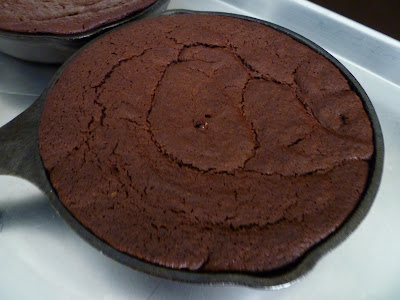
Skillet Brownies

Skillet Brownies - made April 22, 2017, adapted from The Barefoot Contessa
It was only a matter of time before I baked brownies in my cast iron skillet(s). I think they’re starting to become my de facto baking pans. As in “what else can I bake in these?” crosses my mind whenever I break out the mixing bowl.
I was in a chocolate mood and making brownies is like breathing to me so the time seemed right to do a skillet brownie. I got this recipe from the Barefoot Contessa. It was meant to make 4 (generous) servings but I cut the recipe in half and ended up baking it in 2 6” skillets and a ramekin.

I’m of two minds about these skillet brownies. I liked when I first took it out of the oven and ate it warm with vanilla ice cream. Who wouldn’t? But when I went back to it later and ate it at room temperature, I was less enamored. I waffled between did I like it or did I not like it? The flavor was fine but the texture baffled me on the likeability scale. It wasn’t like a dense, baked-fudge texture with a firm bite which is how I like my brownies. It was more firm than a soft flourless chocolate cake but it wasn’t as dense as a brownie or as light as a cake. It was something in between all of that. Some people like that; I’m not sure I do.
But then again, when I went back for a third bite, I did like it. So I don’t know. Try it out and see if you like it. But I think I still liked it best when it was warm with ice cream.
4 ounces (1 stick) unsalted butter
4 ounces bittersweet chocolate
1 1/2 ounces unsweetened chocolate
2 large eggs
2 teaspoons espresso powder
1 1/2 teaspoons pure vanilla extract
1/2 cup plus 1 tablespoon sugar
1/4 cup plus 1 tablespoon all-purpose flour
1 teaspoon baking powder
1/4 teaspoon salt
  1. Preheat oven to 350 degrees F.
  2. Melt the butter, bittersweet chocolate and unsweetened chocolate in the top half of a double boiler set over barely simmering water. Whisk until melted and smooth. Cool for 5-10 minutes.
  3. In a large bowl, stir together egg, espresso powder, vanilla and sugar. Stir in the chocolate mixture.
  4. In a medium bowl, sift together flour, baking powder and salt. Stir into chocolate mixture.
  5. Spoon the batter into 4 individual cast-iron skillets and place them on a sheet pan. Bake for 20-22 minutes or until a toothpick inserted near the center comes out with moist crumbs. Serve warm with ice cream.