Thursday, November 6, 2014

Cooke Butter-Glazed Shortbread Cookies

Cookie Butter Shortbread Sandwich Cookies  - made dough October 25, 2014, recipe adapted from Baking with Melissa
Much as I love shortbread, I’m honest enough to admit that it’s mostly butter with some sugar and flour clinging to it. Really good shortbread makes this obvious but it also makes you not care about that. I try to only have shortbread in moderation which means making them small. Which is what I did with this recipe. What I love about making shortbread cookies is the ingredients list is usually short and simple and it gives me a chance to use vanilla bean paste so I can see those little flecks of vanilla bean scrapings in the pale shortbread dough and subsequent cookies.
When I made these, I thought I would bake them “as is” and have cute little shortbread cookies, similar to the picture in the original blog where I found the recipe. Then I got hit with the inspiration to make them as shortbread sandwiches with cookie butter filling. I’ve been having a re-discovered love affair with cookie butter again and looking for any excuse to eat it that didn’t involve my sticking a spoon inside the jar and licking it.
The plain, unglazed version
First I tried the shortbread cookie “plain” and thought it was good. Then I spread some cookie butter on one and thought it was excellent. By itself, you can taste the buttery goodness of the shortbread. With the cookie butter, the shortbread moves from being the star to Best Supporting Actor. Which is still pretty good. The only thing that didn’t make this ideal for a cookie sandwich is the cookie dough balls don’t spread so they remained rounded cookies. Which is fine – and even cute - if you’re serving them plain so they’re like little butter buttons but if you’re sandwiching them, the thickness of two chubby rounded cookies, no matter how small, is still a slightly thicker cookie than you’d normally probably want to bite into. By the time I had the idea of making cookie butter shortbread sandwiches, I had already portioned out the dough and frozen them so it was too late to try and flatten them before baking unless I wanted to thaw the dough first. Which I didn’t. So, instead of making cookie sandwiches with them, I melted some cookie butter for 10 seconds in the microwave (no longer than 10 seconds) and dipped the rounded tops of the cookies to glaze them with cookie butter instead. Voila, problem solved.
2 cups butter, softened
1 cup granulated sugar
2 teaspoons vanilla extract 4 cups all-purpose flour
Biscoff spread or Speculoos cookie butter
  1. Cream butter and sugar until fluffy. 
  2. Stir in vanilla; add flour and mix well.
  3. Scoop cookies with a small cookie scoop and form into small, thick discs. Freeze overnight. 
  4. When ready to bake, preheat oven to 350 degrees F. 
  5. Bake for 10-12 minutes depending on the size of the cookie. 
  6. Let cookies cool completely then spread a thin (or thick) layer of cookie butter on half of the cookies and sandwich with the rest of the cookies.

Tuesday, November 4, 2014

Cookie Butter Stuffed Brooksters

Cookie Butter Stuffed Brooksters - made October 25, 2014 from Shared Appetite
Ever since I made the brookies, I've been enamored of pairing brownies and chocolate chip cookies together. When I stumbled upon this version on pinterest where you stuffed cookie butter or nutella between the two, well, okay, yeah, let's give it a whirl.
And I have to confess, I even followed the recipe's direction to use a brownie mix. I know, I know, I should be shot by the Baking Gods for my hypocrisy. A mix? Really? I didn't have one in my pantry so I even had to go out and buy one. I'd been hearing for years from my brownie-mix-defending friends that Ghirardelli brownie mixes are "almost as good" as the made from scratch variety. Heresy. But I figured if I had to use a mix, I should use it with this kind of recipe since the chocolate chip cookie part would be made from scratch and the cookie butter was sure to hide a lot of sins so it's not like I would have to judge the brownie on its own. So I did it. Target didn't have the Dark Chocolate version recommended in the original recipe and I didn't know the difference between "Dark Chocolate" and "Double Chocolate" as the Ghirardelli people defined it so I went with what was available. In using the said mix, I'd have to guess "double chocolate" means they started with their original version of their brownie mix, threw in a handful of chocolate chips and considered that doubling the chocolate.
Anyway, the experiment forged on since I had managed to clear the hardest hurdle of buying a brownie mix. This recipe isn't hard to make; it just has a couple of components so it takes a little more time and a few more baking implements to wash up. I made the cookie dough first as instructed in the recipe but in hindsight, I'd recommend making the brownies first. The brownie batter goes on the bottom and you want it to firm enough to bear the weight of the filling and the cookie dough or else everything will sink and you'll get marbling instead of layering.
The trickiest part of this recipe is the baking. You don't see how the brownie layer is coming along and the toothpick test won't help because you'll mostly encounter the filling. Instead, I had to go by how brown the cookie layer was getting and hoping the brownie layer was baking at the same pace. I did lower the temperature to 350 degrees and changed that in the directions below. The original recipe called for baking at 375 degrees but in my oven, that baked the cookies too brown too quickly so 350 worked better for me.
For the most part it worked but since I tended to underbake my cookies, I think the brownies were a bit soft. They're fine when cooled but when warm, which is when the cookie layer was best, the brownie layer was a bit mushy.

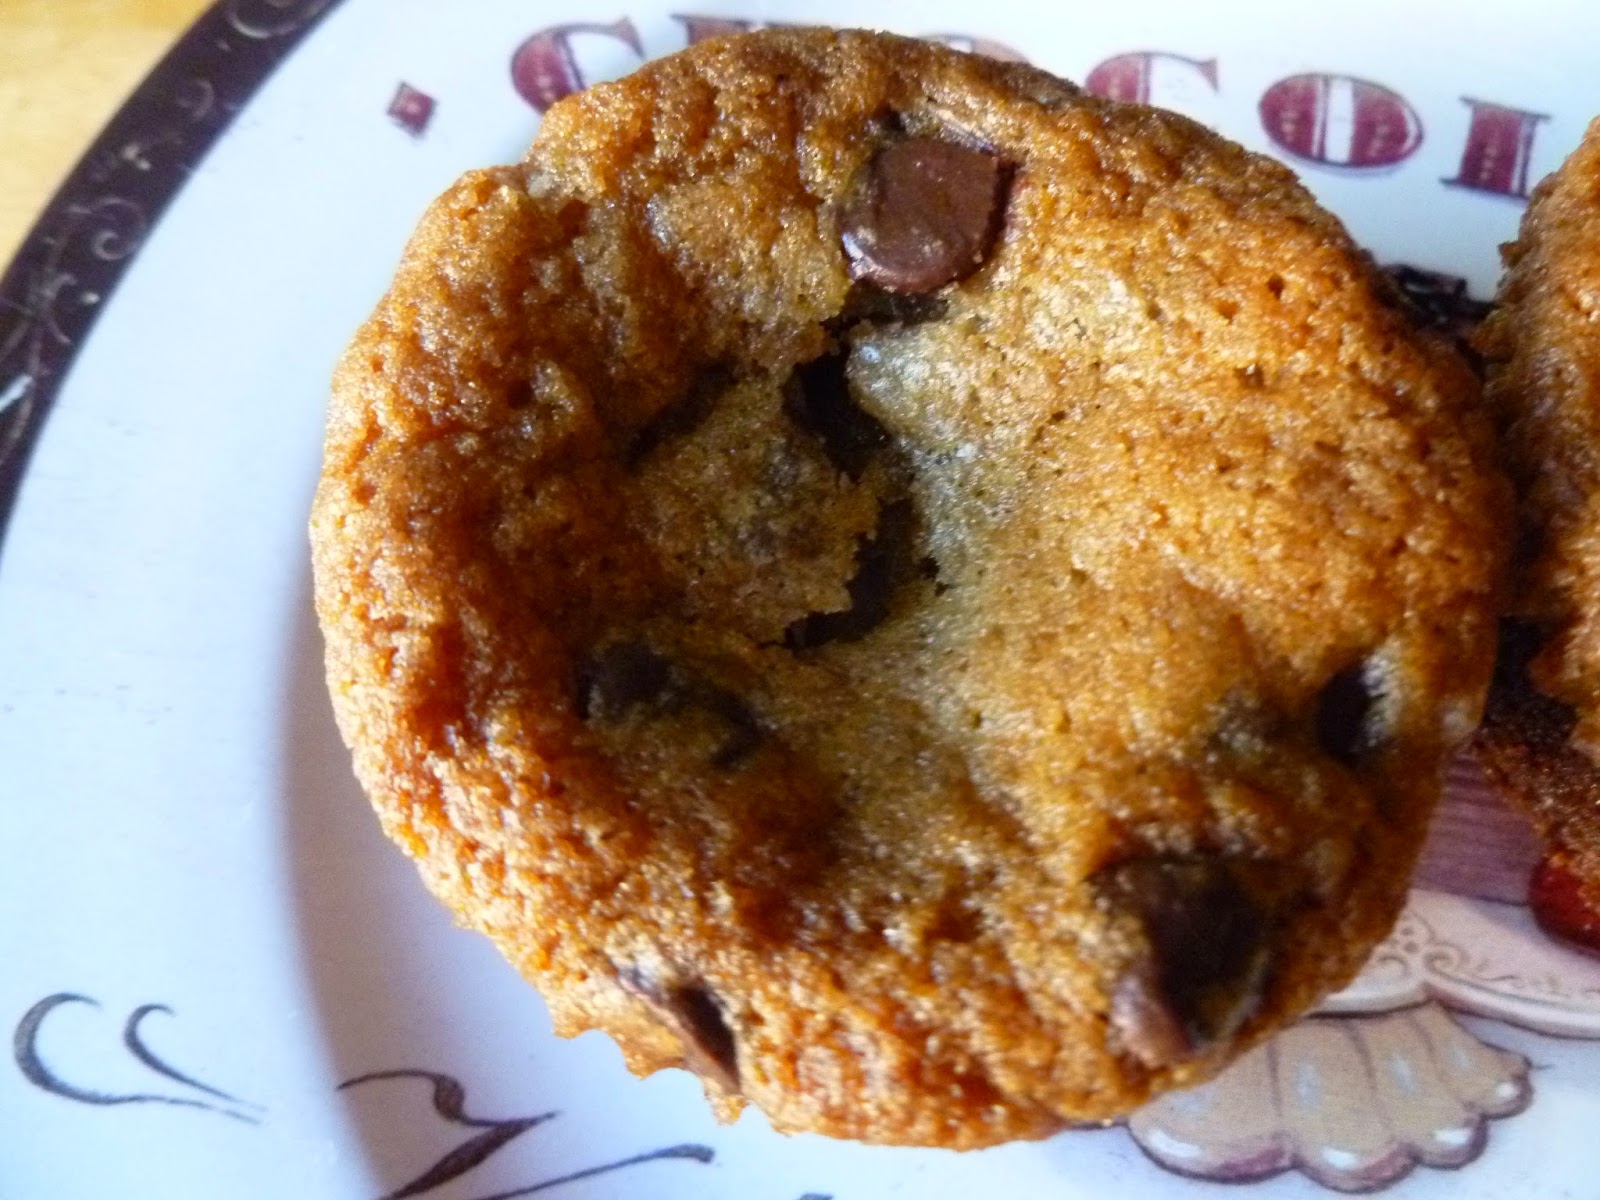
The cookie butter filling is always amazing, especially when eaten lukewarm and it's still gooey. When it cools completely, it's more manageable to eat without a fork and doesn't flow like lava. Not that that's a bad thing but this is easier to serve at room temperature.
I do strongly advise lining your muffin tins with cupcake liners. I tried baking a batch in a mini muffin pan with no liners and got the cookie layer divorcing from the brownie layer with the filling forlornly torn between the two. Not pretty. It only worked to use the liners. Conversely, you could try putting the cookie layer on the bottom and the brownie layer on top. Those would be easier to take out because the cookie layer has a firmer texture than the brownies when cool. Either way, don't forget the cookie butter. You can also use nutella or peanut butter for the filling if you wish.
Chocolate Chip Cookies
  • 2¼ cups all-purpose flour
  • 1 teaspoon baking soda
  • 1 teaspoon salt
  • 1 cup (2 sticks) unsalted butter, softened
  • ½ cup granulated sugar
  • 1 cup brown sugar, lightly packed
  • 1½ teaspoons vanilla extract
  • 2 large eggs
  • 2 cups good quality semi-sweet or dark chocolate chips

Brownies*
  • 1 box Ghirardelli Chocolate Brownie Mix
  • ¼ cup water
  • ½ cup vegetable or canola oil
  • 1 egg
  • *or your favorite brownie mix (follow directions on box) or homemade recipe.

for Brookster assembly
  • Brownie Batter
  • Chocolate Chip Cookie Dough
  • Nutella
  • Cookie Butter (alternatively, Biscoff Spread or Speculoos)

Chocolate Chip Cookies
  1. Combine flour, baking soda, and salt in a small bowl. 
  2. In your stand mixer fitted with the paddle attachment or in a large bowl with an electric mixer, beat butter, sugars, and vanilla extract until smooth and creamy. 
  3. Add eggs, one at a time, beating well after each. Gradually mix in flour mixture, and then stir in chocolate chips. Refrigerate until well-chilled, about 1 to 2 hours.

Brownies
  1. Place water, oil, and egg in a medium mixing bowl and stir until fully combined. Add brownie mix and stir until fully incorporated, about 50 strokes.
  2. Fill 2 cupcake pans with cupcake liners. 
  3. Divide brownie batter among the cupcake liners, filling each one with about ¾" of batter. 
  4. Refrigerate until very well-chilled, about 2 hours.

Assemble the Brooskters
  1. Preheat the oven to 350°F. Remove cookie dough and brownie-filled cupcake pans from the refrigerator.
  2. Drop approximately teaspoon-sized amounts of either nutella or cookie butter on top and in the center of each of the brownies.
  3. Scoop cookie dough by heaping spoonfuls, roll into ball, and flatten into discs slightly smaller than the size of each cupcake liner. Gently press cookie dough discs into the brownie batter and sealing the nutella/cookie butter inside.
  4. Bake Brooksters for approximately 15-20 minutes, until the cookie is golden brown.
  5. Remove from oven and let cool.

Monday, November 3, 2014

Restaurant Review: Asian Box

Asian Box - dinner on October 24, 2014
My friend Queen of Cheap Eats and I met for dinner one Friday night to try out a new restaurant. Thanks to poor time management on my part, commute traffic, and a wrong turn, I ended up being 30 minutes late - yeah, I suck. Fortunately she bore with me and amused herself by checking out other restaurants on the same street. some of which have quite a high turnover so we have some new places to try in the future as well.
Despite my lateness, we entered around 6:30 and it was sparsely populated. Not a good sign but they're also on "restaurant row" with a lot of competition so it takes time for a new place to catch on. I don't know how long they've been open at that location but apparently they're a (small) chain with 3 locations in the Northern California (Palo Alto, Mountain View, and San Francisco) and 2 in Southern California (Burbank and downtown LA).
Box with chicken
Asian Box has a similar premise to VN Grill. You build your "box" with a starch (rice or noodles) or a salad, a protein (chicken, beef, pork, tofu, or shrimp), toppings (bean sprouts, pickled vegetables, peanuts, herbs, and the like), then pick your sauce - tamarind vinaigrette, their own housemade sriracha, no-oil fish sauce, a dry rub, hot sauce or peanut sauce. If that's too much decisionmaking for you, they also have "house favorites" that pre-determine the boxes, no substitutions.
I'm a build-my-own sort of girl so I eschewed the normal menu offerings and went with their daily special of Asian pork ribs as my protein. I also flung caution to the winds and paid an extra 95 cents for the caramel egg because Queen said the yelp reviewers spoke favorably of it. I asked the counter person what a caramel egg was and she said they boil it in some kind of caramel sauce. That sounded good so I forked over the extra 95 cents.
Caramel Egg - $.95 extra
In the interest of candor, however, I have to say that while the hard-boiled egg was good and perfectly hard-boiled, I'm afraid it's just an egg. The brown coating on the outside white of the egg tasted more like it was boiled in soy sauce rather than caramel as it was more salty than sweet. It wasn't bad and it was a cheap experiment but I didn't think it was all that. Unless you've a passion for eggs, save your 95 cents. Overall, though, the prices were reasonable and the food was good. The build-your-boxes were in the $8-$9 range, depending on your choice of protein and the portions were reasonable to sizable, depending on your appetite. The house-determined boxes are a bit fancier and range from $8-$13. If you've never been to an Asian Box before, I recommend giving them a try. If I worked in the area, I could see becoming a lunchtime regular whenever I wanted Asian food. They have a lot of competition on that street alone though so I hope they make it.

Sunday, November 2, 2014

Honey Chicken

Honey Chicken - made October 26, 2014 from Heart Mind & Seoul
If you notice it's been awhile since I posted a "real food" recipe, it's because I also haven't cooked real food in awhile. They feed us breakfast, lunch and dinner at work so I haven't had to cook during the week and I usually go out on the weekends. And given the choice, I don't and won't cook. I did finally try it again last weekend and was forcibly reminded why I don't cook. I'm not good at it. I'm not terrible at it (with terrible being I don't give myself food poisoning. Well, except that one time...) but I'm not good at it and I don't really enjoy it.
So it should come as no surprise that I kind of messed up this recipe. Or it's not what I expected. Or both. I cut the chicken too small and the breading got a little whacked so the pieces were small and misshapen. I didn't fry them long enough for the coating to get very brown as they seemed to take a long time to cook and still were pasty white so I took them out when I got tired of frying them. I know, I suck at cooking. The sauce was easy but it didn't have much flavor. I expected it to have more of a honey taste. But it appeared the water really diluted the flavor. Then I tried masking my cooking sins by sprinkling sesame seeds generously over the whole thing. But I don't think that fooled anyone, least of all myself. This dish wasn't horrible. It was edible. Which is kind of the (low) bar I set for myself. Good thing I made this on a Sunday and I could go back to work on Monday and eat someone else's food again. I'll have to go back to not cooking again.
1 ½ lbs boneless skinless chicken breasts (cut into 1” chunks)
Oil (for deep frying) – canola or vegetable oil


Batter-
4 tablespoons cornstarch
¼ cup flour
1 teaspoon baking powder
½ teaspoon salt
¼ cup liquid egg (or 1 egg + 1 egg white)

Sauce-
1 ½ tablespoons olive oil (or regular vegetable oil)
2 teaspoon ginger (minced)
3 tablespoons garlic (minced)
1 teaspoon salt
3-4 tablespoons honey
1 teaspoon rice wine vinegar (or apple vinegar)
½ cup water
1 teaspoon cornstarch (mixed with 1 teaspoon water)
Sesame seeds (for garnish)
  1. In a plastic ziploc bag, place chicken.
  2. Add cornstarch, flour, baking powder, and salt. Toss them together to coat the chicken evenly with the flour mixture. 
  3. Add liquid egg (or 1 egg and 1 egg white) to the chicken. Close the plastic bag and toss them together to coat the chicken evenly with the egg mixture.
  4. Heat oil to 375 degrees F. (Using a fryer is helpful. If you don’t own a fryer, heat oil in frying pan. To test if it’s ready to fry the chicken, add a pinch of flour to the oil. If the flour floats immediately making a sizzling sound, it’s ready.) Add the chicken and fry until dark golden brown. 
  5. Make the sauce – Heat oil and add ginger and garlic, and stir until garlic turns golden brown. Add salt, honey, rice wine vinegar, and water to the pan, stirring occasionally. Add water and bring it to boiling. In a small bowl, mix cornstarch and water together until smooth and add it to the sauce, stirring frequently, until the sauce thickens. Reduce heat to simmer and add the fried chicken to the sauce, and stir to coat.
  6. Garnish with sesame seeds and serve over rice.


Friday, October 31, 2014

Halloween 2014 - get the leftover candy ready

Happy Halloween! I've paid almost no attention to Halloween fast approaching (and now here) this year. It's not really my holiday and I've been busy so October 31 just crept up on me. I don't get many kids trick or treating in my neighborhood so I didn't even really stock up on candy this year. In prior years, I would buy a few bags and end up using them to bake with. Typical Halloween candy has no appeal for me and doesn't tempt me to eat as is. That would be my inner candy snob rearing its haughty head. But I don't mind if they're baked in something. So I thought I would curate some past recipes in case you wake up tomorrow with leftover candy or you want to raid your kids' Halloween haul, especially if you have an overabundance of Snickers, peanut butter cups, Midnight Milky Ways, M&Ms, Rolos, etc.


If you want to stick to your own recipes, it's still easy to use up Halloween candy. Chocolate bars can be easy add-ins to brownies and some cookies. If you have peanut butter cups, cut them up and stick them on top of peanut butter cookies. Almond Joys and Mounds can be cut up and added to Magic Cookie bar recipes. Sugar cookie dough wraps easily around Rolos. Snickers, Milky Ways, 3 Musketeers and the like are easily folded into brownie batters and/or sprinkled on top during the last few minutes of baking. Get creative and bake away.


Wednesday, October 29, 2014

Double Chocolate Chip Pudding Cookies

Double Chocolate Chip Pudding Cookies - made dough October 20, 2014 from Living Better Together
If you notice I've been making a lot of cookie recipes lately, that trend is likely to continue. I'm still trying to keep on a baking and blogging schedule even though I can rarely bake during the week and I write up my blog posts like mad on the weekends for doled out blog posts during the week. Cookie doughs are the easiest to make when I have time then I can freeze the cookies and bake them off just when I need them. Plus when I'm making up goodie bags for social occasions, it's nice to be able to provide several different kinds of cookies, all of which I have as dough reposing in my freezer until it's time for them to leap into the oven for their transformation from raw dough to cookie.
I'm also trying to make my way through my cookie board on pinterest and this one was an easy recipe to cross off my list. Time these since it's hard to tell when chocolate cookies are done just by appearance and you never want to overbake cookies. The nice thing about these cookies is they stay almost as chubby as how you make them. If you want puffy, rounded cookies, scoop them with an ice cream or cookie scooper, freeze then bake from frozen dough. They won't spread much and will retain that chubby cherubic appearance.

Taste-wise they're not super chocolaty since the chocolate flavor comes mostly from the pudding mix and the rest from the chocolate chips. If you're a die-hard chocoholic, you might have to eat several before your chocolate tooth is satisfied. But it's a nice little cookie, soft and moist. If you want to increase the chocolate punch, try subbing out a little of the flour (no more than 1/4 cup) with dark unsweetened cocoa powder.
3/4 cup brown sugar
1/4 cup sugar
1/2 cup (1 stick) unsalted butter, room temperature
1 - 3.4 oz package instant chocolate pudding mix
2 whole eggs
1 egg yolk
1 teaspoon vanilla extract
2 1/2 cups all-purpose flour
1 teaspoon baking soda
1/4 teaspoon salt
1 cup 60% chocolate chips
1 cup milk chocolate chips
  1. Cream butter and sugars together until smooth. Add pudding, eggs, additional egg yolk and vanilla. Beat for about one minute on medium speed.
  2. In a separate bowl, combine flour, baking soda, and salt.
  3. Add dry ingredients to the wet ingredients a 1/2 cup at a time and mix until combined.
  4. Fold in chocolate chips. Portion into golf-ball-sized dough balls, cover with plastic wrap and chill in refrigerator for at least 2-3 hours or else place in freezer bag and freeze for at least 2-3 hours.
  5. When ready to bake, preheat oven to 350 degrees and line baking sheets with parchment paper. Space dough balls evenly on baking sheet and bake for 10-13 minutes.

Tuesday, October 28, 2014

Restaurant Review: Thai Noodle, Berkeley, CA

Thai Noodle - dinner on October 18, 2014
After my family and I went to see the Cal vs UCLA game at Memorial Stadium in Berkeley, we all went out to dinner after the game. There were surprisingly a ton of Bruin fans at the game and milling around after so my UCLA niece didn't feel like such an outlier. Except when she sat in the Bears student section with my other niece during the game, of course. Ha.
We went to dinner early enough that we thought we'd beat the post-game crowds but the Thai restaurant my Bear niece took us to was still full when we got there. Not surprising given it was rather small and didn't have that many tables.
Fried Tofu appetizer
Still, we lucked out that a larger group was on the verge of leaving so we didn't have to wait longer than 5 minutes or so for a table to free up.
Fried chicken over fried rice
The menu was rather varied and like, most popular restaurants in many college towns, the price points were reasonable (around $10 more or less) and the portions were generous. I bypassed my usual pad thai when trying out a new Thai restaurant and went with fried chicken over fried rice. Despite my love of pad thai, I have to say the fried rice at almost every Thai restaurant I've gone to has always been delicious. Usually moist without being greasy and always tasty. This was no exception. I don't usually eat a lot of rice but I could eat Thai fried rice more than is good for me.
Duck Fried Rice
My Bear niece got the Duck Fried Rice and that had a fair amount of roast duck in it so that was a good choice.
Some kind of veggie noodle dish

Grilled chicken over Thai fried rice

Veggie spring rolls

Pad Thai with Shrimp
My sister ordered the pad thai and I tried a bit of that. She got hers with bean sprouts though and I dislike bean sprouts intensely since their non-taste, crunchy texture ruin a good noodle dish so I can't say I could evaluate the pad thai with any justice.
Beef and eggplant
I didn't try everything since I was involved with my own order but everyone appeared to enjoy their dishes so I'd call this a good choice. It's pretty casual dining but the food was delicious and when in Berkeley - or anywhere else - that's what matters.