Sunday, February 11, 2024

Classic Cake Brownies by Lisa Yockelson

Classic Cake Brownies - made January 30, 2024 from Brownies & Blondies by Lisa Yockelson

1 cup unsifted all-purpose flour
1/4 cup unsifted cake flour
3/4 teaspoon baking powder
1/4 teaspoon salt
9 tablespoons unsalted butter, softened
3 tablespoons shortening
1 cup plus 1 tablespoon superfine sugar
2 extra large eggs
2 extra large egg yolks blended with 1 tablespoon milk
3 ounces unsweetened chocolate, melted and cooled slightly
1 1/2 teaspoons vanilla extract
  1. Preheat oven to 350 degrees F. Line a 9 x 9-inch baking pan with foil and lightly spray with nonstick cooking spray.
  2. In a medium bowl, sift together all-purpose flour, cake flour, baking powder and salt.
  3. In the bowl of a stand mixer fitted with the paddle attachment, cream together butter and shortening on medium speed for 2 minutes. Add the sugar and beat another 2 minutes.
  4. Add the eggs, one at a time, beating after each addition. Beat in the egg yolk-milk mixture until combined.
  5. On low speed, beat in the melted chocolate and vanilla extract.
  6. Add dry ingredients and beat until just combined.
  7. Pour batter into prepared pan and smooth into an even layer. Bake for 30 minutes or until a toothpick inserted near the middle comes out with a few moist crumbs. Cool completely before cutting and serving.
If it's hard to tell from the pictures the difference between these brownies and the Sour Cream Brownies from the same baking book by Lisa Yockelson, you're not alone. Although they had slightly different ingredients - this one was made with shortening, milk and unsweetened chocolate vs the other one had sour cream, a little cocoa powder and chocolate extract, I'm not entirely sure I could taste the difference in a blind taste test.
They were similar in the softer texture and were both not richly chocolatey. Still good chocolate flavor but not quite enough to make your taste buds slap you around. While they were good, I have to admit I'm not sure they were worth all the extra ingredients and fussy little steps like separating eggs and whisking yolks with milk. Or having odd measurements of slicing off a tablespoon of butter from a stick or 3 tablespoons of shortening instead of just quartering a stick of shortening. I bake too much to deal with a lot of fuss. I'm always glad to try a new recipe but this didn't stand out enough to make again with the additional ingredients and steps than a more straightforward recipe for good brownies.

Friday, February 9, 2024

Disney Grand Floridian Chocolate Chip Cookies copycat from Mommy Mouse Clubhouse

2 1/2 cups all-purpose flour
1 teaspoon baking soda
1/2 teaspoon salt
10 tablespoons butter, softened
1 cup brown sugar
3/4 cup powdered sugar
2 large eggs
2 teaspoons vanilla
12-ounce bag of chocolate chips
  1. In a medium bowl, whisk together flour, baking soda and salt; set aside.
  2. In the bowl of a stand mixer fitted with the paddle attachment, cream together butter, brown sugar and powdered sugar until light and fluffy, 2-3 minutes.
  3. Beat in eggs, one at a time, then vanilla, until just combined.
  4. Add flour mixture in 2 additions, beating on low speed after each addition until just combined. Stir in chocolate chips.
  5. Portion dough into golf-ball-size dough balls, cover and chill for up to 24 hours.
  6. When ready to bake, preheat oven to 330 degrees and line baking sheets with parchment paper. Evenly space dough balls on baking sheets and bake 12-14 minutes.
  7. Remove from oven and let rest on baking sheets for several minutes before transferring to wire rack to cool completely.
I've never been to the Disney Grand Floridian or tried their chocolate chip cookies but a friend mentioned them and wanted my opinion on copycat recipes of the Grand Floridian cookies vs Levain Bakery. I like to have informed opinions so I thought I'd try this copycat. 
There are a lot of copycats out there for the Disney Grand Floridian cookies (who knew?) but I decided you can't go wrong with a blog that's clearly by a Disney aficionado. This also was slightly different than the typical chocolate chip cookie recipe in that it uses powdered sugar instead of granulated sugar so I figured it'd be worth a try.
The dough handled well and wasn't too soft or sticky. I like to let chocolate chip cookie dough "age" in the refrigerator for at least a day to develop the flavors and I did that with this as well.
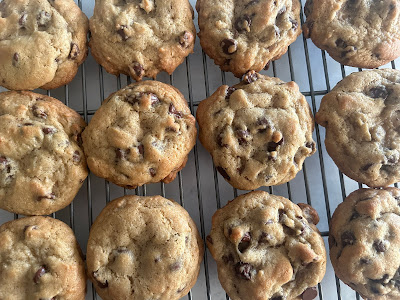
The upshot is this is a good cookie. But - and don't come at me, Disney fans - I thought it was just a typical good chocolate chip cookie. It runs more to the bready-chewy side in terms of texture vs the buttery, crisp edges, rich chewy middles side of my more favorite chocolate chip cookie recipes.
I'm sure when you check into the Disney Grand Floridian and get handed warm chocolate chip cookies as part of your experience, it's going to be the best thing ever. In my kitchen, with hundreds, if not thousands, of chocolate chip cookie recipes notched on my baking belt, this is a good recipe that I'm glad I tried but probably won't remember as it didn't stand out. 
We all have different tastes and mine tend to lean more towards the behemoth cookies with crisp edges, caramelized brown sugar-buttery flavor and underbaked middles of Levain Bakery copycats or even the last Gideon's Bakehouse copycat recipe I tried. 

Wednesday, February 7, 2024

Soft and Chewy Oatmeal Scotchies from Sally's Baking Addiction

Soft and Chewy Oatmeal Scotchies - made dough January 25, 2024 from Sally's Baking Addiction 
1 1/2 cups (188 grams) all-purpose flour
1/2 teaspoon cinnamon
1 teaspoon baking soda
3/4 teaspoon salt
1 cup (2 sticks) unsalted butter
1 cup (200 grams) brown sugar
1/2 cup (100 grams) granulated sugar
2 large eggs
1 tablespoons unsulphured or dark molasses
2 teaspoons vanilla extract
3 cups old-fashioned rolled oats
2 cups butterscotch morsels
  1. In a medium bowl, whisk together flour, cinnamon, baking soda and salt.
  2. In the bowl of a stand mixer fitted with the paddle attachment, cream together butter, brown sugar and granulated sugar until well combined and creamy, 2-3 minutes,
  3. Add eggs, one at a time, beating after each addition until just combined. Add molasses and vanilla extract, mix to combine.
  4. Add dry ingredients in 2 additions, beating on low speed until just combined. Add oats and beat to combine. Add butterscotch morsels and mix to evenly disburse.
  5. Portion dough into small dough balls, cover and chill for several hours or overnight.
  6. When ready to bake, preheat oven to 350 degrees and line baking sheets with parchment paper. Evenly space dough balls and bake 13-14 minutes or until edges are set and middles no longer look raw. Do not overbake.
  7. Remove from oven and let rest on baking sheets for several minutes before transferring to wire rack to cool completely.
I keep saying I find butterscotch too sweet for me so I don't bake with it often. But I think I've unlocked the key to making it more favorable to my taste buds. And that's pairing it with oats. Or more specifically, with oats in a caramelized oatmeal cookie. Like this one.

These did spread a bit so don't make the dough balls too big or you may not be able to fit them into a large round cookie cutter to swirl them to a more uniform shape once they come out of the oven. I managed it with most but not all.
Still, regardless of appearance, these were fantastic. Yes, the butterscotch morsels were still sweet but their sweetness was offset by the sturdiness of the oats and the caramelization of the cookie from baking provided a complement to the flavor. 
I enjoyed the heartiness of the test cookie and these appeared to ship well since they were pretty sturdy. The texture at the edges was crisp and the middle was nicely chewy from the oats.

Sunday, February 4, 2024

Sour Cream Brownies by Lisa Yockelson

Sour Cream Brownies - made January 25, 2024 from Brownies & Blondies by Lisa Yockelson
3/4 cup unsifted all-purpose flour
1 tablespoon unsweetened cocoa
1/4 teaspoon baking powder
1/4 teaspoon salt 
1/3 cup miniature semisweet chocolate chips
5 tablespoons unsalted butter
3 ounces unsweetened chocolate
1 cup granulated sugar
2 extra large eggs
1/4 cup sour cream
1 teaspoon chocolate extract
1 teaspoon vanilla extract
  1. Preheat oven to 350 degrees F. Line an 8 x 8-inch baking pan with foil and lightly spray with nonstick cooking spray.
  2. In a small bowl, whisk together flour, cocoa, baking powder and salt. Toss 1 teaspoon of the mixture with the mini chocolate chips; set aside.
  3. In the top of a double boiler set over hot water, melt butter and unsweetened chocolate, whisking until completely melted and combined. Remove from heat and let cool slightly.
  4. Add sugar to melted chocolate mixture, whisking to combine. Add eggs, one at a time, whisking after each addition to combine. Add sour cream, chocolate extract and vanilla extract, mixing to combine.
  5. Add dry ingredients and mix to combine. Stir in mini chocolate chips. Spread batter into prepared pan, smoothing into an even layer.
  6. Bake for 25-30 minutes or until a toothpick inserted near the center comes out with a few moist crumbs. Remove from heat and let cool completely.
I went back to the queen of brownie recipes for this one. I'm making my usual sporadic effort to use recipes from baking books I have, all nicely gathering dust on my bookshelves.
Fortunately, brownies are a staple in almost every care package I send to deployed military service members for Soldiers Angels so I can try as many brownie recipes I want and have something that ships well and is appreciated at their destination.
This one had a softer bite than my go-to brownie recipe and wasn't an intensely chocolatey but was still good and easy to make, two requirements for brownie bakes. I didn't have enough mini chocolate chips so I went with regular-sized ones. But, given the softer texture of the brownie, the large chips were a little jarring. At least to me as I prefer a straightforward fudgy texture with no chip interference. 
Still, these were good and if you've got a little sour cream to use up, this is a solid recipe to make. You can't taste the tanginess of the sour cream given the chocolate but the sour cream adds to the softer texture.

Thursday, February 1, 2024

Marlie's Vanilla Butter Springerle Cookies from Springerle Joy (Stamped Cookies #36)

Marlie's Vanilla Butter Springerle Cookies - made dough January 23, 2024 from Springerle Joy
250 grams butter, room temperature
150 grams confectioners' sugar
2 teaspoons vanilla extract
1 large egg
450 grams all-purpose flour
1/2 teaspoon salt
  1. In the bowl of a stand mixer fitted with the paddle attachment, cream together butter, confectioners' sugar and vanilla extract until well combined and creamy. Add the egg and mix until well combined.
  2. Add the flour and salt and mix on low speed until dough forms and no more floury streaks remain. Press into a thick disc and wrap completely in plastic wrap. Chill for 2 hours.
  3. Once chilled, stamp cookies with your cookie stamps. I pinch off pieces of dough, roll into balls, flatten into discs, roll in granulated sugar then stamp each piece.
  4. Chill or freeze stamped cookies for several hours or overnight.
  5. When ready to bake, preheat oven to 325 degrees F. Line baking sheets with parchment paper. Evenly space cookies on baking sheets. Bake 15-20 minutes, depending on the size of the cookies, or until bottoms or edges are just beginning to turn light golden brown. Remove from oven and let rest on baking sheets for several minutes before transferring to wire rack to cool completely. 
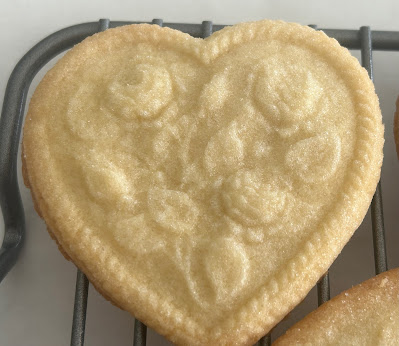
Yes, it's the season for schmaltzy hearts so I had to bust out my heart stamp. But I also still like my ladyfinger stamps so I had to use those as well to try out this recipe. I don't know that I would consider these real springerle cookies as they're not made the same way as traditional springerle and they don't taste the same. Rather, these are more like butter cookies. Truly good butter cookies that hold their impressions well and that's all I ask of a stamped cookie recipe.

The dough was a little soft after I mixed it so I did chill it for more than 30 minutes so it wouldn't stick to my cookie molds/stamps.
Then I froze the stamped cookies overnight to ensure the impressions would hold during baking. For the most part, they held really well. The design has some finer details that blurred a bit in baking but I was pretty pleased with how they turned out.

Taste-wise, these were what a good butter cookie should taste like. Make sure you use fresh butter as, well, it IS a butter cookie and that's what you're going to taste. I used Kerrygold as I find European butter has more flavor than American butter. I like to bake these until you can see the golden color at the edges so they caramelize a bit for more flavor. The texture is somewhere between not-quite-crunchy like a Biscoff cookie but not soft-chewy like a Crumbl cookie. It's somewhere in the middle of chewy-crunch. And good.

Tuesday, January 30, 2024

Crumbl Cookies review #66 - Cinnamon Square and Cannoli (revisited)

Crumbl Cookies review #66 - Cinnamon Square and revisiting Cannoli
Cinnamon Square
Last week, Crumbl put out what (to me) turned out to be a "controversial" baked good. If you can classify it enough of a First World problem to be controversial. I would insert an eye roll here and say it's just a cookie but apparently that was part of the buzz in that it wasn't a cookie. They billed it as not a cookie and not a cinnamon roll but a "cinnamon square".
I'll save you the mind bend and tell you straight up it was a little cinnamon cake with cream cheese frosting. Served in its own container inserted in the pink box. That's it. It's a cake. 
It was actually a pretty good cake. At least the one I got was. My (reminder: First World) issue with it is I don't go to Crumbl for cakes. I go for cookies. I make copycat cookies, some of which are as good or better than the OG and others that miss the mark completely. This? I can make this. It's not that hard either. I've made worse, I've made better. I can make better far more times than I can make worse when it comes to cakes.
The other issues people posted about was their cake didn't have any cinnamon, very little cinnamon, was raw in the middle, was dry and bland and so on. So it appears this one has a lot of quality control issues, depending on the store you go to. Thankfully, my store did their usual bang up job and I got a nice little cake with cream cheese frosting. I did point out on the Crumbl fan page (yes, it's a thing) that this offering doesn't really fit well with the usual elements for the typical fan. Meaning you can't eat it with your fingers without creating an unholy mess so you need to bring a fork or ask for one at the store (if they have it - mine didn't advertise that they did nor did it occur to me at the time to ask) or wait until you get home. Sorry, you "I ate it in the parking lot" people. This also cost 49 cents more than the cookie price. Not a big deal since, again me, I was raised by first generation immigrants who instilled that if you can't afford it, don't buy it. I can afford another 49 cents so I bought it without complaint. Other people complained (now can I insert my eye roll?). Funny enough, apparently you can't offer constructive feedback on a fan page without having people double down on how delicious their cinnamon square was, it's now in their top 5, they would drive miles and miles for it, no one complained at their store, it's a nice change, they hope it's permanent on the menu and so on. That's cool. We're all different with different opinions. I ain't arguing with people about a not-a-cookie. I'm glad I tried it. I don't need to get it again. I can make my own. One hopefully that isn't 920 calories for a little square. 

Cannoli
Now we get to a former test cookie that's now on the regular menu. Remember when I raved about the cannoli when it was a test cookie and how I would buy multiples of it when it hit the regular menu?
Yeah, no. I was planning on it but decided I would try one first as a regular menu item in case they changed it from when it was a test cookie. That turned out to be the right decision. I don't know if they actually changed the cookie recipe or the bake time. It doesn't look like it but this time around, my cannoli cookie wasn't as good. I let it come to room temperature as always then tried it.
Unfortunately it had a drier mouthfeel than the test cookie and not as much flavor. I think it baked a minute too long or had more flour than the test cookie did. It was still good but not good enough to send me into raptures or get me to go back to the store for another. I'm glad I only bought one. 

Monday, January 29, 2024

White Chocolate Chip Cinnamon Cookies from The Food Charlatan

1/2 cup + 1/3 cup salted butter, softened
1/2 cup butter-flavored shortening
1 cup granulated sugar
1 cup brown sugar, packed
2 large eggs
2 teaspoons vanilla
2 cups whole wheat flour
1 cup all-purpose flour
1 1/4 teaspoons cinnamon
1 teaspoon baking soda
1 teaspoon kosher salt
16 ounces premium white chocolate chips or chunks
  1. In the bowl of a stand mixer fitted with the paddle attachment, cream butter until no lumps remain, 1-2 minutes. Add shortening and mix to combine.
  2. Add granulated sugar and brown sugar, mixing until light and fluffy with no lumps, 2-3 minutes.
  3. Add eggs and vanilla, mixing to combine.
  4. In a separate bowl, whisk together whole wheat flour, all-purpose flour, cinnamon, baking soda and salt. Add to butter mixture in 2 additions, mixing on low speed until just combined after each addition. Do not overmix.
  5. Fold in 12 ounces of white chocolate chunks/chips. Portion dough into golf-ball-size dough balls. Cover and chill for at least 1 hour.
  6. When ready to bake, preheat oven to 350 degrees F. Line baking sheets with parchment paper and evenly space chilled dough balls. Bake 10-12 minutes until edges are light golden brown and middles no longer look raw. Remove from oven and gently press reserved white chocolate chunks/chips over tops of warm cookies. Let rest on baking sheets for several minutes before transferring to wire rack to cool completely.
The dough for this was rather soft after I mixed it but I thought that would be okay since it has shortening in it and shortening helps prevent some of the spread that comes from butter. Boy, was I wrong. These cookies spread distressingly thin. Had I known the shortening wouldn't save the spread, I would've added more flour until the dough wasn't so soft and sticky.

I even tried the swirling trick of swirling the cookies inside a large round cookie cutter but that didn't work either as the cookies spread so much I couldn't get them fully inside my largest cutter to even swirl well. I only managed it with a few cookies small enough to just barely fit inside the cutter. Bummer.

Fortunately, despite their appearance, they still tasted good. Because they spread thin and due to the shortening, these came out with more of a crisp texture than a soft-chewy one. The cinnamon paired well with the white chocolate and both flavors were subtle and complementary to each other. If I make these again, I may have to try adding more flour if the dough is still too soft and sticky.
The swirling trick only worked on a few cookies