Tuesday, September 12, 2023

Crumbl Cookies review #50 - Cookie Butter Lava

Crumbl Cookies review #50 - Cookie Butter Lava, visited September 2, 2023
In the same week I got the cannoli test cookie, I went back a few days later to get the cookie butter lava cookie. 
When I lived in Vegas, I learned to be skeptical of Crumbl's filled cookies as none of those stores ever did it well. The filling would bake into the cookie (or so I was told) and not be found, they'd be missed entirely and literally wasn't there to be found or there was such little filling placed inside that it didn't even constitute filling. More like a swirl into the cookie.
But here's where the Sparks, NV store shines once again and I always have to give them props. They know how to make filled cookies correctly and in the right amounts so there are no excuses about too little or nonexistent filling baking into the cookie. The filled cookies are filled. 
This was really good, just the right amount of crisp at the edges and the gooeyness in the middle. It's a messy cookie to eat because the glaze drizzled over the top of the cookie hasn't set if you eat it warm (which I did - the taste piece anyway). But sacrifices must be made and a messy eating experience is worth it for an excellent cookie.

Monday, September 11, 2023

Crumbl Cookies review #49 - Cannoli Cookie (test cookie)

Crumbl Cookies review #49 - Cannoli Cookie (test cookie), visited August 30, 2023
I've gotten into the habit of going to my local Crumbl store on Wednesdays so I can wait for the test cookie and decide if I want it or any other flavor on the menu that week. Although this particular week I wanted the snickerdoodle cupcake and the cookie butter lava as well as the test cookie, I decided against upgrading to a 4-pack and getting them all at once. One of the appeals of Crumbl cookies is having a warm cookie when you buy it. Except I couldn't eat 2 warm cookies and a chilled one in one sitting so for this trip, I only got the test cookie.

There were 3 test cookies on offer at various Crumbl test stores across the country. After looking at the possible flavors, I'm glad my store decided to test the cannoli. I'm actually not a big cannoli fan. I don't mind the crisp tube of pastry shell but I don't like ricotta in a dessert (sorry but it only belongs in lasagna!). But since was supposedly only "cannoli-inspired", I decided to try it.

The cookie is served chilled but of course I let it come to room temperature first since I don't like chilled cookies. At room temp, the cookies are really soft so handle with care. Otherwise, this was fantastic. Loved the cookie and even liked the filling. If it has ricotta in it, you can't taste it. It's more like a lightly sweetened vanilla custard filling, not a ricotta one. The texture is heavier than whipped cream (I don't like whipped cream either) but not as heavy as custard. It's hard to describe other than it's really good.

I haven't always liked the test cookies even though I'm most interested in trying them. Some I'm glad I tried it as a tester but wouldn't get again, others I would get once it hits the regular lineup and still others I would get multiples of once it's released onto the regular menu. This cannoli cookie? It's the only one I've tried so far that I would get multiples of when it's offered in the normal rotation. Yup, it was that good.

Sunday, September 10, 2023

Vanilla Bean Cookies from Fresh April Flours

Vanilla Bean Cookies - made dough August 18. 2023 from Fresh April Flours 
2 cups (240 grams) all-purpose flour
3/4 teaspoon baking powder
1/2 teaspoon baking soda
1/2 teaspoon salt
1/2 cup unsalted butter
1 cup powdered sugar
1 large egg
1/4 cup vegetable oil
1 tablespoon vanilla bean paste
1/2 cup granulated sugar, for rolling
  1. In a medium-sized bowl, whisk together flour, baking powder, baking soda and salt. Set aside.
  2. In the bowl of a stand mixer fitted with the paddle attachment, cream together butter and powdered sugar until light and fluffy, about 2-3 minutes, scraping down the sides and bottom of the bowl to keep mixture even textured.
  3. Add egg, vegetable oil and vanilla bean paste, mixing to combine.
  4. On low speed, add dry ingredients in two additions, mixing until just combined. Do not overmix.
  5. Scoop dough into small cookie dough balls. Cover and chill for several hours or overnight.
  6. When ready to bake, preheat oven to 350 degrees F. Line baking sheets with parchment paper.
  7. Place granulated sugar in small bowl and roll dough balls, coating completely. Evenly space on baking sheets and bake 8-9 minutes, until edges are set. Remove from oven and let cool on baking sheet for several minutes before transferring to wire rack to cool completely.
This is a nice, simple, straightforward sugar cookie. Dough was easy to make and came together nicely. Dough balls were easy to form and cookies tasted good. The texture was soft and the outer edges had a nice crisp. Not much more to say other than if you want an easy to make and tasty sugar cookie, here you go.
One thing I will say (okay, I always have more to say after all), is that I've noticed in recent trends that there's a lot of emphasis on things like "fast! very few ingredients! no chilling required!" and those are meant to be good things. I've been baking a long time and I tend to buck the fad trends. If I don't have a lot of time at any given moment, "fast" to me means I whip up the dough and bake it off later. "Very few ingredients" typically means you start with a mix of some sort *shudder*. Brownie mixes, cake mixes, whatever - yes, I'm a baking snob. I get the appeal of folks who don't have a lot of baking staples in their pantry but I'm not one of them. I always have flour, sugar, brown sugar, eggs, leavenings, butter, etc on hand. No mixes here. Or at least rarely.
And lastly, not chilling dough is not my thing. After decades of working high pressure jobs in the tech industry, I rarely have time to make dough, bake the cookies, cool them and package them up in one block of time. So it's easy enough to take 15 minutes (or less) to make the dough, portion them into dough balls and chill or freeze them. Another 15-30 minutes on a different day to bake and cool them for packaging. So I always chill dough because I rarely intend to make, bake and eat on the same day. I get that's not the case for everyone and some people just want a cookie NOW. Hence why if you just take the time once to make dough and portion into dough balls, stick them in your freezer then warm, freshly baked cookies will only ever be 10-15 minutes away from your grasp.
The other reasons for chilling dough first are 1) to let it firm up and spread less when being baked and 2) as the dough chills, it dries out and the flavors get more concentrated. You don't want it too dry but an extra few hours or overnight chilling doesn't hurt the dough and makes your cookies more flavorful. So yeah, "3-ingredient" baked goods, no chilling time required and so on don't do it for me.


Thursday, September 7, 2023

Pan-Banging Chocolate Chip Cookies from 100 Cookies by Sarah Kieffer

Pan-Banging Chocolate Chip Cookies - made dough August 18, 2023 from 100 Cookies by Sarah Kieffer
2 cups (284 grams) all-purpose flour
3/4 teaspoon salt
1/2 teaspoon baking soda
1 cup (2 sticks or 227 grams) unsalted butter, room temperature
1 1/2 cups (300 grams) granulated sugar
1/4 cup (50 grams) brown sugar
1 large egg
2 tablespoons water
1 tablespoon pure vanilla extract
6 ounces (170 grams) bittersweet chocolate, chopped into chunks
fleur de sel for sprinkling, optional
  1. Preheat oven to 350 degrees F. Line baking sheets with parchment paper.
  2. In a small bowl, whisk together flour, salt and baking soda.
  3. In the bowl of a stand mixer fitted with the paddle attachment, beat the butter on medium speed until creamy, about 1 minute.
  4. Add the granulated sugar and brown sugar and beat on medium speed until light and fluffy, 2 to 3 minutes.
  5. Add the egg, water and vanilla and mix on low speed until combined.
  6. Add the flour mixture in two additions and mix on low speed until just combined. Fold in chocolate chips on low speed.
  7. Portion the dough into 1/4-cup or 3-ounce dough balls. Flatten slightly into thick discs. Place 3 or 4 cookies an equal distance apart on baking sheet. 
  8. Bake the cookies one pan at a time. Bake until the dough discs have spread flat but are puffed slightly in the center, 9 minutes. Lift one side of the baking pan up about 4 inches and gently let it drop down against the oven rack, so the edges of the cookies set and the center falls back. After the cookies puff up again in 2 minutes, repeat lifting and dropping the pan. Repeat a few more times to create ridges around the edge of the cookie. Bake for 15 to 16 minutes total, until the cookies have spread out and the edges are golden brown but the centers are much lighter and not fully cooked.
  9. Transfer the pan to a wire rack and sprinkle the cookies with fleur de sel if desired. Let the cookies cool for 10 minutes then move them to a wire rack to cool completely.
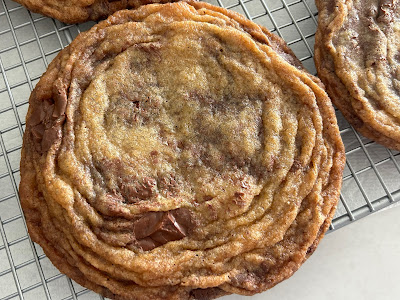
Do you like those ripples at the edges of cookies, commonly found in some bakery cookies? Or do you like your chocolate chip cookies thin and crispy? If you're a "yes" to both. here's the recipe for you. 
This recipe is from Sarah Kieffer's book 100 Cookies but she also has it on her Vanilla Bean blog. I don't think I've tried a bad recipe from her yet, either from her book or her blog. Although I'm not a fan of thin. crispy cookies, surprisingly, I did like this one so her recipe streak continues. It's a bit sweet for me but that's probably because I used milk chocolate chunks and because this has way more granulated sugar than brown sugar. If you want to cut the sweetness, use semisweet or dark chocolate chips.
The pan banging trick is literally just that. You let the cookies bake for 9 minutes then bang the pan on the oven rack several times. Banging the pan deflates the cookies and causes those ripples at the edges as the middle collapses. You let it bake for 2 minutes then bang the pan again to once again deflate the middles that keep trying to rise, thus creating another ripple at the edges. Another 2 minutes, bang, deflate, 2 minutes, bang, deflate and so on until the cookies are the golden caramel you want them to be. 
Depending how long you bake, bang and ripple, the cookies will be crisp if you bake them to an even golden color. I prefer for at least the middles to be chewy so I didn't bake these as long but even then, they were still more crisp than chewy. 
As good as these tasted, I don't think I'd make them again unless I knew someone who really does like crisp cookies, mostly because the pan banging was a pain in the ass. I don't like opening the oven every two minutes to bang the pan (too much heat escapes) and I'm not used to roughing up my baking pans that way, lol. Still, it's a fun technique if you want the rippled look and that crisp texture.

Monday, September 4, 2023

Crumbl Cookies review #48: Skillet Cookie (test cookie)

Crumbl Cookies review #48: Skillet Cookie (test cookie) - visited August 23, 2023
One of the biggest perks in moving into the area I did earlier this year is the Costco is a short drive away. Another big perk is the only Crumbl in my half of the state is across the street from the Costco. And as the proverbial cherry on top to that perk is this particular Crumbl is a test store. Meaning, almost every Wednesday, they're one of a group of Crumbl test stores across the country that tests a new flavor or a new rendition of an existing flavor, that isn't on the regular rotation menu.
Two (or sometimes three) flavors are usually tested per week and I find out on Wednesdays which one my store is testing. For this week, it was the skillet cookie. Which I was glad about since I didn't have any interest in the Jammy Heart (no jams or jellies for me, thanks).

A skillet cookie is essentially a pizookie, a warm cookie baked in a skillet (hence the name) or small round pan, topped with ice cream and served warm. Since it wouldn't be practical for Crumbl to serve these with ice cream, they adapted a vanilla bean mousse to mimic the ice cream. They used semisweet chocolate for this cookie, both the chips and the drizzle. I prefer milk chocolate but the semisweet worked in this cookie to cut some of the sweetness.

It's served warm but by the time I was able to eat it (I virtuously ate a salad before I had the cookie), it had cooled down. So I heated it up in the microwave for 10 seconds. That caused the mousse to spread almost fully into the indent of the cookie which worked just fine. I unexpectedly liked the mousse more than the cookie, unusual since I'm not big on custards, creams or mousses. But it worked really well in this cookie. 
The only issue I had is my cookie seemed fully baked rather than underbaked. It wasn't overbaked or dry but I would've preferred a tad less baked so it had a softer texture. But still a good cookie and if/when it hits the regular rotation, I'd probably get it again for the mousse.

Saturday, September 2, 2023

Churro Bars from Imperial Sugar

Churro Bars - made August 20, 2023 from Imperial Sugar 
1 cup unsalted butter
2 cups light brown sugar
2 large eggs
2 teaspoons vanilla
1 1/2 teaspoons baking powder
1 teaspoon salt
2 1/2 cups all-purpose flour

1/4 cup granulated sugar
1 tablespoon ground cinnamon
  1. In a medium saucepan, melt and brown butter. Remove from heat and let cool for 20 minutes.
  2. Preheat oven to 350 degrees F. Line a 9 x 13 baking pan with foil and lightly spray with nonstick cooking spray.
  3. In a large bowl, stir together melted, browned butter and brown sugar. Add eggs and vanilla and stir to combine. Stir in baking powder, salt and flour, mixing to combine.
  4. In a small bowl, whisk together granulated sugar and cinnamon. Sprinkle half of mixture evenly over bottom of prepared pan. Pour batter into an even layer and smooth top. Sprinkle remaining mixture evenly over top.
  5. Bake 25-30 minutes or until edges are lightly golden. Cool completely before cutting and serving.
Although I usually include a batch of brownies in each of my military care packages for Soldiers Angels, I sometimes mix it up with non-chocolate bars to offer a different flavor and on the off chance there are non-chocolate lovers in the unit.
Snickerdoodles are my go-to cookies so the bar form makes sense. These are technically churro bars but they also are cinnamon-sugar-based so potato/po-tah-to. Same dif.
These are slightly different from snickerdoodle bars in that you sprinkle half the cinnamon-sugar on the bottom of the pan before you spread the batter over it, thereby "sandwiching" the bars between two layers of cinnamon sugar, much like a churro is coated all over. That only partially worked as some of the bottom sprinkle stayed on the foil instead of adhering to the bars.
The batter itself was rather dense so the bars turned out dense. Not quite "fudgy" in texture but more dense than cakey. Not sure I loved these. As a snickerdoodle substitute, they're not bad. I think I just prefer them in cookie form. But these packaged and shipped nicely so they served the purpose they were meant to serve.


Wednesday, August 30, 2023

Fudge Brownies from The Ultimate Brownie Book

Fudge Brownies - made August 18, 2023 from The Ultimate Brownie Book by Bruce Weinstein
8 tablespoons unsalted butter, cut into 4 pieces
9 ounces semisweet chocolate, roughly chopped
2 ounces unsweetened chocolate, chopped
2 large eggs
1 large egg yolk
1 cup sugar
2 teaspoons vanilla extract
2/3 cup all-purpose flour
1/2 teaspoon salt
  1. Preheat oven to 350 degrees F. Line 8 x 8" baking pan with foil and lightly spray with nonstick cooking spray.
  2. In the top half of a double boiler set over hot water, combine butter, semisweet chocolate and unsweetened chocolate. Whisk until completely melted and combined. Remove from heat.
  3. In the bowl of a stand mixer fitted with the paddle attachment, beat together eggs, yolk and sugar until light and thick, about 4 minutes. Add chocolate mixture and vanilla extract and mix to combine. On low speed, add flour and salt, mixing just until combined.
  4. Pour into prepared pan, smoothing into an even layer. Bake for 25-30 minutes or until a toothpick inserted near the center comes out with a few moist crumbs. Let cool completely before cutting and serving. 
I've tried several brownie recipes from this book and others in my cookbook collection and this is the only one I'm blogging in recent weeks. Otherwise most of my observations would be "not as good as my go-to recipe". I'm going to say the same about this because, let's face it, so far, nothing is unseating my go-to brownie recipe.
Still, if you want to mix it up a bit, this is a little more chocolate-y and not quite as dense as my go-to recipe. It's a softer texture because it has less flour and it's more chocolate-y because, well, it has more chocolate.


Sunday, August 27, 2023

Coconut Blondies from The Ultimate Brownie Book

Coconut Blondies - made August 18, 2023 from The Ultimate Brownie Book by Bruce Weinstein 
1 cup all-purpose flour
1/2 teaspoon baking powder
1/2 teaspoon salt
8 tablespoons unsalted butter
3/4 cup brown sugar, packed
1/2 cup granulated sugar
1 large egg
1 large egg white
1 teaspoon vanilla extract
2 cups coconut flakes
3 ounces semisweet chocolate chips
  1. Preheat oven to 350 degrees F. Line 9 x 9" baking pan with foil and lightly spray with nonstick cooking spray.
  2. In a medium bowl, whisk together flour, baking powder and salt; set aside.
  3. In the bowl of a stand mixer fitted with the paddle attachment, cream together butter, brown sugar and granulated sugar until pale brown and thick, about 5 minutes. 
  4. Beat in egg until combined then beat in egg white and vanilla, mixing until combined. Beat in coconut flakes then chocolate chips. Add dry ingredients and mix until just combined. Pour into prepared pan and smooth into an even layer.
  5. Bake for 25 minutes or until top is light golden brown and a toothpick inserted near the center comes out with a few moist crumbs. Let cool completely before cutting and serving.
I'm trying to go back to my recipe books again, partly because I always want to use what I already have and partly because I'm going through another purge of "stuff" and want to pull out any potentially good recipes from some of my books before I donate them.
I haven't found a fudge brownie recipe that I like better than my go-to recipe even though I've tried a few from this book that I didn't blog about; they were good but they just weren't special enough. So I thought I'd mix it up with going with this coconut blondie recipe.
This was pretty good. It reminded me of the topping of a magic cookie bar without the sweetened condensed milk or nuts. The coconut makes this nicely chewy and sweet. It's a good one for coconut lovers.