Monday, April 17, 2017

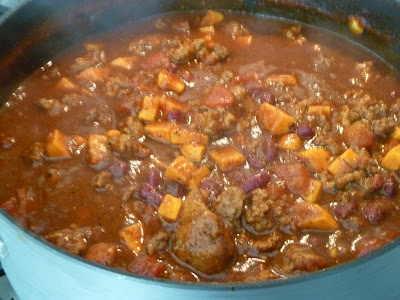
Sweet Potato Chili

Sweet Potato Chili - made April 1, 2017, adapted from Tastes of Lizzy T
I’ve been trying to cook again. Or at least, I make one thing over the weekend that’ll feed me some random meals during the week and call it a day. Chili has become my fallback meal. It’s easy to make, tastes better the next day and freezes easily. Plus I get to use the spices I ordered from Penzey’s! As with Pernigotti, I’m not affiliated with the company. I just like their products and the company itself so I tout their virtues whenever I can. Plus, their spices are what's encouraging me to cook more. Once I've bought them, I have to use them, right?

When it comes to chili, the hardest thing is chopping up the ingredients and in the case of this recipe, even that isn’t very hard. The only mise en place I had to do was peel and chop the onion and sweet potatoes. I cheated on the minced garlic because I had a (free) jar of minced garlic from Penzey’s that I used instead of fresh garlic. It was pretty good in the Skillet ChickenAlfredo Pizza and I’m not snobby about garlic so using it from the jar was just fine with me.
I modified this recipe, mostly by cutting the amount of chili powder in half. Not out of any culinary skill or preference but simply because I only had a 1/4-cup jar of chili powder from Penzey’s and not half a cup. At first I thought it was going to end up too soupy to be chili but I let it boil and boil (and boil), partially covered, until it had thickened enough to surpass the soupy stage. And once it had cooled, even when heated up the next day, it had thickened up to a satisfyingly chili-like consistency. Fortunately, my sweet potatoes didn’t disintegrate into mush and held up quite well but you might not want to chop them too small in case you have to boil your chili for a bit longer.
This chili had some heat. I wouldn’t say it was spicy-hot (me and my bland taste buds balk at that) but it was flavorful. If I sound surprised, you have to understand I’m a bland eater and a bland cook who never used to really use spices. But I feel like I successfully used spices this time to make something with rich, robust flavor rather than be spicy-hot; that doesn’t happen that often. Go me. Go chili.
1 pound ground beef
1 pound ground turkey
1 onion, chopped
1 teaspoon minced garlic
1 29.5-ounce tomato sauce
2 cups diced tomatoes with juice
3 cups beef stock
5 cups sweet potatoes, peeled and cubed
1 15.5-ounce can kidney beans, drained
2 bay leaves
1/2 teaspoon thyme
2 teaspoons salt
1 1/2 teaspoons black pepper
1/4 cup chili powder
dash of oregano
dash of red pepper flakes
  1. In a large saucepan, brown ground beef, ground turkey, onions and garlic. Drain off the fat.
  2. Add the remaining ingredients to the saucepan. Mix well, bring to a boil and simmer, covered, for about 30 to 40 minutes or until the sweet potatoes are cooked through.
  3. Remove and discard the bay leaves. Serve.
Saturday, April 15, 2017

Skillet Chicken Alfredo Pizza

Skillet Chicken Alfredo Pizza - made March 31, 2017
I’m going to try and space out my cast iron skillet recipes but if you check dates, you’ll know I obsessed about using my new skillet within the same few days as that’s when I tried out recipes using it. For this one, I didn’t really have a set recipe but an idea of “hey, I wonder how pizza would turn out in this thing.”
A cast iron skillet is great for baking anything bread-like. The heat and darkness of the skillet, so anathema when making cakes and cookies (the edges cook faster and get darker before the middle is usually done) is perfect for pizza dough. It crisps the outer edges and forms a nice crust. Because I used a smaller skillet (6”), the outer ring of the pizza didn’t have time to burn before the middle was baked. But did have enough time to crisp to a still-chewy exterior and turn a beautiful golden brown.
This pizza requires no cooking skill to make, which is fortunate. I bought the whole wheat, ready-made pizza dough from Trader Joe’s, used cooked chicken (also from TJ’s) as the topping and made up an alfredo sauce (recipe, such as it is, below) which I poured over the chicken. Bake until golden brown and cheese has melted and voila – Skillet Chicken Alfredo Pizza.

I only wanted a little sauce and the only reason I made it alfredo was I didn’t have any tomato sauce for a tomato-based pizza sauce. This turned out pretty well although I admit, I think I could’ve stretched out the pizza dough to a thinner crust. I like thick crust pizza though so I wasn’t too upset with my impromptu “cooking”.
Alfredo Sauce
2 tablespoons butter
¼ cup half and half
¼ cup whole milk
1 tablespoon chopped fresh garlic (I used Penzey’s minced garlic and it was perfect)
½ cup shredded mozzarella cheese

Melt butter and whisk in half and half and milk. Add garlic and stir in mozzarella cheese. Whisk over medium-low heat until completely melted. If mixture is too thin, add more cheese, a tablespoon at a time. Sauce will thicken after being baked and once it sets.

Thursday, April 13, 2017

Peanut Butter Nutella Blondies

Peanut Butter Nutella Blondies - made March 26, 2017 from Relish
If you know any peanut butter and/or Nutella lovers, this is the easiest thing you could make for them and get raves. You make the peanut butter blondie batter, spread half in the bottom of the pan, pour a layer of warm Nutella over it and then drop the rest of the blondie batter on top, covering the Nutella completely.

The trickiest part is telling when it’s done. You can’t do the traditional toothpick test without running into the Nutella middle and that’ll mask whether the blondie has baked enough or not. Instead, angle the toothpick so that you’re able to spear the top half of the blondie without encountering the Nutella. If it comes out with moist crumbs and not raw batter, it’s done.

While I’m not a big peanut butter lover, I liked this combination. It’s straightforward, simple and the flavors marry well. It’s also easy to make ahead of time and freeze for when you need it. I used creamy peanut butter but you can use either creamy or crunchy. Just don’t use natural peanut butter or you won’t get the same texture or results. I also admit I was a bit generous with the Nutella because, hello, Nutella. You can use as much or as little as you like although I wouldn’t go much more than 1 cup or the Nutella layer will overwhelm the peanut butter (I know, I know, I say that like it’s a bad thing). I wouldn’t go too skimpy with the Nutella either; otherwise, why bother?

1/2 cup unsalted butter, softened
2/3 cup creamy peanut butter
1 1/2 cups packed brown sugar
2 large eggs
2 teaspoons vanilla extract
1 3/4 cups all-purpose flour
1 teaspoon baking powder
1/2 to 1 cup Nutella
  1. Preheat oven to 350 degrees F. Line an 8 x 8 baking pan with foil and lightly spray with nonstick cooking spray.
  2. In the bowl of a stand mixer fitted with the paddle attachment, beat the butter, peanut butter and brown sugar together until smooth, about 30 seconds.
  3. Add the eggs, one at a time, beating well after each addition. Mix in the vanilla. Add the flour and baking powder; stir until just combined. Do not overmix.
  4. Pour half the batter into the prepared pan, smoothing the top. Measure out Nutella in a glass measuring cup and microwave for 15 to 20 seconds. Spread evenly over the batter. Top with remaining batter by dropping spoonfuls evenly over the Nutella and gently smoothing out the top.
  5. Bake for 23 to 25 minutes or until the top is no longer glossy and the edges are golden brown. Cool completely before slicing.

Tuesday, April 11, 2017

Restaurant Review: La Fontaine

La Fontaine - dinner on March 30, 2017
I haven’t done a restaurant review in awhile. I’ve still been trying new local restaurants but just haven’t been good about blogging about them. So I thought I’d get back in the swing with this review for La Fontaine, which I took to be an Italian restaurant based on the cuisine but they bill themselves as French-Italian. Okay.

The menu offers a pretty good selection of different dishes. Price range is in the $20-$30+ per entrée with desserts (you know I look at the dessert menu first) under $10.
This is one of those menus where I had a hard time making a selection because there were several options that looked mouth-wateringly viable. I waffled between a couple of the pasta dishes, the short ribs, the steak frites and the Salmon Wellington. Pasta is usually my go-to at an Italian place, it’s hard to go wrong with steak and the short ribs sounded amazing. But I ultimately went with the Salmon Wellington because that’s not something you see on a menu every day.
Salmon Wellington - $25
The description was knee-weakening in and of itself. Salmon “wrapped” in puff pastry, stuffed with leeks and rock shrimp and served atop a bed of saffron risotto. Yum, right? Unfortunately, it wasn’t quite as good as it sounded. Don’t get me wrong, it was pretty tasty. But it wasn’t actually “wrapped” in puff pastry like you would picture a traditional Beef Wellington is wrapped, as in encased completely so that you had to cut through the pastry to see what was inside. No, this was a salmon fillet which had a strip of puff pastry wrapped around its horizontal edge (like where its skin would have been) so you can still see the salmon, exposed. The middle had a spoonful of stuffing but I was hard pressed to find more than a few bits of shrimp. It was more leek than shrimp. I almost forgot it was supposed to have shrimp in the stuffing. The puff pastry was soggy because of the sauce poured over the salmon. The risotto was quite tasty but there wasn’t much of it. I sound more negative about the dish than I actually was. It was a modest portion that didn’t leave me feeling stuffed, which was good. What there was of the dish was delicious. But I think the reality didn’t live up to the advertising.
Meatballs

Seafood Pappardelle
One of my friends ordered the short ribs, which had been on my short – haha – list of entrees to get and let me have a taste. It was amazing. As in, “I’m coming back here again and ordering that instead” amazing. My other friends ordered pasta dishes and those looked good too so I might have to come back a couple more times.
Braised Shortribs - $26
The good news about the modest piece of salmon is I had room for dessert. Which, of course, I had to get. The lava cake called out my name and I paid heed. It too was modest in portion size but that wasn’t a bad thing. The chocolate lava cake was rich so a little went a long way. It was also delicious as was the caramel gelato that accompanied it.  
Lava Cake - $9
Overall, I liked La Fontaine. The servers were nice and it wasn’t too crowded. The menu items were a little pricey but I don’t mind that if it’s for good food with good service. Looking forward to going back and trying out some of the other entrees.

Sunday, April 9, 2017

Skillet Apple Crumble for Two

Skillet Apple Crumble for Two - made March 26, 2017
I cycle through various baking obsessions from time to time. I’m in the beginning of one with cast iron skillets. I had a gift card to Sur la Table that I’d received last Christmas begging to be spent. I already knew I needed espresso powder for the Mocha Cream Cheese Brownies but there was still room on my gift card so I wandered the aisles to see what would catch my fancy.
What caught my eye, as always, was the “made in the USA” label. I’m a big believer in buying “local”, including buying US-made goods as much as possible. It isn’t always easy or readily available and is often more expensive but I’d rather buy less to make up the price difference if I can buy USA-made. Fortunately, cast iron pans are often made in the US and they’re reasonably priced. I bought this one at Sur la Table for $11.95 and found the same one on amazon for $8.49 and at Target for $7.99. I already had an 8” cast iron skillet, also made in the USA, but I wanted the smaller one for dessert size.
I haven’t done a lot of skillet cooking or baking but that’s not to say I couldn’t start. And start I did with making up this Skillet Apple Crumble. I had a lone Granny Smith hanging out in my refrigerator and I got the bright idea of making myself an apple cobbler. At first I had in mind making it more like a skillet apple pie with a real pie crust on top. But as I put this together, I changed my mind and reverted back to the crumble idea.
I made up this recipe, also something I don’t often do as I’m more of a follower of recipes than a creator of them. But, really, it’s hard to go wrong with an apple cobbler or crumble; it’s a very forgiving dessert. The cast iron skillet was perfect for this one because I softened/semi-caramelized the apples in the skillet directly with a little butter, sprinkled on some nutmeg and cinnamon (from Penzey’s, naturally) and a little sprinkle of brown sugar. Let it cook to semi-soft state, add a few dollops of salted caramel, then cover with the crumb mixture.
The crumb mixture I also made up from cobbling – haha – together bits from past recipes. Some flour, a little brown sugar, granulated sugar, generous dashes of nutmeg and cinnamon, melted butter and a little milk to hold it together in biggish crumbs. Cover the apples entirely with the crumb mixture then put the whole thing into the oven to bake.
It might go without saying but I’ll say it anyway for any other cast iron skillet novices. Make sure you’re using a potholder to touch the skillet handle with, even when it’s on the stove and before you put it in the oven (and after as well, of course). The heat from the stovetop fires up the whole skillet, including the handle so it’ll burn your unprotected hand. I might have some firsthand knowledge of that….just sayin’.
This turned out really well as my first skillet dessert creation. The Granny Smith apple was tart and I hadn’t used enough sugar in the apples themselves to tone down the tartness but the crumb topping and the salted caramel dollops made it a perfect complementary combination. The topping also crisped up so it provided a terrific contrast to the softness of the apples. Of course, there’s no point having warm apple crumble without a scoop of vanilla ice cream (to everyone except my brother in law who thinks combining flavors and textures is a travesty) so that also went well to provide a cool contrast to the warm cobbler.
In the picture, you’ll see I put the ice cream off center. That’s because I knew I was only going to eat, at most, one half of the cobbler. While a 6” skillet is a nice size, it’s mostly a nice size for two and is more than one serving for someone who still wants to fit into her existing clothes. The only downside to the skillet is it isn’t microwavable so when I went back for the second half of the cobbler the next day, I ate it at room temperature. Turns out it wasn’t bad that way either, although I did forego the ice cream that time around. First world problems abound. Look for further cast iron skillet obsessing to come.
1 large Granny Smith apple, peeled and sliced
2 tablespoons butter
1/4 teaspoon cinnamon
1/4 teaspoon nutmeg
2 tablespoons brown sugar or 2 tablespoons salted caramel

Topping
2 tablespoons butter, melted
1/2 cup all-purpose flour
2 tablespoons granulated sugar
2 tablespoons dark brown sugar
1/2 teaspoon cinnamon
1/4 teaspoon nutmeg
2 tablespoons milk
  1. Preheat oven to 350 degrees F.
  2. Using a 6" cast iron skillet, melt butter over low heat and add apple slices. Sprinkle with cinnamon and nutmeg then brown sugar if using, stirring gently until sugar has melted. If using salted caramel, cook apples until slightly softened then dollop caramel over apples.
  3. Topping: Combine melted butter, flour, granulated sugar, brown sugar, cinnamon and nutmeg. Mixture will be crumbly with loose flour. Dribble in milk, a little at a time, until mixture gathers together in crumbly pieces and there's only minimal loose flour.
  4. Sprinkle topping mixture over apple, covering apples completely. Bake for 20 minutes or until apples are soft and topping is golden brown. Remove from heat and cool for several minutes. Serve warm with a scoop of vanilla ice cream.

Friday, April 7, 2017

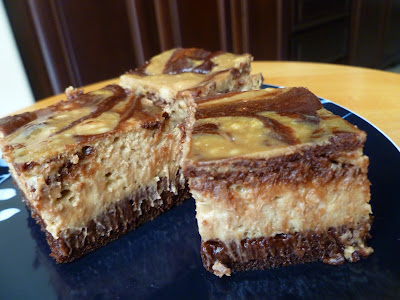
Mocha Cream Cheese Brownies

Mocha Cream Cheese Brownies - made March 26, 2017 from The Fearless Baker by Emily Luchetti
I need to rename these Mocha Cheesecake Bars because that’s what they are. Calling them cream cheese brownies implies there’s cream cheese swirling through the brownie like a supporting cast member. Instead, there’s enough cream cheese batter to warrant top billing and it’s more like a cheesecake with a bit of brownie along for the ride.

If you’re a cheesecake lover, that’s good news. If you’re like me and don’t care for cheesecake, it’s a bit of an “oops” moment. Although I did suspect that’s how it would turn out given the amount of cream cheese I saw in the recipe before I started making it. But I had bought that Costco pack of cream cheese because I needed 8 ounces for the coconut cake recipe and I had to figure out something else to do with the remaining 40 ounces that the pack came with. Honestly, that’s how I end up trying most of the recipes I make; I have too much of an ingredient and I need to use it up somehow.
As cheesecake brownies go, this one was fairly decent, especially if you’re a coffee or mocha lover. I still can’t get into cheesecake so this wouldn’t make my top 10 brownie list but it’s rich and decadent if you’re a cheesecake lover. I didn’t do a very good job of swirling the two batters together so mine came out more like a brownie layer on the bottom, a cheesecake layer on top and a swirly pattern overlay attempt. If you want more of a true swirl, rather than spreading into separate layers and then swirling, I would drop alternate dollops of each batter into the pan then run a knife through the dollops to make big swirls.

You can see bits of cream cheese that didn’t fully incorporate into the cheesecake layer because the cheesecake mixture was too liquid to blend them all in. Plus my cream cheese was probably too cool and I couldn’t get it more uniform without beating the batter too much. When it comes to cheesecake, you don’t want to overbeat the batter or you’ll aerate it and you won’t get that dense cheesecake texture. I don’t bake cheesecake-y things enough to get good at it so my amateur status is apparent in this brownie/cheesecake bar. Fortunately, it tastes better than it looks.
9 ounces bittersweet chocolate, coarsely chopped
10 tablespoons (1 1/4 sticks) unsalted butter
1 cup granulated sugar
3 large eggs
3/4 cup unbleached all-purpose flour
large pinch of kosher salt

Coffee-Cream Cheese Layer
2 8-ounce packages of cream cheese, softened
1/2 cup granulated sugar
2 large eggs
2 teaspoons instant coffee granules
1 teaspoon vanilla extract
  1. Preheat oven to 350 degrees. Line a 9" square baking pan with foil and lightly spray with nonstick cooking spray.
  2. Brownie: Melt the chocolate and butter in the top half of a double boiler set over barely simmering water. Stir and scrape sides of bowl until mixture is melted and smooth. Set aside and let cool.
  3. In a medium bowl, whisk the sugar and eggs until smooth. Stir in the melted chocolate then the flour and salt; mix until well blended. Turn the batter into the prepared pan and spread evenly with a spatula.
  4. Cream Cheese Layer: In another bowl, mix the cream cheese with the sugar until smooth. Add the eggs and stir until combined. Scrape down the side of the bowl with a rubber spatula. Stir in the instant coffee and vanilla until combined.
  5. Using the rubber spatula, spread the cream cheese mixture on top of the chocolate layer, then run a table knife through the cream cheese to swirl it into large white ribbons throughout the brownie batter.
  6. Bake, until a toothpick inserted near the center comes out with a few moist crumbs, 30 to 35 minutes. Let cool to room temperature before cutting and serving.

Wednesday, April 5, 2017

Peanut Butter Chocolate Chip Cookies

Peanut Butter Chocolate Chip Cookies - made dough March 19, 2017 from Averie Cooks
This is what I would consider a staple cookie. The dough is easy to make, portion into dough balls and keep on hand in the freezer, ready to bake at a moment’s notice whenever you need a cookie fix or to gift someone with a goodie bag.

I had a peanut butter lover at work I had promised “anything peanut butter” to so I whipped up these cookies one day and baked off a batch the night before I saw her. I like this kind of cookie because, not only does it taste good (according to my peanut butter-loving coworker) but it also stays thick and doesn’t spread much. That’s all I ask for from a cookie.


1 large egg
1/2 cup unsalted butter
1/2 cup brown sugar, packed
1/4 cup granulated sugar
heaping 3/4 cup of creamy or crunchy peanut butter (not natural peanut butter)
2 teaspoons vanilla extract
1 1/4 cups all-purpose flour
1/2 teaspoon baking soda
1/2 teaspoon salt
1 1/2 cups chocolate chips
  1. In the bowl of a stand mixer fitted with the paddle attachment, cream the egg, butter, brown sugar and granulated sugar on medium-high speed until light and fluffy, about 3 to 4 minutes.
  2. Scrape down sides of the bowl and add the peanut butter and vanilla. Mix on medium-high speed until combined, about 1 minute.
  3. Add the flour, baking soda and salt; mix on low speed until just combined; do not overmix.
  4. Fold in the chocolate chips.
  5. Portion into golf-ball size dough balls, cover and chill or freeze for several hours or overnight.
  6. When ready to bake, preheat oven to 350 degrees F. Line baking sheets with parchment paper and evenly space chilled or frozen dough balls on baking sheets.
  7. Bake for 10-11 minutes or until edges have set and middles are no longer raw. Do not overbake. Remove to wire rack to cool completely.


Monday, April 3, 2017

Chocolate Chocolate Chunk Muffins

Chocolate Chocolate Chunk Muffins - made March 20, 2017 from Baking From My Home to Yours by Dorie Greenspan
I was rereading Kerry Greenwood’s Corinna Chapman series recently. Corinna Chapman is an accountant-turned-bread-baker in Melbourne who takes on a 15-year-old recovering heroin addict named Jason as an apprentice. Turns out Jason has quite the talent for baking, especially with making incredible muffins that are better than Corinna’s herself. Whenever I read this series, I feel the urge to try and be a Jason (the muffin baker, not the recovering heroin addict). You’ll probably find a muffin recipe on my blog that makes the same reference from the last time I read the series.
I’ve tasted some seriously amazing muffins in my time. What makes a good muffin to me is, of course, a crisp but not hard muffin top and a velvety crumb interior that’s more firm than a cake but not dense or hard. Don’t tell but I used to live on the Costco lemon poppyseed muffins 20 pounds ago. Yum. So I thought I would give it a go and channel my latent Jason to try and make good muffins. The key to a good muffin and getting that velvety texture is the lightness of the batter. Which means not overmixing it and getting the batter together quickly and evenly with the barest of strokes. Otherwise you end up with a tough interior, not a soft one.
Alas, just like the last time, Jason was so latent in my muffin-making abilities that I’m forced to acknowledge and remember, this fictional character exists nowhere in my baking DNA. That’s my fancy way of saying I can’t make very good muffins. Try as I might, I can’t mix it right. I err on the side of undermixing and end up with flour pockets. Not small ones either. Laughably big ones, as a matter of fact. So then I have to mix a little more and before you know it, I’m sure my batter is overmixed.
Not that these turned out tough in texture. They were actually almost cupcake like. But missing that soft tender crumb of a good muffin. The muffin top wasn’t crisp either but had nearly the same texture as a soft cupcake top. I think I’ll stick to reading about muffins then.
3/4 stick (6 tablespoons) unsalted butter
4 ounces bittersweet chocolate, coarsely chopped
2 cups all-purpose flour
2/3 cup sugar
1/3 cup unsweetened cocoa powder, sifted
1 tablespoon baking powder
1/2 teaspoon baking soda
1/2 teaspoon salt
1 1/4 cups buttermilk
1 large egg
1 teaspoon pure vanilla extract
  1. Preheat oven to 375 degrees F. Line the 12 cup molds in a regular-size muffin pan with cupcake or muffin liners.
  2. Melt the butter and 2 ounces of the chopped bittersweet chocolate in the top half of a double boiler over barely simmering water. Remove from heat.
  3. In a large bowl, whisk together the flour, sugar, cocoa, baking powder, baking soda and salt. In another mixing bowl, whisk the buttermilk, egg, and vanilla extract together until well combined. 
  4. Pour the liquid ingredients and the melted butter-chocolate mixture over the dry ingredients and, with a whisk or rubber spatula, gently but quickly stir to blend. A few lumps are okay; do not overmix. Fold in remaining chocolate chunks. Divide batter evenly among the muffin cups.
  5. Bake for about 20 minutes or until a toothpick inserted into the center of the muffins come out clean. Transfer the pan to a rack and let cool for 5 minutes before removing each muffin from its mold.