Monday, January 30, 2023

Butter Toffee Cookies from Julie Blanner

Butter Toffee Cookies - made dough January 15, 2023 from Julie Blanner 
1 cup unsalted butter, softened
1/2 cup granulated sugar
1/2 cup brown sugar, packed
1 teaspoon vanilla extract
1 egg
2 1/2 cups all-purpose flour
1/2 teaspoon baking powder
1/2 teaspoon baking soda
1/4 teaspoon salt
1 cup toffee bits
  1. In the bowl of a stand mixer fitted with the paddle attachment, cream together butter, granulated sugar and brown sugar until well combined, light and fluffy, 2 to 3 minutes. Mix in egg and vanilla extract until just combined.
  2. In a separate bowl, whisk together flour, baking powder, baking soda and salt. Add to butter mixture in two additions, mixing on low speed until just combined. Fold in toffee bits.
  3. Portion into dough balls, cover and chill for at least 2 hours.
  4. When ready to bake, preheat oven to 350 degrees F. Line baking sheets with parchment paper. Evenly space chilled dough balls. Bake 8 minutes or until edges are light golden brown. Remove from oven and let rest on baking sheets for several minutes before transferring to wire rack to cool completely.
I've been wanting to try out this recipe because of how they looked on Julie Blanner's blog: cute little morsels of buttery toffee cookie goodness. They reminded me of my friend AnnietheBaker.com's cookies in being cute, little and chubby.

As you can tell from the pictures, my attempt didn't come out as cute and chubby. I did make them little though with my smallest cookie scoop. The recipe said to only bake for 8 minutes. But at 8 minutes in my oven, while they hadn't spread yet, they were still definitely raw dough. Even though cookies continue baking on a hot baking sheet even after you remove it from the oven, I knew they were still too raw to take out. I don't mind underbaked cookies and actually prefer them but I don't care for raw ones.

Hence why I baked mine for longer, about 12-13 minutes and ended up with little, not flat or thin cookies but definitely with more spread than the original blog.


But don't let that put you off as these cookies were excellent. Just the right morsel-sized bite and they really were buttery toffee goodness.
These make perfect little tea cookies and were also easy to pack into care packages to fill in smaller gaps and corners.


Sunday, January 29, 2023

Double Chocolate Espresso Cookies from 100 Cookies

Double Chocolate Espresso Cookies - made dough January 11, 2023 from 100 Cookies by Sarah Kieffer 
1 1/2 cups (213 grams) all-purpose flour
1/2 cup (50 grams) Dutch-process cocoa powder
2 teaspoons ground espresso
1 teaspoon baking powder
1/2 teaspoon baking soda
14 tablespoons (198 grams) unsalted butter, room temperature
3/4 cup (150 grams) granulated sugar
3/4 cup (150 grams) brown sugar
1 tablespoon pure vanilla extract
3/4 teaspoon salt
1 large egg plus 1 large egg yolk
5 ounces (142 gams) bittersweet chocolate, coarsely chopped
2 tablespoons cocoa nibs, optional
  1. Preheat oven to 350 degrees F. Line baking sheets with parchment paper.
  2. In a small bowl, whisk together flour, cocoa powder, ground espresso, baking powder and baking soda.
  3. Slice 4 tablespoons butter into 4 pieces and place them in a large bowl. Melt the remaining 10 tablespoons butter in a medium skillet over medium-high heat. Brown the butter until dark golden brown and gives off a nutty aroma, 2 to 3 minutes. Pour the browned butter, scraping the bottom and sides of skillet for all the browned bits, over the 4 tablespoons butter in large bowl. Stir until all the butter is melted and combined.
  4. Stir in the granulated sugar, brown sugar, vanilla and salt until combined. 
  5. Whisk in the egg and yolk until fully combined and the batter is smooth and glossy, about 45 seconds. Let rest 2 to 3 minutes then whisk again for another 45 seconds.
  6. Add the flour mixture and use a rubber spatula to combine.
  7. Fold in the chopped chocolate and cocoa nibs, if using, mixing to distribute evenly.
  8. Form dough into golf-ball-size dough balls (about 45 grams each). Evenly space on baking sheet, about 6-7 cookies per sheet.
  9. Bake 8 to 9 minutes or until edges are set and middles are barely past the raw stage. For a more crisp edge, bake 10-11 minutes.
  10. Let rest on baking sheets for several minutes then transfer to wire rack to cool completely.
When I get onto a new baking book, you'll soon be able to tell as there will be a flurry of recipes from it on my blog in a short amount of time. Such is what’s happening with 100 Cookies by Sarah Kieffer. 
Since I borrowed this one and can't keep it forever, aka let it gather dust on my bookshelves, I got into a frenzy of typing up the recipes I wanted to try. And I know myself well enough that whatever I don't make "right away" is likely going to languish in my cyber files for...well, forever seems like a good estimate.
I didn't want to try ALL the recipes in this book (some weren't to my taste) but there were a decent number that caught my eye and taste buds. This was one of them. I'm not a coffee or espresso drinker but I've heard deployed service members like caffeine (helps with their long shifts) so I'm always open to coffee/espresso-flavored baked goods.
Since the author was kind enough to include weight measurements as well as volume ones, I weighed all the ingredients out for greater adherence to how she intended the recipe. That turned out to be a good call as this dough came together beautifully and is probably one of the easiest doughs I've worked with: not too soft or sticky, not dry or crumbly, but just easy to portion into dough balls.
As always, I chilled and froze the dough before baking and baked directly from frozen dough. That helped make a chubby cookie that didn't spread thin so this didn't fall prey to the too-much-water-in-the-butter issue that's been plaguing me for the past half year.
Taste-wise, this was rich and you can definitely taste the espresso. If you like the flavor, this is a great chocolate and espresso combination with a fudgy middle and crisp (but not hard) edges.


Saturday, January 28, 2023

Crumbl copycat: Churro Cookies from Dirty Dishes Messy Kisses

Cookies
1 cup butter
1 1/3 cups granulated sugar
1 large egg
2 teaspoons vanilla
3 cups all-purpose flour
1 teaspoon cream of tartar
1 teaspoon baking powder
1 teaspoon baking soda
1 1/2 teaspoons ground cinnamon
1/2 teaspoon salt
1/2 cup brown sugar + 1/2 teaspoon cinnamon

Cookie dusting
1/4 cup granulated sugar
1/4 cup brown sugar
1 teaspoon cinnamon

Frosting
1/2 cup butter, softened
1/4 cup margarine (substitute butter if desired)
1 teaspoon vanilla
1/4 teaspoon salt
1 pound powdered sugar
1/4 cup water
1/2 cup brown sugar
1/2 cup granulated sugar
1 teaspoon cinnamon
  1. Preheat oven to 375 degrees F and line baking sheets with parchment paper.
  2. In the bowl of a stand mixer fitted with the paddle attachment, cream together butter and 1 1/3 cups granulated sugar on high until well combined and creamy. Scrape down the sides and bottom of bowl to keep mixture even textured. Add egg and vanilla, mixing to combine.
  3. In a separate bowl, whisk together flour, cream of tartar, baking powder, baking soda, 1 1/2 teaspoons cinnamon and salt. Add dry ingredients to butter mixture in 2 additions, mixing on low speed after each addition until just combined and no floury streaks remain. Do not overmix.
  4. In a small bowl, mix together the brown sugar and cinnamon. Add to dough and mix on low until stirred in; it does not need to be completely incorporated into the dough.
  5. Cookie dust: combine the granulated sugar, brown sugar and cinnamon in a separate bowl.
  6. Roll dough into 2 1/2-inch balls and roll each ball in the cookie dust. Evenly space on prepared baking sheets. 
  7. Bake for 9-10 minutes or until edges are set and middles no longer look raw. Remove from oven, let rest on baking sheets for 5 minutes then transfer to wire rack to cool completely.
  8. Make the frosting: beat the butter on medium-high speed until smooth and creamy. Add vanilla and salt, mixing to combine. 
  9. On low speed, gradually add powdered sugar and water. Beat on medium speed until smooth.
  10. Add in brown sugar, granulated sugar and cinnamon, beating until just combined.
  11. Once cookies have cooled, top with cinnamon sugar frosting; garnish with additional sprinkle of cookie dust on top if desired.
The different lighting in these pictures are because a) I don't know how to do proper food photography and b) I bake at odd hours which means it's often dark when fresh cookies come out of the oven and light when I do or don't take the pictures before I package them up for mailing.
Odd lighting aside, although I'm not going to Crumbl as often as I once did, I still like trying the copycat recipes for their cookies. The Crumbl Churro cookie remains one of my favorites so I'm always seeking new copycats for them.
I was intrigued by this one as it has a slightly different approach with having "cookie dust" swirled through the dough after mixing the rest of the ingredients in. It could have the effect of adding more brown sugar-cinnamon flavor throughout the cookie itself and perhaps even a little crunch.
I don't eat real (i.e. non-cookie-form) churros that often as I find them too sweet with the brown sugar coating. These were good cookies in their own right but I also found them a little too sweet between the cookie itself, the cookie dust and the rolling in cinnamon-sugar-brown sugar.
I did like the cookie so maybe it's just my taste buds hitting their sweets-level-max (noooooooo) or next time, I wouldn't have such a heavy hand with the rolling in the sugar mixture and sprinkling more of the mixture after the cookies come out of the oven.
Texture-wise, these were not as fluffy as the original Crumbl Churro Cookie but I don't know if that's because I ate the taste test cookie at room temperature while I'd had the Crumbl one when it was warm.  As you can see from the pictures, as usual, I skipped the frosting because these got mailed in military care packages as soon as they cooled.

Friday, January 27, 2023

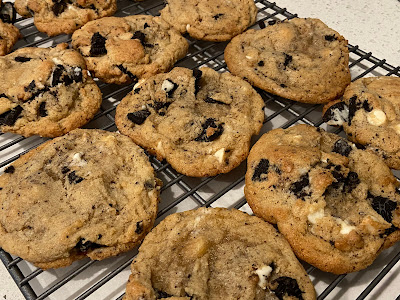
White Chocolate Oreo Cookies from The Recipe Critic

White Chocolate Oreo Cookies - made dough January 5, 2023 from The Recipe Critic
3/4 cup butter, softened
3/4 cup brown sugar, packed
3/4 cup granulated sugar
2 large eggs
1 teaspoon vanilla
2 1/2 cups all-purpose flour
1 teaspoon baking soda
1/2 teaspoon baking powder
1 teaspoon salt
14 Oreo cookies, coarsely crushed
2 cups white chocolate chips
  1. Preheat oven to 350 degrees. Line baking sheets with parchment paper.
  2. In a medium bowl, whisk together flour, baking soda, baking powder and salt; set aside.
  3. In the bowl of a stand mixer fitted with the paddle attachment, beat together butter, brown sugar and granulated sugar until well combined and fluffy, 2-3 minutes.
  4. Beat in the eggs and vanilla, mixing on low speed until combined.
  5. Add dry ingredients in two additions, mixing on low speed, just combined combined. Fold in crushes Oreos and chocolate chips.
  6. Portion into golf-ball-size dough balls and place 2 inches apart on prepared baking sheets. Bake for 7-9 minutes until edges are set and middles no longer look raw.
I'm still working through my pinterest recipes as well as the Costco pack of Oreo sleeves so this was a logical choice of cookie recipe to try out.

I like the concept of cookies and cream cookies more than the actual cookie itself. You'd think being an Oreo fan that I would like cookies and cream more but it turns out that I like Oreos so much that I prefer them in their original form.
Still, these weren't about me, me, me so I tried them out for care packages and they were good. The cookie was crisp at the edges, chewy in the middle and the random placement of Oreo chunks also insured some crunch in almost every bite of the cookie while the white chocolate added some sweetness.


Wednesday, January 25, 2023

Snickerdoodles from 100 Cookies

Snickerdoodles - made dough January 9, 2023 from 100 Cookies by Sarah Kieffer
2 1/2 cups (355 grams) all-purpose flour
1 teaspoon cream of tartar
3/4 teaspoon baking soda
3/4 teaspoon salt
12 tablespoons (1 1/2 sticks or 170 grams) unsalted butter, room temperature
2 ounces shortening or refined coconut oil
1 3/4 cups (350 grams) granulated sugar 
1 large egg
1 large egg yolk
1 tablespoon pure vanilla extract

For coating
1/3 cup granulated sugar
1 tablespoon ground cinnamon
  1. Preheat oven to 350 degrees F. Line baking sheets with parchment paper.
  2. In a medium bowl, whisk together flour, cream of tartar, baking soda and salt.
  3. In the bowl of a stand mixer fitted with the paddle attachment, beat the butter and shortening until creamy, about 1 minute. Add 1 3/4 cups granulated sugar and beat on medium speed until light and fluffy, 2 to 3 minutes.
  4. Add the egg, egg yolk and vanilla and beat on medium speed to combine.
  5. Add the flour mixture and beat on low speed until just combined.
  6. Combine the remaining 1/3 cup granulated sugar and cinnamon in a small bowl. Portion dough into golf-ball-size dough balls and roll each ball in the cinnamon-sugar. Evenly space on baking sheets. 
  7. Bake one baking sheet at a time, rotating pan halfway through baking. Bake until the sides are set and the tops begin to crackle, 12 to 14 minutes. Let rest on baking sheet for 5 to 10 minutes then transfer cookies to wire rack to cool completely. 
Hello and welcome back to the Flat Cookie Club! At first I thought we'd broken up because when I first took these out of the oven, they were beautifully puffy and thick. But as they cooled, they deflated faster than Cinderella's hopes to leave the ball with both shoes.
Yes, back to flat cookies. You can't convince me it isn't the butter although the flat cookie issue is inconsistent as I've had some cookies, notably chocolate chip and chocolate espresso cookies (forthcoming post), turn out just fine. But snickerdoodles seem particularly vulnerable to flat cookie syndrome and this is no exception.

However, just like Cinderella who got her shoe back and the guy to boot (get it? boot? *wipes tear*), this has a happy ending as the flavor on these cookies is fantastic. Just the right snickerdoodle-y taste with the balance of cinnamon and sugar. The texture was also on point, light, airy, crisp but also chewy. I enjoyed these so much, I might make them again and try them out with a different brand of butter and/or European butter to see if they can remain puffy or at least, less flat.

Monday, January 23, 2023

Crumbl Copycat Chocolate Chip Cookies from The Fresh Cooky

1 cup butter, room temperature
1 1/4 cups light brown sugar, packed
1/2 cup granulated sugar
2 large eggs
1 tablespoon vanilla extract
3 cups all-purpose flour
2 teaspoons cornstarch
1 teaspoon baking soda
1 1/4 teaspoons salt
2-3 cups milk chocolate chips
  1. Preheat oven to 375 degrees F. Line baking sheets with parchment paper.
  2. In the bowl of a stand mixer fitted with the paddle attachment, beat butter until light and fluffy, about 1 minute. Add brown sugar and granulated sugar and beat until well combined, creamy and smooth, 3-5 minutes.
  3. Add eggs, one at a time, beating on medium speed until combined. Add vanilla and beat to combine. Scrape down bottom and sides of bowl to keep mixture even textured.
  4. In a medium bowl, combine flour, baking soda, cornstarch and salt, whisking to combine. Add flour mixture to butter mixture in two additions, mixing on low speed after each addition until just combined. Do not overbeat. Mix in chocolate chips.
  5. Portion dough into 4-ounce measurements, roll into a tall ball, then flatten each ball slightly to thick discs. Evenly space 2-3 inches apart on prepared baking sheets. (If your dough is too soft, chill for 20-30 minutes and do not preheat oven until dough balls are chilled.)
  6. Bake for 10-12 minutes or until edges are barely set. Remove from oven and let rest on baking sheets for 10 minutes. Transfer to wire rack to cool completely.
Another amazing chocolate chip cookie recipe. At this point, I'm not even trying to replicate Crumbl's milk chocolate chip. I just like a good chocolate chip cookie and of course, with milk chocolate. Sorry, semisweet lovers, I'm Team Milk Chocolate.

My favorite way to make chocolate chip cookies is to use Trader Joe's Pound Plus milk chocolate, chopped into chunks, the smaller pieces mixed into the cookie dough before baking and the larger chunks pressed gently into the cookies as soon as they come out of the oven. Let them cool for 10 minutes on the baking sheet then eat. Or gobble. I won’t judge. 

By then, the edges will have crisped up slightly and the middle is still gooey and the chocolate chunks are melty.
These baked up nice and thick. I made the test cookie Crumbl-size but the rest of the dough as normal-size so I could get more cookies out of this recipe. 
The inside picture below looks slightly raw because I took the picture while the cookie was still warm but when it cooled, it cooled to the perfect texture of a thick, chewy chocolate chip cookie.

Sunday, January 22, 2023

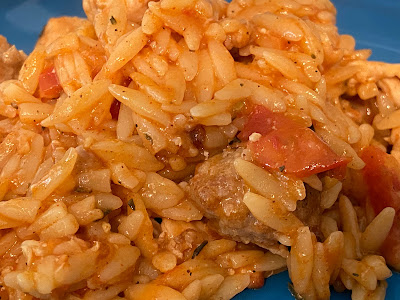
Weeknight Orzo Paella from The Kitchn

Weeknight Orzo Paella - made January 3, 2023, modified from The Kitchn
1 tablespoon olive oil
8 ounces cooked hot or sweet Italian chicken sausage, cut into 1/4"-thick rounds
4 cloves garlic, minced
1 1/2 cups (10 ounces) dried orzo pasta
2 cups low-sodium chicken broth
1 14.5-ounce can diced tomatoes
1 teaspoon smoked paprika
3/4 teaspoon kosher salt, divided
1/2 teaspoon freshly ground black pepper, divided
8 ounces uncooked peeled and deveined shrimp, thawed if frozen (I used chicken)
1/2 cup frozen peas (I left them out)
2 tablespoons chopped fresh parsley leaves (I used dried oregano)
  1. Heat oil in a 9 or 10-inch straight-sided skilled over medium heat until shimmering. Add the sausage and cook, stirring occasionally, until evenly browned on both sides, 3 to 4 minutes total. Stir in garlic and cook until fragrant, about 30 seconds more.
  2. Add the orzo and cook, stirring occasionally, until lightly toasted, 2 to 3 minutes. Add the broth, tomatoes and their juices, paprika, 1/2 teaspoon of the salt and 1/4 teaspoon of the pepper. Stir to combine and bring to a boil.
  3. Cover, reduce heat to maintain a simmer and cook, undisturbed, until the orzo is almost al dente, the liquid has reduced by about half and there is tight, rapid bubbling, 7 to 9 minutes.
  4. Meanwhile, pat the shrimp dry with paper towels and season with remaining 1/4 teaspoon salt and 1/4 teaspoon pepper.
  5. Scatter the shrimp and peas (if using) over the orzo, cover and cook until the shrimp are pink and opaque, about 5 minutes. Remove from heat and let rest, covered, for 5 minutes. Top with parsley and serve warm.
Orzo is fast becoming my go-to carb for quick and easy meals. They're much easier to cook than rice, they look like rice and they taste like a great combination of rice and pasta. I gave away my rice cooker when I moved so when I have rice or something rice-like, it's either instant rice (my Filipino ancestors are rolling in their graves and doing backflips while scolding me with their eyes and pursed lips - I'm not kidding) or orzo.
This is a super easy recipe to make, albeit you can tell I took liberties as I omitted the peas (I despise peas) and didn't have parsley so I used dried thyme instead. I had also run out of shrimp because I used them for another dish so I subbed chunks of chicken breast instead.

I enjoy making these easy (and tasty) recipes, partly because they're so easy but also because it helps me use the spices in my spice drawer. And it makes me feel like I can cook, ha.

Saturday, January 21, 2023

Creamy Pesto Gnocchi (with Shrimp) from Salt & Lavender

Creamy Pesto Gnocchi - made January 5, 2023 from Salt & Lavender
1/4 cup pesto
1 cup heavy whipping cream
1/4 cup dry white wine or chicken broth
2 cloves garlic, minced
1 pound uncooked potato gnocchi
1/2 cup freshly grated parmesan cheese
salt and pepper to taste
  1. In a deep skillet over medium heat, combine pesto, whipping cream, wine and garlic, stirring to a boil.
  2. Once the sauce starts to gently bubble, stir in the gnocchi. Cover pan and cook for 5 minutes.
  3. Uncover the pan and stir. Continue to cook for 2 more minutes, constantly stirring, until sauce has thickened to preference. Stir in parmesan cheese. Serve immediately.
I love pesto. It's the only reason I used to grow my own basil. I'm not currently growing basil (too cold) but thanks to Trader Joe's, I can snag fresh basil in quantities that allow me to make pesto. I like to make my own because the storebought stuff comes as more of a sauce whereas I like to food-processor-process the basil while it's still small bits and not a paste. I don't use a recipe anymore but just throw the basil (sans stems), olive oil, garlic, pine nuts, pepper and parmesan cheese into the food processor and pulse until it's the texture I like.
For this recipe, I used a generous amount of pesto (more than 1/4 cup) but followed the rest of the recipe exactly. This is rich and makes a lot of sauce, even after it thickened. It's not for the faint of heart (all that cream) or a dieter (cream and gnocchi) but it's good in moderate portions. You can add any protein of your choice. I went with shrimp and it added a nice touch.