Sunday, September 30, 2018

Nutella Caramel Hazelnut Brownies

Nutella Caramel Hazelnut Brownies - made August 11, 2018 from Bell' Alimento
Whenever I see a caramel layer baked into a brownie, I always have high hopes I can replicate it as successfully as the blog from which I found the recipe.
I'm almost always wrong. I even modified the directions so that you parbake the bottom layer of the brownie to make it firm enough to hold the caramel layer and not have the caramel mingle into the brownie batter. Yeah, still wrong.

I think it's because of the caramel I'm using, which is salted caramel sauce from Trader Joe's, instead of the more traditional melted Kraft caramels thinned with a little milk or cream. The Kraft caramels make a thicker caramel layer that remains more distinct. Much as I like the Trader Joe's caramel sauce, all it does in this brownie is sink into the bottom layer, get stuck to the bottom, and make the brownies more moist and fudgy but loses that distinct caramel layer.

But still, this was a good fudgy brownie. Don't eat it warm unless you just want fudgy mush. Do top it with the toasted hazelnuts as they provide a nice crunch and contrast to the fudginess of the brownie.

I also experimented with making this a mini dessert in a little dessert glass, layered with Nutella. Yup, it was as good as it sounded.


1/2 cup all-purpose flour
1/4 teaspoon baking powder
1/3 cup cocoa powder
1/4 teaspoon salt
1 cup sugar
1/2 stick (4 tablespoons) unsalted butter (I mistakenly used 1 stick but it was fine)
2 large eggs
1 teaspoon vanilla extract
1/4 cup caramel sauce
1/4 cup Nutella, melted
Hazelnuts, toasted and roughly chopped for garnish
  1. Preheat oven to 350 degrees F. Line a 10" x 7" baking dish with foil and lightly spray with nonstick cooking spray.
  2. In a mixing bowl, whisk together flour, baking powder, salt and cocoa powder; set aside.
  3. In the bowl of a stand mix, combine sugar and butter; beat until creamy. Add in eggs, one at a time, then add vanilla. Mix just until combined. 
  4. Gradually add flour mixture, mixing until just combined; do not overbeat.
  5. Pour half the batter into prepared pan and bake for 10 minutes or until top layer looks firm (no more than 15 minutes). Pour caramel in an even layer over parbaked crust and cover with remaining batter. Return to oven and bake another 15-20 minutes, until toothpick inserted at an angle near the center comes out with a few moist crumbs, not raw batter.
  6. While brownie is still hot, spread evenly with Nutella. Garnish with chopped, toasted. hazelnuts. Let cool completely before cutting and serving.

Saturday, September 8, 2018

Mrs. Sigg's Snickerdoodles

Mrs. Sigg's Snickerdoodles - made dough August 11, 2018 from Taste and Tell
I don’t know who Mrs. Sigg is but her snickerdoodle recipe has been making the rounds on pinterest. I have several really good snickerdoodle recipes already but I’m willing to be captivated by a new one so I gave this a test drive.

And it drove quite well. I’m normally leery about cookie recipes that use shortening because, hi, butter snob checking in. But I’m willing to lower my nose-in-the-air a fraction when there’s both butter and shortening in there. The shortening prevents spread and adds a crispness and the butter gives it a better flavor while also keeping the cookie chewy. So Mrs. Sigg knew what she was doing.

I did modify the recipe to add a teaspoon of Penzey’s Vietnamese cinnamon to the cookie dough. That was a trick I learned from Sally’s Baking Addiction to add a little more snickerdoodly (yes, it’s a word, k?) flavor to the cookies. The dough was a little soft when I finished mixing and I chilled it for 30 minutes before portioning into cookie dough balls but I needn’t have worried as they didn’t spread much, thanks to the shortening.

I will also give props to the shortening for giving the edges an airy crispness to the texture while kudos to the butter for keeping the important middle portion soft and chewy. Overall I liked both the texture and flavor of this. And now I have another good snickerdoodle recipe to add to my arsenal.

1/2 cup butter
1/2 cup shortening
1 1/2 cups granulated sugar
2 eggs
2 teaspoons vanilla extract
2 3/4 cups all-purpose flour
2 teaspoons cream of tartar
1 teaspoon baking soda
1/4 teaspoon salt
1 teaspoon ground cinnamon

2 tablespoons granulated sugar
2 teaspoons ground cinnamon
  1. Cream together butter, shortening and sugar. Add in eggs and vanilla. Stir in flour, cream of tartar, baking soda, salt and cinnamon until blended. Do not overmix. Chill, covered, in the refrigerator for 20-30 minutes.
  2. Portion dough into golf-ball-size dough balls and pat into thick discs. Cover and chill or refrigerate for several hours or overnight.
  3. When ready to bake, preheat oven to 400 degrees F and line baking sheets with parchment paper.
  4. Combine 2 tablespoons granulated sugar and 2 teaspoons ground cinnamon in a small bowl. Roll frozen dough discs in cinnamon-sugar mixture until completely coated. Evenly space on baking sheets and bake for 8 to 10 minutes or until just set at the edges. Do not overbake. Remove from heat, let set on baking sheets for 3-4 minutes then transfer cookies to wire racks to cool completely.

Sunday, September 2, 2018

Perfectly Thick and Soft Chocolate Chip Cookies

Perfectly Thick and Soft Chocolate Chip Cookies - made dough August 11, 2018, modified from Sincerely Mindy
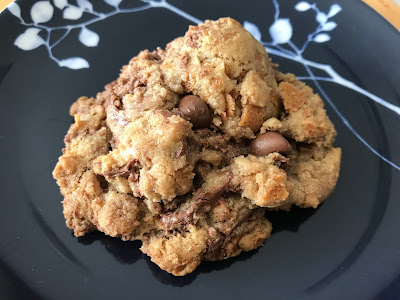
This is the third of the chocolate chip cookie recipes I tried out last month. The first  three pictures are of the first cookie I baked from the batch. The last 5 pictures are a second cookie I baked from the same batch a couple of weeks later. Both were frozen before baking.

You can see the first cookie came out "puffier" and thicker while the second flattened slightly more, although it wasn't a thin cookie.

Same ingredients, same dough. The main difference is I baked the second cookie a few minutes longer than the first one. It didn't impact the taste and the only slight difference in texture is the first cookie was softer and more fragile while the edges were more crisp on the second one.
But truthfully, both were amazing. This is another delicious chocolate chip cookie recipe. So of this batch of three recipes, I liked the first and this one best.

3 3/4 cups all-purpose flour
1 1/2 teaspoons baking powder
1 1/2 teaspoon baking soda
1/2 teaspoon salt
1 cup (2 sticks) unsalted butter
2 cups dark brown sugar, packed
2 teaspoons vanilla extract
2 large eggs
2 cups milk chocolate chunks
  1. In a large mixing bowl, combine flour, baking powder, baking soda and salt; set aside.
  2. In the bowl of a stand mixer fitted with the paddle attachment, cream together butter and brown sugar until well combined, 1-2 minutes. 
  3. On low speed, add vanilla then eggs, one at a time. Mix until combined.
  4. Add dry ingredients in 3 additions, combining on low speed, mixing until just combined with each addition. Do not overmix. Fold in chocolate chunks.
  5. Portion dough into golf-ball-size dough balls and pat into thick discs. Cover and chill or freeze for several hours or overnight.
  6. When ready to bake, preheat oven to 375 degrees F. Line baking sheets with parchment paper. Evenly space chilled dough discs on prepared baking sheets and bake 10-12 minutes or until golden brown at the edges and middles no longer look raw. Do not overbake. Remove from heat, let cool on baking sheets for several minutes then transfer to wire racks to cool completely.

Sunday, August 26, 2018

Chocolate Chip Crunch Cookies

Chocolate Chip Crunch Cookies - made dough August 11, 2018 from The Chocolate Chip Cookie Murder by Joanne Fluke
This is the second of three chocolate chip cookie recipes I tried at once. Or at least I made the doughs on the same day. I was working from home a few Saturdays ago and while I was waiting to hear back from my various coworkers, I whiled away the time making cookie dough. Since I couldn't leave home as I had to collaborate back and forth with some work that had a Sunday night deadline, I might as well be productive, right?
I don't often try out recipes from my mystery books yet I read culinary mysteries partly for that reason. I've read the Hannah Swensen mysteries by Joanne Fluke almost from the beginning but have given up in recent years when her "love triangle" never resolved itself until she made it a square. After all that emotional investment into the characters (will it be Mike? But how about Norman? What, who's this other guy?), I couldn't continue the journey any longer. But I digress.
Whether you like the mysteries or not, a new chocolate chip cookie recipe in the first one almost begs to be tried. Although I've actually had this book for years and only just now tried this recipe. Mostly because it called for the use of cornflakes and I've never jumped on the cornflakes-in-cookies craze. But since I've discovered feuilletine, I decided it would make a great substitute for the cornflakes.
I thought they would remain airy-crispy in the cookie but alas, no. Actually it was hard to get any texture from them at all once they were mixed into the dough. I think the liquid of the brown butter did them in and instead they contributed a texture similar to what I would have gotten had I added oatmeal to the dough. More of a chewiness rather than a crispiness. Bummer.
However, all was not lost since, as with all recipes involving browned butter, the nice thing about using it, besides the flavor it contributes to the cookie, is, if you time it right and mix the dough while the brown butter has cooled enough not to cook the eggs when you stir them in but is still warm enough that when you add the chocolate chips at the end, the chips partially melt into the dough itself. Some remain intact but others melt into the dough, imparting a richness of flavor and texture that's a notch above your average chocolate chip cookie. This might still be crunchy if you stick to cornflakes but overall the flavor was pretty good. And they didn't spread very much, always a positive in my (mystery) book.
1 cup (2 sticks) butter, melted
1 cup granulated sugar
1 cup dark brown sugar
2 teaspoons baking soda
1 teaspoon salt
2 teaspoons vanilla
2 eggs
2 1/2 cups all-purpose flour
2 cups feuilletine
1 to 2 cups chocolate chips
  1. Combine melted butter, granulated sugar and brown sugar. Add baking soda, salt, vanilla and eggs. Mix well.
  2. Add flour and mix until just combined. Fold in feuilletine and chocolate chips.
  3. Portion into golf-ball-size dough balls and flatten into thick discs. Cover and chill or freeze for several hours or overnight.
  4. When ready to bake, preheat oven to 375 degrees F. Line baking sheets with parchment paper. Evenly space chilled dough discs and bake for 8-10 minutes or until edges are golden brown and middles no longer look raw. Remove from heat, cool on cookie sheets for 2-3 minutes then transfer to wire racks to cool completely.

Sunday, August 19, 2018

Thick Chocolate Chip Cookies

Thick Chocolate Chip Cookies - made dough August 11, 2018 from House of Yumm
This is the first of several chocolate chip cookie recipes I've recently tried and this one is amazing. This recipe only makes six good-sized cookies but what a six they are. It has all the hallmarks of what I adore lust obsess over really, really like in a chocolate chip cookie.

It almost goes without saying that it was chubby and didn't spread much. The brown sugar caramel overtones are there. But what really made it for me was the soft, chewy texture, not cake-like but just what a thick, fat cookie should be. It doesn't quite have the crisp outside of a Levain Bakery cookie but it's the perfect texture on the inside of a chewy cookie you can really sink your teeth into.

I did all the usual tricks I do to maximize perfection of cookies in general, chocolate chip cookies in particular: portion the dough into good-sized dough balls then pat into thick discs. These don't spread much and if you want cookies of uniform thickness, go the route of the thick disc. Put in a freezer bag and freeze at least several hours.
If you read nothing else of this post, follow this part: do not overbake. I like to bake cookies just until the edges are brown and the middles are just barely past the raw stage. You can tell they're not raw anymore as the middles won't be shiny and there may be a few thin fissures or hairline cracks on top. Do not wait until all of the middles are brown or else they'll be overbaked.

For maximum enjoyment of this cookie, you have to wait until they're completely cool and at room temperature. I know, you just rolled your eyes. What happened to "10 minutes out of the oven"? Well, for cookies this thick and for the chewy texture I was rhapsodizing about, these are best at room temperature or, if your willpower doesn't stretch that far, wait until they're just barely lukewarm. The chips will still be melty but the cookie should be set just enough to be chewy but not mushy. If you eat while they're still too hot or warm, you'll get cookie mush. Trust me, the wait is worth it.


1/2 cup unsalted butter
3/4 cup brown sugar
1/4 cup granulated sugar
1 large egg
1 tablespoon vanilla extract
2 cups all-purpose flour
1/2 teaspoon salt
1/2 teaspoon baking powder
3/4 cup chocolate chunks
  1. In a large mixing bowl, cream butter, brown sugar and granulated sugar until combined and fluffy.
  2. Add egg and vanilla; mix until just combined.
  3. Add flour, baking powder and salt. Mix until just combined; do not overmix.
  4. Fold in chocolate chunks by hand. Divide into 6 pieces and gently form into thick disks. Cover and chill or freeze for several hours or overnight.
  5. Preheat oven to 375 degrees F. Line baking sheet with parchment paper and evenly space chilled cookie dough balls. Bake 15-18 minutes or until edges are golden and middles no longer look raw. Remove from heat and let cool completely on a wire rack.

Saturday, August 11, 2018

Instant Pot Filipino Chicken Adobo

Instant Pot Filipino Chicken Adobo - made August 4, 2018 from Two Sleevers
I received an Instant Pot for my birthday. I'd wanted one off and on for a bit but not seriously since you know...me and cooking. I had a large crock pot once and have posted some recipes I've made from it but I wasn't interested in cooking enough to use it very much so I gave it to my niece and got a small one. Which I don't use that often.
But as with any new toy, I'm all-in with good intentions to use it, cook for myself, be all grown up, blah blah. Plus I liked the concept of the instant pot being the updated version of a pressure cooker, just prettier and digital. Shorter cooking time than a crock pot and promises of tender protein in mere minutes. Works for me.

My maiden voyage with the Instant Pot is this Chicken Adobo recipe I found on pinterest. Honestly, it couldn't be easier and for a non-cook like me, that says something. You just combine the ingredients in a bowl or ziploc bag, let the chicken marinate for 30 minutes or more (more is always better when it comes to marinating. Or so I've been told), then put everything in the Instant Pot for 8 minutes and go away. There's an extra step of broiling the chicken to brown it at the end and letting the sauce mixture boil to thicken a bit but even that's pretty easy.
I have to say, this was pretty delicious. My mom makes adobo often and she makes it really well. This is almost as good as my mom's with far less effort. And in an effort to be somewhat healthy, I ate this with mashed cauliflower instead of rice. Go me.
1 pound bone-in, skin-on chicken thighs
1/2 cup white vinegar
1/4 cup soy sauce
2 tablespoons vegetable oil
2 tablespoons minced garlic
1 tablespoon brown sugar or 1 teaspoon splenda
1 teaspoon whole black peppercorns, roughly crushed
1 teaspoon crushed red pepper flakes, optional
3 bay leaves, crushed

  1. In a large bowl or ziplock bag, combine vinegar, soy sauce, oil, garlic, sugar, black and red pepper, and bay leaves. Place the chicken thighs in the mixture, and coat them well with the sauce. Allow the chicken to marinate for 30 minutes, or up to 24 hours in the refrigerator.  
  2. Place the chicken and marinade into the inner liner of the Instant Pot. Set Instant Pot at High pressure for 8 minutes. When cook time is complete, allow the pot to sit undisturbed for 10 minutes and then release all remaining pressure. 
  3. Remove chicken thighs and set on a foil-covered sheet pan. Broil under high heat for 3-5 minutes until the skin crisps.
  4. Meanwhile, set the Instant Pot on Sauté and cook until the sauce has bubbled and thickened, about 3-5 minutes. Pour this thickened sauce over the chicken and serve. 

Saturday, August 4, 2018

Low Carb Cauliflower Risotto

Low Carb Cauliflower Risotto - made July 28, 2018
I made up this recipe. I don't normally since I'm an uninspired cook but I was looking through so many recipes on pinterest for cauliflower risotto that all looked so similar but I was inevitably missing one ingredient or the other from each one. So I decided to just make do with what I had. Measurements are not exact since I don't remember them exactly and didn't write them down. Now I understand the freedom real cooks have when they just "throw something together".
Oh wait, no, you're not reading the wrong blog. I ate a vegetable. Not my version of "vegetable" which generously includes corn and potatoes - and French fries when I'm in a mood - but an honest to goodness vegetable that has nutrients instead of starch and empty calories. It's really me *waves*. I bought one of those boxes of riced cauliflower from Costco in a fit of nutritional virtue and needed to do something with them. Unlike the last time I bought a pack from Trader Joe's then hung onto it until it went bad. Oops.
I've never been a fan of cauliflower. Never liked the smell when it was cooking. But the riced version looks so un-cauliflower-like and I've been trying to low carb so I thought I'd give it a shot. Surprisingly, this turned out okay. I know, that doesn't sound like much of an endorsement but, hello, me and vegetables. If I can eat it, it's already miles ahead of other vegetables. Although I'm not going to lie, the cheeses helped. A lot. The key to this one is to cook the riced cauliflower enough to really soften it. It doesn't have much flavor in and of itself and I'm not gonna lie, that helped me eat it. I added some hamburger for protein and presto, low-carb dinner.
1 tablespoon vegetable oil
12 ounces riced cauliflower
1 tablespoon minced garlic
1/4 cup heavy cream
1/2 cup shredded mozzarella cheese
1/2 cup shredded cheddar cheese
1/2 teaspoon salt or to taste
1/2 teaspoon pepper or to taste
1/2 teaspoon Tuscan Sunset spice (Penzey's) for garnish, optional

  1. In a large saucepan, heat 1 tablespoon vegetable oil. Saute riced cauliflower and garlic until softened, 5-10 minutes. 
  2. Add heavy cream, mozzarella cheese and cheddar cheese, stirring until combined and cheeses have melted. Season with salt and pepper. 
  3. Garnish with Tuscan Sunset or any other Italian-style seasoning if desired. Serve warm.